0. はじめに
この記事は、RailsでGoogle Mapを表示する方法の説明です。gem 'gmaps4rails'の使い方を書いてきます。
https://github.com/apneadiving/Google-Maps-for-Rails
1. gmaps4railsの導入
1. 準備
新しいプロジェクトを作ります。
$ rails new gmap
$ cd gmap
今回は、地名から緯度経度に変換できるgem 'geocoder'は使わずに進めてきます。
$ rails g scaffold place name:string description:string latitude:float longitude:float
$ rake db:migrate
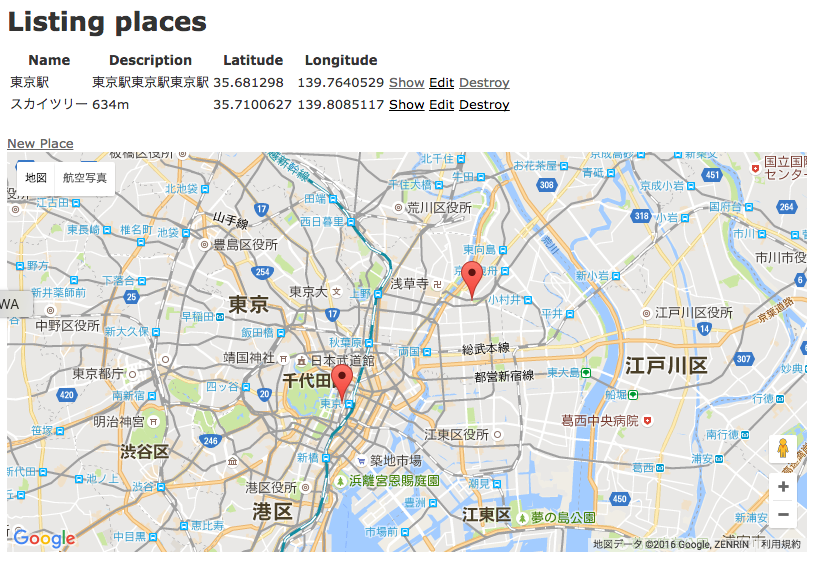
Google Mapに表示するPlaceデータがまだない場合はrails consoleで、作っておいて試してみてもいいかと思います。
$ rails c
Loading development environment (Rails 4.2.5)
>>Place.create([
  { name: '東京駅', description: '東京駅東京駅東京駅', latitude: '35.681298', longitude: '139.7640529' },
  { name: 'スカイツリー', description: '634m', latitude: '35.7100627', longitude: '139.8085117' },
])
2.Gemfileの編集とインストール
Gemfileにgmaps4railsを追加する。
source 'https://rubygems.org'

(省略)...
gem 'gmaps4rails'
gemをインストール。
bundle install
3.Google Maps JavaScript API のロードする
・Google Maps APIのキーを取得する
以下にキーの取得の仕方は書いてあります。
https://developers.google.com/maps/documentation/javascript/get-api-key
script src="//maps.google.com/maps/api/js?v=3.23&key=[your API key]"
application.html.slimに追加。
[your API key]部分に取得したAPIキーを書いてください。
doctype html
html
  head
    title
      | Gmap
    = stylesheet_link_tag    'application', media: 'all', 'data-turbolinks-track' => true
    = javascript_include_tag 'application', 'data-turbolinks-track' => true
    = csrf_meta_tags
    script src="//maps.google.com/maps/api/js?v=3.23&key=[your API key]"
    script src="//cdn.rawgit.com/mahnunchik/markerclustererplus/master/dist/markerclusterer.min.js"
    script src='//cdn.rawgit.com/printercu/google-maps-utility-library-v3-read-only/master/infobox/src/infobox_packed.js' type='text/javascript'
  body
    = yield
・underscore、gmaps/googleをapplicaton.jsに追加します。
//= require jquery
//= require jquery_ujs
//= require turbolinks
//= require underscore
//= require gmaps/google
//= require_tree .
・underscore.jsも読み込みます。(Gmaps4railsはunderscore.jsを使っているため。)underscore.jsをこちらからコピーしてきます。underscore.jsとunderscore-min.jsがありますが、underscore-min.jsで大丈夫です。
// underscore-min.jsの中身を貼る
(省略)...
【補足】Google MapのAPIキーが必須になりました。
2016年6月22日から新規のサイトでGoogle MapのAPIを使用する際には、keyが必須なったと公式サイトで発表されています。これまではキーがなくても地図の表示は行えましたが、こちらに書いてある方法で、APIキーを取得してください。
ですので、gmaps4railsの使い方に関する6月から更新がないQiitaの記事で、以下のscriptを読み込むと書いていると思いますが、今はそれではマップは表示されません。
<script src="//maps.google.com/maps/api/js?v=3.23&sensor=false&client=&key=&libraries=geometry&language=&hl=®ion=">
上記のscriotsを使うと、consoleログに以下の警告が出ます。
Google Maps API warning: NoApiKeys https://developers.google.com/maps/documentation/javascript/error-messages#no-api-keys
Google-Maps-for-Railsの公式GitHubページでも2016年6月に修正されています。
4.View
Google Mapを表示する箇所に以下のコード挿入します。
# map style="width: 800px; height: 400px;"

javascript:
  handler = Gmaps.build('Google');
  handler.buildMap({ provider: {}, internal: {id: 'map'}}, function(){
    markers = handler.addMarkers(#{raw @hash.to_json});
    handler.bounds.extendWith(markers);
    handler.fitMapToBounds();
  });
5.Controller
def index
  @places = Place.all
  @hash = Gmaps4rails.build_markers(@places) do |place, marker|
    marker.lat place.latitude
    marker.lng place.longitude
    marker.infowindow place.name
  end
end
6.動作確認
http://localhost:3000/places
起動して、アクセスすると、表示されます!
2.追加
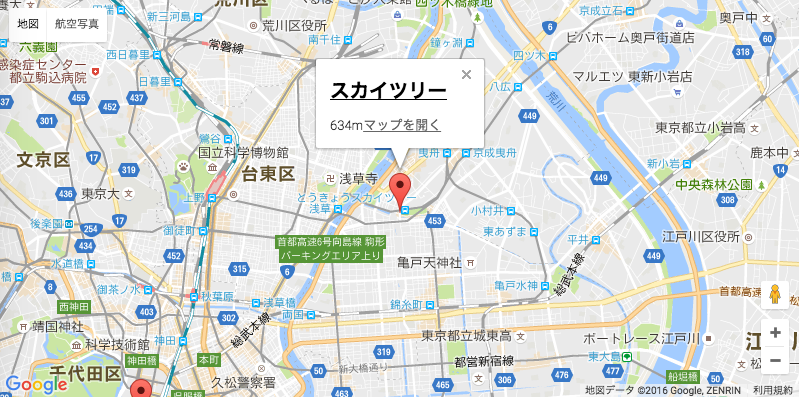
1.infowindowに関して
InfoWindow は、マップ上の指定の場所にポップアップ ウィンドウでコンテンツ(通常はテキストまたは画像)を表示します。情報ウィンドウには、コンテンツ領域と先細の突起部分があります。突起部分の先端が、マップ上の指定された場所に付着しています。
1.導入でやったようにmarker.infowindow place.nameを追加しておくと、markerをクリックした時に、infowindowが開くのですが、いい感じに変更したい時に以下の方法で出来ます。また、marker.lat,marker.lngがあるので、infowindowの中に個々のplaceのGoggle Mapへのリンクを追加しておくといいと思います。
def index
  @places = Place.all
  @hash = Gmaps4rails.build_markers(@places) do |place, marker|
    marker.lat place.latitude
    marker.lng place.longitude
    marker.infowindow render_to_string(partial: "places/infowindow", locals: { place: place })
  end
end
h2 = link_to place.name, place_path(place)
= place.description
= link_to "マップを開く" ,"https://maps.google.co.jp/maps?q=loc:#{place.latitude},#{place.longitude}&iwloc=J",target: "_blank"
2.Mapのzoomとcenterに関して
handler.fitMapToBounds();がすべてのスポットが、枠に収まるようにzoomを自動的に調整してくれています。
逆に、すべてのスポットを表示することによって、以下の問題が起きます。
・Google Mapが広範囲を表示しすぎでそれぞれの場所分かりにくい。
・スポットが一つの時に、拡大しすぎてしまう。
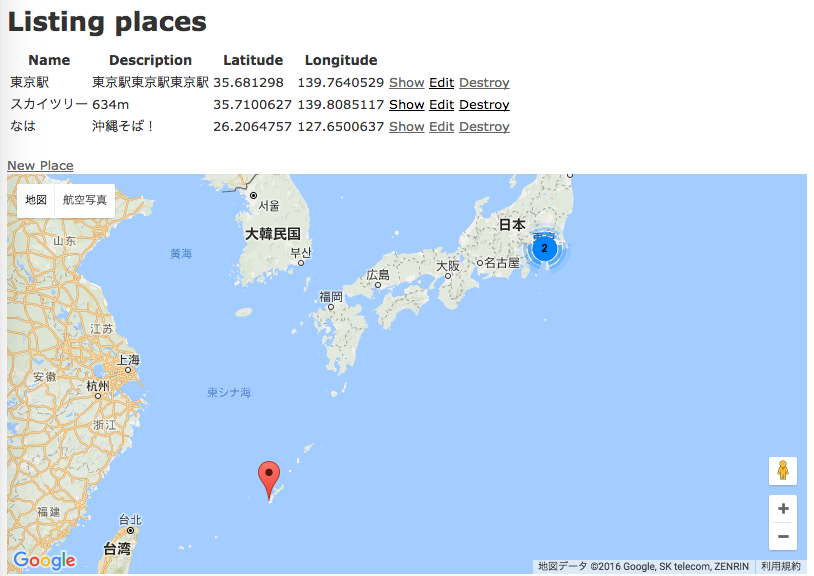
解決法として、handler.getMap().setZoom(yourValue);を追加すると、zoomを指定することができます。
ただ上の図では、handler.getMap().setZoom(12);だけを追加すると、海が表示される(centerがそこだから)だけになってしますので、handler.getMap().setCenter(latlng);も追加し、どの位置を中心として、handler.getMap().setZoom(12);にするかを決めるようにします。
# map style="width: 800px; height: 400px;"

javascript:
  handler = Gmaps.build('Google');
  handler.buildMap({ provider: {}, internal: {id: 'map'}}, function(){
    markers = handler.addMarkers(#{raw @hash.to_json});
    handler.bounds.extendWith(markers);
    handler.fitMapToBounds();
    handler.getMap().setCenter(new google.maps.LatLng(35.681298, 139.7640582));
    handler.getMap().setZoom(12);
  });
・他にも,maxZoomやminZoomは指定して、対応することもできます。
(ちなみに、こういうAPIのオプションは、providerの部分に書くのが普通ですが、handler.fitMapToBounds();が自動的に枠に収まるようにするので、handler.fitMapToBounds();を使う場合、providerにzoomとcenterは書かない方がいいと思います。僕はこれで、ずっと詰まってました。。)
handler.buildMap({
  internal: {id: 'map'},
  provider: {
    zoom: 12,
    center: new google.maps.LatLng(35.681298, 140.7640529),
  }
},
https://developers.google.com/maps/documentation/javascript/reference
これが、そこらへんに関するリファレンスです。
最後に
僕も、公式ページに書いてある通りにしているのに、マップが表示されないと困っていたので、うまく表示されなかったらコメント等してもらえたらと思います。