記事の概要
2015/6/13のオープンソースカンファレンス2015 Hokkaidoの講演PostgreSQLの監視運用を楽にするツールのご紹介 ~ pg_monz と fluentd ~で紹介した環境を構築する手順の説明
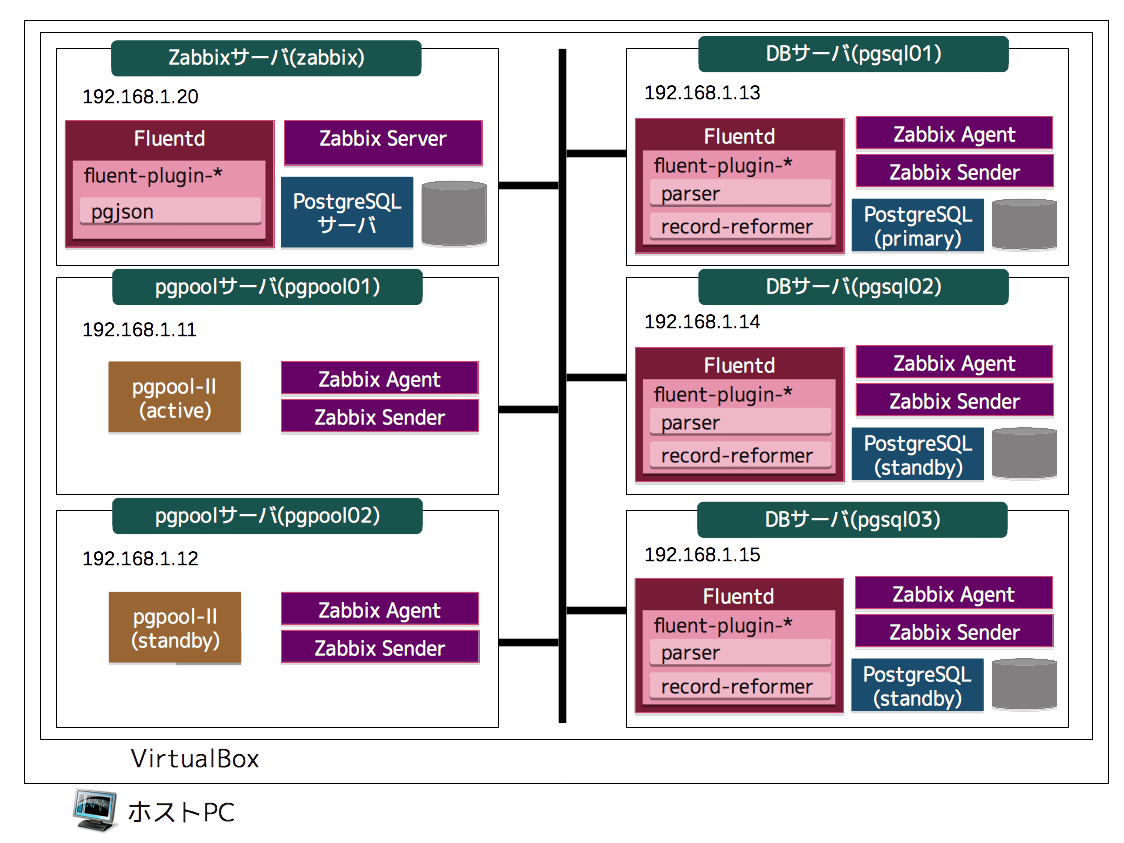
構成図
下図の様な環境をホストPCに構築します。
ホストPC(筆者環境はMacOS10.10.3)上のVirtualBoxにCentOSのVMを6台起動します。

サーバの役割
| サーバ名 | IPアドレス | 役割 |
|---|---|---|
| zabbix | 192.168.1.20 | Zabbix監視サーバ,PostgreSQLログ管理サーバ |
| pgpool01 | 192.168.1.11 | pgpool-II稼働サーバ。Active用の仮想IP割当て済 |
| pqpool02 | 192.168.1.12 | pgpool-II稼働サーバ(Standby) |
| pgsql01 | 192.168.1.13 | PostgreSQL稼働サーバ。SRのprimary |
| pgsql02 | 192.168.1.14 | PostgreSQL稼働サーバ。SRの同期Standby |
| pgsql03 | 192.168.1.15 | PostgreSQL稼働サーバ。SRの非同期Standby |
稼働環境
使用しているプロダクトと筆者環境で動作確認しているバージョンは以下のとおりです。
ホストPC
| プロダクト名 | バージョン |
|---|---|
| VirtualBox | 4.3.26 |
| Vagrant | 1.7.2 |
| Ansible | 1.9.0.1 |
ゲストOS
| プロダクト名 | バージョン |
|---|---|
| CentOS | 6.6 |
| PostgreSQL | 9.4.3 |
| Zabbix | 2.4.5 |
| Fluentd(td-agent) | 0.12.7(2.2.0) |
| fluent-plugin-parser | 0.5.0 |
| fluent-plugin-record-reformer | 0.6.3 |
| fluent-plugin-pgjson | 0.0.7 |
構築手順
pgpool-II,PostgreSQL SRクラスタの構築 (ホストPCの作業)
- ホストPCにVirtualBox,Vagrant,Ansibleをインストール(詳細省略)
- Vagrant作業用のディレクトリ、Vagrantfileを生成
$ mkdir PgMonzTest
$ cd PgMonzTest
$ vagrant init
- Vagrantfileを編集
Vagrant.configure(2) do |config|
  config.vm.define :pgpool01 do |h1|
    h1.vm.provider "virtualbox" do |v|
      v.customize ["modifyvm", :id, "--memory", 512]
    end
    h1.vm.network :private_network, ip: "192.168.1.11"
    h1.vm.box = "chef/centos-6.6"
    h1.vm.hostname = "pgpool01"
  end
  config.vm.define :pgpool02 do |h1|
    h1.vm.provider "virtualbox" do |v|
      v.customize ["modifyvm", :id, "--memory", 512]
    end
    h1.vm.network :private_network, ip: "192.168.1.12"
    h1.vm.box = "chef/centos-6.6"
    h1.vm.hostname = "pgpool02"
  end
  config.vm.define :pgsql01 do |h1|
    h1.vm.provider "virtualbox" do |v|
      v.customize ["modifyvm", :id, "--memory", 512]
    end
    h1.vm.network :private_network, ip: "192.168.1.13"
    h1.vm.box = "chef/centos-6.6"
    h1.vm.hostname = "pgsql01"
  end
  config.vm.define :pgsql02 do |h1|
    h1.vm.provider "virtualbox" do |v|
      v.customize ["modifyvm", :id, "--memory", 512]
    end
    h1.vm.network :private_network, ip: "192.168.1.14"
    h1.vm.box = "chef/centos-6.6"
    h1.vm.hostname = "pgsql02"
  end
  config.vm.define :pgsql03 do |h1|
    h1.vm.provider "virtualbox" do |v|
      v.customize ["modifyvm", :id, "--memory", 512]
    end
    h1.vm.network :private_network, ip: "192.168.1.15"
    h1.vm.box = "chef/centos-6.6"
    h1.vm.hostname = "pgsql03"
  end
  config.vm.define :zabbix do |h1|
    h1.vm.provider "virtualbox" do |v|
      v.customize ["modifyvm", :id, "--memory", 512]
    end
    h1.vm.network :private_network, ip: "192.168.1.20"
    h1.vm.box = "chef/centos-6.6"
    h1.vm.hostname = "zabbix"
  end
end
- VM を起動
$ vagrant up
$ vagrant status
Current machine states:

pgpool01                  running (virtualbox)
pgpool02                  running (virtualbox)
pgsql01                   running (virtualbox)
pgsql02                   running (virtualbox)
pgsql03                   running (virtualbox)
zabbix                    running (virtualbox)
- pgpool-II,PostgreSQL SRクラスタを構築するAnsible Playbookをダウンロード
$ git clone https://github.com/pg-monz/ansible-pgool-pgsql-cluster.git
- group_vars/all.ymlを編集
# 編集箇所
synchronous_standby_names: '192.168.1.14,192.168.1.15'
vip: 192.168.1.100
pgpool_active_ip: 192.168.1.11
pgpool_standby_ip: 192.168.1.12
pgsql_primary_ip: 192.168.1.13
pgsql_standby01_ip: 192.168.1.14
pgsql_standby02_ip: 192.168.1.15
- そのままではうまく動かない部分があったのでPlaybookを修正
# roles/spred_selinux_settings/tasks/main.ymlを新規作成
---
- name: Check if selinux is installed
  command: getenforce
  register: command_result
  ignore_errors: True

- name: Install libselinux-python
  yum: name={{ item }}
  with_items:
    - epel-release
    - libselinux-python
  when: command_result|success and command_result.stdout != 'Disabled'
# prepare.ymlにspred_selinux_settingsを追加
---
- hosts: all
  sudo: yes
  gather_facts: no
  roles:
   - spred_selinux_settings
   - spred_ssh_settings
   - spred_pgdg_rpms
   - spred_pgpool_src
   - spred_os_cmd
- Playbookを実行
$ ansible-playbook --ask-pass --ask-sudo-pass -i hosts site.yml
Zabbix サーバの構築 (サーバzabbixの作業)
- サーバ zabbix にログイン。後の作業は基本的にrootユーザで実行する。
$ vagrant ssh zabbix
$ su
- PostgreSQLをインストール
$ wget http://yum.postgresql.org/9.4/redhat/rhel-6-x86_64/pgdg-centos94-9.4-1.noarch.rpm
$ rpm -ivh pgdg-centos94-9.4-1.noarch.rpm
$ yum install postgresql94 postgresql94-server postgresql94-contrib
$ su - postgres
$ cd /var/lib/pgsql/9.4/data
$ /usr/pgsql-9.4/bin/initdb --encoding=UTF8 --no-locale
# ユーザを root に戻す
$ service postgresql-9.4 start
- Zabbix Serverをインストール
$ wget http://repo.zabbix.com/zabbix/2.4/rhel/6/x86_64/zabbix-release-2.4-1.el6.noarch.rpm
$ rpm -ivh zabbix-release-2.4-1.el6.noarch.rpm
$ yum install zabbix zabbix-server-pgsql zabbix-server zabbix-sender zabbix-get
$ yum install zabbix-web-pgsql zabbix-web zabbix-web-japanese
- zabbixという名前のユーザ,データベースを作成
$ su - postgres
$ psql
# create user zabbix with encrypted password 'zabbix' nocreatedb nocreateuser;
# create database zabbix owner zabbix;
$ psql -U zabbix zabbix < /usr/share/doc/zabbix-server-pgsql-2.4.5/create/schema.sql
$ psql -U zabbix zabbix < /usr/share/doc/zabbix-server-pgsql-2.4.5/create/images.sql
$ psql -U zabbix zabbix < /usr/share/doc/zabbix-server-pgsql-2.4.5/create/data.sql
- Zabbixサーバ設定ファイルを編集して起動
$ vi /etc/zabbix/zabbix_server.conf
※編集箇所
DBPort=5432
$ vi /etc/php.ini
※編集箇所
date.timezone = Asia/Tokyo
$ service zabbix-server start
$ service httpd start
- Zabbix Webページにアクセスし、初期設定ウィザードを起動
-
- Configure DB connection 画面でDBの接続情報入力
Database name : zabbix
User : zabbix
Password : zabbix
- pg_monz をダウンロード
$ git clone https://github.com/pg-monz/pg_monz.git
-
templateフォルダのテンプレート(.xml)をインポートする。
-
テンプレートTemplate App PostgreSQLのマクロを編集
{$PGLOGDIR} : /var/log/pgsql
- ホストを作成し、テンプレートを割り当てる。
| ホスト名 | テンプレート名 |
|---|---|
| pgpool01,pgpool02 | Template App pgpool-II |
| pgsql01,pgsql02,pgsql03 | Template App PostgreSQL SR |
| PostgreSQL Cluster | Template App pgpool-II watchdog, Template App PostgreSQL SR Cluster |
- ホストグループを作成する。
| ホストグループ名 | ホスト名 |
|---|---|
| pgpool | pgpool01,pgpool02 |
| PostgreSQL | pgsql01,pgsql02,pgsql03 |
| PostgreSQL Cluster | PostgreSQL Cluster |
Zabbix エージェントの導入(サーバzabbix以外の全サーバでの作業)
- Zabbixエージェントのインストール
$ wget http://repo.zabbix.com/zabbix/2.4/rhel/6/x86_64/zabbix-release-2.4-1.el6.noarch.rpm
$ rpm -ivh zabbix-release-2.4-1.el6.noarch.rpm
$ yum install zabbix-agent zabbix-sender
- Zabbixエージェントの設定ファイルを編集して起動
$ vi /etc/zabbix/zabbix_agentd.conf
※編集箇所(Hostnameは各サーバのホスト名を記載)
Server=192.168.1.20
ServerActive=192.168.1.20
Hostname=pgpool01
AllowRoot=1
- pg_monz 設定ファイル、スクリプトを配置し、Zabbixエージェントを起動
$ git clone https://github.com/pg-monz/pg_monz.git
$ cd pg_monz/pg_monz/
$ cp usr-local-etc/* /usr/local/etc
$ cp usr-local-bin/* /usr/local/bin
$ chmod +x /usr/local/bin/*.sh
$ cp zabbix_agentd.d/userparameter_pgsql.conf /etc/zabbix/zabbix_agentd.d/
$ service zabbix-agent start
Fluentd の導入
- td-agentのインストール(サーバzabbix,pgsql01,pgsql02,pgsql03での作業)
$ curl -L https://td-toolbelt.herokuapp.com/sh/install-redhat-td-agent2.sh | sh
- fluentdプラグインのインストール(サーバpgsql01,pgsql02,pgsql03)
$ td-agent-gem install fluent-plugin-parser
$ td-agent-gem install fluent-plugin-record-reformer
- fluentdプラグインのインストール(サーバzabbix)
$ yum install gcc
$ yum install postgresql9.4-devel
$ export PATH=/usr/pgsql-9.4/bin:$PATH
$ td-agent-gem install fluent-plugin-pgjson
PostgreSQLのログ設定を変更
- /var/lib/pgsql/9.4/data/postgresql.confを編集し、再読み込み(サーバpgsql01,pgsql02,pgsql03での作業)
※編集箇所
log_destination = 'stderr,csvlog'
log_line_prefix = '[%t][%p][%c-%l][%x][%e]%q (%u, %d, %r, %a)'
log_filename = 'postgresql.log'
log_rotation_age = 0
log_min_duration_statement = '1s'
log_checkpoints = on
log_lock_waits = on
log_temp_files = 0
$ service postgresql-9.4 reload
Fluentdの設定を変更
- /etc/td-agent/td-agent.conf に設定を追記(サーバpgsql01,pgsql02,pgsql03での作業)
<source>
  type      tail
  path      /var/log/pgsql/postgresql.csv
  pos_file   /var/log/td-agent/postgresql.log.pos
  tag       postgresql
  format    multiline
  format_firstline  /^\d{4}-\d{2}-\d{2}/
  format1   /^(?<time>[^",]*),"?(?<user_name>(?:[^",]|"")*)"?,"?(?<database_name>(?:[^",]|"")*)"?,(?<process_id>[^",]*),"?(?<connection_from>(?:[^",]|"")*)"?,(?<session_id>[^",]*),(?<session_line_num>[^",]*),"?(?<command_tag>(?:[^",]|"")*)"?,(?<session_start_time>[^",]*),(?<virtual_transaction_id>[^",]*),(?<transaction_id>[^",]*),(?<error_severity>[^",]*),(?<sql_state_code>[^",]*),"?(?<message>(?:[^"]|"")*)"?,(?<detail>[^",]*),"?(?<hint>(?:[^",]|"")*)"?,(?<internal_query>[^",]*),(?<internal_query_pos>[^",]*),(?<context>[^",]*),"?(?<query>(?:[^"]|"")*)"?,(?<query_pos>[^",]*),(?<location>[^",]*),"?(?<application_name>(?:[^",]|"")*)"?$/
</source>

<match postgresql>
  type rewrite_tag_filter
  rewriterule1  message  ^duration:                             raw.postgresql.slow_query
  rewriterule2  message  ^checkpoints\sare\soccurring\stoo\sfrequently                                                                                  postgresql.checkpoints.frequently
  rewriterule3  message  ^checkpoint\sstarting:                 postgresql.checkpoint.start
  rewriterule4  message  ^checkpoint\scomplete:                 postgresql.checkpoint.complete
  rewriterule5  message  ^automatic                             postgresql.vacuum
  rewriterule6  message  ^temporary file:                       postgresql.tempfiles
  rewriterule7  message  ^process.*detected\sdeadlock           postgresql.deadlock
  rewriterule8  message  ^process.*(still waiting|acquired)     postgresql.lockwait
  rewriterule9  message  .*                                     postgresql.others
</match>

<match raw.postgresql.slow_query>
  type parser
  remove_prefix raw
  reserve_data  yes
  key_name      message
  format        /^duration: (?<duration>[0-9\.]+) ms  statement: (?<statement>.+)$/
</match>

<match {postgresql.**}>
  type record_reformer
  renew_record false
  enable_ruby true
  tag pgsql.${tag_suffix[1]}
  <record>
    hostname ${hostname}
  </record>
</match>

<match {pgsql.**}>
  type forward
  <server>
    host 192.168.1.20
    port 29680
  </server>
  flush_interval 10s
</match>
- /etc/td-agent/td-agent.conf に設定を追記(サーバzabbixでの作業)
<source>
  type forward
  port 29680
</source>

<match {pgsql.**}>
  type          pgjson
  host          localhost
  port          5432
  sslmode       prefer
  database      fluentd
  table         fluentd
  user          postgres
  password      postgres
  time_col      time
  tag_col       tag
  record_col    record
</match>
ログデータ格納用テーブルを作成(Zabbixサーバ)
$ su - postgres
$ psql
# CREATE DATABASE fluentd;
# ¥c fluentd
# CREATE TABLE fluentd (tag Text, time Timestamptz, record Jsonb);
Fluentd を起動(サーバzabbix,pgsql01,pgsql02,pgsql03での作業)
$ service td-agent start
ログデータ格納用テーブルに対するSQLサンプル
スロークエリを検索(時間が長い10件)
# select time, record#>>'{hostname}' as host, record#>>'{user_name}' as user, record#>>'{database_name}' as db, record#>>'{duration}' as duration, record#>>'{statement}' as statement from fluentd where tag = 'pgsql.slow_query' ORDER BY (record#>'{duration}') desc LIMIT 10;