経緯
さて、第一回の記事では、WebSphere Application ServerとDB2をBluemixでささっと用意いただきました。
テーブル作成も行ったところですので、今回はローカル環境での作業になります。
レシピ
前回から引き続き同じです。
- IBM Bluemixアカウント
- Ecilpse
- 保存したい画像
作り方
手順の概要のおさらいです。
1. Bluemix上にWebサーバーとDBサーバーを用意(第一回)
2. Javaアプリを用意(第二回)←いまここ
3. BluemixのDBサーバーに画像をアップロード(第三回)
4. libertyサーバーをBluemixにプッシュ(第四回)
1.Dynamic WebServicesのプロジェクトの作成
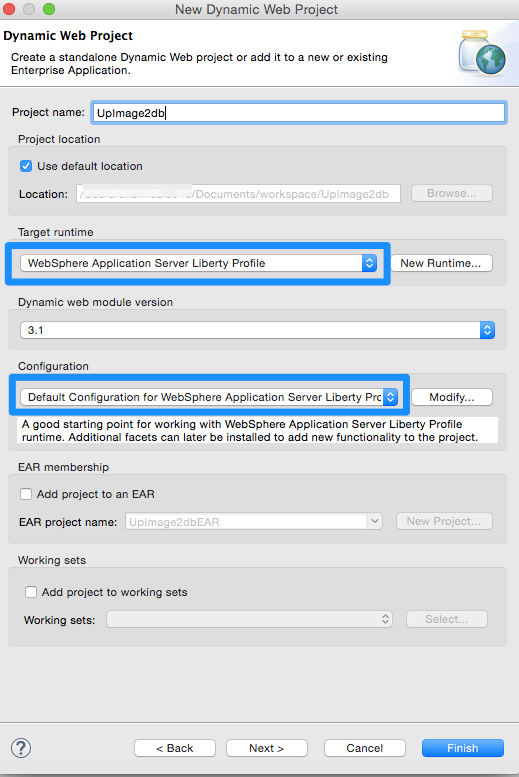
File > New > Project > Web > Dynamic Web Project を選択。
プロジェクト名を入れてあげます。さらにターゲット・ランタイムは
WebSphere Application Server Liberty Profileにしました。。
ひとまずローカルのサーバーで確認するためです。
尚、このWebSphere Application Server Liberty ProfileはBluemix Pluginを入れると
インストールされます。
もし、ランタイムに存在しない場合、こちらのdevelopserworksの記事
を参考にしてローカルサーバーを準備してください。
Nextを押したら、このままスルーでFinish!
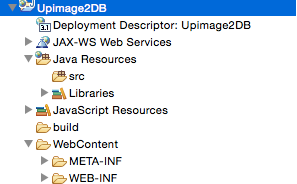
Project Exploerに以下のようなライブラリができたはずです。
2.プログラム作成
さて、ここからがプログラミンの本番です。次の3つを作成していきましょう。
- Upload.jsp(画像をアップロードするためのインターフェース)
- FileUploadDBServer.java(メインのソースコード)
- Message.jsp(アップロード結果を返す)
2.1 Upload.jsp
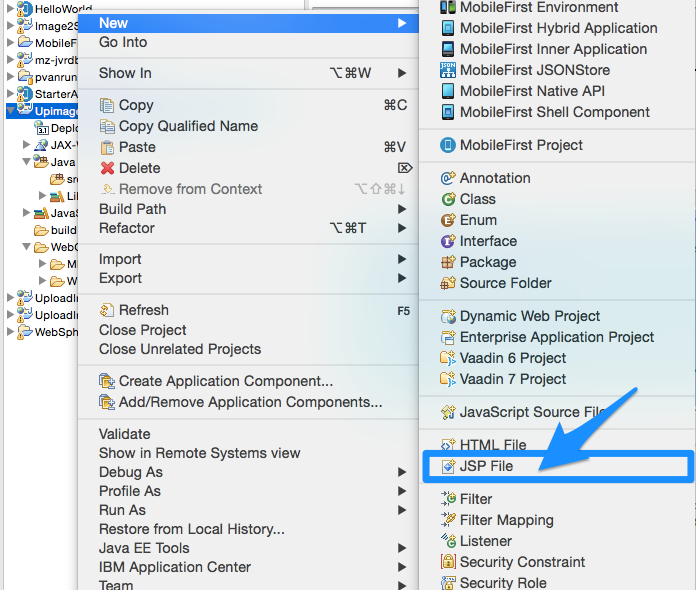
作成したプロジェクトのフォルダで右クリックし、File > New > Jsp File
WebContent直下にjspファイルを作成します。作成したらコードを書いていきます。以下の通り。
<%@ page language="java" contentType="text/html; charset=UTF-8"
    pageEncoding="UTF-8"%>
<!DOCTYPE html PUBLIC "-//W3C//DTD HTML 4.01 Transitional//EN" "http://www.w3.org/TR/html4/loose.dtd">
<html>
<head>
<meta http-equiv="Content-Type" content="text/html; charset=UTF-8">
<title>File Upload to Database Demo</title>
</head>
    <center>
        <h1>File Upload to Database Demo</h1>
        <form method="post" action="uploadServlet" enctype="multipart/form-data">
            <table border="0">
                <tr>
                    <td>First Name: </td>
                    <td><input type="text" name="firstName" size="50"/></td>
                </tr>
                <tr>
                    <td>Last Name: </td>
                    <td><input type="text" name="lastName" size="50"/></td>
                </tr>
                <tr>
                    <td>Portrait Photo: </td>
                    <td><input type="file" name="photo" size="50"/></td>
                </tr>
                <tr>
                    <td colspan="2">
                        <input type="submit" value="Save">
                    </td>
                </tr>
            </table>
        </form>
    </center>
</body>
</html>
2.2 FileUploadDBServer.java
続いてJavaのクラスファイルを作成していきましょう。
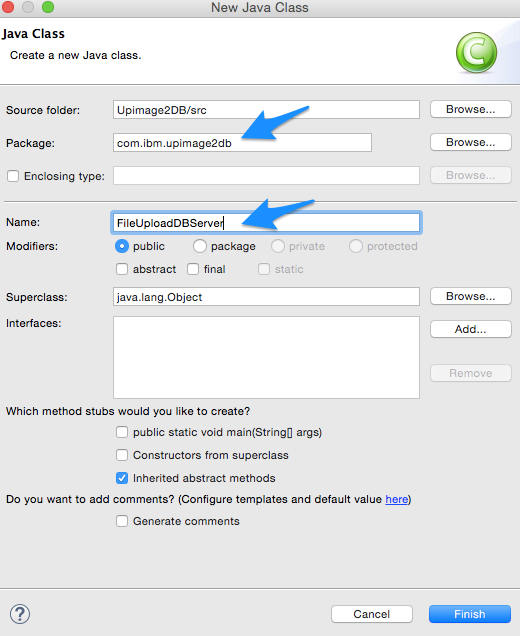
プロジェクトのフォルダで右クリックし、New > Class を選択。
Package名をcom.ibm.upimage2dbなどにします。Classの名前をFileUploadDBServerにしてFinish!
肝心の中身ですが、環境に合わせて変更してください。本当はもっと賢いやり方がありますが、データベースの情報をベタ打ちしてます。「//please mod!」と表記された箇所は皆様がBluemixで立てたデータベースの値に合わせます。後ほど解説と共に変更します。
package com.ibm.upload;


import java.io.IOException;
import java.io.InputStream;
import java.sql.Connection;
import java.sql.DriverManager;
import java.sql.PreparedStatement;
import java.sql.SQLException;
import javax.sql.DataSource;

import javax.servlet.ServletException;
import javax.servlet.annotation.MultipartConfig;
import javax.servlet.annotation.WebServlet;
import javax.annotation.Resource;
import javax.servlet.http.HttpServlet;
import javax.servlet.http.HttpServletRequest;
import javax.servlet.http.HttpServletResponse;
import javax.servlet.http.Part;

@WebServlet("/uploadServlet")
@MultipartConfig(maxFileSize = 16177215)    // upload file's size up to 16MB
public class FileUploadDBServer extends HttpServlet {
    //String url = "jdbc:db2://xx.xxx.xxx.xxx:50000/SQLDB"; //please mod!
    //String user = "xxxxxxxx"; //please mod!
    //String pass = "xxxxxxxx"; //please mod!

    @Resource(lookup = "jdbc/mz-jvdb220150923-test-sqldb") //please mod!
	DataSource ds;

    protected void doPost(HttpServletRequest request,
            HttpServletResponse response) throws ServletException, IOException {
        // gets values of text fields
        String firstName = request.getParameter("firstName");
        String lastName = request.getParameter("lastName");

        InputStream inputStream = null; // input stream of the upload file

        // obtains the upload file part in this multipart request
        Part filePart = request.getPart("photo");
        if (filePart != null) {
            // prints out some information for debugging
            System.out.println(filePart.getName());
            System.out.println(filePart.getSize());
            System.out.println(filePart.getContentType());

            // obtains input stream of the upload file
            inputStream = filePart.getInputStream();
        }

        Connection conn = null; // connection to the database
        String message = null;  // message will be sent back to client


        try {

        	System.out.println("Trying!");
            // connects to the database
        	conn = ds.getConnection();
        	System.out.println("Conecting dataSource!");

        	//conn = DriverManager.getConnection(url, user, pass);
            //DriverManager.registerDriver(new com.mysql.jdbc.Driver());
            //conn = DriverManager.getConnection(url, user, pass);

            // constructs SQL statement
            String sql = "INSERT INTO CONTACTS (first_name, last_name, photo) values (?, ?, ?)";
            PreparedStatement statement = conn.prepareStatement(sql);
            statement.setString(1, firstName);
            statement.setString(2, lastName);

            if (inputStream != null) {
                // fetches input stream of the upload file for the blob column
                statement.setBlob(3, inputStream);
            }

            // sends the statement to the database server
            int row = statement.executeUpdate();
            if (row > 0) {
                message = "File uploaded and saved into database";
            }
        } catch (SQLException ex) {
            message = "ERROR: " + ex.getMessage();
            ex.printStackTrace();
        } finally {
            if (conn != null) {
                // closes the database connection
                try {
                    conn.close();
                } catch (SQLException ex) {
                    ex.printStackTrace();
                }
            }
            // sets the message in request scope
            request.setAttribute("Message", message);

            // forwards to the message page
            getServletContext().getRequestDispatcher("/Message.jsp").forward(request, response);
        }
    }

}
2.3 Message.jsp
先ほどのjspファイルと同様にWebContent直下に作成して以下のコードを記載。
<%@ page language="java" contentType="text/html; charset=UTF-8"
    pageEncoding="UTF-8"%>
<!DOCTYPE html PUBLIC "-//W3C//DTD HTML 4.01 Transitional//EN" "http://www.w3.org/TR/html4/loose.dtd">
<html>
<head>
<meta http-equiv="Content-Type" content="text/html; charset=UTF-8">
<title>Insert title here</title>
</head>
<body>
    <center>
        <h3><%=request.getAttribute("Message")%></h3>
    </center>
</body>
</html>
3. 解説
FileUploadDBServer.javaの中のServletの記載で、データソースのJNDIを定義している箇所がありますので、こちらの情報はBluemixから値をコピペしてきます。
@WebServlet("/uploadServlet")
@MultipartConfig(maxFileSize = 16177215)    // upload file's size up to 16MB
public class FileUploadDBServer extends HttpServlet {
    //String url = "jdbc:db2://xx.xxx.xxx.xxx:50000/SQLDB"; //please mod!
    //String user = "xxxxxxxx"; //please mod!
    //String pass = "xxxxxxxx"; //please mod!

    @Resource(lookup = "jdbc/mz-jvdb220150923-test-sqldb") //please mod!
	DataSource ds;
Bluemixのダッシュボードから、アプリケーションを選択。環境変数を選択すると、右側のVCAP_SERVICESに"name"があります。
その値を元に、データソースのリソースをlookupできるように以下のようにlookup属性のアノテーションを使用します。
    @Resource(lookup = "jdbc/MasterDBServer01-mz-sqldb")
    DataSource ds;
データソースの定義をWebSphere Application Server Liverty側で次回の記事で登録していきます。
4. 次回予告
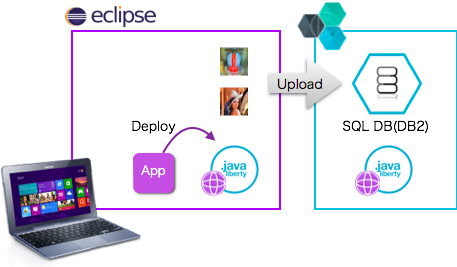
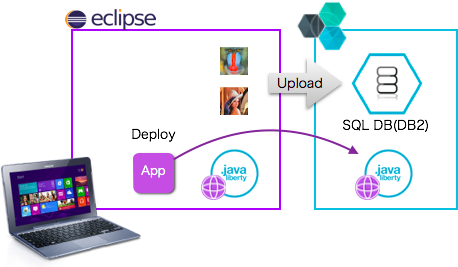
さて、ここで少しこのあとのステップイメージを共有します。以下の①、②、③のステップでそれぞれ稼働確認していこうと思います。
①Eclipse環境内(ローカル環境)のLivertyにアプリケーションをデプロイし、Bluemix(クラウド環境)のDBに接続した状態でアプリケーションを稼働させる。
②Eclipse環境内(ローカル環境)で確認が取れたアプリケーションを、Bluemix上にデプロイし同様にアプリケーションを稼働させる。
③ローカル環境のLivertyサーバーをBluemix(クラウド環境)にプッシュして同様に稼働確認。
ということで、第三回はLiverty側の設定を行っていきます!!
