概要
-
apt-get update; apt-get upgradeでの、aptのパッケージをキャッシュ。2度目/2台目以降は、LANのキャッシュサーバからファイル取得。 - Apt-Cacher NG is a caching HTTP proxy だそうです。
- 関連
# あー、こんな簡単にできるのに、なんで いままでちゃんと調べなかったんだろうか。
環境
- aptキャッシュサーバ
- Ubuntu 16.04
- Raspberry Pi 2 (
2016-09-23-raspbian-jessie.imgと lite)
- クライアント
- Ubuntuマシンたち
- Raspberry Pi たち
# らずぱい鯖でUbuntu(Intel)クライアント、もOK。その逆もまた然り。
手順
- サーバ: apt-cacher-ngのインストール
- クライアント: aptの設定(1ファイル追加 -
/etc/apt/apt.conf.d/02proxy)
サーバ設定
-
apt-chcher-ng導入- インストール:(パッケージインストールと自分自身へ)
sudo apt-get update; sudo apt-get install apt-cacher-ng ; echo 'Acquire::http::Proxy "http://127.0.0.1:3142";' | sudo tee /etc/apt/apt.conf.d/02proxy - IPアドレス確認:
ifconfig eth0 | grep inet\ addr
表示例 - インストール:(パッケージインストールと自分自身へ)
pi@raspberrypi:~ $ ifconfig eth0 | grep inet\ addr
inet addr:10.10.6.165 Bcast:10.10.7.255 Mask:255.255.248.0
pi@raspberrypi:~ $
<!--
    - 一応、apt-cacher-ngの状態とIPアドレス確認:<br>`sudo systemctl status apt-cacher-ng ; ifconfig eth0 | grep inet\ addr`

    ```shell-session:表示例
pi@raspberrypi:~ $ sudo systemctl status apt-cacher-ng ; ifconfig eth0 | grep inet\ addr
● apt-cacher-ng.service - Apt-Cacher NG software download proxy
       Loaded: loaded (/lib/systemd/system/apt-cacher-ng.service; enabled)
       Active: active (running) since Wed 2016-11-23 23:08:39 UTC; 18min ago
     Main PID: 2572 (apt-cacher-ng)
       CGroup: /system.slice/apt-cacher-ng.service
               └─2572 /usr/sbin/apt-cacher-ng SocketPath=/var/run/apt-cacher-ng/socket -c /etc/apt-cacher-ng ForeGround=1

    Nov 23 23:08:39 raspberrypi systemd[1]: Started Apt-Cacher NG software download proxy.
              inet addr:10.10.6.165  Bcast:10.10.7.255  Mask:255.255.248.0
pi@raspberrypi:~ $
-->
- 設定ファイル:
/etc/apt-cacher-ng/acng.conf- ファイルがキャッシュされるところ:
CacheDir: /var/cache/apt-cacher-ngtail -f /var/log/apt-cacher-ng/apt-cacher.logとかやると いろいろキャッシュされてる. - ログが保存されるところ:
LogDir: /var/log/apt-cacher-ngtail -f /var/log/apt-cacher-ng/apt-cacher.logとかみてると、アクセスされてるのが見れる。 - 使用ポート:
Port:3142 - レポートのページ:
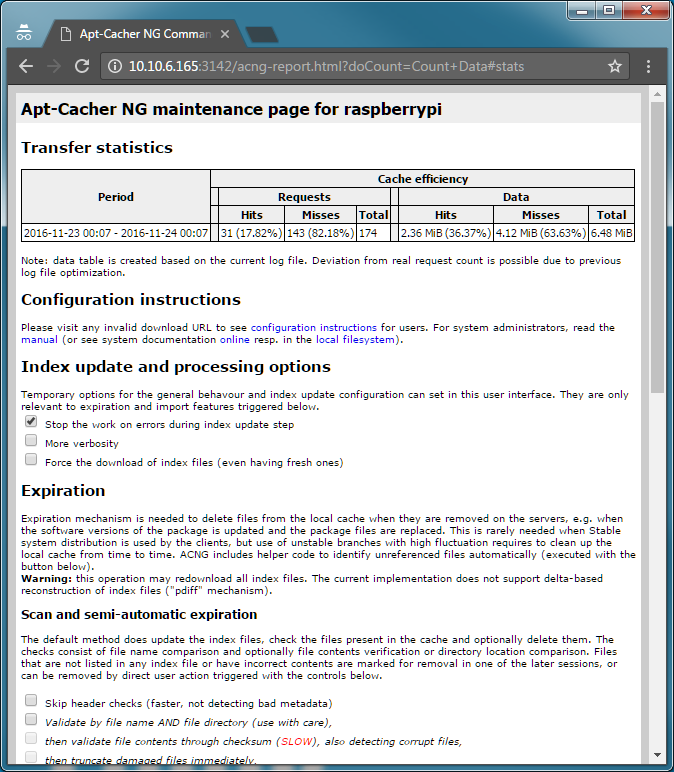
ReportPage: acng-report.htmlhttp://サーバのIP:3142/acng-report.htmlにアクセスすると、レポートが見れる ([Count Data]をクリックしよう。)
- ファイルがキャッシュされるところ:
クライアント側設定
-
/etc/apt/apt.conf.d/02proxy作成 (http://鯖のIP:3142/という感じで)/etc/apt/apt.conf.d/02proxy
Acquire::http::Proxy "http://10.10.6.165:3142";
    - コマンドラインにて<br>`echo 'Acquire::http::Proxy "http://AptCacherNg_no_IP:3142/";' | sudo tee /etc/apt/apt.conf.d/02proxy ; cat /etc/apt/apt.conf.d/02proxy`

    ```shell-session:実行例
pi@raspberrypi:~ $ echo 'Acquire::http::Proxy "http://10.10.6.165:3142";' | sudo tee /etc/apt/apt.conf.d/02proxy ; cat /etc/apt/apt.conf.d/02proxy
Acquire::http::Proxy "http://10.10.6.165:3142";
Acquire::http::Proxy "http://10.10.6.165:3142";
pi@raspberrypi:~ $
- あとは通常通りにインストールやら、アップグレードをすればよい、
sudo apt-get update; sudo apt-get upgrade
その他
- サーバにするマシンは、LAN、ストレージアクセスがはやいのがいいとおもう。
