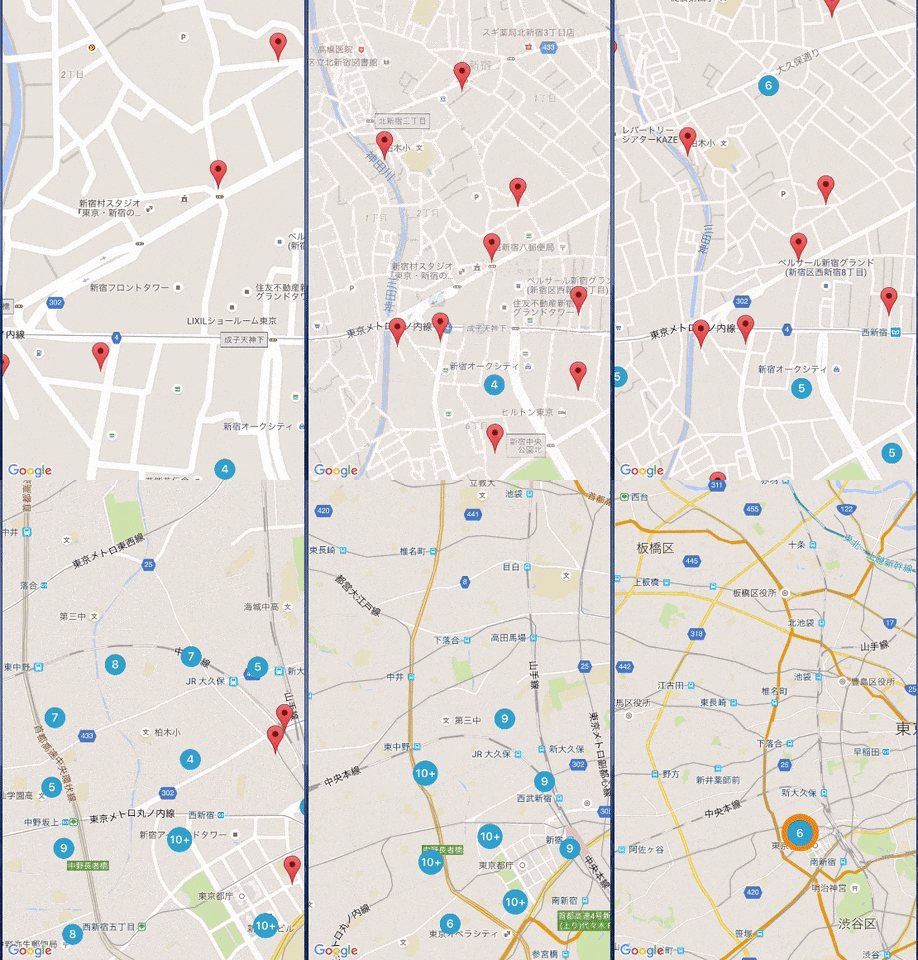
TL; DR
Google Maps SDK for iOSに、Marker Clusteringが新登場したので試してみました!
Marker Clusteringでは、ズームインするとMarkerがクラスターから分離し、ズームアウトするとMarkerがクラスター化されます。これにより、大量のMarkerで地図が埋め尽くされ、見づらくなってしまう問題が解決されます。

環境
- Xcode Version 8.0 beta
- iPhone 6s iOS 9.3.3
- Swift 3.0
- Cocoapods 1.0.1
- Google Maps SDK 1.13.2
GMSをCocoapodsでインストール
Cocoapods経由でGoogle Maps SDK for iOSと、Google Maps SDK for iOS Utility Libraryをインストールします。
platform :ios, '9.0'

target プロジェクト名 do
   pod 'GoogleMaps'
   pod 'Google-Maps-iOS-Utils'
end
Swiftプロジェクトで使う準備
GMSは、Objective-Cで書かれています。
SwiftプロジェクトではBridging-Headerを作成し、GMUMarkerClusteringをインポートします。
#import <Google-Maps-iOS-Utils/GMUMarkerClustering.h>
AppDelegateでGoogle Maps API Keyの設定を忘れないようにもします。
import UIKit
import GoogleMaps

// Google Maps API Key
let APIKey = "YOUR_API_KEY"

@UIApplicationMain
class AppDelegate: UIResponder, UIApplicationDelegate {

    var window: UIWindow?

    func application(_ application: UIApplication, didFinishLaunchingWithOptions launchOptions: [NSObject: AnyObject]?) -> Bool {

        GMSServices.provideAPIKey(APIKey)

        let mapViewController = UINavigationController.init(rootViewController: MapViewController())

        self.window = UIWindow(frame: UIScreen.main().bounds)
        self.window?.rootViewController = mapViewController
        self.window?.makeKeyAndVisible()

        return true
    }
}
GMUClusterItemプロトコルに適合したItemを作成
Mapに表示するMarkerItemを作成します。
class MarkerItem: NSObject, GMUClusterItem {
    var position: CLLocationCoordinate2D //必須

    init(position: CLLocationCoordinate2D) {
        self.position = position
    }
}
Mapを表示するViewControllerを作成
import UIKit
import GoogleMaps


// 新宿フロントタワー
let cameraLatitude = 35.695978
let cameraLongitude = 139.689340

class MapViewController: UIViewController, GMUClusterManagerDelegate, GMSMapViewDelegate {
    private let camera = GMSCameraPosition.camera(withLatitude: cameraLatitude,
                                                  longitude: cameraLongitude, zoom: 15)
    private let mapView = GMSMapView.init(frame: CGRect.zero)

    private lazy var clusterManager: GMUClusterManager = {
        let iconGenerator = GMUDefaultClusterIconGenerator()
        let algorithm = GMUNonHierarchicalDistanceBasedAlgorithm()
        let renderer = GMUDefaultClusterRenderer(mapView: self.mapView, clusterIconGenerator: iconGenerator)
        return GMUClusterManager(map: self.mapView, algorithm: algorithm, renderer: renderer)
    }()

    override func viewDidLoad() {
        super.viewDidLoad()

        self.mapView.camera = camera
        self.view = self.mapView

        // Marker × 1000 ランダム座標を生成し、ClusterManagerにadd
        for _ in 0...1000 {
            let extent = 0.1
            let latitude = cameraLatitude + extent * randomScale()
            let longitude = cameraLongitude + extent * randomScale()
            clusterManager.add(MarkerItem.init(position: CLLocationCoordinate2DMake(latitude, longitude)))
        }

        // MarkerItemをClusteringし、地図にプロット
        clusterManager.cluster()

        // GMUClusterManagerDelegate + GMSMapViewDelegateを設定
        clusterManager.setDelegate(self, mapDelegate: self)
    }

    // MARK: - GMUMapViewDelegate

    // Marker or Cluster Markerがタップされた
    func mapView(_ mapView: GMSMapView, didTap marker: GMSMarker) -> Bool {
        if marker.userData is MarkerItem {
            debugPrint("ClusterのMarkerItemがタップされた")
        } else {
            debugPrint("通常のMarkerがタップされた")
        }
        return false
    }

    // MARK: - GMUClusterManagerDelegate

    // Clusterがタップされたたら、Camera Positionを移動
    func clusterManager(_ clusterManager: GMUClusterManager, didTap cluster: GMUCluster) {
        let newCamera = GMSCameraPosition.camera(withTarget: cluster.position,
                                                 zoom: mapView.camera.zoom + 1)
        let update = GMSCameraUpdate.setCamera(newCamera)
        mapView.moveCamera(update)
    }


    private func randomScale() -> Double {
        return Double(arc4random()) / Double(UINT32_MAX) * 2.0 - 1.0
    }

}
利用可能なクラスタリングアルゴリズム
まだドキュメントが見当たらないので、Jump to Definitionで飛んでいったところ、2種類のクラスタリングアルゴリズムを確認。
以下の説明文は意訳です。なお、冒頭のgifはGMUNonHierarchicalDistanceBasedAlgorithmを使用しています。
// マップをグリッド状に分割
GMUGridBasedClusterAlgorithm

/*
非階層的クラスタリング
1. 追加順にitemsをイテレート(クラスター候補)
2. itemの中心点を持つクラスターを作成
3. 特定の距離圏内に含まれるすべてのitemをクラスターに追加
4. 別のクラスターに近ければ、既存クラスターから追加済みitemを移動させる
5. それらをクラスター候補から削除
各クラスターは最初のitemの中心点を持つ(複数itemの重心ではなく)
*/
GMUNonHierarchicalDistanceBasedAlgorithm
参考
以下のドキュメント、ソースコードを参考にしました。