今回は勉強会でRubymotionで簡単なアプリを作るをやってみるので、そのための資料としてまとめてみました。
※主に初心者を対象にしています。
①まずは、購入 & インストールをしましょう。
(2014年4月23日現在 21,300円)
※ちなみに30日間は返金対象期間です。
②次にチュートリアルをやってみましょう。
インストールをしたら、チュートリアルで簡単なアプリの作成
http://tutorial.rubymotion.jp/
③実践に向けての準備をしましょう。
-RubyMotionをはじめる人が最低限知っとくべきObjC
http://qiita.com/shida/items/a03b05fbc58dbb4f4575
-Objective-CのコードをRubyMotionに変換するSublime Textプラグイン
※これ便利なので、入れておいた方が良いと思います♩
http://quattro4.hatenablog.com/entry/2013/04/10/010201
-RubyMotion API Reference
http://www.rubymotion.com/developer-center/api/_index.html
-RubyMotionがすごく良く分かる良記事のまとめ
http://showrtpath.hatenablog.com/entry/2014/01/12/202941
④では実践に入ります。
(ⅰ)まずは簡単なUITableViewを作ってみましょう。
class AppDelegate

  def application(application, didFinishLaunchingWithOptions:launchOptions)
    @window = UIWindow.alloc.initWithFrame(UIScreen.mainScreen.bounds)
    hoge_controller = UINavigationController.alloc.initWithRootViewController(HogeController.alloc.init)
    @tab_controller = UITabBarController.alloc.init
    @tab_controller.viewControllers = [hoge_controller]
    @window.rootViewController = @tab_controller
    @window.makeKeyAndVisible
    true
  end
end
ちなみに最初に疑問に思うのが、alloc.init と new って何が違うのって話。Obj-Cではalloc.initでRubyではnewってだけでしょっと思いながら、ちょっとググってみると議論している。
https://groups.google.com/forum/#!topic/rubymotion/RPxKXMfcGGs
結論としてはほぼ同じらしいw(もしかしたら違う可能性があるので、一応断定はしていません)
ただ、開発していると、alloc.initiWith●●〜みたいなメソッドが多く、この場合はnew.initiWith●●〜みたいにはできないみたい。
なので個人の好きにしてくださいw
もう一つとして、ライフタイムが長そうなオブジェクトはインスタンス変数に入れる事。ローカル変数に入れると他の場所では使えませんので。
(ⅱ)次はUITableViewの中身を書いていきます。
※ちなみにiosのアプリではUITableViewはかなり重要な役割を占めています。
class HogeController < UIViewController

  def initWithNibName(name, bundle: bundle)
    super
    self.tabBarItem = UITabBarItem.alloc.initWithTitle(nil, image: nil, tag:1)
  end

  def viewDidLoad
    super
    @table_view = UITableView.alloc.initWithFrame(UIScreen.mainScreen.bounds, style:UITableViewStylePlain)
    @table_view.delegate = self
    @table_view.dataSource = self
    self.view.addSubview(@pass_jobs_table_view)
    @lists = []
    table_reload
  end

end
一旦ストップ。(※ここのコードはこの後も続きます)
まずHogeController < UIViewControllerなの?って所ですね。
てっきりHogeController < UITableViewじゃないのって声が聞こえてきそうです。
僕も作り始めはそうしてたのですが、
-rubymotionで動的にtabBarを表示する方法
http://qiita.com/moriyaman/items/68634b3dc33f3afc14ad
こういうように"状況に応じてviewのサイズを変えたりしたい!"とかってなったときに、あまり言う事を聞いてくれなかった...orz
なので基本はUIViewにUITableViewをaddSubviewするようにしています!w
次にdataSource、delegateってなんぞや?という部分。
もともとiosを開発してましたっていう人ならきっと詰まる事は無いと思いますが、はじめてだと呪文のように書くけどいったい何なのか分からないって人が多いみたいです。
これを読めば分かりやすいです。
http://konton.ninpou.jp/program/cocoa/delegate.html
delegateって直訳すると代理人とか代表者とか委譲などの意味があります。
その意味の通りで、例えばUITableViewにあるメソッドをここでいうとこのHogeControllerに委譲しましたよって言う事。
つまりコードで書くと、
class HogeController < UIViewController

  def initWithNibName(name, bundle: bundle)
    super
    self.tabBarItem = UITabBarItem.alloc.initWithTitle(nil, image: nil, tag:1)
  end

  def viewDidLoad
    super
    @table_view = UITableView.alloc.initWithFrame(UIScreen.mainScreen.bounds, style:UITableViewStylePlain)
    @table_view.delegate = self
    @table_view.dataSource = self
    self.view.addSubview(@table_view)
    table_reload
  end

  def table_reload
    Hoge.get_lists do |lists,message|
      if message.nil?
        @hoge_lists = lists
        @table_view.reloadData # テーブルをリロード
      else
        #エラーメッセージを表示
      end
    end
  end

  # テーブルの行数を返すメソッド
  def tableView(tableView, numberOfRowsInSection:section)
    @hoge_lists.count
  end

  # テーブルのセルを返すメソッド
  CELL_ID = 'Hoge Lists'
  def tableView(tableView, cellForRowAtIndexPath:indexPath)
    cell = tableView.dequeueReusableCellWithIdentifier(CELL_ID) || begin
      cell = FugaCell.alloc.initWithStyle(UITableViewCellStyleSubtitle, reuseIdentifier:CELL_ID)
    end
    hoge = @hoge_lists[indexPath.row]
    cell.createLabels(hoge)
    cell
  end

  #テーブルがクリックした時のメソッド
  def tableView(tableView, didSelectRowAtIndexPath:indexPath)
    p "click"
  end
end
上記のようなUITableViewのメソッドを定義します。
ちなみにdataSourceっていうはtableviewに表示するデータの事なので、このcontrollerで(テーブルのセルを返すメソッド)やっているので同じくdataSource=selfと書いています。
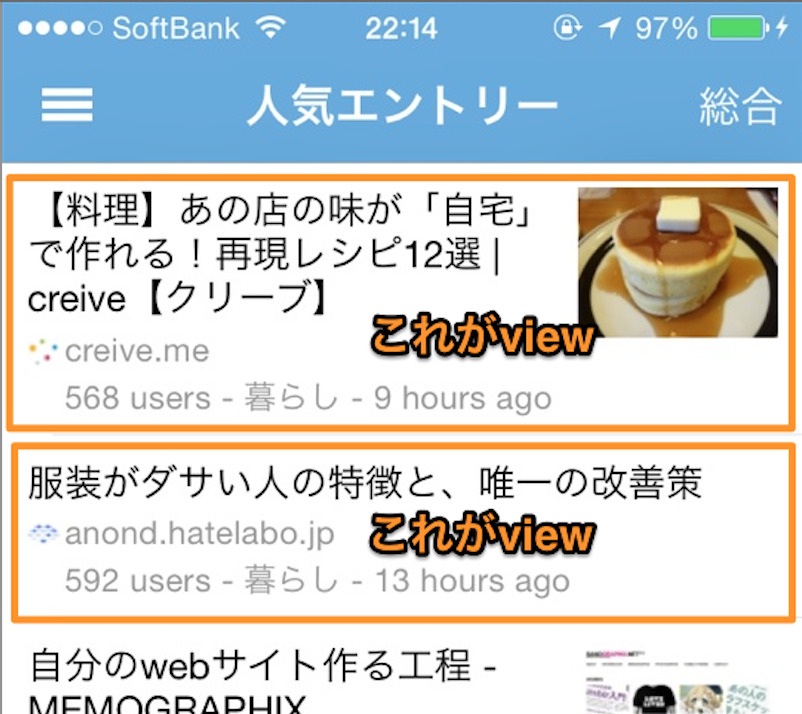
(ⅲ)rubymotionにおけるviewとは?
rubymotionで実装していくにあたって、MVCのMとCは何となく分かるんだけど、Viewって何だ?となっていた時期がありました。
この画像であるように、少しviewの定義が違うように感じるだけでしっかり分ける事ができます。先程のコードをみてみると、
cell = FugaCell.alloc.initWithStyle(UITableViewCellStyleSubtitle, reuseIdentifier:CELL_ID)
ここでのFugaCellはUITableViewCellを継承したクラスで、tableのviewの部分になります。
実際の中身は、こんな感じです。
1つ1つのcellに出す、名前や写真をセットしています。
class FugaCell < UITableViewCell

  def createLabels(hoge)
    url = NSURL.URLWithString(hoge.photo_url)
    data = NSData.dataWithContentsOfURL(url)
    img = UIImage.imageWithData(data)
    @photo = UIImageView.alloc.initWithFrame(CGRectMake(10.0, 10.0, 200.0, 100.0))
    @photo.autoresizingMask = UIViewAutoresizingFlexibleLeftMargin | UIViewAutoresizingFlexibleHeight
    @photo.image = img
    @name_label = UILabel.alloc.init
    @name_label.textColor = UIColor.colorWithRed(0, green:0, blue:0, alpha:1.000)
    @name_label.text = hoge.name
    self.addSubview(@name_label)
    self.addSubview(@photo)
    self
  end

end
(ⅳ)BubbleWrapのBubbleWrap::HTTPラッパーを用いて自分のサービスからデータを引っ張ってみましょう(apiが存在する前提ですw)
ではではUITableViewの実際のデータを取ってくる部分を実装します。
https://github.com/rubymotion/BubbleWrap
def table_reload
  Hoge.get_lists do |lists,message|
     if message.nil?
       @hoge_lists = lists
       @table_view.reloadData # テーブルをリロード
     else
       #エラーメッセージを表示
     end
   end
end
class << self
  def get_lists(&block)
    BW::HTTP.get('http://www.hoge_fuga/apis/hoge') do |response|
      begin
        if response.ok?
          json = BW::JSON.parse(response.body)
          lists = json['hoge_lists']
        else
        #通信が失敗したとき
          message = "データの取得に失敗しました。"
        end
      rescue => e
        message = 'エラーが発生しました。'
      end
      block.call(lists, message)
    end
  end
end
BubbleWrap::HTTPラッパーを使えばこんなに簡単に書けます♩
ちなみにBubbleWrapはその他にも色々と用意してくれているので、知りたい方は http://bubblewrap.io/ を見てみてください。
④rubymotionでcocoapodsを使おう!
iosの開発にかかせないのが、cocoapods。
rubyで言うところのbundlerのようなもの。
ライブラリを管理してくれます。
rubymotionではHipByte社がmotion-cocoapodsというのを用意してくれてます。素敵♩
インストール方法は下記を見てください。
https://github.com/HipByte/motion-cocoapods
http://higelog.brassworks.jp/?p=2092
簡単ですね。
では下記のサイトから何か使いたいライブラリを探してみましょう!
swipeであったり、ローディングであったり色々あります。
見ているだけで楽しいw
http://cocoapods.org/
http://cocoapods.wantedly.com/
では、実際に一つ入れてみます。
今回はSWTableViewCellというものを。
スワイプの機能を実装するライブラリです。
app.pods do
  pod 'SWTableViewCell'
end
pod setup
rake pod:install
を実行してインストール。
実装はとても簡単です。
※githubを見ていただければ分かります。
# テーブルのセルを返すメソッド
CELL_ID = 'Hoge Lists'
def tableView(tableView, cellForRowAtIndexPath:indexPath)
  cell = tableView.dequeueReusableCellWithIdentifier(CELL_ID) || begin
  #左にスワイプした時に表示する
 leftUtilityButtons = NSMutableArray.alloc.init
  #右にスワイプした時に表示する
  rightUtilityButtons = NSMutableArray.alloc.init
  rightUtilityButtons.sw_addUtilityButtonWithColor(UIColor.colorWithRed(0.07, green:0.75, blue:0.16, alpha:1.0) , title: 'hogefuga')
  cell = FugaCell.alloc.initWithStyle(UITableViewCellStyleSubtitle, reuseIdentifier:CELL_ID, containingTableView:tabl    eView, leftUtilityButtons:leftUtilityButtons, rightUtilityButtons:rightUtilityButtons)
  hoge = @hoge_lists[indexPath.row]
  cell.createLabels(hoge)
  cell
end

def swipeableTableViewCell(cell,didTriggerRightUtilityButtonWithIndex:index)
  #swipeしてhogefugaをクリックした時の動作を定義
end
class FugaCell < SWTableViewCell

end
こんな感じで実装できました。
ライブラリを使うと簡単ですね♩
⑤Pixateを使ってみましょう。
iosのスタイルをcssでかけるios用ミドルウェアです。
先日完全無料になったようで、早速インストールしてみます♩
https://github.com/Pixate/RubyMotion-PixateFreestyle
上記をみればインストール方法は分かるかと思います。
なんとrealtime更新もついに出来るようになったようです。
https://gist.github.com/pcolton/4410841
今迄watson1978さんが作ってくれていたこちらのgemを使ってrealtimeに更新するようにしてたのですが、、、
https://github.com/Watson1978/motion-pixate-observer
と思ったらなんか上手くいかないorzww
ちょっと今日は眠いのでこの辺でやめます。
⑥チュートリアルでSDKの使い方を学んでみましょう。
-RubyMotion ではじめるGoogle Analytics for iOS
http://watson1978.github.io/blog/2012/08/30/use-google-analytics/
-Evernoteのチュートリアルをrubymotionでやった
http://p.tl/yx0G
⑦さぁ、後はとにかく数を作るのみ!
一緒に頑張りましょう!
