この記事における「PostCSS」という単語のスコープは、GitHubリポジトリにあるPostCSS本体のコードが行う範囲を指します。
PostCSSのAST
PostCSSは自体はただのCSSのパーサーで、それほど大きいコードベースではありません。PostCSSは入力としてCSSのソースコードを受け取り、パースし、独自のAST(Abstruact Syntax Tree, 抽象構文木)を生成します。
実際のASTはどういうものかを見てみましょう。
まず、以下の内容で input.css というファイル名を作ります。
.qiita {
  color: #fff;
  background-color: #4ea30a;
}
そして、input.css のコードをパースし、ASTを標準出力します。
// parse.js
const fs = require('fs')
const util = require('util')
const postcss = require('postcss')

const css = fs.readFileSync('./input.css')

const ast = postcss.parse(css)
console.log(util.inspect(ast, false, null))
実行:
$ node parse.js
Root {
  raws: { semicolon: false, after: '\n' },
  type: 'root',
  nodes:
   [ Rule {
       raws: { before: '', between: ' ', semicolon: true, after: '\n' },
       type: 'rule',
       nodes:
        [ Declaration {
            raws: { before: '\n  ', between: ': ' },
            type: 'decl',
            parent: [Circular],
            source:
             { start: { line: 2, column: 3 },
               input:
                Input {
                  css: '.qiita {\n  color: #fff;\n  background-color: #4ea30a;\n}\n',
                  id: '<input css 1>' },
               end: { line: 2, column: 14 } },
            prop: 'color',
            value: '#fff' },
          Declaration {
            raws: { before: '\n  ', between: ': ' },
            type: 'decl',
            parent: [Circular],
            source:
             { start: { line: 3, column: 3 },
               input:
                Input {
                  css: '.qiita {\n  color: #fff;\n  background-color: #4ea30a;\n}\n',
                  id: '<input css 1>' },
               end: { line: 3, column: 28 } },
            prop: 'background-color',
            value: '#4ea30a' } ],
       parent: [Circular],
       source:
        { start: { line: 1, column: 1 },
          input:
           Input {
             css: '.qiita {\n  color: #fff;\n  background-color: #4ea30a;\n}\n',
             id: '<input css 1>' },
          end: { line: 4, column: 1 } },
       selector: '.qiita' } ],
  source:
   { input:
      Input {
        css: '.qiita {\n  color: #fff;\n  background-color: #4ea30a;\n}\n',
        id: '<input css 1>' },
     start: { line: 1, column: 1 } } }
ASTと聞くと難しく感じるかもしれませんが、ただのJavaScriptのオブジェクトです。今回は、Root ノードがまずあって、その下に Rule ノードが1つ、その下に Declaration ノード(プロパティ宣言)が2つ、という構造になっています。 また、各ノードにある source プロパティはソースマップです。
PostCSSの処理の流れ
PostCSSは上述した通り、CSSコードを受け取り、ASTを生成します。そして、そのASTをCSSの文字列に変換するだけです。PostCSS自体はASTの変換は行ないません。つまり、 PostCSS単体ではCSSは一切変換されない ということです。
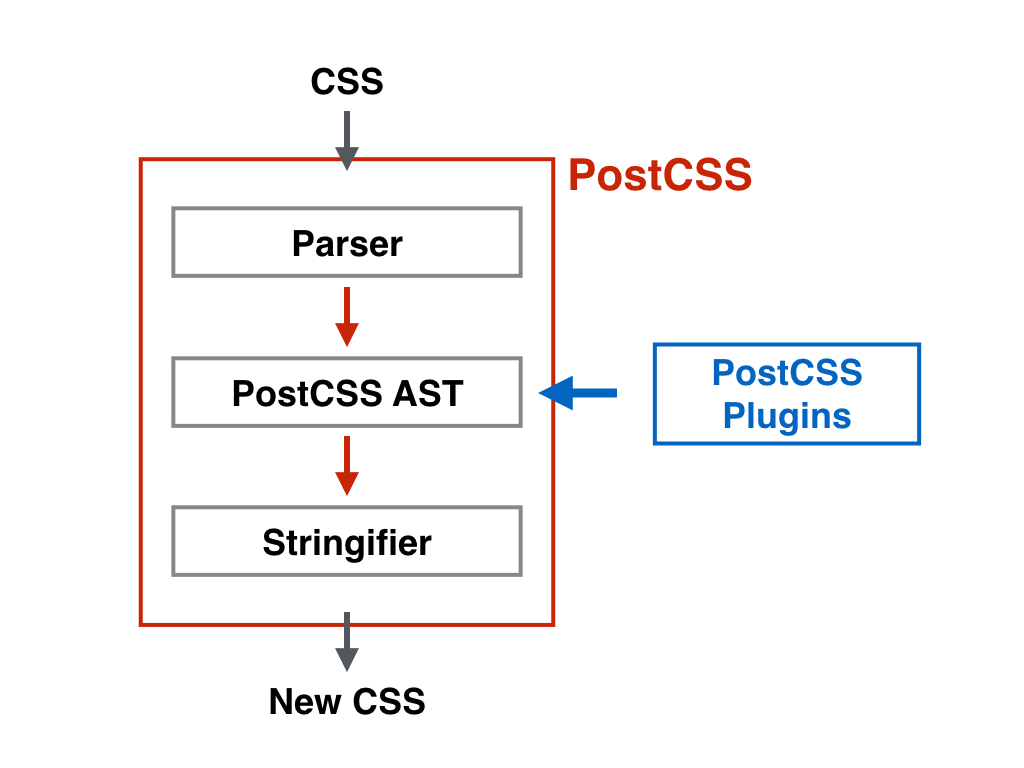
実際にCSSを変換する処理は、PostCSSのプラグインが担当します。PostCSSでは複数のプラグインを組み合わせて使うことができ、読み込んだ順に実行されます。プラグインとは、ASTを受け取り、任意の変換を行ったASTを返すプログラムのことです。
また、PostCSSはこのASTを簡単に操作するための便利なAPIも提供しています。
明日はこのAPIをいくつか使って、ASTの変換の方法を説明します。