前提
- プログラミング歴は半年
- 普段使っているのはmac
- 拾ったパソコンwindows
- 借りたアイテムUSB
- デスクの端から出ているLANケーブルにつなげるとネットに繋がる
- CentOSをいれます
まずは、isoファイルをダウンロード
http://isoredirect.centos.org/centos/6/isos/x86_64/
http://ftp.riken.jp/Linux/centos/6.6/isos/x86_64/
CentOS-6.6-x86_64-netinstall.iso
を使っているMacにダウンロード。
空っぽのUSBを準備
なんか空っぽの方が安全かと思って。
UNetbootinを入手
僕のmacはマックなので、
unetbootin-mac-608.zip
を落として解凍。
できあがるunetbootin.appを起動すると、次の画面でDiskimageのラジオボタンを選択して、上のisoファイルを指定する。
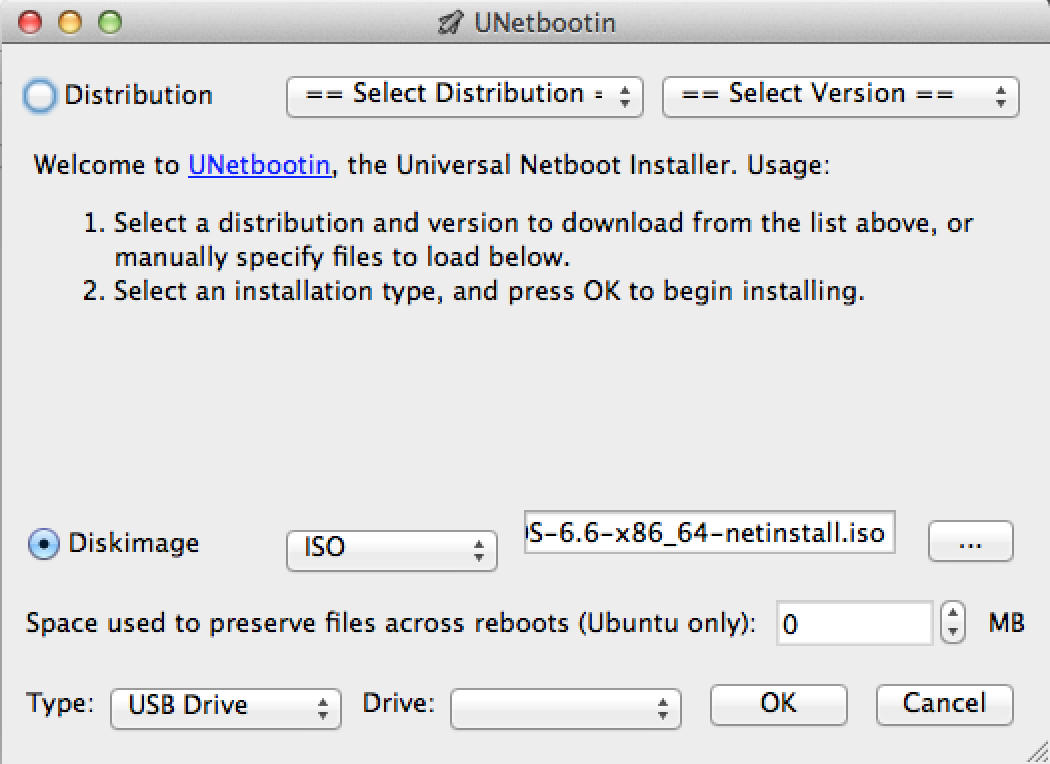
適当に進めるとUSBに必要なものが入る。
USBの中身にこんなのが入っている。
[mochizuki@moch] /Volumes/U
% tree -L 2
.
├── System Volume Information
│   └── IndexerVolumeGuid
├── images
│   ├── TRANS.TBL
│   ├── efiboot.img
│   ├── efidisk.img
│   ├── install.img
│   └── pxeboot
├── isolinux
│   ├── TRANS.TBL
│   ├── boot.cat
│   ├── boot.msg
│   ├── grub.conf
│   ├── initrd.img
│   ├── isolinux.bin
│   ├── isolinux.cfg
│   ├── memtest
│   ├── splash.jpg
│   ├── vesamenu.c32
│   └── vmlinuz
├── ldlinux.sys
├── menu.c32
├── syslinux.cfg
├── ubnfilel.txt
├── ubninit
├── ubnkern
└── ubnpathl.txt
windowsのパソコンにusbを差して起動する。
BIOSの設定のBoot settingで、差したUSBの優先度を一番高くする。
そして、save configuration 的なことをすると、
おお、
「Welcom to CentOS fori386」
まで辿りついた!
Step1: Choose a language
-> English
Step2: Keyboard type
-> us
Step3: Installation Method
あれなんだこれ、
What type of media contains the installation image?
- Local CD/DVD
- Hard drive
- NFS directory
- URL
意味がわからない。けど。URLをチョイス。
きっとネットワークインストールになるのだろう。。
Step4: Configure TCP/IP
よくわからないけど defaultでok!
...waiting
URLの入力を求められるので。
これを入力してみたら、「Unable to retrieve」というエラーで駄目。なんでだ。。
15分捜索の後。
あ。こっちか。。
(いろいろ分かってないのです。。)
これで、無事いけました!
ここからがCentOSのインストールかな。
CentOSの設定画面みたいになりますね。手順をすすめていきます。以下はほとんど英語の勉強ですね。w
1.
What type of devices will your installation involeve?
-> Basic Strorage Devices
2.
At lseast one existing installation has been detected on your system.
What would you like to do?
-> Fresh Installation
3.
Please name this computer.
The hostname identifies the computer on a network.
デフォルトでは
Hostname: localhost.localdomain
となっています。
でこれに対するアプローチは
1。WAN内で使用するならそのままでもおk?localhost部分だけ固有なものに変えておくと良い?
2。ドメイン使うなら、例えば使うドメインがhoge.comなら
web1.hoge.comなどとする。
いったん。
mochtest.localdomain
に変更してやってみる。WAN内での使用を想定しておく。
あとでdomainが必要なったら作り直せばよい。練習練習。つくって壊してを繰り返す。予定。
4.
Please select the nearest city in your time zone:
-> Selected city: Tokyo, Asia
5.
The root account is used for administering the system.
Enter a password for the root user
-> Root Password: ****
-> Confirm* ****
(適当に入力)
いったんrootとかにしておきますね。
すると、
The root password must be at least six characters long.
とおこられるので6文字以上にしまーす。
6.
Which type of installation would you like?
他にも選択肢あるのですが、デフォルトがこれだからこれでいいか。
-> Replace Existing Linux System(s)
さて、次らへんから英語の技量を試される感がある。。楽しい、
僕の英語力はTOEIC300点レベル!というか、最初から日本語選択すれば良いのでは?たしかに。。
7.
Below are the storage devices you've selected to be a part of this installation.
Please indicate using the arrows below which devices you'd like to use as data drives
and which devices you'd like to use as system drives.
Please also indicate which system drive wil have the bootloader installation.
選択肢として
- ATA Hitachi HDP***
- Imation USB Device
とかがあるのですが、とりあえず、
-> ATA ****
を選択して、Bootloaderにも指定して「Next!」とすると、アラートが出る。
Writing storage configuration to disk
The partitioning opetions you have selected will now bie wirtten to disk.
Any data on deleted or reformatted partitions will be lost.
-> Write chages to disk
...ちょっと時間かかりますね。
8.
The default installation of CentOS is a minimum install.
You can optionally select a different set of software now.
やべえ項目いろいろある。
- Desktop
- MInimal Desktop
- Minimal
- Basic Server
- etc.
-> Minimal
をチョイス!!
...しばし時間かかる。3分くらいか。
...
(やった!)
9.
Congratulations, your CentOS installation is complete.
Please reboot to use the installed system.
Note that updates may be available to ensure the proper functioning of your system
and installation of these updates is recommended after the reboot.
-> reboot
再起動的なやつかな。
10. そのまま再起動すると、またUSBをBootしてしまう。。
resumeとかでるから、それかな。。と思ってぽちぽちしていると。。
あ、、、、、やべ、、、、、、、また、USBのやつ読み込んでいる。
11. ちゃんとBoot settingを変更して再起動する。
ということで、いったん、電源消して、また点けて
reboot した後に、
F2とかでsettingでbootのpriorityを切り替えるよ!!
Setup Utilityのbootで
Boot priority order:
1: PCI SCSI: P1-Hitachi ***
とかにする。
そんでsave and exit
またresume
Bootin centOS 6.6 が出た!
なんかいけそうだ。。
いけた。
mochtest login: root
Password: ****
設定したパスワードを入れる。
いけた!!!!!!ありがとうございました!!!
いつも打っている。
pwdとか
lsとか打てる!
さて、ここから何すんだ。。(。・‿・)