どうも。GIBの宮本です。
公式ドキュメントベースで調べました。
chainerにかなり近い構文になってますが、少し違いがある関数もあるので注意が必要です。

facebookやニューヨーク大学が主導してるイメージの深層学習フレームワーク。
chainerからforkされたらしい。torch7もfacebookやニューヨーク大学が主導してるイメージ。
torch7はluaで且つ抽象化があまりされてないので関数がむき出し。
pytorchはかなり抽象化されておりコーディング量が減る。
コミッターさんのブログ
Adam Paszkeさん
http://apaszke.github.io/posts.html
Soumith Chintala
http://soumith.ch/
盛り上がり具合
2017年3月時点。一概にgitのグラフで盛り上がり具合が測れるかはわからないが、気になったので比較。
chainer
 #### pytorch
 #### keras
 #### tensorflow
 #### torch7
 #### caffe
 #### caffe2
 #### theano
 #### deeplearning4j

cntk

さすがにcaffeとかtorch7はもぉあまり更新されてない。意外にcntkが、、
2018/6
cntk,tensorflow,theano,mxnetはほぼkerasにラップされたが、pytorchは高レベルフレームワークなのでラップされない説が高いとフォーラムに書かれていた。
cntkのissueでkerasの作者が「cntkもkerasでラップする?」って書いて,cntkの人が「いいねー」的なノリのコメントを見つけた時は驚いた。
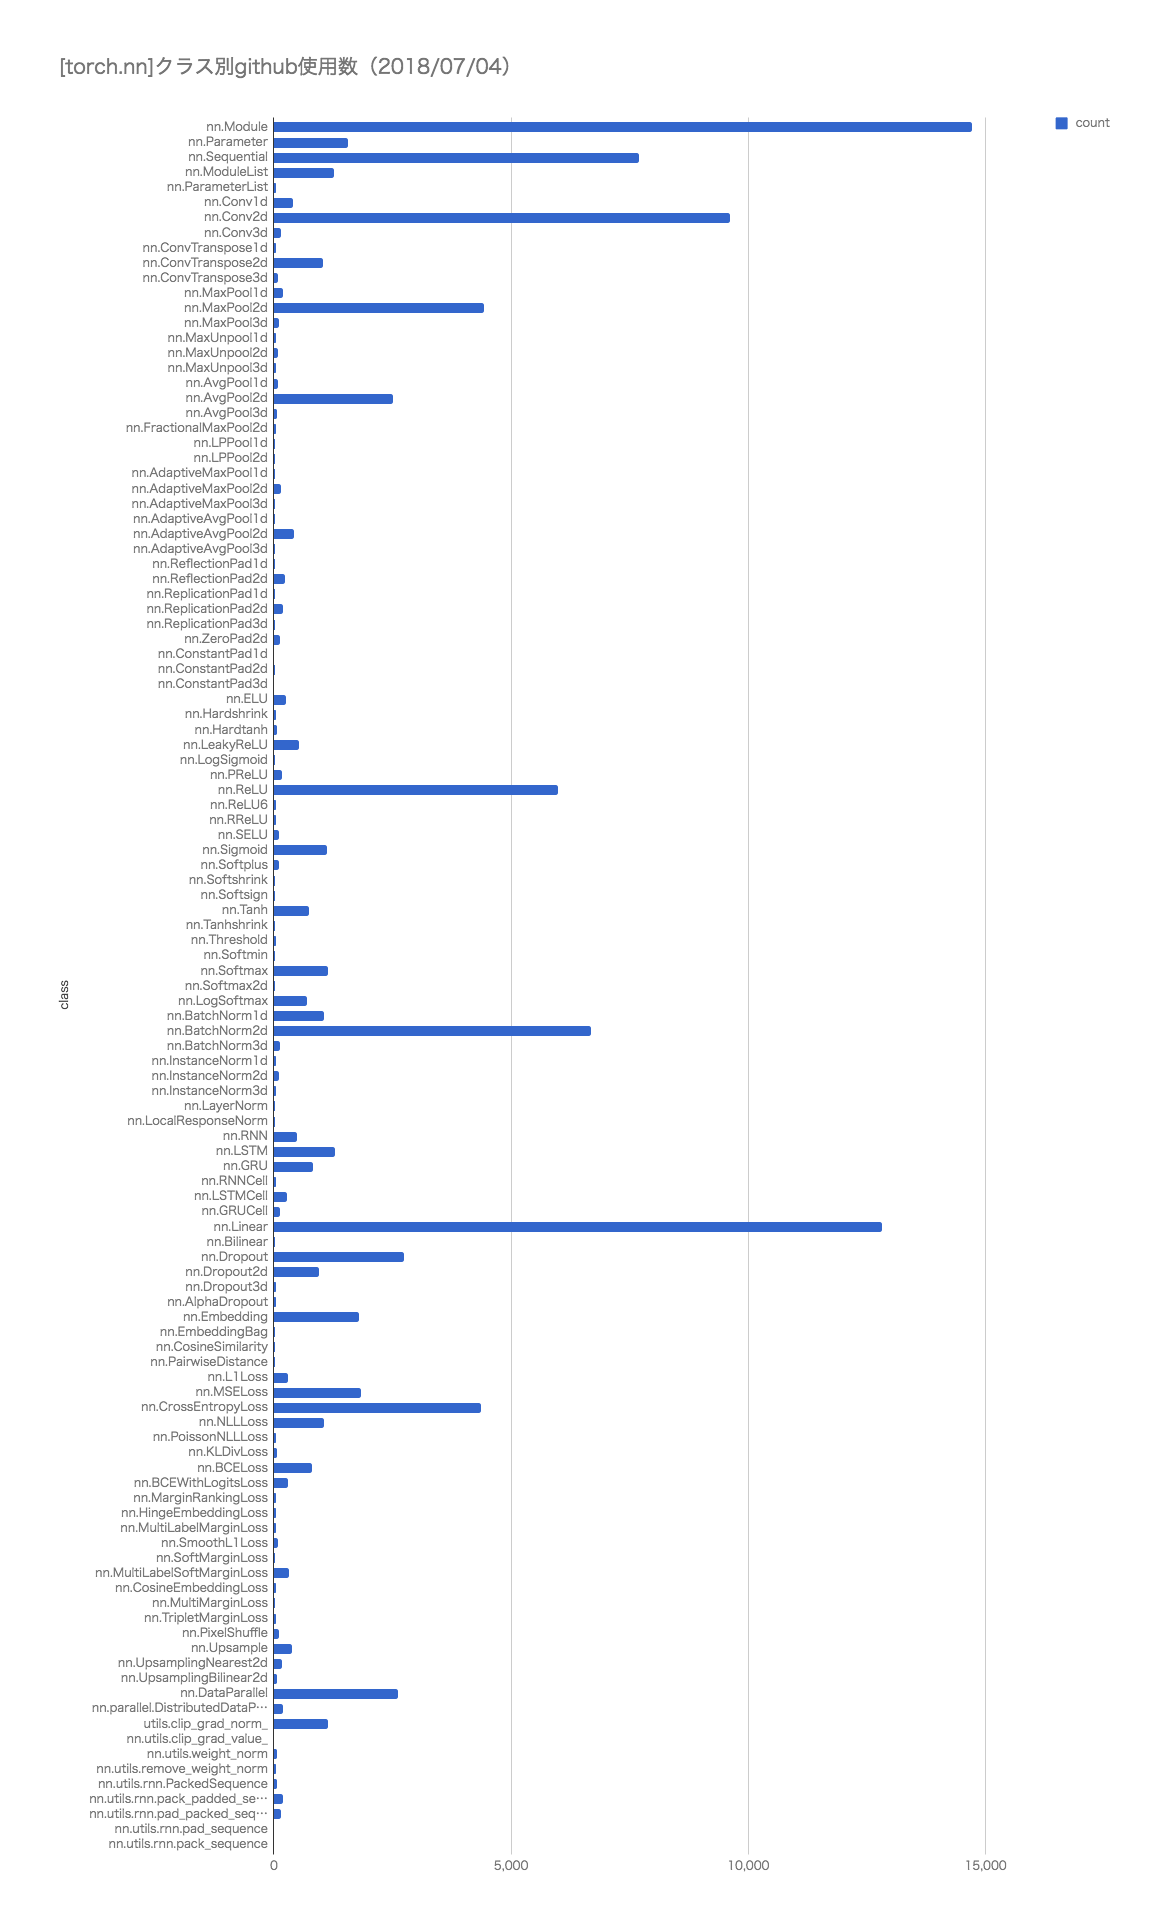
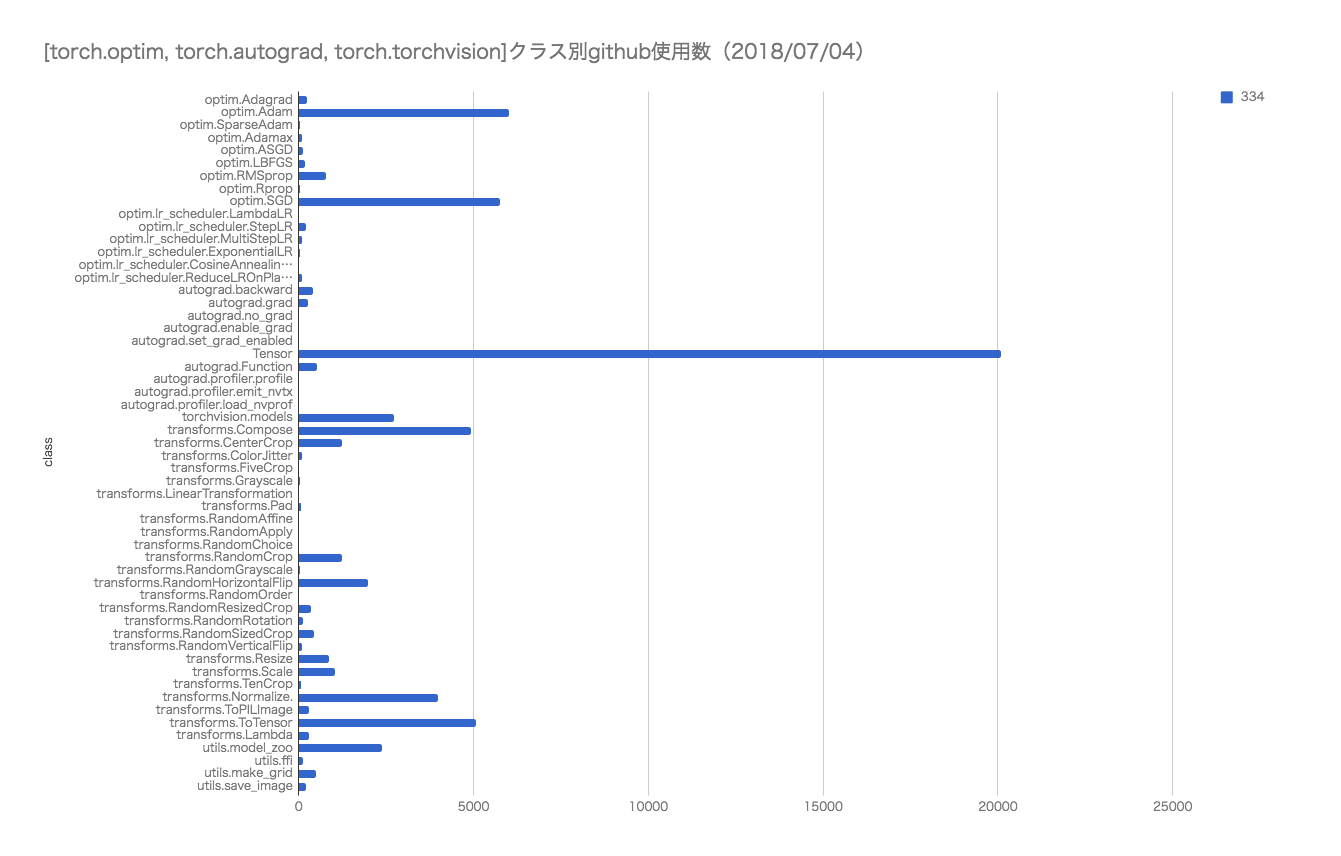
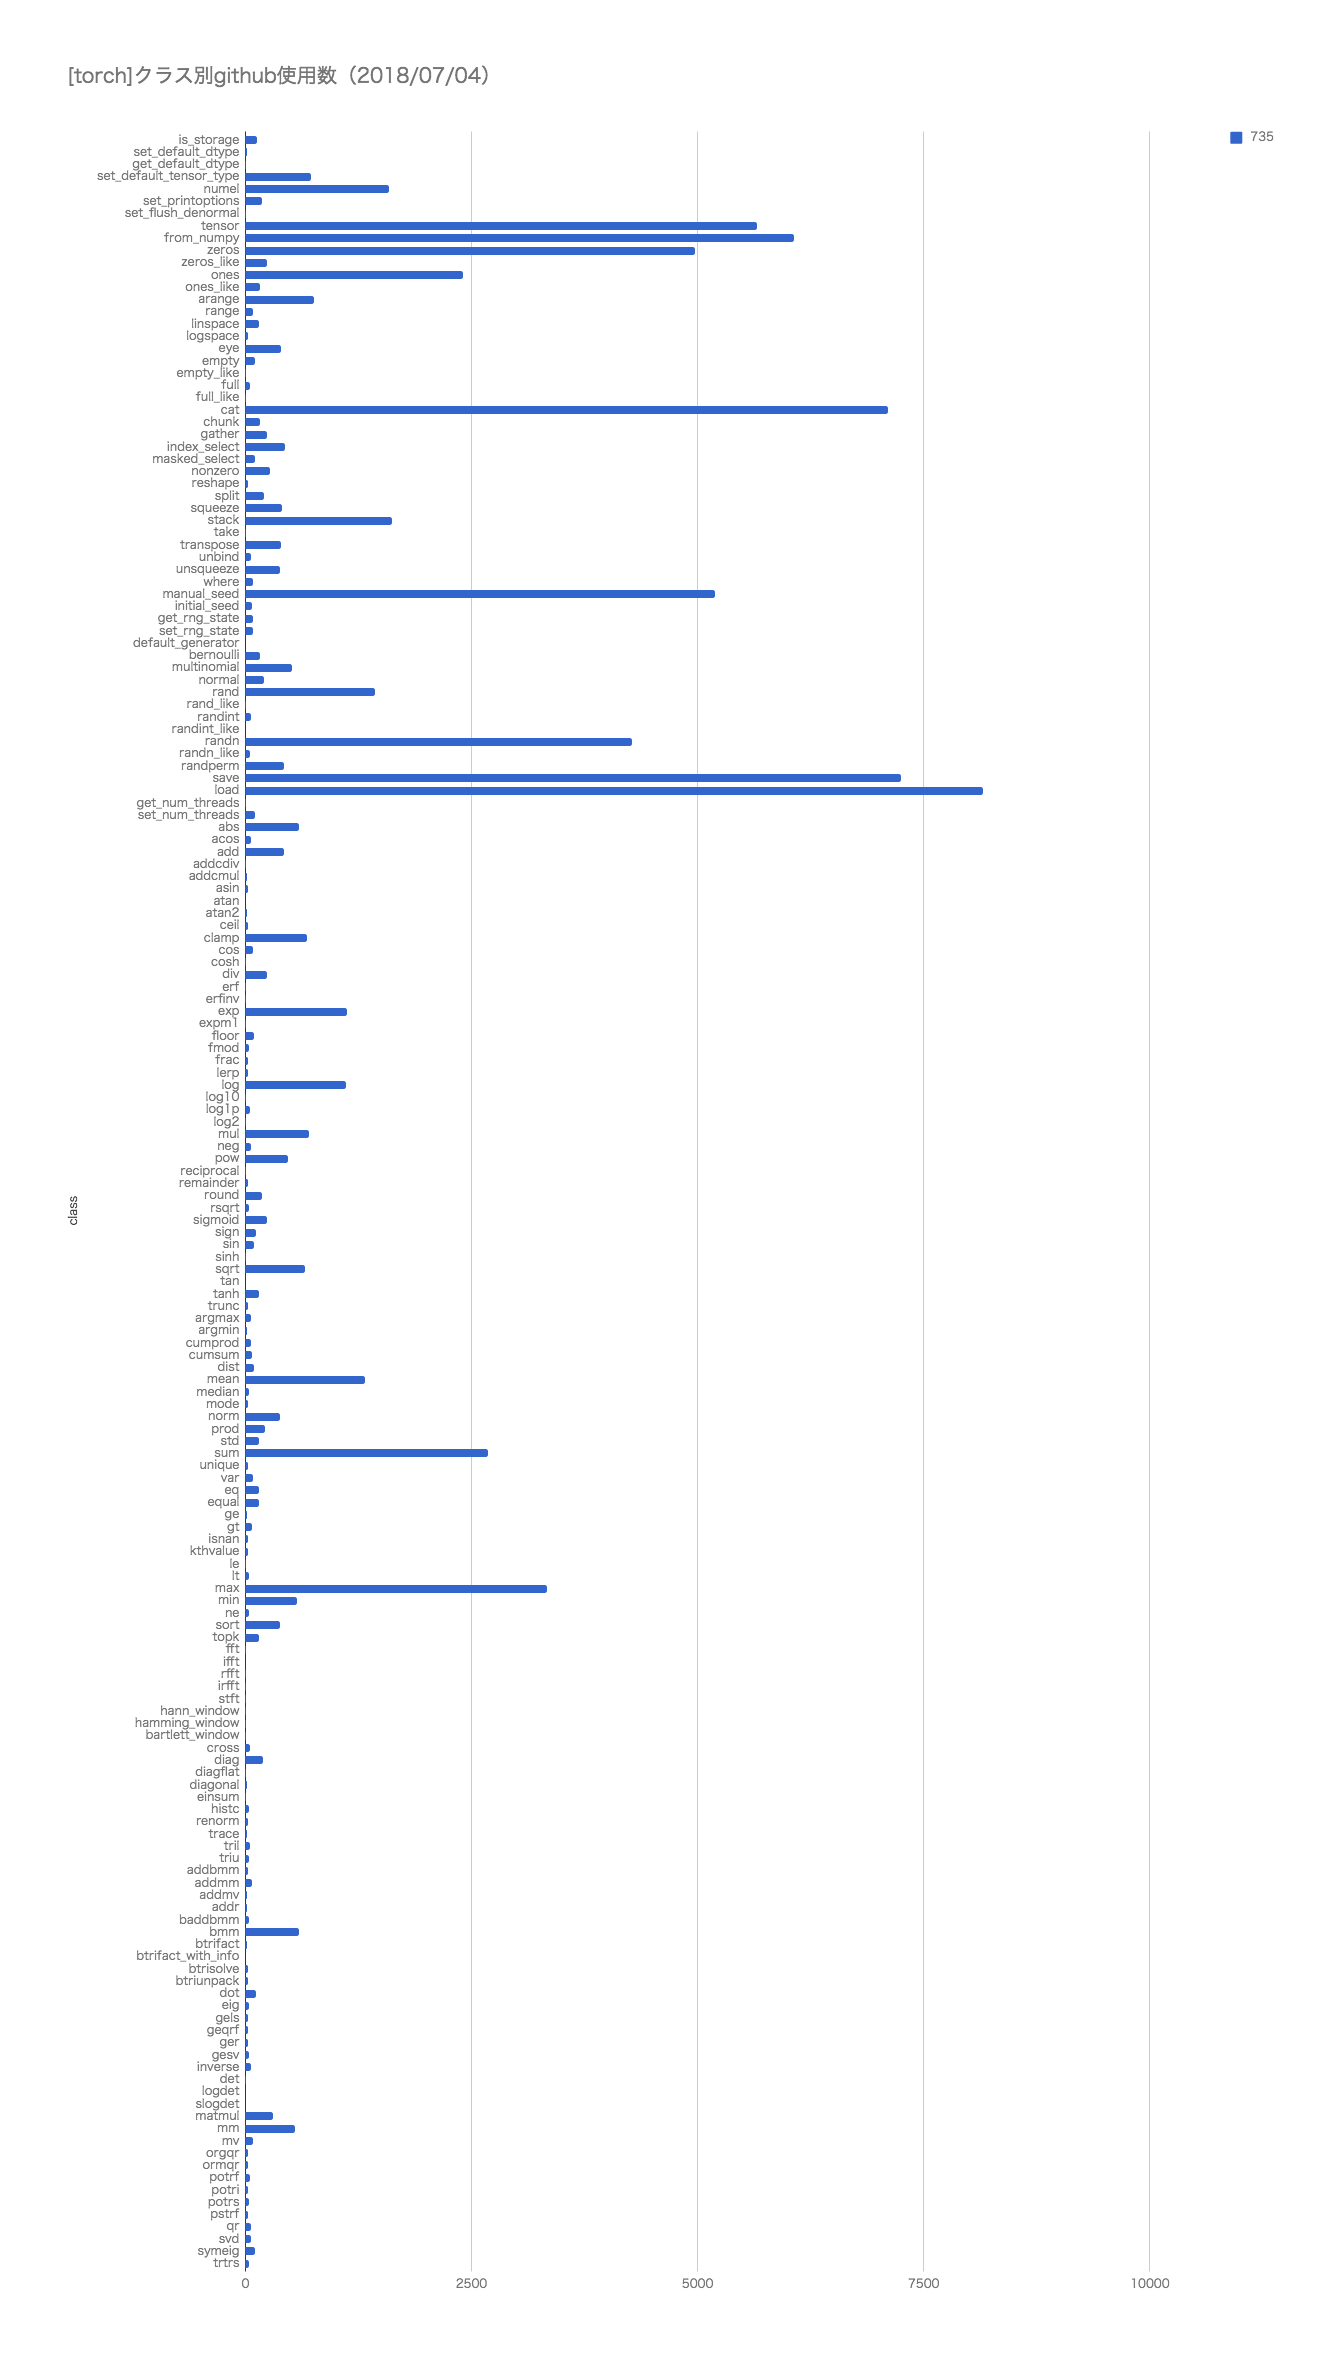
関数の使用頻度
各種APIのgit検索でのヒットした数。
ご参考までに。
インストール
condaが推奨されてる。pipとnumpyを最新にしとこうと言ってる。

2021/1/12
pythonではpipenvが主流になりつつある。condaは商用で有料になったが、pytorchではcondaを推奨してる。
conda install pytorch torchvision -c soumith
conda install -c peterjc123 pytorch
pytorchについて
必要に応じて、numpy、scipy、CythonなどのPythonパッケージを再利用してPyTorchを拡張することができます。
| パッケージ | 説明 |
|---|---|
| torch | NumPyのような強力なGPUサポートを備えたTensorライブラリ |
| torch.autograd | torch内のすべての微分可能なテンソル操作をサポートするテープベースの自動微分ライブラリ |
| torch.nn | 軟性を最大限に高めるように設計された自動微分機能と統合されたニューラルネットワークライブラリ |
| torch.optim | SGD、RMSProp、LBFGS、Adamなどの標準的な最適化手法を使用してtorch.nnとともに使用する最適化パッケージ |
| torch.multiprocessing | Pythonマルチプロセッシングではなく、プロセス全体にわたるトーチ・テンソルの魔法のメモリ共有が可能です。データロードとホグワルドトレーニングに役立ちます。 |
| torch.utils | DataLoader、Trainerおよびその他のユーティリティ関数 |
| torch.legacy(.nn/.optim) | 後方互換性の理由からトーチから移植されたレガシーコード |
よく使う機能
PyTorchではこの辺りの機能をよく使います。後々説明していこうと思います。
requires_grad:勾配計算をするかどうか指定できます。
backward:勾配計算をできます。
nn.Module:これを継承してネットワークのクラスを定義します。
DataSetとDataLoader:データをバッチごとに読み込むのに使用します。
datasets.ImageFolder:画像をフォルダごとに分けて配置しておけば簡単に読み込めます。この後にDataLoaderに入れてバッチごとに分けて処理できます。
transforms:画像データの前処理ができます。
make_grid:画像の表示時にグリッドに並べて表示してくれます。
GPU対応Tensorライブラリ
numpyを使うなら、Tensorsを使います。

PyTorchは、CPUまたはGPUのいずれかに存在するTensorsを提供し、膨大な量の計算を高速化します。
私たちは、スライシング、インデクシング、数学演算、線形代数、リダクションなど、科学計算のニーズを加速し、適合させるために、さまざまなテンソルルーチンを提供しています。
ダイナミックニューラルネットワーク:テープベースの自動微分
PyTorchには、テープレコーダーを使用して再生するニューラルネットワークを構築するユニークな方法があります。
TensorFlow、Theano、Caffe、CNTKなどのほとんどのフレームワークは、
世界を静的に見ています。ニューラルネットワークを構築し、何度も同じ構造を再利用する必要があります。ネットワークの振る舞いを変えるということは、最初から始めなければならないということです。
PyTorchでは、リバースモードの自動微分と呼ばれる手法を使用して、ゼロラグやオーバーヘッドでネットワークが任意に動作する方法を変更できます。私たちのインスピレーションは、このトピックに関するいくつかの研究論文、ならびに autograd, autograd, chainerなどの現在および過去の研究からもたらされます。
chainerからforkされて作られてるので、chainerの主張通りに動的ネットワークになってるという主張。ネットワークを途中で変えれる的な意味かと。

mnistのサンプル
情報が古くなってるかもしれないです。
最新はGitを参照
バージョンを確認。
import torch
print(torch.__version__)
データの取得
train_loader = torch.utils.data.DataLoader(
    datasets.MNIST('../data', train=True, download=True,
                   transform=transforms.Compose([
                       transforms.ToTensor(),
                       transforms.Normalize((0.1307,), (0.3081,))
                   ])),
    batch_size=args.batch_size, shuffle=True, **kwargs)
test_loader = torch.utils.data.DataLoader(
    datasets.MNIST('../data', train=False, transform=transforms.Compose([
                       transforms.ToTensor(),
                       transforms.Normalize((0.1307,), (0.3081,))
                   ])),
    batch_size=args.batch_size, shuffle=True, **kwargs)
モデルの定義
class Net(nn.Module):
    def __init__(self):
        super(Net, self).__init__()
        self.conv1 = nn.Conv2d(1, 10, kernel_size=5)
        self.conv2 = nn.Conv2d(10, 20, kernel_size=5)
        self.conv2_drop = nn.Dropout2d()
        self.fc1 = nn.Linear(320, 50)
        self.fc2 = nn.Linear(50, 10)

    def forward(self, x):
        x = F.relu(F.max_pool2d(self.conv1(x), 2))
        x = F.relu(F.max_pool2d(self.conv2_drop(self.conv2(x)), 2))
        x = x.view(-1, 320)
        x = F.relu(self.fc1(x))
        x = F.dropout(x, training=self.training)
        x = F.relu(self.fc2(x))
        return F.log_softmax(x)
モデル生成、最適化関数設定
model = Net()
if args.cuda:
    model.cuda()

optimizer = optim.SGD(model.parameters(), lr=args.lr, momentum=args.momentum)
学習
def train(epoch):
    model.train()
    for batch_idx, (data, target) in enumerate(train_loader):
        if args.cuda:
            data, target = data.cuda(), target.cuda()
        data, target = Variable(data), Variable(target)
        optimizer.zero_grad()
        output = model(data)
        loss = F.nll_loss(output, target)
        loss.backward()
        optimizer.step()
        if batch_idx % args.log_interval == 0:
            print('Train Epoch: {} [{}/{} ({:.0f}%)]\tLoss: {:.6f}'.format(
                epoch, batch_idx * len(data), len(train_loader.dataset),
                100. * batch_idx / len(train_loader), loss.data[0]))
学習の実行
for epoch in range(1, args.epochs + 1):
    train(epoch)
    test(epoch)
chainerとに過ぎてて、勉強コストがかからない。
PyTorch入門
テンソル
import torch
a = torch.FloatTensor(10, 20)
# creates tensor of size (10 x 20) with uninitialized memory

a = torch.randn(10, 20)
# initializes a tensor randomized with a normal distribution with mean=0, var=1

a.size()
torch.Sizeは実際はタプルなので、同じ操作をサポートしてる。
インプレース/アウトオブプレイス
最後に_をつけると元の変数の内容が変わる。
a.fill_(3.5)
# a has now been filled with the value 3.5

b = a.add(4.0)
# a is still filled with 3.5
# new tensor b is returned with values 3.5 + 4.0 = 7.5
ゼロインデックス
b = a[0,3] # 1行目と4列目
b = a[:,3:5] # 4番目の列と5番目の列
キャメルケース以外で。
すべての関数がcamelCaseではない。たとえば、indexAddはindex_add_。
x = torch.ones(5, 5)
print(x)
z = torch.Tensor(5, 2)
z[:,0] = 10
z[:,1] = 100
print(z)
x.index_add_(1, torch.LongTensor([4,0]), z)
print(x)
numpyブリッジ
トーチテンソルからnumpy配列への変換
a = torch.ones(5)
b = a.numpy()
a.add_(1)
print(a)
print(b)
numpy配列をトーチTensorに変換
import numpy as np
a = np.ones(5)
b = torch.from_numpy(a)
np.add(a, 1, out=a)
print(a)
print(b)
CUDAテンソル
# let us run this cell only if CUDA is available
if torch.cuda.is_available():
    # creates a LongTensor and transfers it
    # to GPU as torch.cuda.LongTensor
    a = torch.LongTensor(10).fill_(3).cuda()
    print(type(a))
    b = a.cpu()
    # transfers it to CPU, back to
    # being a torch.LongTensor
Autograd
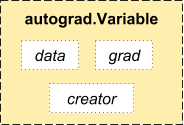
Autogradでは、Variableクラスを導入しています。これは、Tensorラッパーです。

from torch.autograd import Variable
x = Variable(torch.ones(2, 2), requires_grad = True)
x.data
x.grad
y = x + 2
z = y * y * 3
out = z.mean()
out.backward()
nnパッケージ
import torch.nn as nn
状態はモジュール内に保持されず、ネットワークグラフ内に保持される

例1:ConvNet
クラスを作成
import torch.nn.functional as F

class MNISTConvNet(nn.Module):
    def __init__(self):
        super(MNISTConvNet, self).__init__()
        self.conv1 = nn.Conv2d(1, 10, 5)
        self.pool1 = nn.MaxPool2d(2,2)
        self.conv2 = nn.Conv2d(10, 20, 5)
        self.pool2 = nn.MaxPool2d(2, 2)
        self.fc1   = nn.Linear(320, 50)
        self.fc2   = nn.Linear(50, 10)
    def forward(self, input):
        x = self.pool1(F.relu(self.conv1(input)))
        x = self.pool2(F.relu(self.conv2(x)))
        x = x.view(x.size(0), -1)
        x = F.relu(self.fc1(x))
        x = F.relu(self.fc2(x))
        return x
クラスのインスタンスを作成
net = MNISTConvNet()
print(net)
※torch.nnパッケージ全体では、サンプルのミニバッチであり、単一のサンプルではない入力のみがサポートされています。 たとえば、nn.Conv2dはnSamples x nChannels x Height x Widthの4Dテンソルを取ります。
サンプルが1つの場合は、input.unsqueeze(0)を使用して偽のバッチディメンションを追加してください。
input = Variable(torch.randn(1, 1, 28, 28))
out = net(input)
print(out.size())
# define a dummy target label
target = Variable(torch.LongTensor([3]))

# create a loss function
loss_fn = nn.CrossEntropyLoss() # LogSoftmax + ClassNLL Loss
err = loss_fn(out, target)
print(err)
err.backward()
ConvNetの出力は変数です。それを使って損失を計算すると、変数でもあるerrという結果になります。 逆にerrを呼び出すと、ConvNet全体のグラデーションがウェイトに伝播します。
個々のレイヤーの重みとグラデーションにアクセスしましょう。
print(net.conv1.weight.grad.size())
print(net.conv1.weight.data.norm()) # norm of the weight
print(net.conv1.weight.grad.data.norm()) # norm of the gradients
forwardおよびbackwardフック
私たちはウエイトと勾配を調べました。しかし、レイヤーの出力とgrad_outputの検査/修正はどうですか? この目的のためにフックを紹介します。
モジュールまたは変数に関数を登録することができます。
フックは、前方フックまたは後方フックとすることができる。
フォワードフックは、フォワードコールが実行されたときに実行されます。
後方フックは後方フェーズで実行されます。
例を見てみましょう。
# We register a forward hook on conv2 and print some information
def printnorm(self, input, output):
    # input is a tuple of packed inputs
    # output is a Variable. output.data is the Tensor we are interested
    print('Inside ' + self.__class__.__name__ + ' forward')
    print('')
    print('input: ', type(input))
    print('input[0]: ', type(input[0]))
    print('output: ', type(output))
    print('')
    print('input size:', input[0].size())
    print('output size:', output.data.size())
    print('output norm:', output.data.norm())

net.conv2.register_forward_hook(printnorm)

out = net(input)
# We register a backward hook on conv2 and print some information
def printgradnorm(self, grad_input, grad_output):
    print('Inside ' + self.__class__.__name__ + ' backward')
    print('Inside class:' + self.__class__.__name__)
    print('')
    print('grad_input: ', type(grad_input))
    print('grad_input[0]: ', type(grad_input[0]))
    print('grad_output: ', type(grad_output))
    print('grad_output[0]: ', type(grad_output[0]))
    print('')
    print('grad_input size:', grad_input[0].size())
    print('grad_output size:', grad_output[0].size())
    print('grad_input norm:', grad_input[0].data.norm())

net.conv2.register_backward_hook(printgradnorm)

out = net(input)
err = loss_fn(out, target)
err.backward()
例2:リカレントネット
次に、PyTorchで再帰的なネットを構築する方法を見てみましょう。 ネットワークの状態はグラフではなく、レイヤーに保持されているので、単純にnn.Linearを作成し、それを何度も再利用して再帰を行うことができます。
class RNN(nn.Module):

    # you can also accept arguments in your model constructor
    def __init__(self, data_size, hidden_size, output_size):
        super(RNN, self).__init__()

        self.hidden_size = hidden_size
        input_size = data_size + hidden_size

        self.i2h = nn.Linear(input_size, hidden_size)
        self.h2o = nn.Linear(hidden_size, output_size)

    def forward(self, data, last_hidden):
        input = torch.cat((data, last_hidden), 1)
        hidden = self.i2h(input)
        output = self.h2o(hidden)
        return hidden, output

rnn = RNN(50, 20, 10)
loss_fn = nn.MSELoss()

batch_size = 10
TIMESTEPS = 5

# Create some fake data
batch = Variable(torch.randn(batch_size, 50))
hidden = Variable(torch.zeros(batch_size, 20))
target = Variable(torch.zeros(batch_size, 10))

loss = 0
for t in range(TIMESTEPS):
    # yes! you can reuse the same network several times,
    # sum up the losses, and call backward!
    hidden, output = rnn(batch, hidden)
    loss += loss_fn(output, target)
loss.backward()
デフォルトでPyTorchはConvNetsとRecurrent NetsのためのシームレスなCuDNN統合を持っています。
マルチGPUの例
データ並列処理は、サンプルのミニバッチを複数の小さなミニバッチに分割し、各ミニバッチの計算を並列に実行するときです。
データ並列処理は、torch.nn.DataParallelを使用して実装されています。
DataParallelでModuleをラップすることができ、バッチディメンション内の複数のGPUで並列化されます。
データ並列
class DataParallelModel(nn.Module):
    def __init__(self):
        super().__init__()
        self.block1=nn.Linear(10, 20)

        # wrap block2 in DataParallel
        self.block2=nn.Linear(20, 20)
        self.block2 = nn.DataParallel(self.block2)

        self.block3=nn.Linear(20, 20)

    def forward(self, x):
        x = self.block1(x)
        x = self.block2(x)
        x = self.block3(x)
        return x
CPUモードでコードを変更する必要はありません。
データ並列が実装されているプリミティブ
一般に、pytorchのnn.parallelプリミティブは独立して使用できます。 単純なMPIのようなプリミティブを実装しました。
replicate:複数のデバイスにモジュールを複製する
scatter:入力を第1次元に分配する
gather:第1次元の入力を集めて連結する
parallel_apply:すでに分散された入力のセットを、すでに分散されたモデルのセットに適用します。
より明確にするために、ここではこれらの集合を使って構成された関数data_parallel
def data_parallel(module, input, device_ids, output_device=None):
    if not device_ids:
        return module(input)

    if output_device is None:
        output_device = device_ids[0]

    replicas = nn.parallel.replicate(module, device_ids)
    inputs = nn.parallel.scatter(input, device_ids)
    replicas = replicas[:len(inputs)]
    outputs = nn.parallel.parallel_apply(replicas, inputs)
    return nn.parallel.gather(outputs, output_device)
CPU上のモデルの一部とGPU上の一部
その一部がCPU上にあり、GPU上にあるネットワークを実装する小さな例を見てみましょう。
class DistributedModel(nn.Module):
    def __init__(self):
        super().__init__(
            embedding=nn.Embedding(1000, 10),
            rnn=nn.Linear(10, 10).cuda(0),
        )

    def forward(self, x):
        # Compute embedding on CPU
        x = self.embedding(x)

        # Transfer to GPU
        x = x.cuda(0)

        # Compute RNN on GPU
        x = self.rnn(x)
        return x
pytorch例
画像生成系などサンプルコードがある。っていうか全然もっとあった。
ここに書く必要ないくらいいっぱいあったので、使いたい方はgitで検索してください。
世界は広かった。
pix2pix
https://github.com/mrzhu-cool/pix2pix-pytorch
densenet
https://github.com/bamos/densenet.pytorch
animeGAN
https://github.com/jayleicn/animeGAN
yolo2
https://github.com/longcw/yolo2-pytorch
gan
https://github.com/devnag/pytorch-generative-adversarial-networks
生成モデル一覧
https://github.com/wiseodd/generative-models
functional model
https://github.com/szagoruyko/functional-zoo
シンプルなサンプル一覧
https://github.com/pytorch/examples/
PyTorchでの深層学習チュートリアル
torchとtorchvisionパッケージをインストール済みにする。
conda install torchvision -c soumith
or
pip install torchvision
入門
テンソル
テンソルはnumpyのndarrayに似てるが、TensorsをGPUで使用することもできる。
from __future__ import print_function
import torch
x = torch.Tensor(5, 3)  # construct a 5x3 matrix, uninitialized
x = torch.rand(5, 3)  # construct a randomly initialized matrix
x.size()
y = torch.rand(5, 3)
# addition: syntax 1
x + y
Numpyブリッジ
torchテンソルからnumpy配列への変換
a = torch.ones(5)
b = a.numpy()
a.add_(1)
print(a)
print(b) # see how the numpy array changed in value
numpy配列をトーチTensorに変換する
import numpy as np
a = np.ones(5)
b = torch.from_numpy(a)
np.add(a, 1, out=a)
print(a)
print(b) # see how changing the np array changed the torch Tensor automatically
〜書き中〜
torch.Tensorクラス
| データ型 | dtype | CPUテンソル | GPUテンソル |
|---|---|---|---|
| 64ビット浮動小数点 | torch.float64かtorch.double | torch.DoubleTensor | torch.cuda.DoubleTensor |
| 32ビット浮動小数点 | torch.float32かtorch.float | torch.FloatTensor | torch.cuda.FloatTensor |
| 16ビット浮動小数点 | torch.float16かtorch.half | torch.HalfTensor | torch.cuda.HalfTensor |
| 8ビット整数(符号なし) | torch.uint8 | torch.ByteTensor | torch.cuda.ByteTensor |
| 8ビット整数(符号付き) | torch.int8 | torch.CharTensor | torch.cuda.CharTensor |
| 16ビット整数(符号付き) | torch.int16かtorch.short | torch.ShortTensor | torch.cuda.ShortTensor |
| 32ビット整数(符号付き) | torch.int32かtorch.int | torch.IntTensor | torch.cuda.IntTensor |
| 64ビット整数(符号付き) | torch.int64かtorch.long | torch.LongTensor | torch.cuda.LongTensor |
比較のためにtorch7のコードも記載。
torch7
mnistの学習例
https://github.com/torch/demos/blob/master/train-a-digit-classifier/train-on-mnist.lua
モデルの定義
-- define model to train
model = nn.Sequential()
model:add(nn.Reshape(1024))
model:add(nn.Linear(1024,#classes))
model:add(nn.LogSoftMax())
データ取得。モデルを生成。
criterion = nn.ClassNLLCriterion()
trainData = mnist.loadTrainSet(nbTrainingPatches, geometry)
trainData:normalizeGlobal(mean, std)
学習を定義
-- training function
function train(dataset)
   -- epoch tracker
   epoch = epoch or 1

  〜略〜

         gradParameters:zero()

         -- evaluate function for complete mini batch
         local outputs = model:forward(inputs)
         local f = criterion:forward(outputs, targets)

         -- estimate df/dW
         local df_do = criterion:backward(outputs, targets)
         model:backward(inputs, df_do)

        〜略〜
   end
学習を実行
while true do
   -- train/test
   train(trainData)
  〜略〜

end
torchnet
-- load torchnet:
local tnt = require 'torchnet'

-- use GPU or not:
〜略〜

-- function that sets of dataset iterator:
local function getIterator(mode)
〜略〜
end

-- set up logistic regressor:
local net = nn.Sequential():add(nn.Linear(784,10))
local criterion = nn.CrossEntropyCriterion()

-- set up training engine:
local engine = tnt.SGDEngine()
〜略〜
end

-- set up GPU training:
〜略〜

-- train the model:
engine:train{
   network   = net,
   iterator  = getIterator('train'),
   criterion = criterion,
   lr        = 0.2,
   maxepoch  = 5,
}

-- measure test loss and error:
〜略〜
print(string.format('test loss: %2.4f; test error: %2.4f',
   meter:value(), clerr:value{k = 1}))
転移学習(ファインチューニング)
torchとかpytorchで転移学習したい時ってどうすればいいんだろうと思って調べた。
いずれ試したい。
caffemodelからchainerのpkl形式へ
変換
# 読み込むcaffeモデルとpklファイルを保存するパス
loadpath = "bvlc_alexnet.caffemodel"
savepath = "./chainermodels/alexnet.pkl"

from chainer.links.caffe import CaffeFunction
alexnet = CaffeFunction(loadpath)

import _pickle as pickle
pickle.dump(alexnet, open(savepath, 'wb'))
読み込み
if ext == ".caffemodel":
    print('Loading Caffe model file %s...' % args.model, file=sys.stderr)
    func = caffe.CaffeFunction(args.model)
    print('Loaded', file=sys.stderr)
elif ext == ".pkl":
    print('Loading Caffe model file %s...' % args.model, file=sys.stderr)
    func = pickle.load(open(args.model, 'rb'))
    print('Loaded', file=sys.stderr)
def predict(x):
        y, = func(inputs={'data': x}, outputs=['fc8'], train=False)
        return F.softmax(y)
kerasをpkl形式へ
keras modelの保存
hogehoge_model.save_weights('model.h5', overwrite=True)
keras modelの読み込み
hogehoge_model.load_weights('model.h5')
pklで保存
import _pickle as pickle
pickle.dump(hogehoge_model, open('model.pkl', 'wb'))
pklを読み込み
hogehoge_model = pickle.load(open('model.pkl', 'rb'))
caffemodelからtensorflowの形式へ
def convert(def_path, caffemodel_path, data_output_path, code_output_path, phase):
    try:
        transformer = TensorFlowTransformer(def_path, caffemodel_path, phase=phase)
        print_stderr('Converting data...')
        if caffemodel_path is not None:
            data = transformer.transform_data()
            print_stderr('Saving data...')
            with open(data_output_path, 'wb') as data_out:
                np.save(data_out, data)
        if code_output_path:
            print_stderr('Saving source...')
            with open(code_output_path, 'wb') as src_out:
                src_out.write(transformer.transform_source())
        print_stderr('Done.')
    except KaffeError as err:
        fatal_error('Error encountered: {}'.format(err))
tensorflowからtorch7かpytorch形式へ
python3 inceptionv4/tensorflow_dump.py

th inceptionv4/torch_load.lua
or
python3 inceptionv4/pytorch_load.py
torch-hdf5
https://github.com/deepmind/torch-hdf5
このパッケージを使用すると、TorchデータをHDF5ファイルとの間で読み書きすることができます。フォーマットは高速で柔軟性があり、MATLAB、Python、およびRを含む幅広い他のソフトウェアによってサポートされています。
動かし方
https://github.com/deepmind/torch-hdf5/blob/master/doc/usage.md
ubuntu14以上の場合
sudo apt-get install libhdf5-serial-dev hdf5-tools
git clone https://github.com/deepmind/torch-hdf5
cd torch-hdf5
luarocks make hdf5-0-0.rockspec LIBHDF5_LIBDIR="/usr/lib/x86_64-linux-gnu/"
ベンチマークを取るコードを少し変えて動かした。
require 'hdf5'

print("Size\t\t", "torch.save\t\t", "hdf5\t")
n = 1
local size = math.pow(2, n)
local data = torch.rand(size)
local t = torch.tic()
torch.save("out.t7", data)
local normalTime = torch.toc(t)
t = torch.tic()
local hdf5file = hdf5.open("out.h5", 'w')
hdf5file["foo"] = data
hdf5file:close()
local hdf5time = torch.toc(t)
print(n, "\t", normalTime,"\t", hdf5time)
テスト自動化
pytorch用のjenkins
https://github.com/pytorch/builder
QA
複数gpuある場合に使うgpuを指定したい
cuda()にcuda(2)とかやってみるとか、torch.nn.DataParallelで指定するとか
色々やったのだけど結局これに落ち着いた。ちなみにこれはGPU共有なので、tensorflowなど他のライブラリでも同じ挙動。tensorflowなど勝手に他のGPUメモリを占有するのでGPUをmaskするイメージ。
CUDA_VISIBLE_DEVICES=2 python main.py
http://www.acceleware.com/blog/cudavisibledevices-masking-gpus
http://qiita.com/kikusumk3/items/907565559739376076b9
http://qiita.com/ballforest/items/3f21bcf34cba8f048f1e
8gpu以上場合はクラスタ化しないとダメらしい。
http://qiita.com/YusukeSuzuki@github/items/aa5fcc4b4d06c116c3e8


