はじめに
以前、UbuntuServerについて同じような記事を書きましたが、macOSでも簡単だったので同じく手順を整理します。
[Ubuntu Server版]
http://qiita.com/mix_dvd/items/29dfb8d47a596b4df36d
Gitのインストール
バージョンを確認。
$ git --version
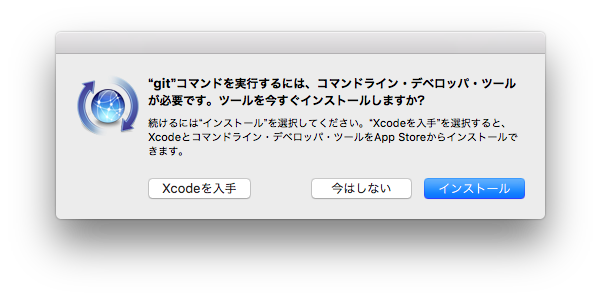
Gitがインストールされていない場合は、以下のようにインストールを求める画面が表示されるので、「インストール」を選択。
インストールされていればmacOS Sierraの場合、以下のとおり表示されます。
git version 2.8.4 (Apple Git-73)
pyenvのインストール
pyenvは複数バージョンのPythonを一つの環境にインストールするためのツールです。
$ git clone https://github.com/yyuu/pyenv.git ~/.pyenv
$ echo 'export PYENV_ROOT="$HOME/.pyenv"' >> ~/.bashrc
$ echo 'export PATH="$PYENV_ROOT/bin:$PATH"' >> ~/.bashrc
$ echo 'eval "$(pyenv init -)"' >> ~/.bashrc
$ exit
ターミナルを再起動し、バージョンを確認。
$ pyenv -v
pyenv 20160629-19-ga761ff6
※ もし、pyenvが動作しない場合、ホームディレクトリに「.bash_profile」というファイルを作ってターミナル起動時に「.bashrc」が読み込まれるようにします。
$ vi .bash_profile
エディタが起動したら「i」キーを押して以下のコードをコピペし、「esc」キーを押して「:wq」と入力して「enter」キーを押すとファイルを保存してエディタが終了します。
if [ -f ~/.bashrc ] ; then
. ~/.bashrc
fi
Anacondaのインストール
バージョン確認
インストールできるAnacondaのバージョンを確認。
$ pyenv install -l | grep anaconda
2016/7/16現在、最新版は4.1.0でした。
Pythonはバージョン2.x系とバージョン3.x系で異なるところが多いため、お使いの環境にあわせて、以下のいずれかをお選びください。特に指定がなければ、3.x系を選んで良いと思います。
Python 2系
$ pyenv install anaconda2-4.1.0
$ pyenv rehash
$ pyenv global anaconda2-4.1.0
$ echo 'export PATH="$PYENV_ROOT/versions/anaconda2-4.1.0/bin/:$PATH"' >> ~/.bashrc
$ exit
Python 3系
$ pyenv install anaconda3-4.1.0
$ pyenv rehash
$ pyenv global anaconda3-4.1.0
$ echo 'export PATH="$PYENV_ROOT/versions/anaconda3-4.1.0/bin/:$PATH"' >> ~/.bashrc
$ exit
ターミナルを再起動し、Pythonのバージョンを確認。
$ python -V
Python 3.5.1 :: Anaconda 4.1.0 (x86_64)
Seabornのインストール
本家サイト https://web.stanford.edu/~mwaskom/software/seaborn/
$ pip install seaborn
XGBoostのインストール
本家サイト https://xgboost.readthedocs.io/
参考URL https://xgboost.readthedocs.io/en/latest/build.html#python-package-installation
Mac用のインストール手順
https://github.com/dmlc/xgboost/blob/master/doc/build.md#building-on-osx
Xcodeがインストールされていない場合は、Xcodeをインストール。
Xcodeのインストール後、以下のコマンドを実行。
$ git clone --recursive https://github.com/dmlc/xgboost
$ cd xgboost
$ cp make/minimum.mk ./config.mk
$ make -j4
$ cd python-package
$ python setup.py install
matplotlibの日本語環境設定
以下のサイトから4書体パック(Ver.003.03)のフォントファイル「IPAfont00303.zip(19.1 MB)」をダウンロード。
ダウンロード後、以下のコマンドを実行。
$ cd Download
$ unzip IPAfont00303.zip
$ mv IPAfont00303/*.ttf ~/.pyenv/versions/anaconda3-4.1.0/lib/python3.5/site-packages/matplotlib/mpl-data/fonts/ttf/
$ rm ~/.matplotlib/fontList.*.cache
Jupyter Notebook
本家サイト http://jupyter.org
初期ユーザーのホームディレクトリで以下のコマンドを実行。
$ jupyter notebook
自動的にデフォルトのブラウザが起動し、Jupyterの画面が表示されるはずです。
ただし、ホームディレクトリで起動すると色々と余計なものも見えてしまうし、誤操作の危険があるので、作業用のディレクトリを作って使うことをお勧めします。
$ mkdir notebook
$ cd notebook
$ jupiter notebook
以上、おつかれさまでした。
