はじめに
OpenCVやTensorFlowの使い方がそこそこわかってきたので、何かわかりやすいものを作ってみようかなと思っていたら、カメラの画像を取り込んでリアルタイムにエフェクトをかけるサンプルがあったので、これを参考にして顔画像から誰かを学習して、リアルタイムに顔から人を識別して画面に表示することを試してみました。
環境
- MacBook Air (13-inch, Early 2015)
- macOS Sierra 10.12.6
- Python 3.6.0 :: Anaconda 4.3.1 (x86_64)
- OpenCV 3.3.0-rc
- TensorFlow 1.1.0
環境構築の手順は以下を参照。
データ収集
OpenCVのフォルダから「haarcascade_frontalface_alt2.xml」をコピーし、同じフォルダに以下のスクリプトを作成。
get_faces.py
import os
import sys
import time
from datetime import datetime as dt
import cv2

name = sys.argv[-1]
print(name)

cascade_file = "haarcascade_frontalface_alt2.xml"
cascade = cv2.CascadeClassifier(cascade_file)

cnt_max = 21
cnt_face = 0
faces = []

# カメラ取り込み開始
DEVICE_ID = 0
cap = cv2.VideoCapture(DEVICE_ID)

# 初期フレームの取得
time.sleep(1)
end_flag, c_frame = cap.read()
height, width, channels = c_frame.shape

while cnt_face < cnt_max:

    img = c_frame

    img_gray = cv2.cvtColor(img, cv2.COLOR_BGR2GRAY)
    face_list = cascade.detectMultiScale(img_gray, minSize=(100, 100))

    for (pos_x, pos_y, w, h) in face_list:

        # 顔の切出
        img_face = img[pos_y:pos_y+h, pos_x:pos_x+w]
        # 画像サイズ変更
        img_face = cv2.resize(img_face, (100, 100))
        faces.append(img_face)

    if len(face_list) > 0:
        cnt_face += 1
        print("\r", cnt_face, end="")

    time.sleep(1)
    end_flag, c_frame = cap.read()

cap.release()

print(len(faces))

num = 0
tdatetime = dt.now()
tstr = tdatetime.strftime('%Y%m%d%H%M')

# 学習データ
path = '{}/faces/train/{}'.format(os.getcwd(), name)
print("学習データ", path)
os.makedirs(path)

for face in faces[:-1]:
    filename = '{}-{}.jpg'.format(tstr, num)
    print("\t", filename)
    cv2.imwrite('{}/{}'.format(path, filename), face)
    num += 1

# テストデータ
path = '{}/faces/test/{}'.format(os.getcwd(), name)
print("テストデータ", path)
os.makedirs(path)

face = faces[-1]
filename = '{}-{}.jpg'.format(tstr, num)
print("\t", filename)
cv2.imwrite('{}/{}'.format(path, filename), face)
識別したい人別に以下のコマンドでデータ収集。
$ python get_faces.py [name of person]
学習
上記と同じフォルダに以下のスクリプトを作成。
train.py
import os
import random
import cv2
import numpy as np
import tensorflow as tf

import matplotlib.pyplot as plt

path = "./faces/train"
dirs = os.listdir(path)
dirs = [f for f in dirs if os.path.isdir(os.path.join(path, f))]

label_dict = {}
i = 0

for dirname in dirs:
    label_dict[dirname] = i
    i += 1

def load_data(data_type):

    filenames, images, labels = [], [], []

    walk = filter(lambda _: not len(_[1]) and data_type in _[0], os.walk('faces'))

    for root, dirs, files in walk:
        filenames += ['{}/{}'.format(root, _) for _ in files if not _.startswith('.')]

    # Shuffle files
    random.shuffle(filenames)

    # Read, resize, and reshape images
    images = []
    for file in filenames:
        img = cv2.imread(file)
        img = cv2.resize(img, (32,32))
        images.append(img.flatten().astype(np.float32) / 255.0)
    images = np.asarray(images)

    for filename in filenames:
        label = np.zeros(len(label_dict))
        for k, v in label_dict.items():
            if k in filename:
                label[v] = 1.
        labels.append(label)

    return images, labels

def get_batch_list(l, batch_size):
    # [1, 2, 3, 4, 5,...] -> [[1, 2, 3], [4, 5,..]]
    return [np.asarray(l[_:_+batch_size]) for _ in range(0, len(l), batch_size)]

def weight_variable(shape):
    initial = tf.truncated_normal(shape, stddev=0.1)
    return tf.Variable(initial)

def bias_variable(shape):
    initial = tf.constant(0.1, shape=shape)
    return tf.Variable(initial)

def conv2d(x, W):
    return tf.nn.conv2d(x, W, strides=[1, 1, 1, 1], padding='SAME')

def max_pool_2x2(x):
    return tf.nn.max_pool(x, ksize=[1, 2, 2, 1], strides=[1, 2, 2, 1], padding='SAME')

def inference(images_placeholder, keep_prob):

    x_image = tf.reshape(images_placeholder, [-1, 32, 32, 3])

    # Convolution layer
    W_conv1 = weight_variable([5, 5, 3, 32])
    b_conv1 = bias_variable([32])
    h_conv1 = tf.nn.relu(conv2d(x_image, W_conv1) + b_conv1)

    # Pooling layer
    h_pool1 = max_pool_2x2(h_conv1)

    # Convolution layer
    W_conv2 = weight_variable([5, 5, 32, 64])
    b_conv2 = bias_variable([64])
    h_conv2 = tf.nn.relu(conv2d(h_pool1, W_conv2) + b_conv2)

    # Pooling layer
    h_pool2 = max_pool_2x2(h_conv2)

    # Full connected layer
    W_fc1 = weight_variable([8 * 8 * 64, 1024])
    b_fc1 = bias_variable([1024])
    h_pool2_flat = tf.reshape(h_pool2, [-1, 8 * 8 * 64])
    h_fc1 = tf.nn.relu(tf.matmul(h_pool2_flat, W_fc1) + b_fc1)

    # Dropout
    h_fc1_drop = tf.nn.dropout(h_fc1, keep_prob)

    # Full connected layer
    W_fc2 = weight_variable([1024, len(label_dict)])
    b_fc2 = bias_variable([len(label_dict)])

    return tf.nn.softmax(tf.matmul(h_fc1_drop, W_fc2) + b_fc2)

# データ読込
train_images, train_labels = load_data('train')
test_images, test_labels = load_data('test')

print("train_images", len(train_images))
print("test_images", len(test_images))

#
x = tf.placeholder('float', shape=[None, 32 * 32 * 3])  # 32 * 32, 3 channels
y_ = tf.placeholder('float', shape=[None, len(label_dict)]) # label_dict size
keep_prob = tf.placeholder('float')
y_conv = inference(x, keep_prob)

# Loss function
cross_entropy = -tf.reduce_sum(y_ * tf.log(y_conv))
tf.summary.scalar('cross_entropy', cross_entropy)

# Minimize cross entropy by using SGD
train_step = tf.train.AdamOptimizer(1e-4).minimize(cross_entropy)

# Accuracy
correct_prediction = tf.equal(tf.argmax(y_conv, 1), tf.argmax(y_, 1))
accuracy = tf.reduce_mean(tf.cast(correct_prediction, 'float'))

saver = tf.train.Saver()
sess = tf.InteractiveSession()
sess.run(tf.global_variables_initializer())

# Batch
batch_size = 20
batched_train_images = get_batch_list(train_images, batch_size)
batched_train_labels = get_batch_list(train_labels, batch_size)
print(len(batched_train_labels))

train_labels, test_labels = np.asarray(train_labels), np.asarray(test_labels)

cnt = 0

accuracys = []

# Train
for i in range(15):

    for step, (images, labels) in enumerate(zip(batched_train_images, batched_train_labels)):
        sess.run(train_step, feed_dict={ x: images, y_: labels, keep_prob: 0.5 })
        train_accuracy = accuracy.eval(feed_dict = {
            x: train_images, y_: train_labels, keep_prob: 1.0 })
        accuracys.append(train_accuracy)
        cnt += 1

        print('step {}, training accuracy {}'.format(cnt, train_accuracy))

# Test trained model
test_accuracy = accuracy.eval(feed_dict = {
    x: test_images, y_: test_labels, keep_prob: 1.0 })
print('test accuracy {}'.format(test_accuracy))

# Save model
save_path = saver.save(sess, "model_face/model.ckpt")

sess.close()

plt.plot(accuracys)
plt.show()
以下のコマンドで実行。
$ mkdir model_face
$ python train.py
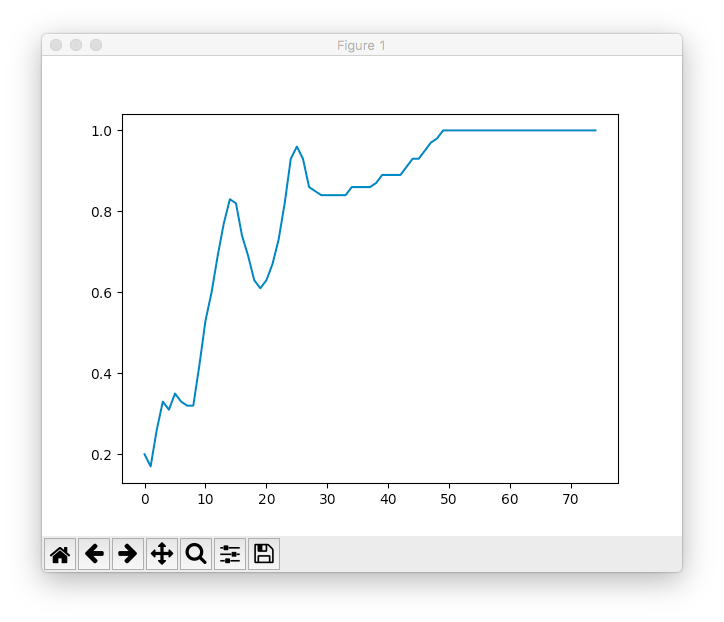
学習結果が以下のようにグラフで表示されます。
識別
上記と同じフォルダに以下のスクリプトを作成。
detect.py
import os
import random
import cv2
import numpy as np
import tensorflow as tf

path = "./faces/train"
dirs = os.listdir(path)
dirs = [f for f in dirs if os.path.isdir(os.path.join(path, f))]

label_dict = {}
i = 0

for dirname in dirs:
    label_dict[dirname] = i
    i += 1

names = dirs

def get_batch_list(l, batch_size):
    # [1, 2, 3, 4, 5,...] -> [[1, 2, 3], [4, 5,..]]
    return [np.asarray(l[_:_+batch_size]) for _ in range(0, len(l), batch_size)]

def weight_variable(shape):
    initial = tf.truncated_normal(shape, stddev=0.1)
    return tf.Variable(initial)

def bias_variable(shape):
    initial = tf.constant(0.1, shape=shape)
    return tf.Variable(initial)

def conv2d(x, W):
    return tf.nn.conv2d(x, W, strides=[1, 1, 1, 1], padding='SAME')

def max_pool_2x2(x):
    return tf.nn.max_pool(x, ksize=[1, 2, 2, 1], strides=[1, 2, 2, 1], padding='SAME')

def inference(images_placeholder, keep_prob):

    x_image = tf.reshape(images_placeholder, [-1, 32, 32, 3])

    # Convolution layer
    W_conv1 = weight_variable([5, 5, 3, 32])
    b_conv1 = bias_variable([32])
    h_conv1 = tf.nn.relu(conv2d(x_image, W_conv1) + b_conv1)

    # Pooling layer
    h_pool1 = max_pool_2x2(h_conv1)

    # Convolution layer
    W_conv2 = weight_variable([5, 5, 32, 64])
    b_conv2 = bias_variable([64])
    h_conv2 = tf.nn.relu(conv2d(h_pool1, W_conv2) + b_conv2)

    # Pooling layer
    h_pool2 = max_pool_2x2(h_conv2)

    # Full connected layer
    W_fc1 = weight_variable([8 * 8 * 64, 1024])
    b_fc1 = bias_variable([1024])
    h_pool2_flat = tf.reshape(h_pool2, [-1, 8 * 8 * 64])
    h_fc1 = tf.nn.relu(tf.matmul(h_pool2_flat, W_fc1) + b_fc1)

    # Dropout
    h_fc1_drop = tf.nn.dropout(h_fc1, keep_prob)

    # Full connected layer
    W_fc2 = weight_variable([1024, len(label_dict)])
    b_fc2 = bias_variable([len(label_dict)])

    return tf.nn.softmax(tf.matmul(h_fc1_drop, W_fc2) + b_fc2)

# cv2.cv.CV_FOURCC
def cv_fourcc(c1, c2, c3, c4):
    return (ord(c1) & 255) + ((ord(c2) & 255) << 8) + \
        ((ord(c3) & 255) << 16) + ((ord(c4) & 255) << 24)

if __name__ == '__main__':

    # 定数定義
    ESC_KEY = 27     # Escキー
    INTERVAL= 33     # 待ち時間
    FRAME_RATE = 30  # fps

    WINDOW_NAME = "detect"
    #FILE_NAME = "detect.avi"

    DEVICE_ID = 0

    # 分類器の指定
    cascade_file = "haarcascade_frontalface_alt2.xml"
    cascade = cv2.CascadeClassifier(cascade_file)

    # カメラ映像取得
    cap = cv2.VideoCapture(DEVICE_ID)

    end_flag, c_frame = cap.read()
    height, width, channels = c_frame.shape

    # 保存ビデオファイルの準備
    #rec = cv2.VideoWriter(FILE_NAME, cv_fourcc('X', 'V', 'I', 'D'), FRAME_RATE, (width, height), True)

    # ウィンドウの準備
    cv2.namedWindow(WINDOW_NAME)

    font = cv2.FONT_HERSHEY_PLAIN
    font_size = 1.5

    print("setup tensorflow")
    x = tf.placeholder('float', shape=[None, 32 * 32 * 3])  # 32 * 32, 3 channels
    keep_prob = tf.placeholder('float')
    y_conv = inference(x, keep_prob)
    sess = tf.InteractiveSession()
    sess.run(tf.global_variables_initializer())

    print("loading model data")
    tf.train.Saver().restore(sess, "model_face/model.ckpt")

    # 変換処理ループ
    while end_flag == True:

        img = c_frame

        img_gray = cv2.cvtColor(img, cv2.COLOR_BGR2GRAY)
        #img_gray = img
        face_list = cascade.detectMultiScale(img_gray, minSize=(150, 150))

        for (pos_x, pos_y, w, h) in face_list:

            img_face = img[pos_y:pos_y+h, pos_x:pos_x+w]

            img_face = cv2.resize(img_face, (32, 32))

            test_images = []
            test_images.append(img_face.flatten().astype(np.float32) / 255.0)
            test_images = np.asarray(test_images)

            results = y_conv.eval(feed_dict={ x: test_images, keep_prob: 1.0 })
            text = names[np.argmax(results[0])]

            color = (0, 0, 225)
            pen_w = 2
            cv2.putText(img,text,(pos_x,pos_y - 10),font,font_size,(255,255,0))
            cv2.rectangle(img, (pos_x, pos_y), (pos_x+w, pos_y+h), color, thickness = pen_w)

        # フレーム表示
        cv2.imshow(WINDOW_NAME, img)

        # フレーム書き込み
        #rec.write(img)

        # Escキーで終了
        key = cv2.waitKey(INTERVAL)
        if key == ESC_KEY:
            break

        # 次のフレーム読み込み
        end_flag, c_frame = cap.read()

    # 終了処理
    sess.close()

    cv2.destroyAllWindows()

    cap.release()
    #rec.release()
以下のコマンドで実行。
$ python detect.py
こうなります。
TensorFlowを使って、こんなことできるようになった(^-^) pic.twitter.com/OKkLPlF9Z8
— Shinobu Kimura (@mix_dvd) 2017年7月31日
できた!
ちなみに、複数の人を同時に識別しますよ(^-^)