はじめに
本記事はXcode初心者向けです。
Xcodeは素晴らしいIDEであり、使いこなせば開発スピードをどんどん上げることができます。
例えば、
- ショートカットを使いこなす
- nibファイルを利用してコード量を減らす
- Code Snippetを使いこなす
- 便利なプラグインを入れる
などありますが、今回はFile Templatesの話をしたいと思います。
[参考にしたページ]
http://qiita.com/shu223/items/5d8a245e5743f77df9eb
http://www.slideshare.net/kaniza1/xcode-cocoa-20120324?related=1
※本記事は弊社エンジニア@kgmyshinの 【Android】もっと先へ「加速」したくはないか、少年 〜File Template編〜を見てiOS向けにXcodeのFile Templateについて書こうと思って書いたものです。
Android開発もしている方は合わせてご覧下さい。
File Templatesとは
開発をしていると、同じようなコードを毎回書くことがあると思います。
毎回書くのが面倒だなと思ったとき、その解決法として自動化するということがあります。
File Templatesはその名前の通り、新しいファイルを作成する際に利用するテンプレートです。
これを利用することでファイル作成時の手間を省き、開発スピードをはやくすることができます。
1. File Templatesの置き場所について
既存の(iPhone用の)Templatesは、
/Applications/Xcode.app/Contents/Developer/Platforms/iPhoneOS.platform/Developer/Library/Xcode/Templates/File Templates/
以下にあります。
一方、自作する場合は、
~/Library/Developer/Xcode/Templates/File Templates/
以下に保存します。こちらのディレクトリがない方は作成しておきましょう。
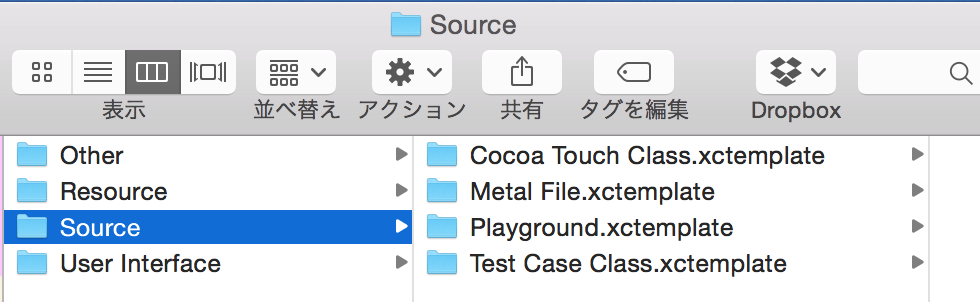
2. File Templatesの構成
既存のFile Templatesディレクトリをみると、以下のようになっています。
このディレクトリの構造が分類になっており、XXX.xctemplate以下に各テンプレートの情報が格納されています。
XXX.xctemplateは主に以下の要素からなります。
TemplateInfo.plistにテンプレートに関わる様々な情報を記入し、実際のテンプレートファイルが.hと.mのファイルです。
XXX.xctemplate
├── TemplateInfo.plist
├── TemplateIcon.png
├── ___FILEBASENAME___.h
└── ___FILEBASENAME___.m
3. File Templateを作ってみる
一から作るのもあれなので、既存のものをコピペして改良することで作成していきます。
Cocoa Touch Class.xctemplateをまるまるコピーし、~/Library/Developer/Xcode/Templates/File Templates/以下に置きます。
3.1 TemplateInfo.plistの作成
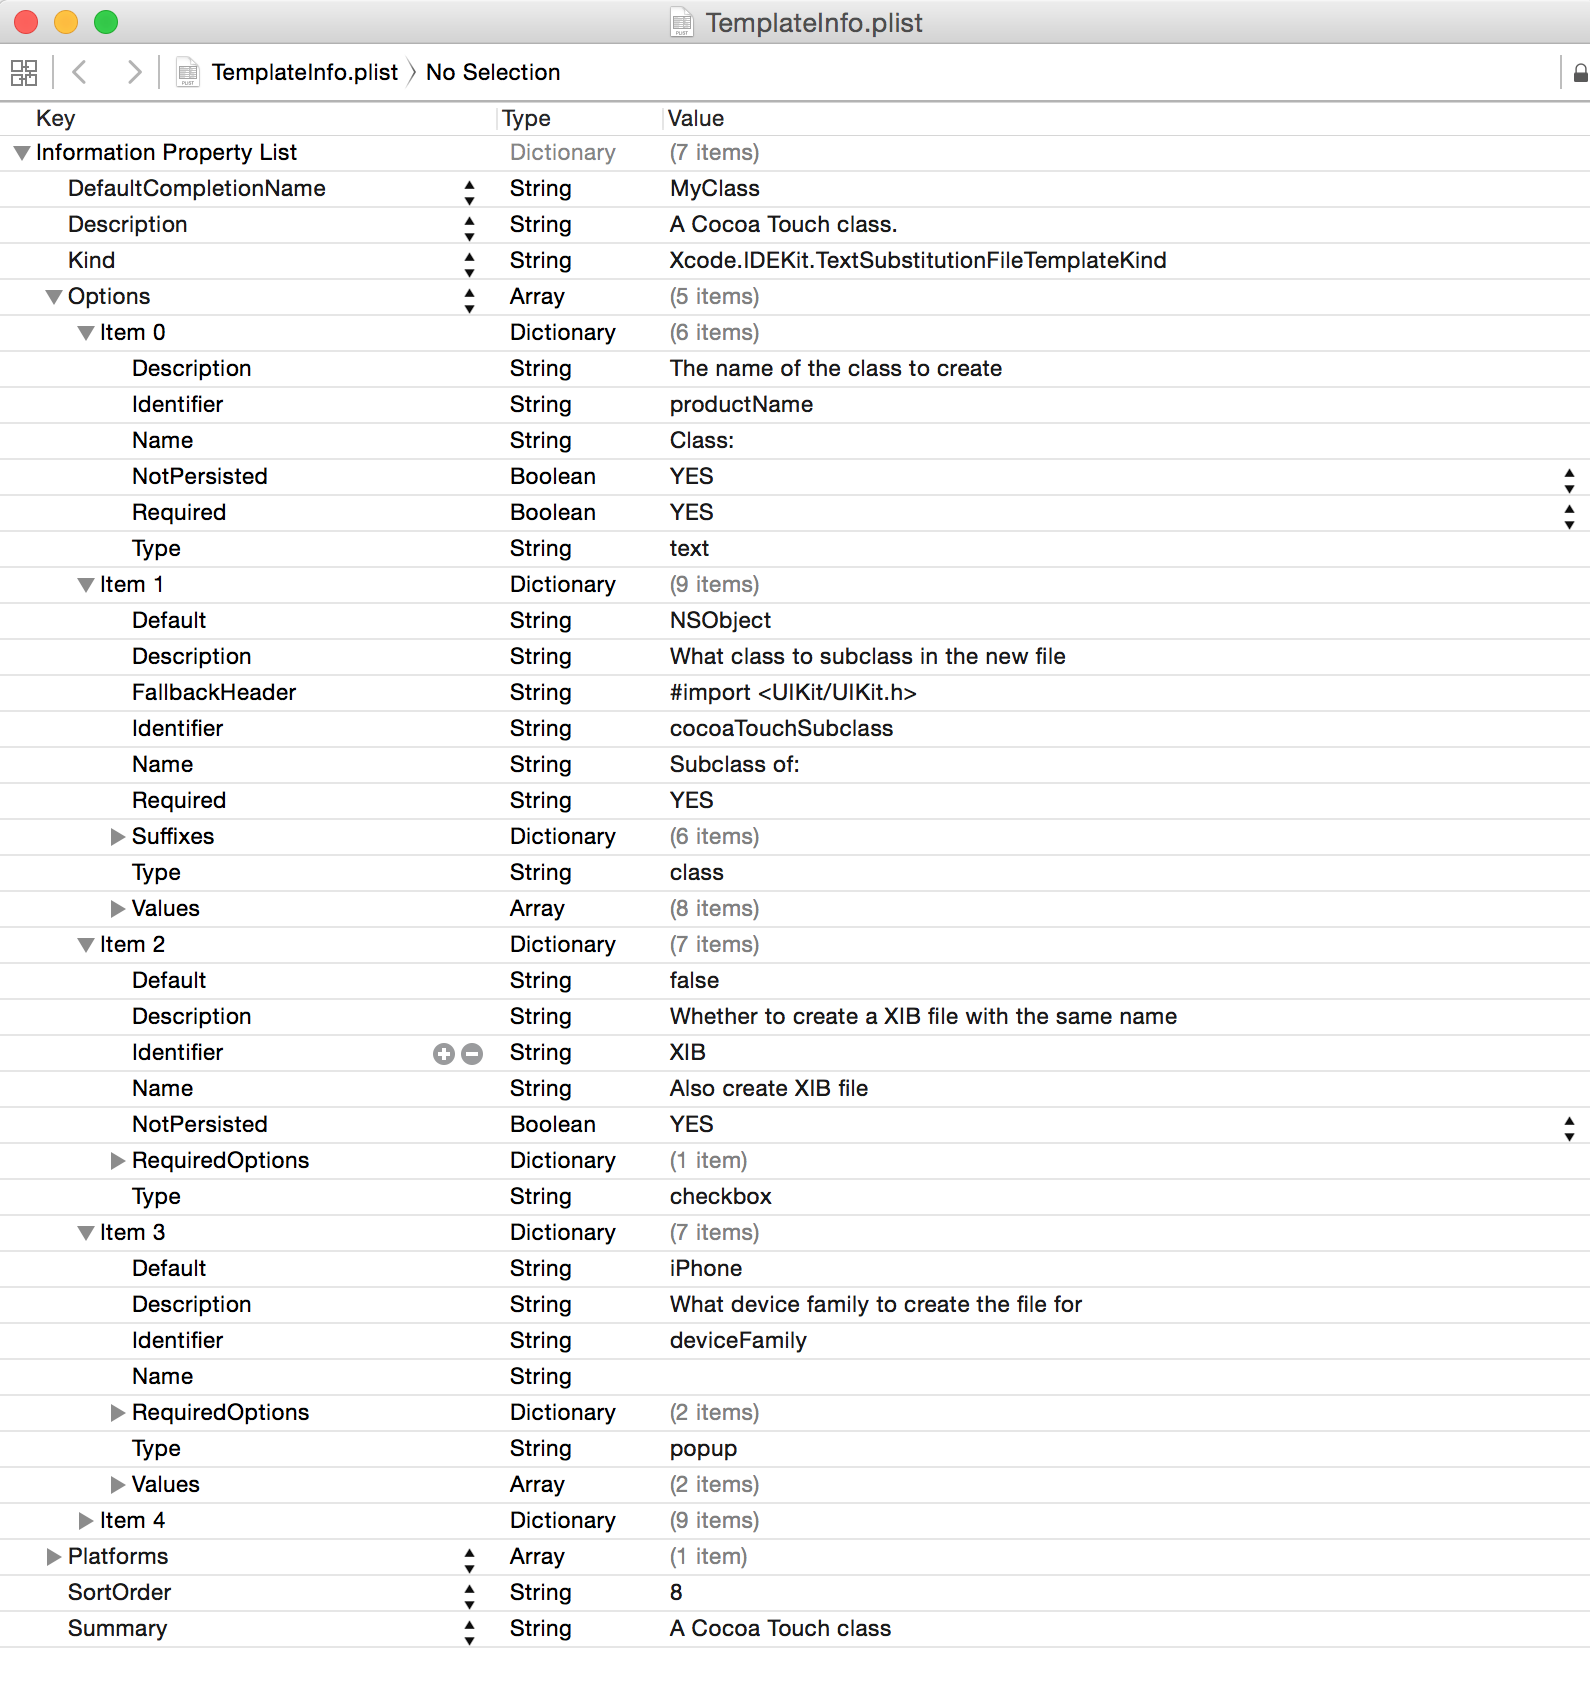
まずTemplateInfo.plistを見ていきます。コピーしてきた状態でTemplateInfo.plistを開くと以下のようになっているかと思います。しかし、これだけ見ても何のことか分からないと思うので、Xcodeで新規ファイルを作成するときの画面と比較しながら見ていきましょう。
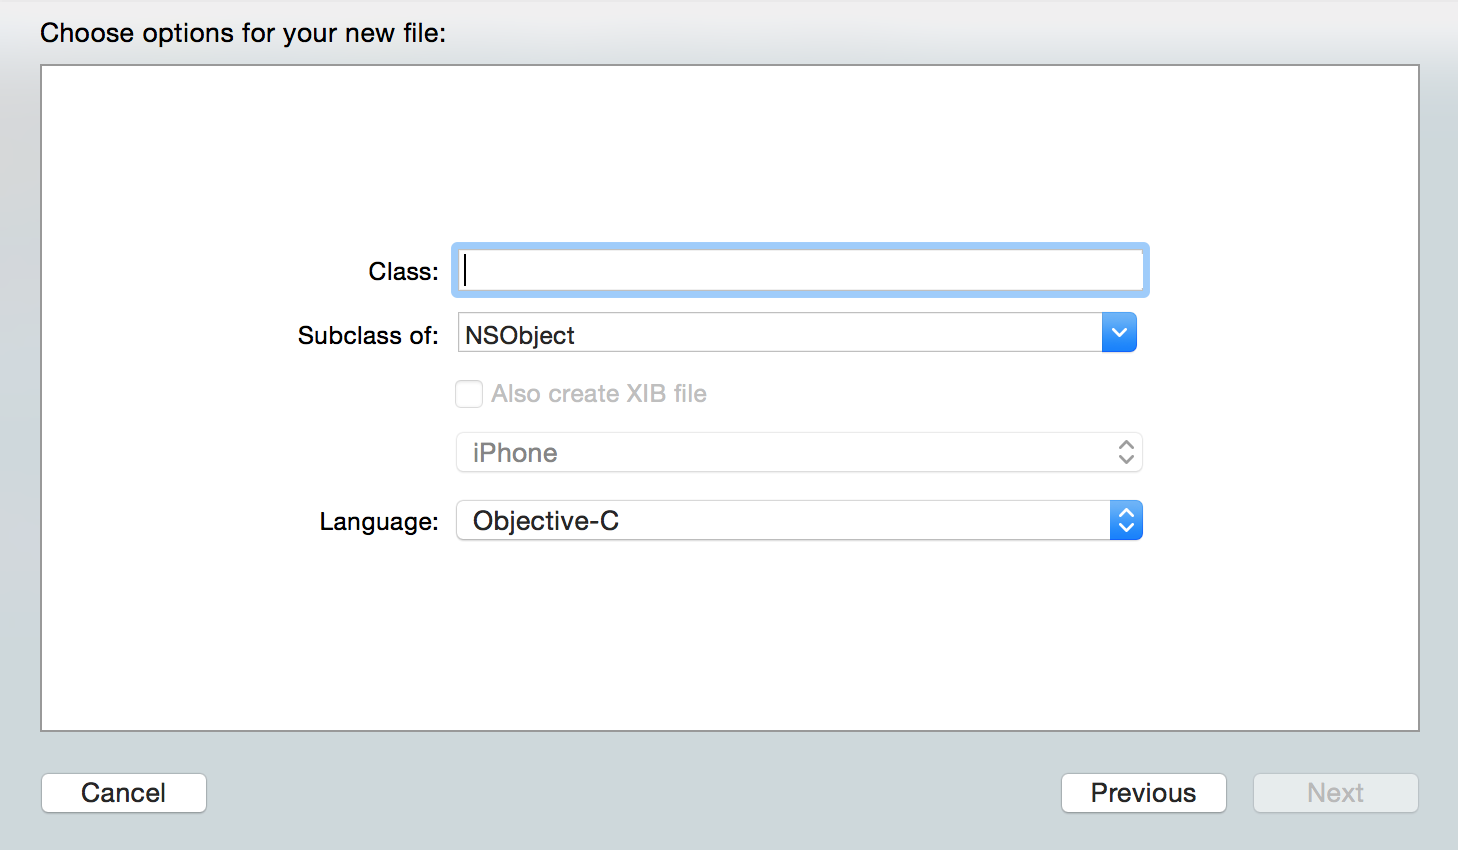
Xcodeの画面をみると、
1. クラス名を記入
2. 親クラスを選択
3. xibファイルも一緒に作成するかを選択
4. iPhoneかiPadか選択
5. 言語を選択
という5つのパーツからできています。
これらの情報を入力すれば、その情報をもとにファイルを作成してくれるという訳です。
これらがplistファイルでどのように記述されているかを見ていきます。
plistファイルをみると、Optionsという項目があり、その中にitemがあります。この一つ一つが上の5つのパーツの一つ一つに対応しています。
itemの中に様々な情報が書かれていますが、以下の項目について理解していれば大丈夫かと思います。
- Identifier : テンプレートファイルを参照する際に使うIdentifier
- Name : 表示されるテキスト
- Type : タイプ。text, class, checkbox, popupがある
- RequiredOptions : 特定の条件の時にのみ入力可能にするときの条件を書く
- Values : タイプがclass, popupのときに選ぶ選択肢
これらの項目を使いこなすことで、様々なテンプレートを作成することができます。
こちらの記事ではSingletonのcheckboxを作成し、自動的にSingletonのコードを生成する例があるので、具体的な作成方法はそちらをご覧ください。
3.2 .h, .mファイルの作成
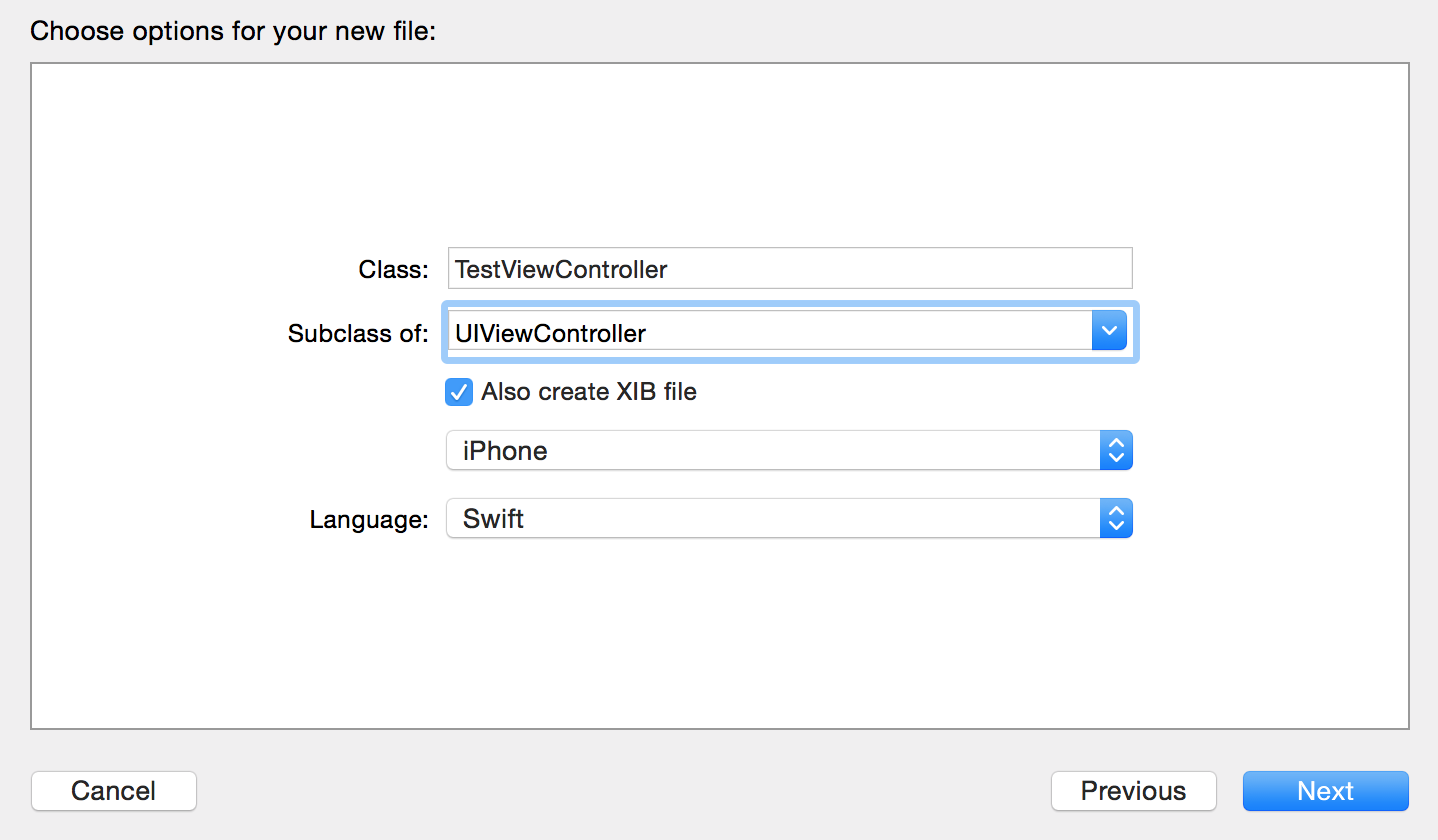
Xcodeにてファイル名やチェックボックスなどの入力が終え作成ボタンを押すと、Identifierを元にファイルが参照されます。
例えば、以下の画像のように設定すると、UIViewControllerXIBiPhoneSwiftというフォルダ内にあるファイルを参照します。これは、plistファイルでIdentifierに設定された項目を元に参照しているのですが、checkbox以外のitemでは入力されている値が、checkboxではitemのIdentifierを並べたファイル名が参照されます。
今回であれば、UIViewController + XIB(checkboxのIdentifier) + iPhone + Swiftを並べたという訳ですね。
それでは、参照されたフォルダ内にあるファイルを編集し、テンプレートを作成していきます。
それではヘッダーファイルを見ていきましょう。例えば、NSObjectObjective-C内にあるヘッダーファイルは以下のようになっています。このテンプレートを元に、ファイル作成の際に入力されたファイル名や情報を使ってファイルを作成しています。
例えば、入力したファイル名は___FILEBASENAMEASIDENTIFIER___で受け取り、親クラスは___VARIABLE_cocoaTouchSubclass___で受け取っています。
これらを利用すれば、Delegateの記述の際に{ファイル名+Delegate}などと書く事もできますね。
//
//  ___FILENAME___
//  ___PROJECTNAME___
//
//  Created by ___FULLUSERNAME___ on ___DATE___.
//___COPYRIGHT___
//

___IMPORTHEADER_cocoaTouchSubclass___

@interface ___FILEBASENAMEASIDENTIFIER___ : ___VARIABLE_cocoaTouchSubclass___

@end
次にTemplateの力が発揮されているTableViewControllerを見てみます。
UITableViewControllerObjective-C以下にある___FILEBASENAME___.mを例にします。
テンプレートはこう使うんだよという良い例だと思います。TableViewやCollectionViewのような書くコード量が多いものはこのように自動化すると開発スピードが上がると思います。
//
//  ___FILENAME___
//  ___PROJECTNAME___
//
//  Created by ___FULLUSERNAME___ on ___DATE___.
//___COPYRIGHT___
//

#import "___FILEBASENAME___.h"

@interface ___FILEBASENAMEASIDENTIFIER___ ()

@end

@implementation ___FILEBASENAMEASIDENTIFIER___

- (void)viewDidLoad {
    [super viewDidLoad];

    // Uncomment the following line to preserve selection between presentations.
    // self.clearsSelectionOnViewWillAppear = NO;

    // Uncomment the following line to display an Edit button in the navigation bar for this view controller.
    // self.navigationItem.rightBarButtonItem = self.editButtonItem;
}

- (void)didReceiveMemoryWarning {
    [super didReceiveMemoryWarning];
    // Dispose of any resources that can be recreated.
}

#pragma mark - Table view data source

- (NSInteger)numberOfSectionsInTableView:(UITableView *)tableView {
#warning Potentially incomplete method implementation.
    // Return the number of sections.
    return 0;
}

- (NSInteger)tableView:(UITableView *)tableView numberOfRowsInSection:(NSInteger)section {
#warning Incomplete method implementation.
    // Return the number of rows in the section.
    return 0;
}

/*
- (UITableViewCell *)tableView:(UITableView *)tableView cellForRowAtIndexPath:(NSIndexPath *)indexPath {
    UITableViewCell *cell = [tableView dequeueReusableCellWithIdentifier:<#@"reuseIdentifier"#> forIndexPath:indexPath];

    // Configure the cell...

    return cell;
}
*/

/*
// Override to support conditional editing of the table view.
- (BOOL)tableView:(UITableView *)tableView canEditRowAtIndexPath:(NSIndexPath *)indexPath {
    // Return NO if you do not want the specified item to be editable.
    return YES;
}
*/

/*
// Override to support editing the table view.
- (void)tableView:(UITableView *)tableView commitEditingStyle:(UITableViewCellEditingStyle)editingStyle forRowAtIndexPath:(NSIndexPath *)indexPath {
    if (editingStyle == UITableViewCellEditingStyleDelete) {
        // Delete the row from the data source
        [tableView deleteRowsAtIndexPaths:@[indexPath] withRowAnimation:UITableViewRowAnimationFade];
    } else if (editingStyle == UITableViewCellEditingStyleInsert) {
        // Create a new instance of the appropriate class, insert it into the array, and add a new row to the table view
    }
}
*/

/*
// Override to support rearranging the table view.
- (void)tableView:(UITableView *)tableView moveRowAtIndexPath:(NSIndexPath *)fromIndexPath toIndexPath:(NSIndexPath *)toIndexPath {
}
*/

/*
// Override to support conditional rearranging of the table view.
- (BOOL)tableView:(UITableView *)tableView canMoveRowAtIndexPath:(NSIndexPath *)indexPath {
    // Return NO if you do not want the item to be re-orderable.
    return YES;
}
*/

/*
#pragma mark - Navigation

// In a storyboard-based application, you will often want to do a little preparation before navigation
- (void)prepareForSegue:(UIStoryboardSegue *)segue sender:(id)sender {
    // Get the new view controller using [segue destinationViewController].
    // Pass the selected object to the new view controller.
}
*/

@end
さいごに
以上、File Templatesの紹介でした。
毎回同じコード書いてるなーと思ったときには、File Templatesを使ってみてください!
面倒なコードを簡単にかけるので非常に楽で早いです。
また、このテンプレートファイルをgit管理すればチームで高速開発できる&コードを統一できるので、可読性の面から見ても良いかと思います!