今回は、学習時に使用する「caffe.exe train」時の入出力ファイルについて説明したいと思います。
全体構成
入出力ファイルの全体構成は、こんな感じになっています。
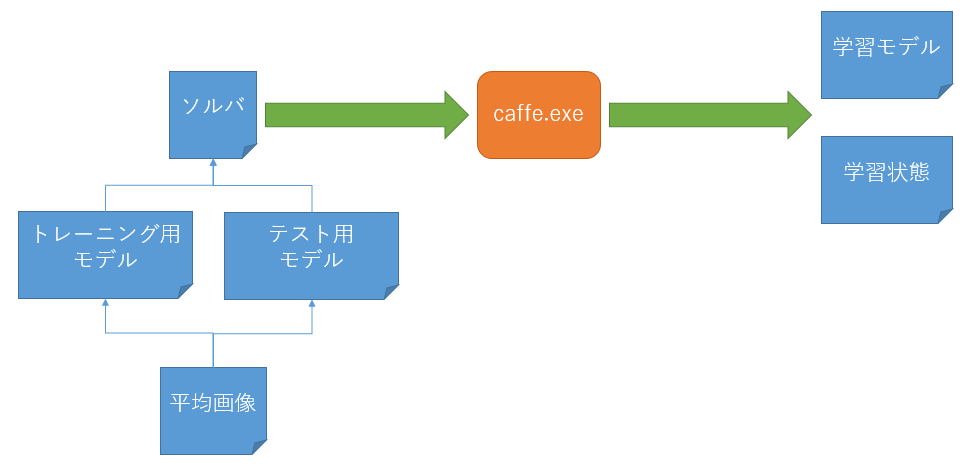
なお、トレーニング用モデルとテスト用モデルは1つのファイルにするのが最近の流行です。
(昔は2つのファイルに分かれていました)
入力ファイル
まずは入力ファイルについて説明していきます。
ちなみにサンプルの入力ファイルは「caffe\models」に置かれています。
ここではその中にある「bvlc_alexnet」を例として、話を進めていきます。
ソルバ
このファイルでは全体的な設定をします。
テキストのProtocolBuffers形式になっています。
ファイルの中身は以下のようになっています。
net: "models/bvlc_alexnet/train_val.prototxt"
test_iter: 1000
test_interval: 1000
base_lr: 0.01
lr_policy: "step"
gamma: 0.1
stepsize: 100000
display: 20
max_iter: 450000
momentum: 0.9
weight_decay: 0.0005
snapshot: 10000
snapshot_prefix: "models/bvlc_alexnet/caffe_alexnet_train"
solver_mode: GPU
それぞれのパラメータの説明をしていきます。
| パラメータ名 | 意味 | 調整の頻度 |
|---|---|---|
| net | トレーニング用/テスト用モデルが設定されたファイル名 | △ |
| test_iter | テスト時の実行回数 | |
| test_interval | テストを行うタイミング | △ |
| base_lr | 学習率(小さいほうがよい) | ○ |
| lr_policy | 学習率の変更方法(fixed:変更しない、step:徐々に小さくする) | |
| gamma | 学習率を変更するパラメータ値 | △ |
| stepsize | 学習率を変更するタイミング | △ |
| display | 学習率の表示のタイミング | △ |
| max_iter | 学習を終了させるタイミング | ○ |
| momentum | 現在の勾配と過去の勾配の重み付き平均の重み | |
| weight_decay | 重みづけの遅延 | |
| snapshot | ファイル出力のタイミング | △ |
| snapshot_prefix | 出力ファイルの接頭文字列(パスを含む) | △ |
| solver_mode | GPUを使用するか、CPUのみとするか |
タイミングはバッチ回数になります。
なお、トレーニング用モデルとテスト用モデルを別のファイルにした場合は、それぞれ「train_net」「test_net」というパラメータでファイル名を指定します。
「lr_policy」が"step"の場合、「base_lr」の値を「stepsize」毎に「gamma」倍していきます。
トレーニング用/テスト用モデル
このファイルで、ニューラルネットワークのレイヤーの種類やつながりなどを設定します。
テキストのProtocolBuffers形式になっています。
レイヤーの種類やつながりは、図で書くとこのようなイメージになります。

これを以下のように記述していきます。
name: "AlexNet"
layer {
  name: "data"
  type: "Data"
  top: "data"
  top: "label"
  include {
    phase: TRAIN
  }
  transform_param {
    mirror: true
    crop_size: 227
    mean_file: "data/ilsvrc12/imagenet_mean.binaryproto"
  }
  data_param {
    source: "examples/imagenet/ilsvrc12_train_lmdb"
    batch_size: 256
    backend: LMDB
  }
}
layer {
  name: "data"
  type: "Data"
  top: "data"
  top: "label"
  include {
    phase: TEST
  }
  transform_param {
    mirror: false
    crop_size: 227
    mean_file: "data/ilsvrc12/imagenet_mean.binaryproto"
  }
  data_param {
    source: "examples/imagenet/ilsvrc12_val_lmdb"
    batch_size: 50
    backend: LMDB
  }
}
layer {
  name: "conv1"
  type: "Convolution"
  bottom: "data"
  top: "conv1"
  param {
    lr_mult: 1
    decay_mult: 1
  }
  param {
    lr_mult: 2
    decay_mult: 0
  }
  convolution_param {
    num_output: 96
    kernel_size: 11
    stride: 4
    weight_filler {
      type: "gaussian"
      std: 0.01
    }
    bias_filler {
      type: "constant"
      value: 0
    }
  }
}
layer {
  name: "relu1"
  type: "ReLU"
  bottom: "conv1"
  top: "conv1"
}
layer {
  name: "norm1"
  type: "LRN"
  bottom: "conv1"
  top: "norm1"
  lrn_param {
    local_size: 5
    alpha: 0.0001
    beta: 0.75
  }
}
layer {
  name: "pool1"
  type: "Pooling"
  bottom: "norm1"
  top: "pool1"
  pooling_param {
    pool: MAX
    kernel_size: 3
    stride: 2
  }
}
layer {
  name: "conv2"
  type: "Convolution"
  bottom: "pool1"
  top: "conv2"
  param {
    lr_mult: 1
    decay_mult: 1
  }
  param {
    lr_mult: 2
    decay_mult: 0
  }
  convolution_param {
    num_output: 256
    pad: 2
    kernel_size: 5
    group: 2
    weight_filler {
      type: "gaussian"
      std: 0.01
    }
    bias_filler {
      type: "constant"
      value: 0.1
    }
  }
}
layer {
  name: "relu2"
  type: "ReLU"
  bottom: "conv2"
  top: "conv2"
}
layer {
  name: "norm2"
  type: "LRN"
  bottom: "conv2"
  top: "norm2"
  lrn_param {
    local_size: 5
    alpha: 0.0001
    beta: 0.75
  }
}
layer {
  name: "pool2"
  type: "Pooling"
  bottom: "norm2"
  top: "pool2"
  pooling_param {
    pool: MAX
    kernel_size: 3
    stride: 2
  }
}
layer {
  name: "conv3"
  type: "Convolution"
  bottom: "pool2"
  top: "conv3"
  param {
    lr_mult: 1
    decay_mult: 1
  }
  param {
    lr_mult: 2
    decay_mult: 0
  }
  convolution_param {
    num_output: 384
    pad: 1
    kernel_size: 3
    weight_filler {
      type: "gaussian"
      std: 0.01
    }
    bias_filler {
      type: "constant"
      value: 0
    }
  }
}
layer {
  name: "relu3"
  type: "ReLU"
  bottom: "conv3"
  top: "conv3"
}
layer {
  name: "conv4"
  type: "Convolution"
  bottom: "conv3"
  top: "conv4"
  param {
    lr_mult: 1
    decay_mult: 1
  }
  param {
    lr_mult: 2
    decay_mult: 0
  }
  convolution_param {
    num_output: 384
    pad: 1
    kernel_size: 3
    group: 2
    weight_filler {
      type: "gaussian"
      std: 0.01
    }
    bias_filler {
      type: "constant"
      value: 0.1
    }
  }
}
layer {
  name: "relu4"
  type: "ReLU"
  bottom: "conv4"
  top: "conv4"
}
layer {
  name: "conv5"
  type: "Convolution"
  bottom: "conv4"
  top: "conv5"
  param {
    lr_mult: 1
    decay_mult: 1
  }
  param {
    lr_mult: 2
    decay_mult: 0
  }
  convolution_param {
    num_output: 256
    pad: 1
    kernel_size: 3
    group: 2
    weight_filler {
      type: "gaussian"
      std: 0.01
    }
    bias_filler {
      type: "constant"
      value: 0.1
    }
  }
}
layer {
  name: "relu5"
  type: "ReLU"
  bottom: "conv5"
  top: "conv5"
}
layer {
  name: "pool5"
  type: "Pooling"
  bottom: "conv5"
  top: "pool5"
  pooling_param {
    pool: MAX
    kernel_size: 3
    stride: 2
  }
}
layer {
  name: "fc6"
  type: "InnerProduct"
  bottom: "pool5"
  top: "fc6"
  param {
    lr_mult: 1
    decay_mult: 1
  }
  param {
    lr_mult: 2
    decay_mult: 0
  }
  inner_product_param {
    num_output: 4096
    weight_filler {
      type: "gaussian"
      std: 0.005
    }
    bias_filler {
      type: "constant"
      value: 0.1
    }
  }
}
layer {
  name: "relu6"
  type: "ReLU"
  bottom: "fc6"
  top: "fc6"
}
layer {
  name: "drop6"
  type: "Dropout"
  bottom: "fc6"
  top: "fc6"
  dropout_param {
    dropout_ratio: 0.5
  }
}
layer {
  name: "fc7"
  type: "InnerProduct"
  bottom: "fc6"
  top: "fc7"
  param {
    lr_mult: 1
    decay_mult: 1
  }
  param {
    lr_mult: 2
    decay_mult: 0
  }
  inner_product_param {
    num_output: 4096
    weight_filler {
      type: "gaussian"
      std: 0.005
    }
    bias_filler {
      type: "constant"
      value: 0.1
    }
  }
}
layer {
  name: "relu7"
  type: "ReLU"
  bottom: "fc7"
  top: "fc7"
}
layer {
  name: "drop7"
  type: "Dropout"
  bottom: "fc7"
  top: "fc7"
  dropout_param {
    dropout_ratio: 0.5
  }
}
layer {
  name: "fc8"
  type: "InnerProduct"
  bottom: "fc7"
  top: "fc8"
  param {
    lr_mult: 1
    decay_mult: 1
  }
  param {
    lr_mult: 2
    decay_mult: 0
  }
  inner_product_param {
    num_output: 1000
    weight_filler {
      type: "gaussian"
      std: 0.01
    }
    bias_filler {
      type: "constant"
      value: 0
    }
  }
}
layer {
  name: "accuracy"
  type: "Accuracy"
  bottom: "fc8"
  bottom: "label"
  top: "accuracy"
  include {
    phase: TEST
  }
}
layer {
  name: "loss"
  type: "SoftmaxWithLoss"
  bottom: "fc8"
  bottom: "label"
  top: "loss"
}
name
このネットワークの名前です。
何でもいいです。
layer
ここでレイヤーの中身を指定していきます。
代表的なパラメータは以下の通りです。
| パラメータ名 | 意味 |
|---|---|
| name | レイヤーの名前で、他のレイヤーから参照するときに使用する |
| type | レイヤーの種類(別表で説明) |
| top | 出力先のレイヤー名 |
| bottom | 入力元のレイヤー名 |
| param | 各種パラメータ |
| [type]_param | レイヤー種類ごとのパラメータ |
なお、上の表には書いていませんが、includeに「TRAIN」か「TEST」を記述することで、トレーニング時のみに使用するかテスト時のみ使用するかを指定できます。
感覚的に「top」と「bottom」が逆に流れていく(下から上に)ので注意。
「[type]_param」は、たとえば「type」が"Convolution"に場合は"convolution_param"になります。
少し細かい話になりますが、ニューラルネットでは、レイヤーとレイヤーをつなぐときに「ブロブ」と言うものを介して行います。
(DirectShowのフィルターとピンの関係のようなものです)
このあたりのお話は、公式サイトのここあたりに書かれています。
layer/type
レイヤーの種類には、以下のようなものがあります。
(代表的なものだけ)
| レイヤー種類 | 名称 | 意味 |
|---|---|---|
| Data | 入力層 | 画像データベースのファイル名や平均画像ファイル名、画像サイズ、バッチサイズなどを指定 |
| Convolution | 畳み込み層 | 畳み込みフィルタの設定(サイズやステップなど) |
| Pooling | プーリング層 | プーリング処理のための設定 |
| ReLU | 活性化関数 | ランプ関数(設定するパラメータはない) |
| InnerProduct | 全結合層 | 内積計算を行うための設定 |
| SoftmaxWithLoss | 誤差関数 | ソフトマックス関数により交差エントロピー誤差を算出するための設定 |
ちなみに、公式の説明はこちらです。
各レイヤーのパラメータや、その設定値の説明などはここでは説明しませんが、ビルド時に作成される「caffe\include\caffe\proto\caffe.pb.h」を見ると、全てのレイヤーとそのパラメータが記述されています。
ネット上の情報も参考になりますが、ここを見るのが最新で、一番確実です。
平均画像
他の記事で説明しましたが、どうしても学習するときの画像に偏りが出来てしまうため、その影響を減らすために使用する全学習画像の平均をとった情報になります。
バイナリのProtocolBuffers形式になっています。
出力ファイル
次に出力ファイルについて説明していきます。
学習モデル
このファイルは評価するときに使用します。
また、追加して学習するときにも使用します。
(「caffe.exe -weights」のこと)
バイナリのProtocolBuffers形式になっています。
中身については、特にここでは解説しません。
学習状態
このファイルは、学習の続きを行うときに使用します。
(「caffe.exe -snapshot」のこと)
バイナリのProtocolBuffers形式になっています。
中身については、特にここでは解説しません。
関連記事
C++プログラマがWindows上でCaffeを使ってDeep Learningするお話(1)
C++プログラマがWindows上でCaffeを使ってDeep Learningするお話(2)
C++プログラマがWindows上でCaffeを使ってDeep Learningするお話(3)
C++プログラマがWindows上でCaffeを使ってDeep Learningするお話(4)
C++プログラマがWindows上でCaffeを使ってDeep Learningするお話(6)
C++プログラマがWindows上でCaffeを使ってDeep Learningするお話(7)
C++プログラマがWindows上でCaffeを使ってDeep Learningするお話(8)