はじめに
Ubuntu環境をVirtualBox+Vagrantで環境構築する手順を記します。
CentOS7環境構築手順についてはこちらを参照
http://qiita.com/mikoski01/items/c3984901c22a7736d726
構築手順
ではさっそく、VirtualBox+Vagrantで構築していきます。
1. VirtualBoxのインストール
VitualBoxを既にインストールしている場合は読み飛ばしてください。
VitualBox本家サイトからWindows版をダウンロードしインストールします。
2. Vagrantのインストール
Vagrantを既にインストールしている場合は読み飛ばしてください。
Vagrant本家サイトからWindows版をダウンロードしインストールします。
3. Vagrantのプロキシの設定
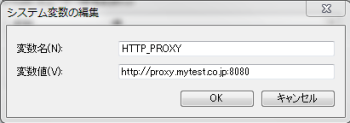
プロキシを介してVagrantを使う場合はシステム環境変数に下記を追加します。
OSの環境変数に下記のように設定してください。
| 変数名 | 値 |
|---|---|
| HTTP_PROXY | http://<プロキシサーバ名>:<ポート番号> |
| HTTPS_PROXY | http://<プロキシサーバ名>:<ポート番号> |
【例】ホスト:proxy.mytest.co.jp、ポート:8080の場合

4. Vagrantのプラグインをインストール
4-1. vagrant-vbguestをインストール
仮想マシンのカーネルを新しくする度に Guest Additions を手動で再インストールする必要がありますが、vagrant-vbguestプラグインをインストールすることでその煩わしさを取り払ってくれます。便利プラグインなのでインストールすることをお勧めします。
下記コマンドを実行します。
vagrant plugin install vagrant-vbguest
※詳細について知りたい方はこちらを参照
http://blog.amedama.jp/entry/2015/08/19/204044
https://github.com/dotless-de/vagrant-vbguest
4-2. vagrant-proxyconfをインストール
プロキシを介している場合はインストールしてださい。
このvagrant-proxyconfプラグインを利用すると、ゲストOSの以下の機能に対して Proxy の設定を自動的に行ってくれます。
- 多くのプログラムがサポートしているhttp_proxyなどの環境変数
- Chef provisioners
- Apt
- Docker
- Git
- npm
- PEAR
- Yum
- Subversion
下記コマンドを実行します。
vagrant plugin install vagrant-proxyconf
※詳細について知りたい方はこちらを参照
http://weblabo.oscasierra.net/vagrant-proxyconf/
https://github.com/tmatilai/vagrant-proxyconf
5. Vagrantfileの作成
cd <適当な作業フォルダ>
vagrant init
作業フォルダ直下に「Vagrantfile」が作成されているはず。
6. Vagrantfileの修正
前回の手順で生成した「Vagrantfile」ファイルを修正します。
6-1. proxyとvbguestの設定
「Vagrant.configure("2") do |config|」の直後に設定を追記してください。
- プロキシを介している場合、下記のようにプロキシ情報を設定。
プロキシを介していない場合、「config.proxy.enabled = false」に設定するか、「if Vagrant.has_plugin?("vagrant-proxyconf") ~ end」を記載しなければ正常に稼働します。 - vbguestを下記のように設定。
  ...
Vagrant.configure("2") do |config|

  if Vagrant.has_plugin?("vagrant-proxyconf")
    config.proxy.enabled  = true  # => true; all applications enabled, false; all applications disabled
    config.proxy.http     = "http://<プロキシホスト名>:<プロキシポート>"
    config.proxy.https    = "http://<プロキシホスト名>:<プロキシポート>"
    config.proxy.no_proxy = "localhost,127.0.0.1"
  end

  if Vagrant.has_plugin?("vagrant-vbguest")
    # set auto_update to false, if you do NOT want to check the correct
    config.vbguest.auto_update = true
  end

  # The most common configuration options are documented and commented below.
  ...
6-2. boxの設定
対象のUbuntuのboxを設定します。
今回はutuntu公式のtrustyを使用します。
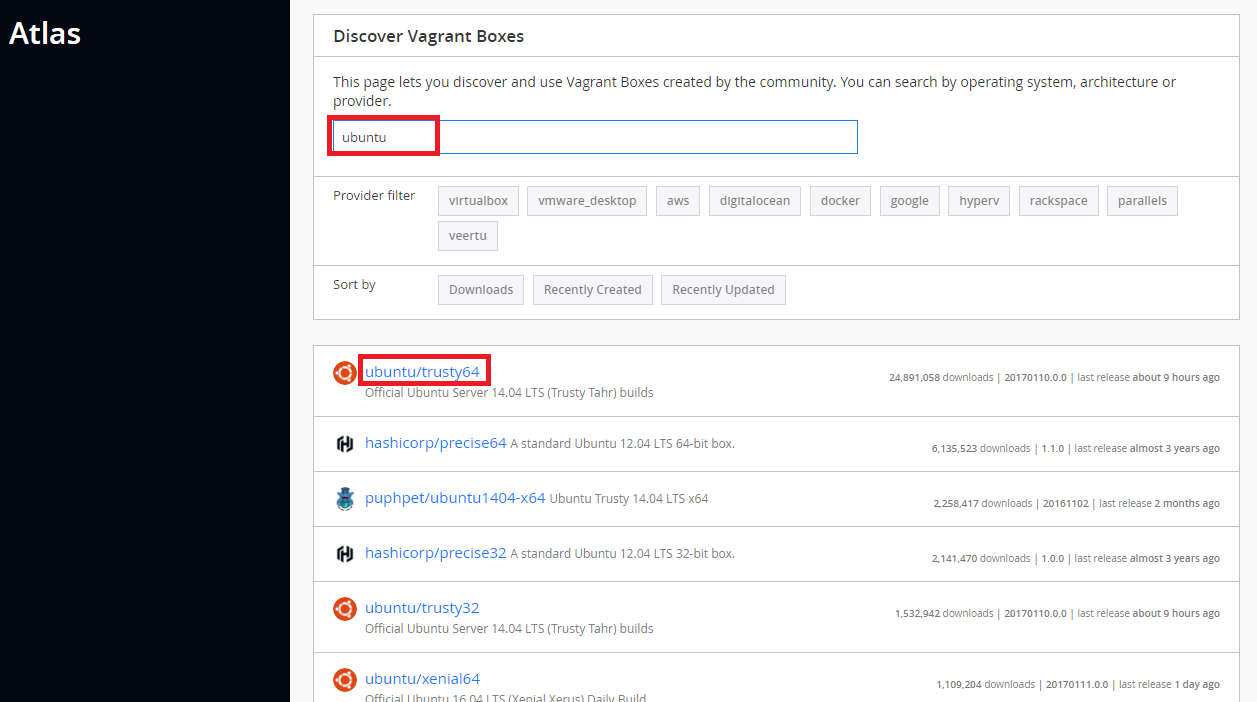
まず、下記にアクセスします。
https://www.vagrantup.com/

「Boxes」押下
検索項目に「ubuntu」を入力して検索
「ubuntu/trusty64」が表示されていると思うので、この書式(文字列)をコピーしてVagrantfile内の「config.vm.box」項目に設定します。
  ...
Vagrant.configure("2") do |config|
 ...
  config.vm.box = "ubuntu/trusty64"
  ...
6-3. IPの設定
IPアドレスを変更したい場合は想定する環境に合わせて設定してください。
  ...
Vagrant.configure("2") do |config|
 ...
  config.vm.network "private_network", ip: "192.168.33.10"
  ...
6-4. ポートフォワードの設定
ポートフォワードを設定したい場合は想定する環境に合わせて設定してください。
  ...
Vagrant.configure("2") do |config|
 ...
  config.vm.network "forwarded_port", guest: 80, host: 8080
  ...
※ポートフォワードの説明については下記を参照
[vagrantのネットワークについて - ポートフォワーディング]
(http://qiita.com/ftakao2007/items/0ec05c2ef3c14cdbea11#%E3%83%9D%E3%83%BC%E3%83%88%E3%83%95%E3%82%A9%E3%83%AF%E3%83%BC%E3%83%87%E3%82%A3%E3%83%B3%E3%82%B0)
7. ゲストOS起動
Vagrantfileの配置されているフォルダで下記コマンドを実行します。
vagrant up
8. ゲストOSへログイン
8-1. コマンドプロンプトからそのままログインする場合
Vagrantfileの配置されているフォルダで下記コマンドを実行します。
vagrant ssh
8-2. ターミナル(TeraTerm、PuTTY等)を使う場合
Vagrantfileで設定したIP(デフォルト: 192.168.33.10)へSSHでログインできます。
※ ID / PW : vagrant / vagrant
9. ゲストOS停止
Vagrantfileの配置されているフォルダで下記コマンドを実行します。
vagrant halt
以上。
