Packer (1.0.4〜) と Ansible で Azure Managed Image を作る方法です。
旧来の VHD (Storage Account) を作る方法ではありません。
AWS の AMI (Builders >> amazon-ebs) と同じでしょ?と思ってましたが、実際はかなりハマったのでまとめ。
ハマりポイント
-
Azure Managed Image が作れるのは Packer 1.0.3 から〜
- 〜1.0.2 で作れるのは VHD (Storage Account) だけ
-
Packer 1.0.3 は Ansible Provisioner が使えないバグ があります (sshがフリーズする)
- 2017/07/27現在は、未リリースの 1.0.4 を 自前でビルド して使う
# install go.
$ brew install go. # ← ここがMac専用 (あとはLinux共通)
$ export GOPATH=$HOME/go
$ export PATH=$PATH:$GOPATH/bin

# get packer git repository into "~/go".
$ go get github.com/hashicorp/packer
$ cd $GOPATH/src/github.com/hashicorp/packer

# compile.
$ make
$ go build -o bin/packer .
$ $GOPATH/src/github.com/hashicorp/packer/bin/packer -v
1.0.4

# install.
$ mv $GOPATH/src/github.com/hashicorp/packer/bin/packer /usr/local/bin
$ which packer
/usr/local/bin/packer
- Builders >> amazon-ebs とは異なり、Deprovision という対応を自分でやらないといけない。これを忘れると Image作成は成功するが、出来たImageからVMが起動できない!!
Packer設定例
Packer公式のガイドはこれです。
実際にImageを作れた時の packer.json 。CentOS7ベースです。
{
  "builders": [
    {
      "type": "azure-arm",

      "client_id": "{アプリケーションID}",
      "client_secret": "{パスワード}",
      "tenant_id": "{テナントID}",
      "subscription_id": "{サブスクリプションID}",

      "managed_image_name": "{登録したいイメージ名}",
      "managed_image_resource_group_name": "{イメージ登録先のリソースグループ}",

      "os_type": "Linux",
      "image_publisher": "OpenLogic",
      "image_offer": "CentOS",
      "image_sku": "7.3",

      "location": "eastasia",
      "vm_size": "Standard_DS2"
    }
  ],
  "provisioners": [
    {
      "type": "ansible",
      "playbook_file": "playbook.yml"
    },
    {
      "type": "shell",
      "execute_command": "chmod +x {{ .Path }}; {{ .Vars }} sudo -E sh '{{ .Path }}'",
      "inline": [
        "/usr/sbin/waagent -force -deprovision+user && export HISTSIZE=0 && sync"
      ],
      "inline_shebang": "/bin/sh -x"
    }
  ]
}
一応 Ansible の playbook.yml の例も。
---
- hosts: all
  become: true
  tasks:
    - name: you can do anythin in this playbook.
      shell: echo hello world !!
Builders設定
Azure Portal で packer.json に指定するID類を確認&作成していきます。基本↓に書いてあります。
- リソースにアクセスできる Azure Active Directory アプリケーションとサービス プリンシパルをポータルで作成する
- How to use Packer to create Windows virtual machine images in Azure (←VHD作成なので注意)
まずはリソースグループを作ります。これは packer.json の "managed_image_resource_group_name" に指定するリソースグループ名です。
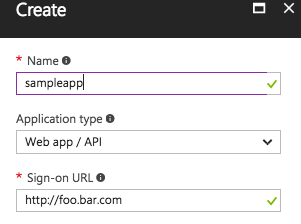
Azure Active Directory >> App registrations でアプリを登録します
上部メニューの "+ADD" を押して、アプリIDを発行します。
アプリIDは↓です。これは packer.json の "client_id" に指定するIDです。
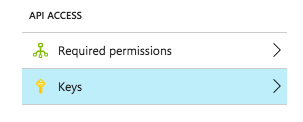
Azure Active Directory >> App registrations >> sampleapp >> API ACCESS:Keys でキー (パスワード) の発行をします。
"DESCRIPTION", "EXPIRES" を入力して "Save" を押すとキー (パスワード) が発行されます。これは packer.json の "client_secret" に指定します。
Subscriptions >> {Subscription名} >> Access control (IAM) でアプリにロール (アクセス権) の登録をします。ロールは "Contributor" (日本語では"共同作成者") を指定します。
Azure Active Directory >> Properties でテナントID (Directory ID) が見れます。これは packer.json の "tenant_id" に指定します。
Subscriptions で Subscription ID が見れます。これは packer.json の "subscription_id" に指定します。
Deprovision処理を忘れるな!
からなず "provisioners" の最後に↓の Deprovision 処理が必要です。これを忘れると Image作成は成功しますが、VMの起動は失敗 します。
{
  "provisioners": [
    {
      "type": "shell",
      "execute_command": "chmod +x {{ .Path }}; {{ .Vars }} sudo -E sh '{{ .Path }}'",
      "inline": [
        "/usr/sbin/waagent -force -deprovision+user && export HISTSIZE=0 && sync"
      ],
      "inline_shebang": "/bin/sh -x"
    }
  ]
}
Windowsマシン用の処理は↑とは違うので Deprovision を参照


