ツイキャス好き向けのマストドン、castodon.jpを立ててみた。
*RailsやDockerにあまり慣れてない場合はいきなり立てるより、ローカルで試しに立ててみてその後にやった方がスムーズにいくかもしれない。ここ(DockerでMastodonをローカルで動かしてみた! ので、その方法をご紹介。)に書いてある通りにやれば、とりあえず立てられるのでオススメ。
CentOS7をインストール
さくらVPSの一番?貧弱なやつを借りた。
メモリ:512MB
CPU:1Core
SSD:20GB
借りたら、さくらのvps管理画面に行って、「各種設定」から「OSインストール」→「カスタムOSインストール」で、CentOS7を選択して入れる。
参考:カスタムOSインストールガイド - CentOS7 / ScientificLinux7 / Fedora 24
サーバーセットアップ
主にここを参考にしたりしながらやると良さげ。
【さくらのVPS】サーバの初期設定ガイド
centos7のインストールの際にrootのパスワード設定してるかなと思うので、それを使ってrootでログインして、設定していく。
# ユーザー追加、パスワード設定
$ useradd hoge_user
$ passwd hoge_user
# sudoの設定
$ usermod -G wheel hoge_user
$ visudo
wheelのところコメントアウトされてるので、下記の様に有効にする。
## Allows people in group wheel to run all commands
%wheel ALL=(ALL) ALL
設定したら、一般ユーザーでログインし直す。
# sudo試してみる、問題無くできたらおk
$ sudo ls
次にssh周りをやっていく。先に鍵を置いておくことにする。ssh鍵を作るので、一旦サーバーから出て、ローカルで鍵を作る。
$ cd ~
$ mkdir .ssh
$ cd ~/.ssh
# 4096bitのid_rsaという名前のkeyを作る(秘密鍵:id_rsa, 公開鍵:id_rsa.pubが作成される)
$ ssh-keygen -f id_rsa -t rsa -b 4096
# 公開鍵をサーバー側に送る
$ scp ~/.ssh/id_rsa.pub hoge_user@IPアドレス:~/
hoge_userでサーバー側に入る
# hoge_userのままでやる
$ cd /home/hoge_user
$ mkdir .ssh
$ chmod 700 .ssh
$ cat id_rsa.pub > .ssh/authorized_keys
$ chmod 600 .ssh/authorized_keys
$ rm -f id_rsa.pub
これで一応鍵指定でsshログインできるようになるはず。$ ssh -i ~/.ssh/id_rsa hoge_user@IPアドレス
さらにsshの設定をしていく。(sshポート変更、rootログイン禁止、パスワードログイン禁止)
その前に、sshのポート変更でfirewallとかひっかかってハマりやすいので先にそちらを対応する。
今回はselinuxを有効で、やっていくので、sshに使うポート番号をssh_portにしておかないといけない。
# selinux有効か確認
$ getenforce
Enforcing
# ssh_portを確認(22だけ開いてるはず)
$ semanage port -l | grep ssh
# sshに使うポート番号を追加する(12345の場合)
$ semanage port -a -t ssh_port_t -p tcp 12345
これで再度ssh_port確認すると12345と22が追加されている。22を消すかどうかは議論があるみたい。今回は置いておいた。
参考:SELinux remove or leave the old SSH port label?
次にfirewall対応していく。ざっとコマンド確認。起動してなかったら起動させておく。
# status
$ systemctl status firewalld

# start
$ systemctl start firewalld

# stop
$ systemctl stop firewalld
# portsとかservicesとかを確認
$ firewall-cmd --list-all
初期はservicesにssh, portsが空白になってるかなと。追加されてなかったら追加する。 $ firewall-cmd --add-service=ssh --zone=public --permanent
このserviceのsshのポートが22になってるので、これを希望のポート(12345)に書き換える。
<?xml version="1.0" encoding="utf-8"?>
<service>
  <short>SSH</short>
  <description>Secure Shell (SSH) is a protocol for logging into and executing commands on remote machines. It provides secure encrypted communications. If you plan on accessing your machine remotely via SSH over a firewalled interface, enable this option. You need the openssh-server package installed for this option to be useful.</description>
  <port protocol="tcp" port="12345"/>
</service>
# 反映
$ systemctl reload firewalld.service
このまま進めてマストドン立てると、selinuxで3000 port許可されてなくてupstream周りでエラー出るので先に対応しておく。
$ semanage port -a -t http_port_t -p tcp 3000
これでおk。
今回利用するhttp(80)、https(443)、smtp(25)、smtps(587)もここで合わせて対応しておく。
$ firewall-cmd --add-port=80/tcp --zone=public --permanent
$ firewall-cmd --add-port=443/tcp --zone=public --permanent
$ firewall-cmd --add-port=25/tcp --zone=public --permanent
$ firewall-cmd --add-port=587/tcp --zone=public --permanent
$ firewall-cmd --add-service=http --zone=public --permanent
$ firewall-cmd --add-service=https --zone=public --permanent
$ firewall-cmd --add-service=smtp --zone=public --permanent
$ firewall-cmd --add-service=smtps --zone=public --permanent

$ firewall-cmd --reload
さて、ここでsshに戻ってきて対応やっていく。(sshポート変更、rootログイン禁止、パスワードログイン禁止)
$ vi /etc/ssh/sshd_config
で中身を、
# Port 22
→Port 12345

# PermitRootLogin yes
→PermitRootLogin no

PasswordAuthentication yes
→PasswordAuthentication no
設定したら、反映させる。
$ systemctl restart sshd.service
ここまでで、ローカルからhoge_userで鍵ログインだけでログインできるようになってるはず。$ ssh -p 12345 -i ~/.ssh/id_rsa hoge_user@IPアドレス(一応ポート・鍵指定した)
楽するために、ローカルに設定を書いておく。$ vim ~/.ssh/config
Host castodon
	HostName IPアドレス
	Port 12345
	User hoge_user
	IdentityFile ~/.ssh/id_rsa
こうしとくと、$ ssh hoge_user@castodonでログインできる。
マストドン立てていく
mastodonソース
mastodonのソースを取得する。forkしてるのでもおk。
$ git clone https://github.com/tootsuite/mastodon.git
nginx
nginxを入れる。$ vim /etc/yum.repos.d/nginx.repo
参考:Official Red Hat/CentOS packages
[nginx]
name=nginx repo
baseurl=http://nginx.org/packages/centos/7/$basearch/
gpgcheck=0
enabled=1
で、入れる。
$ yum -y --enablerepo=nginx install nginx
$ nginx -V # 確認
docker
$ yum -y install yum-utils
$ yum-config-manager --add-repo https://download.docker.com/linux/centos/docker-ce.repo
$ yum install docker-ce
# docker-compose
curl -L https://github.com/docker/compose/releases/download/1.12.0/docker-compose-`uname -s`-`uname -m` > /usr/bin/docker-compose
chmod +x /usr/bin/docker-compose
(docker-compose、/usr/local/binに入れてたけど、command not found出たので取り急ぎ上のように/usr/bin/に入れた)
ドメイン
自分でドメイン取る場合はドメインの対応をしておく。(ここは割愛する)
SSL
sslにするのに、Let'sEncryptを利用する。
$ git clone https://github.com/letsencrypt/letsencrypt
$ cd letsencypt
$ ./letsencypt-auto certonly
登録するメアド、証明書を取得するドメイン名を聞かれるので入力する。
マストドン設定
$ cd mastodon
$ cp .env.production.sample .env.production
$ vi .env.production
設定を記入する。
LOCAL_DOMAIN=利用するドメイン名
LOCAL_HTTPS=true

DB_USER=好きなユーザー名
DB_NAME=好きなDB名
DB_PASS=好きなパスワード

PAPERCLIP_SECRET=ここにsecret
SECRET_KEY_BASE=ここにsecret
OTP_SECRET=ここにsecret
各secretには以下のコマンドの実行結果を入れる。
$ docker-compose run --rm web rake secret
3回叩いてsecret作成して、.env.productionのsecretにそれぞれ記入する。
次に、dbの設定をする。vlumesのところをアンコメントする。$ vi docker-compose.yml
db:
    restart: always
    image: postgres:alpine
### Uncomment to enable DB persistance
    volumes:
      - ./postgres:/var/lib/postgresql/data

  redis:
    restart: always
    image: redis:alpine
### Uncomment to enable REDIS persistance
    volumes:
      - ./redis:/data
メール対応
メール送信に、今回はSparkPostを利用した。
流れは大きく下記。
1.SparkPostにsign upする。自分のメールアドレスを登録してverifyする。
2.利用するドメインを設定する。
3.DKIM Recordが表示されるので、コピーして、利用するドメインにTXTレコードを登録する。
4.利用するドメインがSparkPost側にverifyされる。
5.APIキーなどが表示されるので、メモっとく。
6..env.productionのemail configurationに情報を書く。
SMTP_SERVER=smtp.sparkpostmail.com
SMTP_PORT=587
SMTP_LOGIN=SMTP_Injection
SMTP_PASSWORD=生成したAPI鍵を記載
SMTP_FROM_ADDRESS=好きな名前@DKIM/CNAMEを登録したドメイン名
nginx設定
/etc/nginx/conf.d/mastodon.confな感じで作る。
見本はmastodon公式で公開されてるのをコピーしてくる。
- 80, 443のserver_nameのexample.comを、利用するドメインに変更する。
- SSLの設定を先ほど作った証明書を置いてある場所に変更する。
ssl_certificate     /etc/letsencrypt/live/利用するドメイン/fullchain.pem;
ssl_certificate_key /etc/letsencrypt/live/利用するドメイン/privkey.pem;
立ち上げる
# nginx
$ systemctl start nginx
$ systemctl enable nginx

# docker
$ docker-compose build
$ docker-compose up -d

# db
$ docker exec -it mastodon_db_1 /bin/bash
# デフォルトのpostgresユーザーを使う
su - postgres
createuser -P 好きな名前
createdb お好きなDB名 -O 今作ったユーザ名
exitしてコンテナから戻ってきたら、次にdb:migrateとassets:precompileをしていく。
$ docker-compose run --rm web rails db:migrate
$ docker-compose run --rm web rails assets:precompile
この辺りで利用するドメインにアクセスするとマストドンが表示されてるはず。
![]()
![]()
![]()
管理権限を渡す
管理ユーザーとして使うユーザーでログインした後に、管理権限を渡す。
$ docker exec -it mastodon_web_1 /bin/sh
RAILS_ENV=production bundle exec rails mastodon:make_admin USERNAME=利用する管理ユーザーID
これで管理ユーザーとして使えるようになったかなと。
![]()
![]()
![]()
おまけ(Mackerelを入れて監視する)
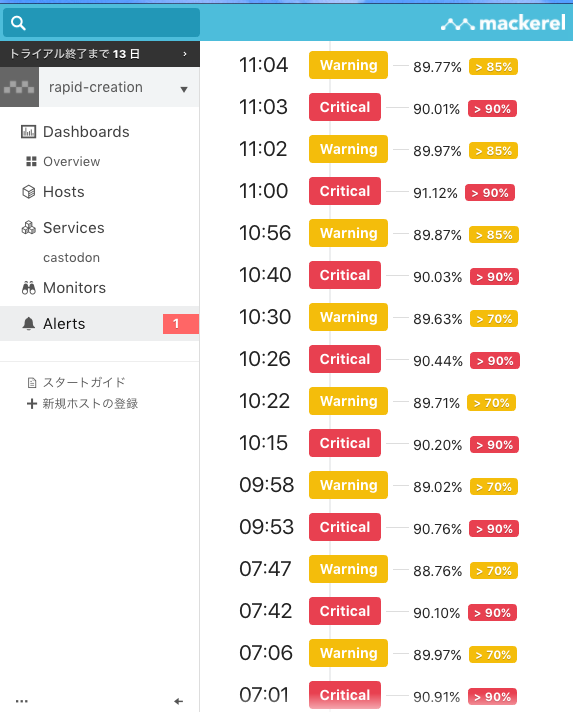
貧弱なサーバーの上に立てたので、どれくらいヤバイか監視したいので、Mackerelを入れた。サーバーホストを登録して、簡単なroleなどを設定するだけですぐできる。
メモリがつらい感じで(512MB)、メモリ監視をアラートに入れると常にアラートが出てつらい気持ちになれる。
参考
下記サイト参考にさせてもらいました ![]()
