-
ここで紹介する以外にも以下の方法が考えられます。
- X11Forwarding + Xming
- tigervnc + VNCクライアント
- tigervnc + xrdp + リモートデスクトップ
-
ゲストマシン上の個別のアプリケーションだけをホストOS側に表示するなら、1.で可能です
-
デスクトップ画面全体を表示するなら、2.、3.、およびここで紹介する方法を採る必要があります
Linuxマシンのデスクトップ画面にリモートアクセスしたい
モチベーション
- VNCクライアントは諸事情で使えない
- ブラウザを使ってLinuxマシンにアクセスしたい
1. インストール
-
以下2つのパッケージをインストールする
tigervnc-servertigervnc-server-applet
-
CentOSのDVD1枚目をマウントして、
tigervnc-serverをインストール- インターネットに繋がる環境ならrikenのリポジトリからインストール
# yum --disablerepo=\* --enablerepo=centos-dvd -y install tigervnc-server
Loaded plugins: fastestmirror, priorities, refresh-packagekit, security
Loading mirror speeds from cached hostfile
Setting up Install Process
Resolving Dependencies
--> Running transaction check
---> Package tigervnc-server.x86_64 0:1.1.0-5.el6_4.1 will be installed
--> Processing Dependency: xorg-x11-fonts-misc for package: tigervnc-server-1.1.0-5.el6_4.1.x86_64
--> Running transaction check
---> Package xorg-x11-fonts-misc.noarch 0:7.2-9.1.el6 will be installed
--> Finished Dependency Resolution

Dependencies Resolved

============================================================================================================
 Package                        Arch              Version                       Repository             Size
============================================================================================================
Installing:
 tigervnc-server                x86_64            1.1.0-5.el6_4.1               centos-dvd            1.1 M
Installing for dependencies:
 xorg-x11-fonts-misc            noarch            7.2-9.1.el6                   centos-dvd            5.8 M

Transaction Summary
============================================================================================================
Install       2 Package(s)

Total download size: 6.9 M
Installed size: 9.7 M
Downloading Packages:
------------------------------------------------------------------------------------------------------------
Total                                                                       227 MB/s | 6.9 MB     00:00
Running rpm_check_debug
Running Transaction Test
Transaction Test Succeeded
Running Transaction
  Installing : xorg-x11-fonts-misc-7.2-9.1.el6.noarch                                                   1/2
  Installing : tigervnc-server-1.1.0-5.el6_4.1.x86_64                                                   2/2
  Verifying  : xorg-x11-fonts-misc-7.2-9.1.el6.noarch                                                   1/2
  Verifying  : tigervnc-server-1.1.0-5.el6_4.1.x86_64                                                   2/2

Installed:
  tigervnc-server.x86_64 0:1.1.0-5.el6_4.1

Dependency Installed:
  xorg-x11-fonts-misc.noarch 0:7.2-9.1.el6

Complete!
- CentOSのDVD2枚目をマウントして、
tigervnc-server-appletをインストール- インターネットに繋がる環境ならrikenのリポジトリからインストール
# yum --disablerepo=\* --enablerepo=centos-dvd -y install tigervnc-server-applet
Loaded plugins: fastestmirror, priorities, refresh-packagekit, security
Loading mirror speeds from cached hostfile
Setting up Install Process
Resolving Dependencies
--> Running transaction check
---> Package tigervnc-server-applet.noarch 0:1.1.0-5.el6_4.1 will be installed
--> Finished Dependency Resolution

Dependencies Resolved

============================================================================================================
 Package                           Arch              Version                    Repository             Size
============================================================================================================
Installing:
 tigervnc-server-applet            noarch            1.1.0-5.el6_4.1            centos-dvd            106 k

Transaction Summary
============================================================================================================
Install       1 Package(s)

Total download size: 106 k
Installed size: 114 k
Downloading Packages:
Running rpm_check_debug
Running Transaction Test
Transaction Test Succeeded
Running Transaction
  Installing : tigervnc-server-applet-1.1.0-5.el6_4.1.noarch                                            1/1
  Verifying  : tigervnc-server-applet-1.1.0-5.el6_4.1.noarch                                            1/1

Installed:
  tigervnc-server-applet.noarch 0:1.1.0-5.el6_4.1

Complete!
2. VNCの設定
2.1 VNCアクセス用ユーザの作成
- adminグループがなければ、作成する
# grep ^admin /etc/group
# groupadd -g 20001 admin
- すでにいれば、次に
# grep ^admin /etc/group
admin:x:20001:vagrant
- VNCアクセス用ユーザ
vncuserを作成して、adminグループに所属させる
# groupadd -g 20002 vncuser
# useradd -u 20002 -g 20002 vncuser
# gpasswd -a vncuser admin
# grep ^admin /etc/group
admin:x:20001:vagrant,vncuser
# id vncuser
uid=20002(vncuser) gid=20002(vncuser) 所属グループ=20002(vncuser),20001(admin)
# passwd vncuser
ユーザー vncuser のパスワードを変更。
新しいパスワード:
新しいパスワードを再入力してください:
passwd: 全ての認証トークンが正しく更新できました。
- VNCアクセス時に使用するパスワードを設定する(上記で設定したユーザパスワードとは異なるので注意)
# su - vncuser
$ vncpasswd
Password:
Verify:
2.2 VNCの設定
-
/etc/sysconfig/vncservers末尾に以下2行を追記する-
VNCSERVERS="1:vncuser"は<ディスプレイ番号>:<アクセスするユーザ>を指定する -
VNCSERVERARGS[1]="-geometry 800x600"は-geometry <画面解像度>を指定する
-
/etc/sysconfig/vncservers
# The VNCSERVERS variable is a list of display:user pairs.
#
# Uncomment the lines below to start a VNC server on display :2
# as my 'myusername' (adjust this to your own).  You will also
# need to set a VNC password; run 'man vncpasswd' to see how
# to do that.
#
# DO NOT RUN THIS SERVICE if your local area network is
# untrusted!  For a secure way of using VNC, see this URL:
# http://kbase.redhat.com/faq/docs/DOC-7028

# Use "-nolisten tcp" to prevent X connections to your VNC server via TCP.

# Use "-localhost" to prevent remote VNC clients connecting except when
# doing so through a secure tunnel.  See the "-via" option in the
# `man vncviewer' manual page.

# VNCSERVERS="2:myusername"
# VNCSERVERARGS[2]="-geometry 800x600 -nolisten tcp -localhost"

VNCSERVERS="1:vncuser"
VNCSERVERARGS[1]="-geometry 1024x768"
- 複数ユーザ設定する場合は以下のようにすればよい
/etc/sysconfig/vncservers
VNCSERVERS="1:vncuser 2:root"
VNCSERVERARGS[1]="-geometry 1024x768"
VNCSERVERARGS[2]="-geometry 800x600"
2.3 起動スクリプトの修正
- VNCを起動する
# /etc/rc.d/init.d/vncserver start
VNC サーバー を起動中: 1:vncuser
New 'centos65.example.com:1 (vncuser)' desktop is centos65.example.com:1

Starting applications specified in /home/vncuser/.vnc/xstartup
Log file is /home/vncuser/.vnc/centos65.example.com:1.log

                                                           [  OK  ]
- ホスト名の名前解決ができない場合は、VNC起動時に以下が出力される
xauth: (stdin):1: bad display name "centos65.example.com:1" in "add" command
- GNOMEを起動するように起動スクリプト
xstartupを修正する
/home/vncuser/.vnc/xstartup
# !/bin/sh

[ -r /etc/sysconfig/i18n ] && . /etc/sysconfig/i18n
export LANG
export SYSFONT
vncconfig -iconic &
unset SESSION_MANAGER
unset DBUS_SESSION_BUS_ADDRESS
OS=`uname -s`
if [ $OS = 'Linux' ]; then
  case "$WINDOWMANAGER" in
    *gnome*)
      if [ -e /etc/SuSE-release ]; then
        PATH=$PATH:/opt/gnome/bin
        export PATH
      fi
      ;;
  esac
fi
if [ -x /etc/X11/xinit/xinitrc ]; then
  exec /etc/X11/xinit/xinitrc
fi
if [ -f /etc/X11/xinit/xinitrc ]; then
  exec sh /etc/X11/xinit/xinitrc
fi
[ -r $HOME/.Xresources ] && xrdb $HOME/.Xresources
xsetroot -solid grey
# xterm -geometry 80x24+10+10 -ls -title "$VNCDESKTOP Desktop" &    ← コメントアウト
# twm &                                                             ← コメントアウト
gnome-session &                                                    ← 追記
- VNCを再起動
# /etc/rc.d/init.d/vncserver restart
VNC サーバー を停止中: 1:vncuser                           [  OK  ]
VNC サーバー を起動中: 1:vncuser
New 'centos65.example.com:1 (vncuser)' desktop is centos65.example.com:1

Starting applications specified in /home/vncuser/.vnc/xstartup
Log file is /home/vncuser/.vnc/centos65.example.com:1.log

                                                           [  OK  ]
- VNCを自動起動するようにする
# chkconfig vncserver on
# chkconfig --list vncserver
vncserver       0:off   1:off   2:on    3:on    4:on    5:on    6:off
3. 動作確認
- ブラウザを起動するアクセス端末はWindowsを想定
3.1 VNCサーバ起動状態確認
- Linuxマシン上でVNCサーバがLISTENしているか確認する
- "5801"はブラウザ(Java Applet)アクセス
- "5901"はVNCクライアントアクセス
- ポート番号はそれぞれ
5800+<ディスプレイ番号>、5900+<ディスプレイ番号>
# netstat -lntp | egrep ":590|:580"
tcp        0      0 0.0.0.0:5901                0.0.0.0:*                   LISTEN      3305/Xvnc
tcp        0      0 0.0.0.0:5801                0.0.0.0:*                   LISTEN      3305/Xvnc
3.2 Java例外サイト設定
- 本節の内容を実施せずにブラウザアクセスすると以下のようにブロックされる
-
Windowsのスタートメニューから「Configure Java」を選択してJavaコントロールパネルを起動する
-
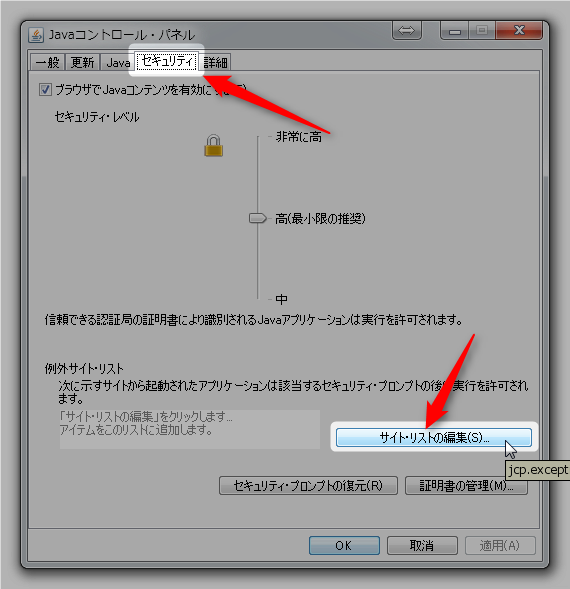
Javaコントロールパネルの例外サイトに
http://<LinuxゲストIPアドレス>:5801を追加する
- ブラウザに
http://<LinuxゲストIPアドレス>:5801を指定してアクセスする


