Intel Edisonはスイッチサイエンス版Eaglet(MFT版)ボードに乗せています。先日ピンヘッダをはんだ付けしたBMP180の大気圧センサーモジュールとI2C接続してセンシングしようと思います。I2CはGroveコネクタになっているので、4ピンコネクタをメス変換してピンヘッダでブレッドボードに挿します。Cylon.jsのBMP180ドライバーやmraaがうまく動作しないので、bmp085のNode.jsライブラリを使います。
Grove変換ケーブル
Groveコネクタをジャンパメスコネクタに変換して使います。ブレッドボードに両方長いピンヘッダを挿してメスコネクタピンケーブルと接続します。
SSCI-Eagletボード
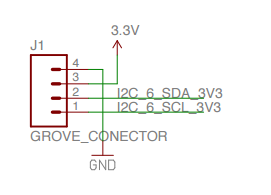
回路図を見ると、EagletボードのGroveコネクタにはI2C-6バスが3.3Vに変換されて割り当てられています。そのためメス変換ケーブルとブレッドボードを使いBMP180とI2C接続することができます。
cylon-intel-iotは失敗
最初はCylon.jsのBMP180ドライバーを使ってみます。cylon-i2cにbmp180.jsドライバーがあります。
プログラム
Intel EdisonにSSHでログインしてプロジェクトを作成します。
$ mkdir -p ~/node_apps/bmp180
$ cd ~/node_apps/bmp180
package.jsonに必要なパッケージを追加します。
{
  "name": "bmp180",
  "version": "0.0.1",
  "private": true,
  "dependencies": {
    "cylon-intel-iot": "0.5.0"
  },
  "scripts": {"start": "node app.js"}
}
npm installコマンドを実行してパッケージをインストールします。
$ npm install
Cylon.jsのBMP180ページにあるサンプルコードを書きます。
var Cylon = require('cylon');

Cylon.robot({
  connections: {
    edison: { adaptor: 'intel-iot' }
  },

  devices: {
    bmp180: { driver: 'bmp180' }
  },

  work: function(my) {
    my.bmp180.getTemperature(function(err, val) {
      if (err) {
        console.log(err);
        return;
      }

      console.log("getTemperature call:");
      console.log("\tTemp: " + val.temp + " C");
    });

    after((1).second(), function() {
      my.bmp180.getPressure(1, function(err, val) {
        if (err) {
          console.log(err);
          return;
        }

        console.log("getPressure call:");
        console.log("\tTemperature: " + val.temp + " C");
        console.log("\tPressure: " + val.press + " Pa");
      });
    });

    after((2).seconds(), function() {
      my.bmp180.getAltitude(1, null, function(err, val) {
        if (err) {
          console.log(err);
          return;
        }

        console.log("getAltitude call:");
        console.log("\tTemperature: " + val.temp + " C");
        console.log("\tPressure: " + val.press + " Pa");
        console.log("\tAltitude: " + val.alt + " m");
      });
    });
  }
}).start();
実行に失敗
残念ながらnpm startでプログラムを実行するとエラーになってしまいます。
$ npm start

> bmp180@0.0.1 start /home/root/node_apps/bmp180
> node app.js

I, [2015-03-12T18:50:49.062Z]  INFO -- : [Robot 19652] - Initializing connections.
I, [2015-03-12T18:50:49.553Z]  INFO -- : [Robot 19652] - Initializing devices.
I, [2015-03-12T18:50:49.574Z]  INFO -- : [Robot 19652] - Starting connections.
I, [2015-03-12T18:50:49.582Z]  INFO -- : [Robot 19652] - Starting devices.
node: /usr/include/node/node_buffer.h:76: static char* node::Buffer::Data(v8::Handle<v8::Value>): Assertion `val->IsObject()' failed.
Aborted

npm ERR! bmp180@0.0.1 start: `node app.js`
npm ERR! Exit status 134
npm ERR!
npm ERR! Failed at the bmp180@0.0.1 start script.
npm ERR! This is most likely a problem with the bmp180 package,
npm ERR! not with npm itself.
npm ERR! Tell the author that this fails on your system:
npm ERR!     node app.js
npm ERR! You can get their info via:
npm ERR!     npm owner ls bmp180
npm ERR! There is likely additional logging output above.
npm ERR! System Linux 3.10.17-poky-edison+
npm ERR! command "node" "/usr/bin/npm" "start"
npm ERR! cwd /home/root/node_apps/bmp180
npm ERR! node -v v0.10.28
npm ERR! npm -v 1.4.9
npm ERR! code ELIFECYCLE
npm ERR!
npm ERR! Additional logging details can be found in:
npm ERR!     /home/root/node_apps/bmp180/npm-debug.log
npm ERR! not ok code 0
BMP180 on I2C with mini breakout ...によると、どうもCylon.jsのドライバーにバグがあるみたいです。
BMP085のサンプルコード
BMP180はBMP085の後継機種なのでほぼ互換性があります。
I2C-6バスのモード設定
GroveコネクタにつながっているI2C-6を確認します。読み書きは可能なようです。
$ i2cdetect -F 6
Functionalities implemented by /dev/i2c-6:
I2C                              yes
SMBus Quick Command              no
SMBus Send Byte                  yes
SMBus Receive Byte               yes
SMBus Write Byte                 yes
SMBus Read Byte                  yes
SMBus Write Word                 yes
SMBus Read Word                  yes
SMBus Process Call               no
SMBus Block Write                no
SMBus Block Read                 no
SMBus Block Process Call         no
SMBus PEC                        no
I2C Block Write                  yes
I2C Block Read                   yes
Intel Edison GPIO Pin Multiplexing Guideやmraaのドキュメントでピン番号とピンモードの確認をします。
| MRAANumber | Physical Pin | Edison Pin | Pinmode0 | Pinmode1 | Pinmode2 |
|---|---|---|---|---|---|
| 6 | J17-7 | GP27 | GPIO-27 | I2C-6-SCL | |
| 8 | J17-9 | GP28 | GPIO-28 | I2C-6-SDA |
現在のピンモードの確認します。I2C-6バスはデフォルトでmode2なので使われていないようです。
$ cat /sys/kernel/debug/gpio_debug/gpio27/current_pinmux
mode2
$ cat /sys/kernel/debug/gpio_debug/gpio28/current_pinmux
mode2
ピンモードをmode1に変更してI2C接続できるようにします。
$ echo "mode1" > /sys/kernel/debug/gpio_debug/gpio27/current_pinmux
$ echo "mode1" > /sys/kernel/debug/gpio_debug/gpio28/current_pinmux
i2detectコマンドでI2C接続したBMP180が確認できました。
$ i2cdetect -y -r 6
     0  1  2  3  4  5  6  7  8  9  a  b  c  d  e  f
00:          -- -- -- -- -- -- -- -- -- -- -- -- --
10: -- -- -- -- -- -- -- -- -- -- -- -- -- -- -- --
20: -- -- -- -- -- -- -- -- -- -- -- -- -- -- -- --
30: -- -- -- -- -- -- -- -- -- -- -- -- -- -- -- --
40: -- -- -- -- -- -- -- -- -- -- -- -- -- -- -- --
50: -- -- -- -- -- -- -- -- -- -- -- -- -- -- -- --
60: -- -- -- -- -- -- -- -- -- -- -- -- -- -- -- --
70: -- -- -- -- -- -- -- 77
mraaのサンプルはよくわからない
mraaにはBMP180のサンプルコードはありませんが、bmp85.jsのコードがありました。ただコードの意味がよくわからないので今回は使いません。
bmp085
Node.jsのBMP085用ライブラリはmraaを含めていくつかあります。設定と出力がわかりやすいbmp085を使ってみます。
EdisonにSSH接続してプロジェクトを作成します。
$ mkdir -p ~/node_apps/bmp085
$ cd ~/node_apps/bmp085
package.jsonに必要なパッケージを記述します。
{
  "name": "bmp085",
  "version": "0.0.1",
  "private": true,
  "dependencies": {
    "bmp085": "0.3.2"
  },
  "scripts": {"start": "node app.js"}
}
npm installします。
$ npm install
app.jsを書きます。コンストラクタにBMP085のスレーブアドレスとI2C-6バスを指定します。
var BMP085 = require('bmp085'),
    barometer = new BMP085(
    {
        'mode': 1,
        'address': 0x77,
        'device': '/dev/i2c-6'
    });

barometer.read(function (data) {
    console.log("Temperature:", data.temperature);
    console.log("Pressure:", data.pressure);
});
npm startでプログラムを実行します。
$ npm start

> bmp085@0.0.1 start /home/root/node_apps/bmp085
> node app.js

Temperature: 24
Pressure: 1021.1134058432693
気温は摂氏24度、大気圧は1021.11 hPaです。
