先日IDCFクラウドのDocker上に構築したCloud9環境に、Node.js製blogframeworkのHexoを移設します。ほぼ1年間Nitrous.IO上でHexoで書いていましたので、ファイル数が増え無料プランだとMarkdownのコンパイルにだんだんと時間がかかるようになりプレビューがストレスでした。Nitrous.IO LITE終了がきっかけでしたが、自分クラウドのDocker環境に移設してとても快適になり結果的によかったです。
移設前のHexoの環境
パッケージの更新を怠っているのでバージョンは少し古く3.0.0を使っています。現在の最新版は3.1.1なのでこの機会にアップデートも行います。
{
  "name": "hexo-site",
  "version": "0.0.1",
  "private": true,
  "dependencies": {
    "hexo": "^3.0.0",
    "hexo-deployer-git": "0.0.4",
    "hexo-generator-archive": "^0.1.1",
    "hexo-generator-category": "^0.1.0",
    "hexo-generator-feed": "^1.0.1",
    "hexo-generator-index": "^0.1.0",
    "hexo-generator-sitemap": "^1.0.1",
    "hexo-generator-tag": "^0.1.0",
    "hexo-renderer-ejs": "^0.1.0",
    "hexo-renderer-marked": "^0.2.4",
    "hexo-renderer-stylus": "^0.2.0",
    "hexo-server": "^0.1.2"
  },
  "scripts": {"start": "node server.js"}
}
GitHubの設定
SSHキーの作成
HexoはGitHub Pagesにデプロイするので、予めDockerホスト上でキーペアを作成しておきます。
$ cd ~/.ssh
$ ssh-keygen -t rsa -b 4096 -C "ma6ato@gmail.com"
GitHubのSSHキー作成ページの手順で自分のプロファイルにキーを追加します。Docker Composeからcloud9サービスをupするときに作業ユーザーで先ほど作成した~/.sshディレクトリをボリュームとしてマウントします。
cloud9:
  build: .
  restart: always
  ports:
    - 8080:80
    - 15454:15454
    - 3000:3000
    - 4000:4000
  volumes:
    - ./workspace:/workspace
    - ~/.ssh/id_rsa:/root/.ssh/id_rsa:ro
    - /etc/localtime:/etc/localtime:ro
  command: node /cloud9/server.js --port 80 -w /workspace --auth xxx:xxx
.gitconfigの追加
/root/.gitconfigに予め用意しておきます。
[user]
        name = Masato Shimizu
        email = ma6ato@gmail.com
[push]
        default = simple
DockerfikeでADDします。
ADD gitconfig /root/.gitconfig
Dockerホストとタイムゾーンを合わせる
Dockerホストの/etc/localtimeをリードオンリーでDockerコンテナにマップします。これでDockerコンテナも同じタイムゾーンで起動します。HexoはURLに日付が入っているのでタイムゾーンが変わると時間帯によってはURLが変わってしまいます。
  volumes:
    - ./workspace:/workspace
    - ~/.ssh/id_rsa:/root/.ssh/id_rsa:ro
    - /etc/localtime:/etc/localtime:ro
Hexoのインストール
npmからhexo-cliをインストールします。Dockerコンテナ環境なのでnpmをグローバルにインストールしても環境が汚れることを気にしなくて済みます。旧環境のblog/sourceディレクトリをGitHub上で管理しているので新環境にHexoをクリーンインストールした後、git cloneしてsourceディレクトリをコピーしようと思います。
npm install
インストールの手順はHexoに書いてあるようにとても簡単です。Dockerfileにhexo-cliのインストールを追加します。
FROM node:0.12
MAINTAINER Masato Shimizu <ma6ato@gmail.com>

RUN git clone https://github.com/c9/core.git /cloud9 && \
    cd /cloud9 && ./scripts/install-sdk.sh

RUN npm install hexo-cli -g
ADD gitconfig /root/.gitconfig

WORKDIR /workspace
Dockerイメージをビルドし直して起動します。
$ docker-compose build
$ docker-compose up -d
Cloud9をWebブラウザから開いてコンソールからhexo initを実行します。
$ cd /workspace
$ hexo init blog
ここで一度commitします。
$ cd blog
$ git config --global user.email "ma6ato@gmail.com"
$ git config --global user.name "Masato Shimizu"
$ git init
$ git add -A
$ git commit -m 'first commit'
旧環境ではいくつかプラグインを使っているので追加でインストールします。
$ npm install hexo-deployer-git hexo-generator-feed hexo-generator-sitemap --save
最終的に以下のようなpackage.jsonになりました。
{
  "name": "hexo-site",
  "version": "0.0.0",
  "private": true,
  "hexo": {
    "version": "3.1.1"
  },
  "dependencies": {
    "hexo": "^3.1.0",
    "hexo-deployer-git": "0.0.4",
    "hexo-generator-archive": "^0.1.2",
    "hexo-generator-category": "^0.1.2",
    "hexo-generator-feed": "^1.0.2",
    "hexo-generator-index": "^0.1.2",
    "hexo-generator-sitemap": "^1.0.1",
    "hexo-generator-tag": "^0.1.1",
    "hexo-renderer-ejs": "^0.1.0",
    "hexo-renderer-marked": "^0.2.4",
    "hexo-renderer-stylus": "^0.2.0",
    "hexo-server": "^0.1.2"
  }
}
デフォルトの状態でプレビューをして確認します。デフォルトは4000 portですが、Cloud9コンテナはDockerホストの5000 portにマップしているので-pフラグから指定します。
$ hexo server -p 5000
INFO  Hexo is running at http://0.0.0.0:5000/. Press Ctrl+C to stop.
WebブラウザからIDCFクラウドのDockerのCloud9コンテナで起動しているHexoサーバーに接続します。ややこしいです。
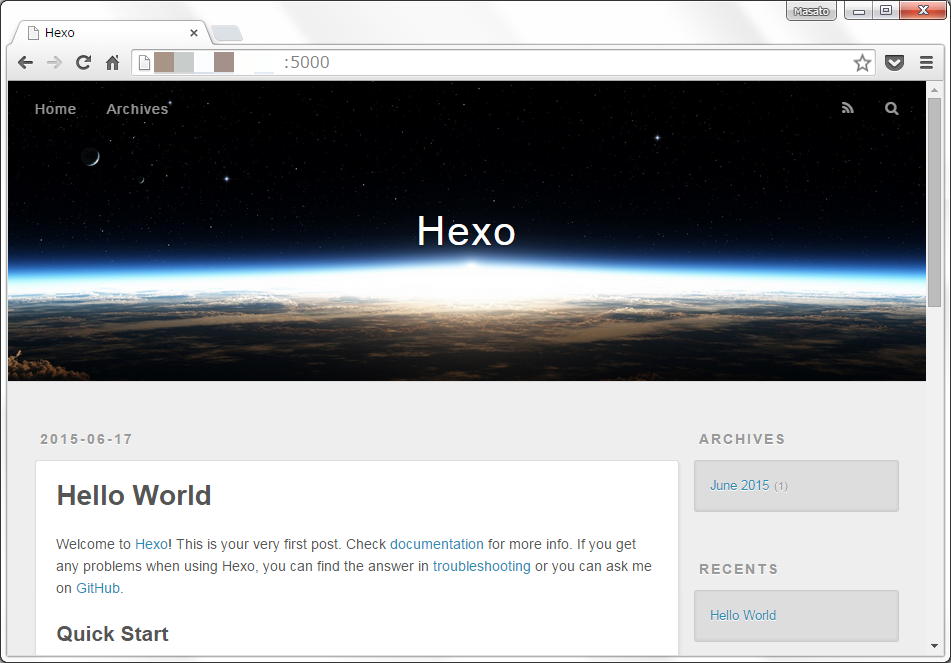
ちゃんとページが表示されているので、ここでcommitしておきます。
$ git add -A
$ git commit -m 'plugin install'
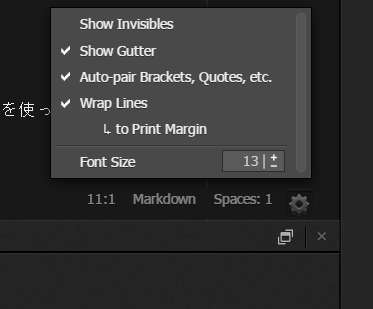
Cloud9のエディタ設定
HexoのブログはMarkdownで記述します。Cloud9は日本語も使えますが、エディタの設定を折り返しにしないととても書きにくいです。エディタの右下にあるギアアイコンをクリックしてWrap linesにチェックをいれます。
NexTテーマ
Hexoはテーマを変更することでブログのテイストを変更することができます。先ほど確認した画面はデフォルトのlandscapeです。久しぶりにテーマのページを除いてみたらまた増えてました。好みのテーマを探すのも楽しいです。最近はNexTが気に入っています。
テーマのインストールも簡単で、GitHubからthemeディレクトリにcloneするだけです。blogインスタンスのディレクトリをgitで管理しているのでサブモジュールとしてcloneします。
$ cd /workspace/blog
$ git submodule add https://github.com/iissnan/hexo-theme-next themes/next
プレビューするとこんな感じです。
設定変更
Hexoのblogインスタンスの設定と、NexTテーマの設定をそれぞれ変更します。
blog/_config.yml
設定方法は好みですが以下のdiffのように編集しました。YAMLの設定ファイルなのでわかりやすいです。
$ diff --git a/_config.yml b/_config.yml
index 57e708e..5de1f0e 100644
--- a/_config.yml
+++ b/_config.yml
@@ -3,16 +3,18 @@
 ## Source: https://github.com/hexojs/hexo/

 # Site
-title: Hexo
+title: "masato's blog"
 subtitle:
-description:
-author: John Doe
-language:
-timezone:
+description: "IoT, RaspberryPi, Arduino, Meshblu, Docker, Node.js, Clojure, ClojureScript"
+author: "Masato Shimizu"
+email: ma6ato@gmail.com
+language: default
+avatar: /images/profile.png
+timezone: Asia/Tokyo

 # URL
 ## If your site is put in a subdirectory, set url as 'http://yoursite.com/child' and root as '/child/'
-url: http://yoursite.com
+url: http://masato.github.io/
 root: /
 permalink: :year/:month/:day/:title/
 permalink_defaults:
@@ -34,14 +36,13 @@ titlecase: false # Transform title into titlecase
 external_link: true # Open external links in new tab
 filename_case: 0
 render_drafts: false
-post_asset_folder: false
+post_asset_folder: true
 relative_link: false
 future: true
 highlight:
   enable: true
   line_number: true
   auto_detect: true
-  tab_replace:
+  tab_replace: true

 # Category & Tag
 default_category: uncategorized
@@ -52,7 +53,8 @@ tag_map:
 ## Hexo uses Moment.js to parse and display date
 ## You can customize the date format as defined in
 ## http://momentjs.com/docs/#/displaying/format/
-date_format: YYYY-MM-DD
+#date_format: YYYY-MM-DD
+date_format: MMM D YYYY
 time_format: HH:mm:ss

 # Pagination
@@ -63,9 +65,36 @@ pagination_dir: page
 # Extensions
 ## Plugins: http://hexo.io/plugins/
 ## Themes: http://hexo.io/themes/
-theme: landscape
+theme: next

 # Deployment
 ## Docs: http://hexo.io/docs/deployment.html
 deploy:
-  type:
+  type: git
+  repo: git@github.com:masato/masato.github.io.git
+
+sitemap:
+  path: sitemap.xml
+
+feed:
+  type: rss2
+  path: rss2.xml
+  limit: 20
+
+tag_generator:
+  per_page: 10
+
+archive_generator:
+  per_page: 10
+  yearly: true
+  monthly: true
+
+
+# Archives
+## 2: Enable pagination
+## 1: Disable pagination
+## 0: Fully Disable
+archive: 2
+category: 2
+tag: 2
themes/next/_config.yml
NexTテーマも同様に編集します。こちらにはテーマ固有の設定を定義しています。
diff --git a/_config.yml b/_config.yml
index feb2741..b5ade09 100755
--- a/_config.yml
+++ b/_config.yml
@@ -11,18 +11,18 @@ menu:
 favicon: /favicon.ico

 # Set default keywords (Use a comma to separate)
-keywords: "Hexo,next"
+keywords: "IoT,RaspberryPi,Arduino,Meshblu,Docker,Node.js,Clojure,ClojureScript"

 # Set rss to false to disable feed link.
 # Leave rss as empty to use site's feed link.
 # Set rss to specific value if you have burned your feed already.
-rss:
+rss: /rss2.xml

 # Icon fonts
 # Place your font into next/source/fonts, specify directory-name and font-name here
 # Avialable: default | linecons | fifty-shades | feather
-icon_font: default
-#icon_font: fifty-shades
+#icon_font: default
+icon_font: fifty-shades
 #icon_font: feather
 #icon_font: linecons

@@ -74,3 +74,7 @@ images: images

 # Theme version
 version: 0.4.3
+
+# Miscellaneous
+google_analytics: UA-xxx
+favicon: /favicon.ico
デフォルトの画像ファイルなどを入れ替えます。
/workspace/blog/themes/next/source/favicon.ico
/workspace/blog/themes/next/source/images/profile.png
設定ファイルの編集が終わったのでcommitします。
$ git add -A
$ git commit -m 'next config edit'
フォントの変更
font-familyも好みで変更します。NexTテーマの場合CSSフレームワークはStylです。これはテーマを作る作者によって様々です。
// Font families.
//$font-family-sans-serif   = "Avenir Next", Avenir, Tahoma, Vendana, sans-serif
//$font-family-serif        = "PT Serif", Cambria, Georgia, "Times New Roman", serif
//$font-family-monospace    = "PT Mono", Consolas, Monaco, Menlo, monospace
//$font-family-chinese      = "Microsoft Jhenghei", "Hiragino Sans GB", "Microsoft YaHei"
//$font-family-base         = Lato, $font-family-chinese, sans-serif
//$font-family-headings     = Cambria, Georgia, $font-family-chinese, "Times New Roman", serif
//$font-family-posts        = $font-family-base

$font-family-sans-serif = 'Open Sans','Helvetica Neue','Helvetica','Arial','ヒラギノ角ゴ Pro W3','Hiragino Kaku Gothic Pro','メイリオ', Meiryo,'MS Pゴシック','MS PGothic',sans-serif
$font-family-serif = Georgia, "Times New Roman", serif
$font-family-monospace = "Source Code Pro", Consolas, Monaco, Menlo, Consolas, monospace

$font-family-headings     = Lato, $font-family-sans-serif
$font-family-posts        = Lato, $font-family-sans-serif
$font-family-base         = $font-family-posts
これでHexoの設定は終了です。コミットしておきます。
$ git add -A
$ git commit -m 'next theme config'
$ cd workspace blog
Markdownのpostファイルのコピー
記述したMarkdownはすべてGitHub上で管理しています。IDCFクラウド上のDockerホストにSSH接続してDocker Composeを起動しているディレクトリに移動します。docker-compose.ymlではCloud9のworkspaceをホストのディレクトリにマウントしています。
cloud9:
  build: .
  restart: always
  ports:
    - 8080:80
    - 15454:15454
    - 3000:3000
    - 4000:4000
  volumes:
    - ./workspace:/workspace
    - ~/.ssh/id_rsa:/root/.ssh/id_rsa/:ro
    - /etc/localtime:/etc/localtime:ro
  command: node /cloud9/server.js --port 80 -w /workspace --auth xxx:xxx
blogインスタンスのsourceディレクトリは一度削除してまるごとコピーします。最後に作り直したblogインスタンスのディレクトリをGitHubの新しいリポジトリにpushして移設は終了です。
GitHub Pagesにデプロイ
blogインスタンスディレクトリの_config.ymlにデプロイの設定をします。
デプロイ
 # Deployment
 ## Docs: http://hexo.io/docs/deployment.html
 deploy:
  type: git
  repo: git@github.com:masato/masato.github.io.git
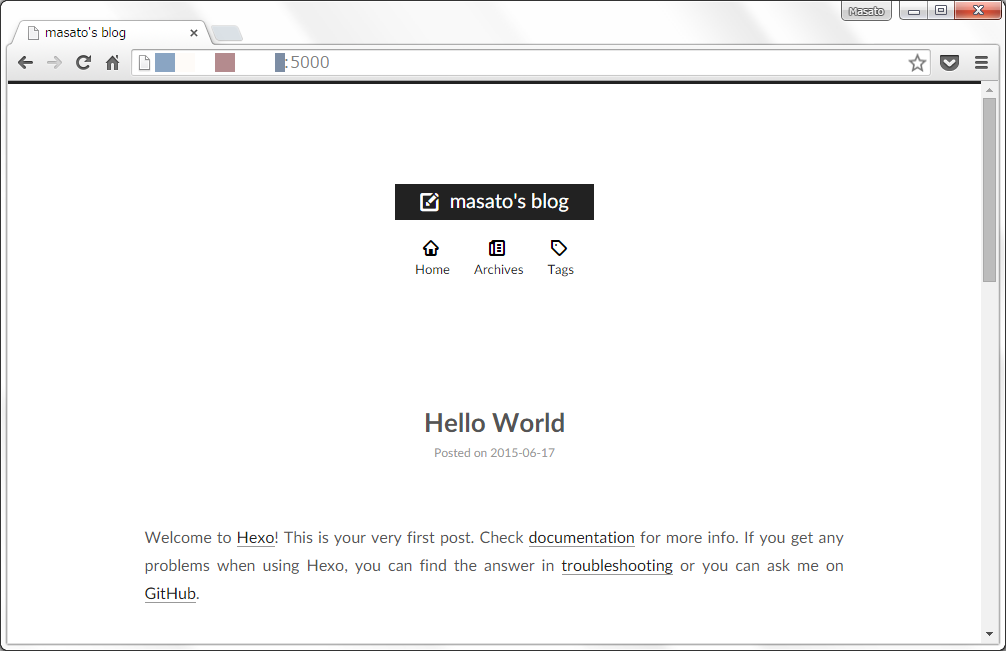
Cloud9のコンソールからhexoコマンドを使ってデプロイします。この例では最初にコンパイル先のディレクトリをきれいにします。--generateフラグでMarkdownのコンパイルを行いデプロイしています。
$ cd /workspace/blog
$ hexo clean && hexo deploy --generate
Nitrous.IOの無料版ではcdコマンドでさえ重いくらいになっていましたが、Markdownのコンパイルもとても速くなりさくさく動くようになりました。Cloud IDEでブログを書いてGitHub Pagesにデプロイする環境が自分クラウドにできました。こちらがCloud9の新環境でデプロイしたHexoのページです。