カーネルが3.8.13でもBeagleBone Blackで1-WireのDS18B20を使えるようにするのは結構面倒ですが、capemgrを使った方法が紹介されているのでなんとかなりそうです。DTSを記述後DTCでコンパイルして作成したDTBのバイナリを使ってpin muxしてピンの機能を変更します。
用意するもの
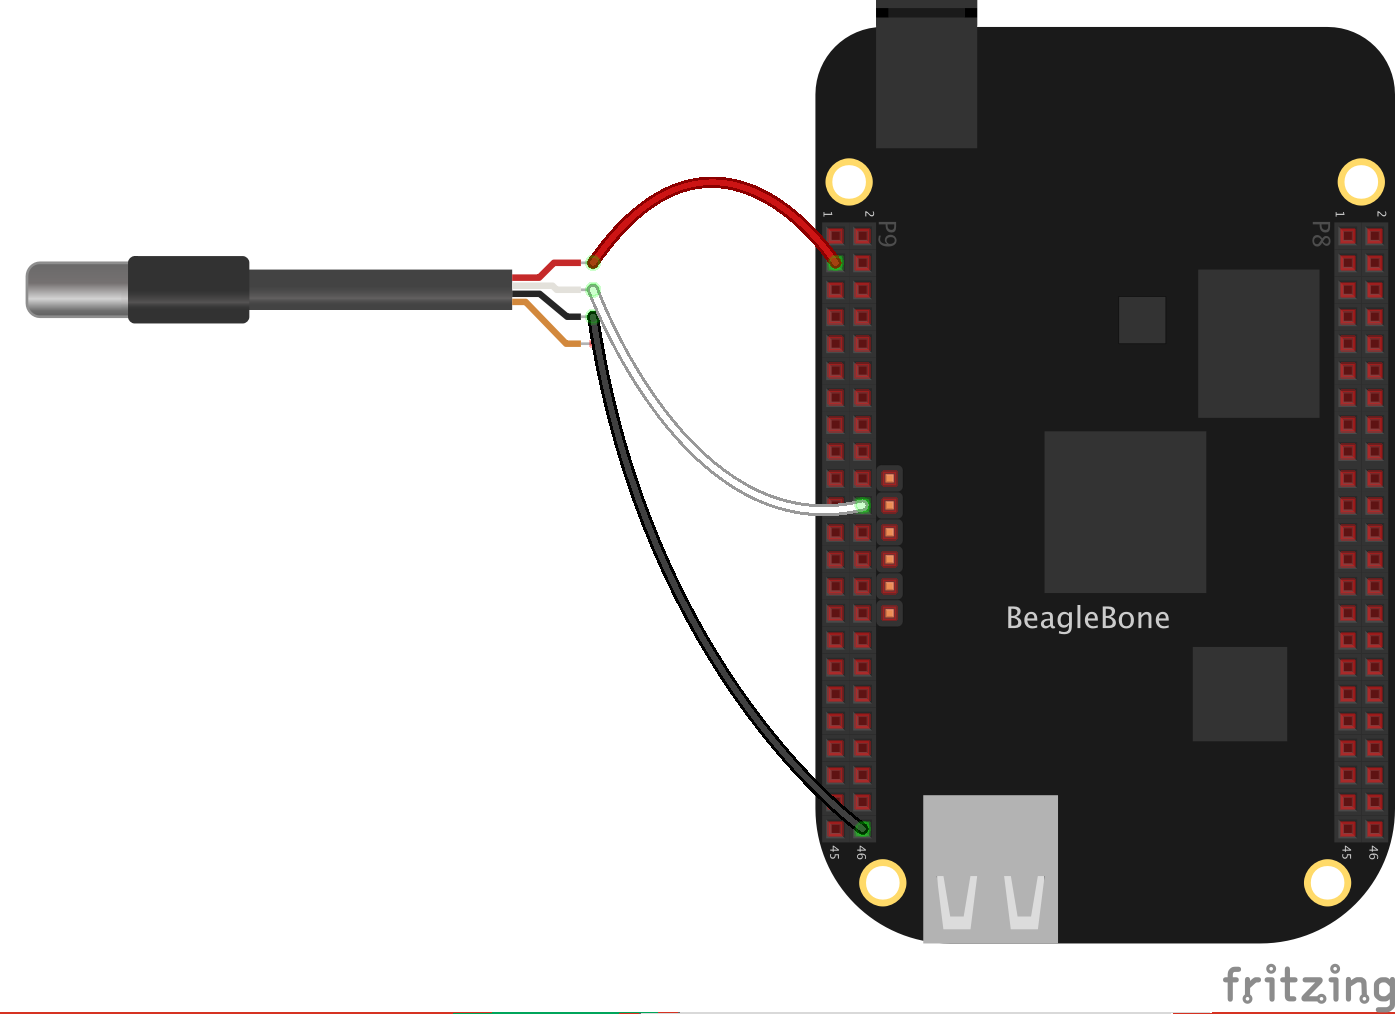
DS18B20は赤(VCC)、黄色(DQ)、黒 (GND)の3本線です。水温を測りたいので防水仕様を購入しました。ミノムシクリップではさんでBeagleBone Blackに配線します。
配線
Fritzingのパーツは4本線ですが、購入したDS18B20は3本線でした。
- DQ -> P9_22
- GND -> P9_46 (GND)
- VDD -> P9_3 (VDD 5V)
DeviceTree
DeviceTreeとはARM Linuxで良く使われるハードウェアの詳細を記述したデータ構造体のことです。ハードウェアの詳細をKernelに書かずにDevice Treeの構造体の外部に記述します。
- Deviece Tree Source (DTS) を作成
- Device Tree Compiler (DTC) でコンパイル
- Device Tree Blob (DTB) のバイナリが作成される
DTSの作成
DTSを記述します。Dallas one-wire temperature reading on BeagleBone Black with dtoに掲載されているDTSをコピーしてファイルを作成します。
/dts-v1/;
/plugin/;

/ {
	compatible = "ti,beaglebone", "ti,beaglebone-black";

	part-number = "BB-W1";
	version = "00A0";

	/* state the resources this cape uses */
	exclusive-use =
		/* the pin header uses */
		"P9.22",
		/* the hardware IP uses */
		"gpio0_2";

	fragment@0 {
               target = <&am33xx_pinmux>;
               __overlay__ {
					dallas_w1_pins: pinmux_dallas_w1_pins {
						pinctrl-single,pins = < 							0x150 0x37 						>;
					};
               };
	};

	fragment@1 {
               target = <&ocp>;
               __overlay__ {
		       onewire@0 {
			       compatible      = "w1-gpio";
			       pinctrl-names   = "default";
			       pinctrl-0       = <&dallas_w1_pins>;
			       status          = "okay";

			       gpios = <&gpio1 2 0>;
		       };
         };
	};
};
DTCでコンパイル
BeagleBone Blackのカーネル情報を確認します。
$ uname -a
Linux beagle
bone 3.8.13-bone72 #1 SMP Tue Jun 16 21:36:04 UTC 2015 armv7l GNU/Linux
DTCをインストールします。DTCのバーションは1.4.0でした。
$ wget -c https://raw.githubusercontent.com/RobertCNelson/tools/master/pkgs/dtc.sh
$ chmod +x dtc.sh
$ ./dtc.sh
$ dtc -v
Version: DTC 1.4.0-gf345d9e4
コンパイルします。
$ dtc -O dtb -o BB-W1-00A0.dtbo -b 0 -@ BB-W1-00A0.dts
DTBのインストール
コンパイルして作成したDTBのバイナリをインストールします。
$ sudo cp BB-W1-00A0.dtbo /lib/firmware/
/sys/devices/bone_capemgr.9/slotsへの記述は再起動後消えてしますので、とりあえずDS18B20を使うときは毎回実行して有効にします。
$ sudo sh -c 'echo BB-W1:00A0 > /sys/devices/bone_capemgr.9/slots'
$ cat /sys/devices/bone_capemgr.9/slots
 0: 54:PF---
 1: 55:PF---
 2: 56:PF---
 3: 57:PF---
 4: ff:P-O-L Bone-LT-eMMC-2G,00A0,Texas Instrument,BB-BONE-EMMC-2G
 5: ff:P-O-L Bone-Black-HDMI,00A0,Texas Instrument,BB-BONELT-HDMI
 7: ff:P-O-L Override Board Name,00A0,Override Manuf,BB-W1
DS18B20
DS18B20を使ってセンサーデータを取得する場合、/sys/bus/w1/devices/の下にある28-xxのディレクトリに移動します。w1_slaveを読むと温度が計測できます。摂氏28.4度Cです。
$ cd /sys/bus/w1/devices/
$ ls
28-0414708c9eff  w1_bus_master1
$ cd 28-0414708c9eff
$ cat w1_slave
c7 01 55 00 7f ff 0c 10 c3 : crc=c3 YES
c7 01 55 00 7f ff 0c 10 c3 t=28437
Pythonのプログラム
簡単なPythonプログラムを書いてみます。
# !/usr/bin/env python
import time

w1 = "/sys/bus/w1/devices/28-0414708c9eff/w1_slave"

while True:
    raw = open(w1, "r").read()
    celsius = float(raw.split("t=")[-1])/1000
    print("Temperature is {0:.2f} degrees".format(celsius))
    time.sleep(5)
このDebianにはPythonもインストールされていないのでインストールします。
$ sudo apt-get update
$ sudo apt-get install python
5秒間隔で温度を計測し始めました。
$ chmod +x w1_test.py
$ ./w1_test.py
./w1_test.py
Temperature is 28.12 degrees
Temperature is 28.12 degrees
Temperature is 28.12 degrees