##Compassってなに?
Sassをもとに書かれたフレームワーク。
以下の特徴があります。
- ソースが綺麗になる
- Webでよく使われる項目がたくさんある
- CSSスプライトが超絶簡単にできる
- CSS3が簡単に使える
- 拡張も簡単
##インストール
terminalから compass っていう gem をインストールするだけ。
gem update --system
gem install compass
##どうやって使うの?
###1, Compassプロジェクトの作成
任意のフォルダに移動してcompassのprojectを作成する。
compass create project名
今回は compass-test ってproject作るんなら↓
compass create compass-test
###2, config.rbの設定
config.rbの中身はこんな感じ↓
インラインで説明書いてます。
# Require any additional compass plugins here.

# Set this to the root of your project when deployed:
http_path = "/"					#HTTPパス
css_dir = "stylesheets"			#cssが書き出されるディレクトリ名
sass_dir = "sass"				#sass(scss)ファイルがあるディレクトリ名
images_dir = "images"			#画像を置くディレクトリ名
javascripts_dir = "javascripts"	#javascriptを置くディレクトリ名

# You can select your preferred output style here (can be overridden via the command line):
# output_style = :expanded or :nested or :compact or :compressed
output_style = :expanded		#CSSへの書き出しスタイル

# To enable relative paths to assets via compass helper functions. Uncomment:
relative_assets = true

# To disable debugging comments that display the original location of your selectors. Uncomment:
line_comments = false

# If you prefer the indented syntax, you might want to regenerate this
# project again passing --syntax sass, or you can uncomment this:
# preferred_syntax = :sass
# and then run:
# sass-convert -R --from scss --to sass sass scss && rm -rf sass && mv scss sass
output_styleに関してはあとで追記。
##使ってみよう!
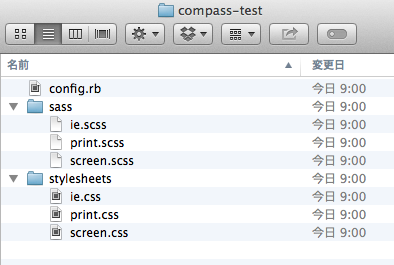
sass ディレクトリに application.scss ファイルを作成。
まあ名前は別に他の名前でもいいけど。
次に、terminalで先ほど作成したディレクトリに移動してから、
compass watch コマンドを実行。
cd compass-test
compass watch
compass watch しておくことで、
sass ディレクトリで保存したものが
stylesheets ディレクトリにリアルタイムに書きだされる。
次に、 appication.scss を開いて、
1行目に以下のように記述するとcompassが使える。
@import 'compass';
これでcompassが使えるようになったぜ!
保存すると、
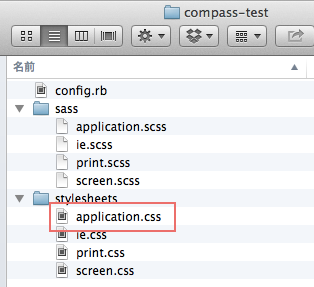
stylesheets ディレクトリに
application.css が書き出される。

わーい、できた!
sass ディレクトリで作ったものが stylesheets ディレクトリに書きだされる。
config.rb で設定したとおりですね。
このままだと application.css には何も記述されていないので、
取り敢えずなんか適当に書いてみよう。
@import 'compass';

.radius {
  @include border-radius;
}
すると
.radius {
  -webkit-border-radius: 5px;
  -moz-border-radius: 5px;
  -ms-border-radius: 5px;
  -o-border-radius: 5px;
  border-radius: 5px;
}
ベンダープレフィックスまで全部書き出されてる〜♪
超便利!そう、これが compass です!
##何ができる?
###1, CSS3がめっちゃ簡単に書ける
CSS3ってさ、基本はベンダープレフィックス書かないとダメじゃん?
あれってめっちゃめんどくさい。。。
どのCSS3がプレフィックスが必要なのかも覚えてないし、
そうなると都度都度調べたりしてコピペしてまた忘れてまた調べてコピペして。。。
でもcompassさん、全部やってくれる〜♪
以下、よく使う項目だけまとめてみました。
.great-compass {
	@include border-radius(3px);
	@include box-shadow;
	@include box-sizing(border-box);
	@include opacity(.8);
	@include text-shadow;
	@include transform(scale(30,20));
	@include transition;
}
.great-compass {
  -webkit-border-radius: 3px;
  -moz-border-radius: 3px;
  -ms-border-radius: 3px;
  -o-border-radius: 3px;
  border-radius: 3px;

  -webkit-box-shadow: 0px 0px 5px #333333;
  -moz-box-shadow: 0px 0px 5px #333333;
  box-shadow: 0px 0px 5px #333333;

  -webkit-box-sizing: border-box;
  -moz-box-sizing: border-box;
  box-sizing: border-box;

  filter: progid:DXImageTransform.Microsoft.Alpha(Opacity=80);
  opacity: 0.8;

  text-shadow: 0px 0px 1px #aaaaaa;

  -webkit-transform: scale(30, 20);
  -moz-transform: scale(30, 20);
  -ms-transform: scale(30, 20);
  -o-transform: scale(30, 20);
  transform: scale(30, 20);

  -webkit-transition: all 1s;
  -moz-transition: all 1s;
  -o-transition: all 1s;
  transition: all 1s;
}
他にもいろいろある。こちらを参照のこと。
###2, CSSSpriteがめっちゃ簡単にできる
CSSSpriteってわざわざフォトショとかで加工してとかやってませんか?
ちなみに俺はやってますorz
でーもー、compass使うとめっちゃ簡単。
まず、プロジェクトの sass ディレクトリと同じ階層に images ディレクトリを作成し、
またその下にまとめたい画像の名前(例えばicon)とかでディレクトリを作成。
使う画像をその中にぶち込みます。

んでもって、 application.scss に以下を記述するとスプライトできる。
@import 'icon/*.png';
@include all-icon-sprites;
.icon-sprite, .icon-iconmonstr-archive-icon-256, .icon-iconmonstr-male-icon-256, .icon-iconmonstr-pdf-file-icon-256, .icon-iconmonstr-script-icon-256 {
  background: url('../images/icon-s88f6a42c38.png') no-repeat;
}

.icon-iconmonstr-archive-icon-256 {
  background-position: 0 -512px;
}

.icon-iconmonstr-male-icon-256 {
  background-position: 0 -256px;
}

.icon-iconmonstr-pdf-file-icon-256 {
  background-position: 0 -768px;
}

.icon-iconmonstr-script-icon-256 {
  background-position: 0 0;
}
いろんな細かい設定もできるんですが、今回は省きます。
チュートリアル見てみてください。
###3, より便利な機能
####reset
reset cssが用意されている。
俺はresetあんまり好きじゃないから使わないが。。。
@include 'compass/reset';
html, body, div, span, applet, object, iframe,
h1, h2, h3, h4, h5, h6, p, blockquote, pre,
a, abbr, acronym, address, big, cite, code,
del, dfn, em, img, ins, kbd, q, s, samp,
small, strike, strong, sub, sup, tt, var,
b, u, i, center,
dl, dt, dd, ol, ul, li,
fieldset, form, label, legend,
table, caption, tbody, tfoot, thead, tr, th, td,
article, aside, canvas, details, embed,
figure, figcaption, footer, header, hgroup,
menu, nav, output, ruby, section, summary,
time, mark, audio, video {
  margin: 0;
  padding: 0;
  border: 0;
  font: inherit;
  font-size: 100%;
  vertical-align: baseline;
}

html {
  line-height: 1;
}

ol, ul {
  list-style: none;
}

table {
  border-collapse: collapse;
  border-spacing: 0;
}

caption, th, td {
  text-align: left;
  font-weight: normal;
  vertical-align: middle;
}

q, blockquote {
  quotes: none;
}
q:before, q:after, blockquote:before, blockquote:after {
  content: "";
  content: none;
}

a img {
  border: none;
}

article, aside, details, figcaption, figure, footer, header, hgroup, menu, nav, section, summary {
  display: block;
}
####link-colors
a {
	@include link-colors(blue, red, pink);
}
a {
  color: blue;
}
a:hover {
  color: red;
}
a:active {
  color: pink;
}
####horizontal-list
ul {
	@include horizontal-list(5px 10px);
}
ul {
  margin: 0;
  padding: 0;
  border: 0;
  overflow: hidden;
  *zoom: 1;
}
ul li {
  list-style-image: none;
  list-style-type: none;
  margin-left: 0;
  white-space: nowrap;
  display: inline;
  float: left;
  padding-left: 5px 10px;
  padding-right: 5px 10px;
}
ul li:first-child, ul li.first {
  padding-left: 0;
}
ul li:last-child {
  padding-right: 0;
}
ul li.last {
  padding-right: 0;
}
####clearfix
div {
	@include clearfix;
}
div {
  overflow: hidden;
  *zoom: 1;
}
####inline-block
div {
	@include inline-block;
}
div {
  display: -moz-inline-stack;
  display: inline-block;
  vertical-align: middle;
  *vertical-align: auto;
  zoom: 1;
  *display: inline;
}
ellipsis
div {
	@include ellipsis;
}
div {
  white-space: nowrap;
  overflow: hidden;
  -ms-text-overflow: ellipsis;
  -o-text-overflow: ellipsis;
  text-overflow: ellipsis;
}
####replace-text
div {
	@include replace-text('/icon/iconmonstr-archive-icon-256.png');
}
div {
  text-indent: -119988px;
  overflow: hidden;
  text-align: left;
  background-image: url(/icon/iconmonstr-archive-icon-256.png);
  background-repeat: no-repeat;
  background-position: 50% 50%;
}
その他、結構あります。
リファレンス見てみてください。

