はじめに
自分用メモです、経緯は下記。
- 前回作成したようなBottleアプリケーションをローカルでなくインターネット上で動かしてみたかった。
- 今更ながらHerokuを使ってみたかった。
- ローカル環境を構築せずに開発ができるというCloud9の存在を知って、使ってみたかった。
前提条件とか
- Cloud9, heroku, GitHubのアカウントは作成済み
- Pythonはバージョン3.5.1を使う
やったこと
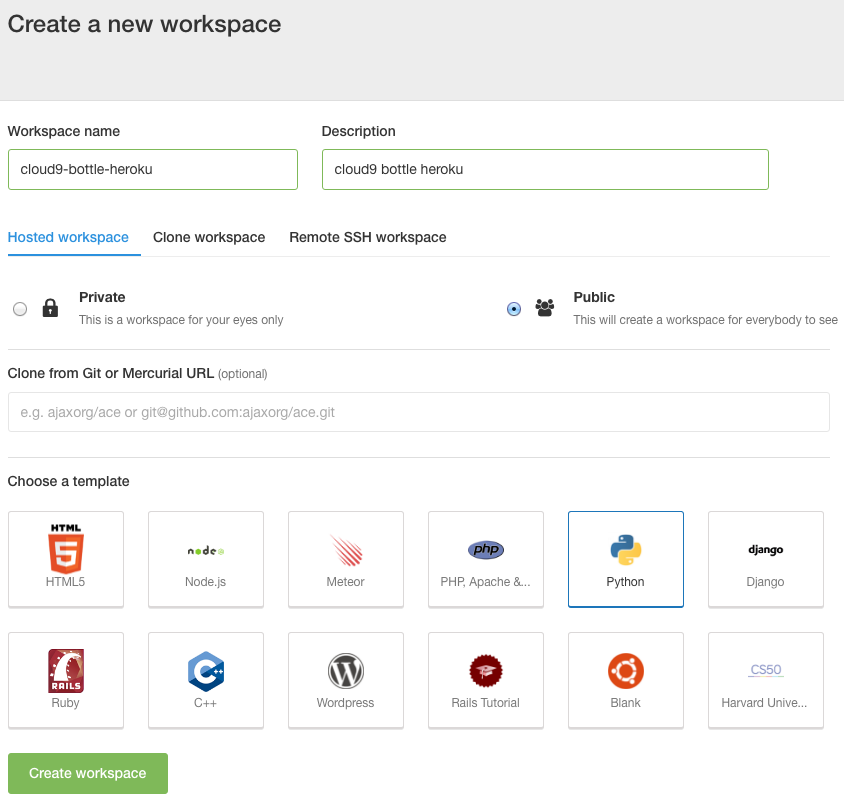
【Cloud9】ワークスペースの作成
https://c9.io/new
Choose a templateでPythonを指定してCreate workspace
【Cloud9】Pythonのバージョンアップ
Cloud9のデフォルトだとPythonのバージョンはPython2系なので、Python3.5.1を利用するよう変更しておく。
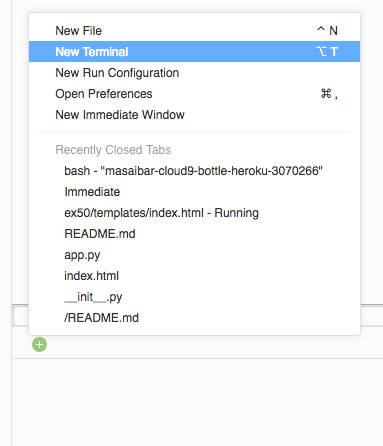
画面下部の緑色の+ボタンを押して[New Terminal]でターミナルを開き、そこにコマンドを打っていく。
# 変更前のバージョンの確認
$ python --version
Python 2.7.6

# Python2系を退避しておく
$ sudo mv /usr/bin/python /usr/bin/python2

# Python3.5にリンクを張る
$ sudo ln -s /usr/bin/python3.5 /usr/bin/python

# バージョンが変わったことを確認
$ python --version
Python 3.5.1
【Cloud9】bottleの導入
そのままだと今回利用するbottleは入っていないので導入しておく。
$ sudo pip install bottle
Downloading/unpacking bottle
  Downloading bottle-0.12.9.tar.gz (69kB): 69kB downloaded
  Running setup.py (path:/tmp/pip_build_root/bottle/setup.py) egg_info for package bottle

Installing collected packages: bottle
  Running setup.py install for bottle
    changing mode of build/scripts-3.5/bottle.py from 644 to 755

    changing mode of /usr/local/bin/bottle.py to 755
Successfully installed bottle
Cleaning up...
【Cloud9】ファイルをすべて削除
とりあえず動かすために、最初に生成されていたファイルは一度すべて消しておく。
【Cloud9】app.pyの作成とコーディング
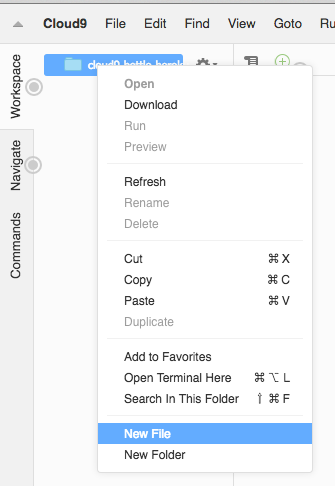
[右クリック]=>[New File]でファイルを作成し、作成されたファイル上で[右クリック]=>[Rename]でapp.pyと入力する。
やっとここからapp.pyを実装していく。
まずは一番簡素に、ブラウザ上でhttp://{your-domain}/hello/にアクセスするとHello Worldが表示されるように。
# -*- coding:utf-8 -*-

import os
from bottle import route, run


@route('/hello/')
def hello():
    return "Hello World"


run(host="0.0.0.0", port=int(os.environ.get("PORT", 5000)))
【Cloud9】実行してみる
Runボタンを押して実行するとブラウザで見るためのURLを教えてくれるので開く。
この時、末尾にルーティングを設定した「/hello/」を付けるのを忘れないように。
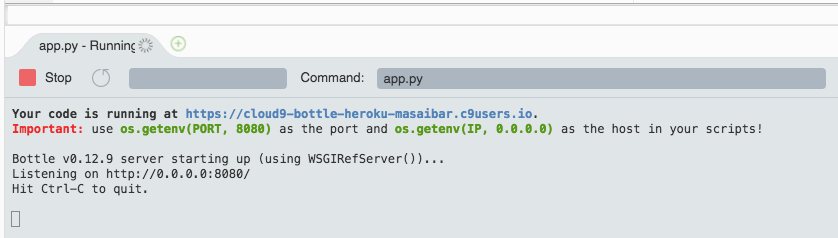
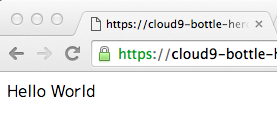
無事にブラウザで表示された!!
【Cloud9】GitHubへのコミット
ここまで出来たら一旦GitHubへコミットを行う。
まずはGitHubで新規リポジトリを作成しておく。
https://github.com/new
Cloud9からGitHubへコミットを行うためにはSSH鍵の登録が必要になる。
Cloud9のダッシュボードから右上の[歯車のマーク]=>[SSH Keys]で表示された公開鍵を連携するGitHubに登録する。
https://c9.io/account/ssh => https://github.com/settings/ssh
鍵の登録が終わったらCloud9のターミナル上でpushしていく。
# 実行するディレクトリに注意
$ pwd
/home/ubuntu/workspace

# deployに必要なファイルの生成
$ pip freeze | grep bottle > requirements.txt #使ってるパッケージだけ入れた方が良さそう
$ python --version | sed 's/\ /-/g' |sed 's/P/p/g' > runtime.txt
$ echo web: python app.py > Procfile

# 下記は参考程度に、リポジトリ作りたての画面に表示されるコマンドを適宜コピーして下さい。
$ echo "# cloud9-bottle-heroku" >> README.md
git init
git add .
git commit -m "first commit"
git remote add origin https://github.com/path/to-youre-repository.git #人によって違うので注意
git push -u origin master
【Cloud9】Herokuへdeploy
次はherokuへの反映を行う、引き続きCloud9のターミナルで作業を行う。
heroku toolbeltは予め導入されているようなので追加は不要。
# まずはherokuにログインする。
$ heroku login

# アプリを作成(名前が被らぬよう適宜変更して下さい)
$ heroku create cloud9-bottle-heroku
Creating cloud9-bottle-heroku... done, stack is cedar-14
https://cloud9-bottle-heroku.herokuapp.com/ | https://git.heroku.com/cloud9-bottle-heroku.git

$ git push heroku master
Counting objects: 21, done.
Delta compression using up to 8 threads.
Compressing objects: 100% (15/15), done.
Writing objects: 100% (21/21), 1.95 KiB | 0 bytes/s, done.
Total 21 (delta 5), reused 0 (delta 0)
remote: Compressing source files... done.
remote: Building source:
remote:
remote: -----> Python app detected
remote: -----> Installing python-3.5.1
remote:      $ pip install -r requirements.txt
remote:        Collecting bottle==0.12.9 (from -r requirements.txt (line 1))
remote:          Downloading bottle-0.12.9.tar.gz (69kB)
remote:        Installing collected packages: bottle
remote:          Running setup.py install for bottle: started
remote:            Running setup.py install for bottle: finished with status 'done'
remote:        Successfully installed bottle-0.12.9
remote:
remote: -----> Discovering process types
remote:        Procfile declares types -> web
remote:
remote: -----> Compressing...
remote:        Done: 49M
remote: -----> Launching...
remote:        Released v3
remote:        https://cloud9-bottle-heroku.herokuapp.com/ deployed to Heroku
remote:
remote: Verifying deploy... done.
To https://git.heroku.com/cloud9-bottle-heroku.git
 * [new branch]      master -> master
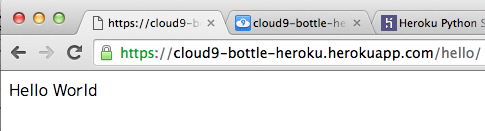
ブラウザで開くことが出来た!!
https://cloud9-bottle-heroku.herokuapp.com/hello/
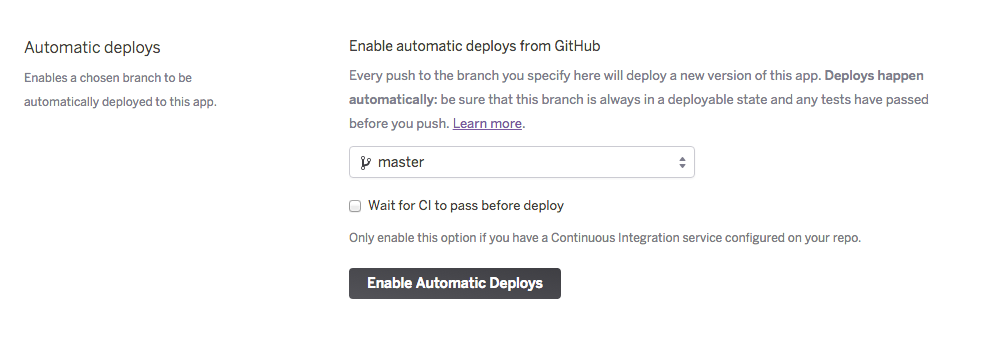
【Heroku】GitHub連携
GitHubにpushしたらherokuにも自動でdeployされるよう設定を変更しておく。
Herokuのダッシュボードから対象のアプリケーションを選び、画面上部のDeployを選択。

Deployment methodでGitHubを選択し、Connect to GitHubにリポジトリ名を入れて検索、対象のリポジトリが表示されたConnect。
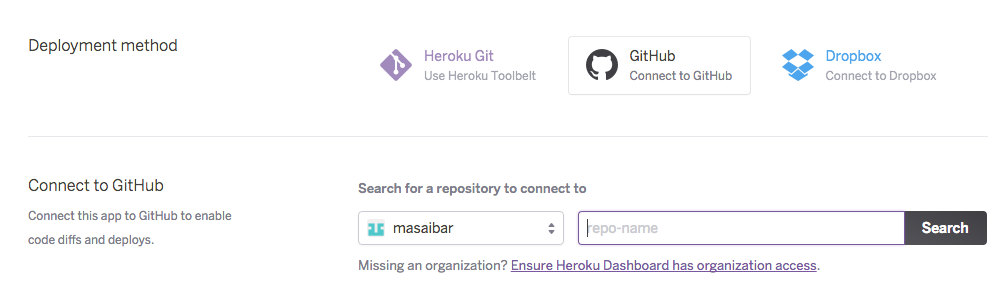
対象のブランチは適宜選択して、Enable Automatic Deploysを押すと設定が完了する。
自動Deployが動いたかどうかは画面上部のActivityから確認することが出来る。
Cloud9のターミナル上から空コミットをpushしてみて、実際にDeployが行われるか確認しておく。
 $ git commit --allow-empty -m "deploy test"
[master 9912982] deploy test

$ git push origin master
コマンドを打ってから1分ほど待ってからActivityタブを開くとDeployが実行されたことが分かる。
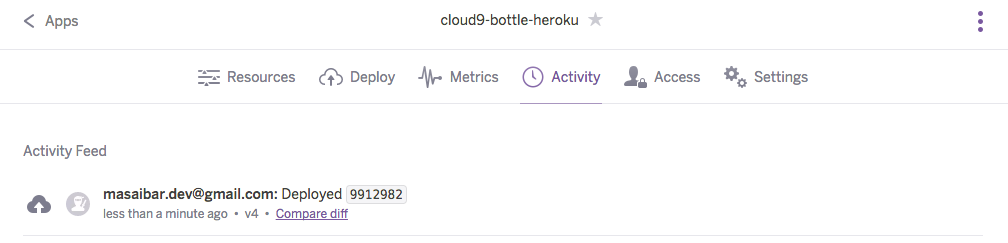
これでgit push heroku masterしなくてもGitHubにpushさえすればHeroku側にも更新が反映されるようになった。
ハマったところなど
requirements.txtの中身
必要最低限だけにしたほうが良さそう。
# 最初
$ pip freeze > requirements.txt

# herokuにpush した際に依存関係で怒られた
$ git push heroku master
Counting objects: 18, done.
Delta compression using up to 8 threads.
Compressing objects: 100% (13/13), done.
Writing objects: 100% (18/18), 1.73 KiB | 0 bytes/s, done.
Total 18 (delta 4), reused 0 (delta 0)
remote: Compressing source files... done.
remote: Building source:
remote:
remote: -----> Python app detected
remote: -----> Installing python-3.5.1
remote:      $ pip install -r requirements.txt
remote:        Collecting Pillow==2.3.0 (from -r requirements.txt (line 1))
remote:          Downloading Pillow-2.3.0.zip (2.4MB)
remote:        Collecting bottle==0.12.9 (from -r requirements.txt (line 2))
remote:          Downloading bottle-0.12.9.tar.gz (69kB)
remote:        Collecting chardet==2.2.1 (from -r requirements.txt (line 3))
remote:          Downloading chardet-2.2.1-py2.py3-none-any.whl (180kB)
remote:        Collecting colorama==0.2.5 (from -r requirements.txt (line 4))
remote:          Downloading colorama-0.2.5.zip
remote:        Collecting decorator==3.4.0 (from -r requirements.txt (line 5))
remote:          Downloading decorator-3.4.0.tar.gz
remote:        Collecting html5lib==0.999 (from -r requirements.txt (line 6))
remote:          Downloading html5lib-0.999.tar.gz (885kB)
remote:        Collecting ipython==1.2.1 (from -r requirements.txt (line 7))
remote:          Downloading ipython-1.2.1.tar.gz (8.7MB)
remote:        Collecting matplotlib==1.3.1 (from -r requirements.txt (line 8))
remote:          Downloading matplotlib-1.3.1.tar.gz (42.7MB)
remote:        Collecting nose==1.3.1 (from -r requirements.txt (line 9))
remote:          Downloading nose-1.3.1.tar.gz (274kB)
remote:        Collecting numpy==1.8.2 (from -r requirements.txt (line 10))
remote:          Downloading numpy-1.8.2.tar.gz (3.8MB)
remote:        Collecting pycurl==7.19.3 (from -r requirements.txt (line 11))
remote:          Downloading pycurl-7.19.3.tar.gz (113kB)
remote:        Collecting pygobject==3.12.0 (from -r requirements.txt (line 12))
remote:          Could not find a version that satisfies the requirement pygobject==3.12.0 (from -r requirements.txt (line 12)) (from versions: 2.28.3)
remote:        No matching distribution found for pygobject==3.12.0 (from -r requirements.txt (line 12))
remote:
remote:  !     Push rejected, failed to compile Python app
remote:
remote: Verifying deploy....
remote:
remote: !       Push rejected to cloud9-bottle-heroku.
remote:
To https://git.heroku.com/cloud9-bottle-heroku.git
 ! [remote rejected] master -> master (pre-receive hook declined)
error: failed to push some refs to 'https://git.heroku.com/cloud9-bottle-heroku.git'

# 絞ったら大丈夫だった。
$ pip freeze | grep bottle > requirements.txt
runtime.txtの表記
python --versionの結果を印字してたらPythonではなくpythonだった件。
# ダメな例
Python-3.5.1

# いい例
python-3.5.1
おわりに
Cloud9のお陰でローカル環境構築不要ですが、何が原因かたまに動きがカクつくときがあり私の環境ではPyCharmを使っての開発のほうが快適な印象でした。
しかし、複数端末で開発をする場合などを考えるとそれらの開発環境を揃えるのは面倒だと思うので、そのような場合に使う選択肢としては有りなのではないかと思います。
Herokuは今回最低限しか使っていないので、まだ良くわかっていない部分が多いですし、一日6時間はスリープする必要があるようですが、細かな設定無しでアプリを公開出来るのは素敵ですね。
参考
Heroku Python Support | Heroku Dev Center : https://devcenter.heroku.com/articles/python-support
Heroku×bottleを使って4分33秒でWebアプリを公開する - Qiita : http://qiita.com/ohbarye/items/55ec574f10685a012baf