はじめに
コードでAutoLayoutを適用しようとすると、Swift、Objective-Cにかかわらず、どうしても長くなってしまいがちで見難くなってしまいます。その見難くなる問題を解決するために、MisterFusionというライブラリを使用して改善する例を挙げていこうと思います。
レイアウト
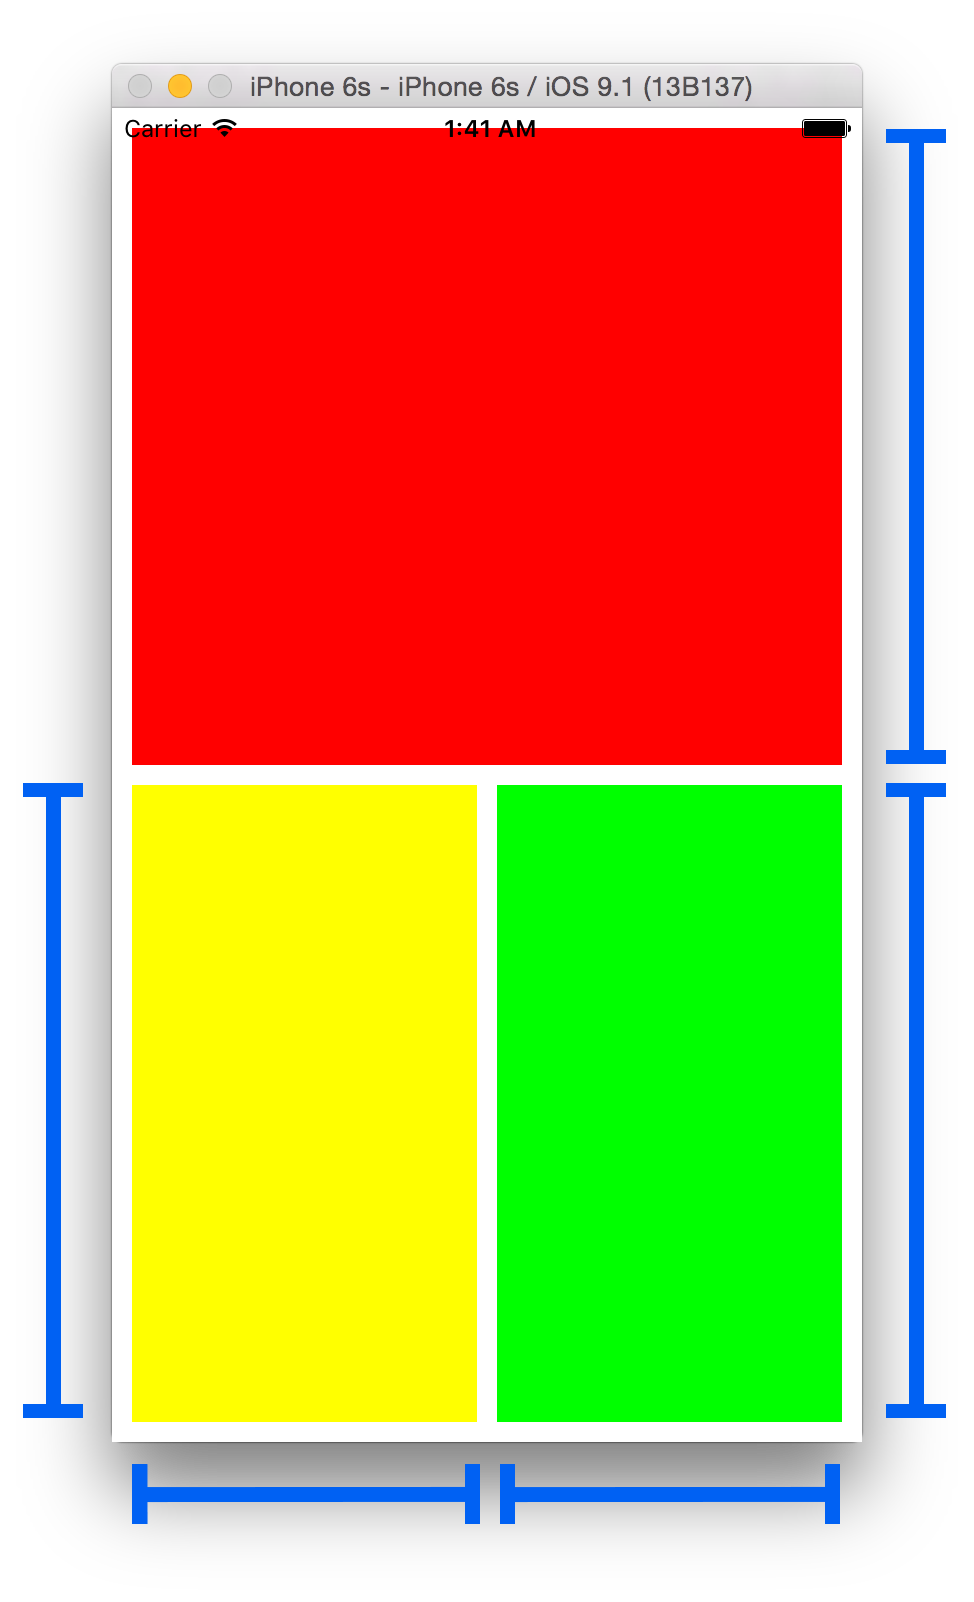
下記のスクリーンショットは
- 赤い
Viewと緑のViewと黄色のViewが同じ高さ - 黄色の
Viewと緑のViewは同じ幅 - すべてのスペースは10px
という条件のレイアウトになります。このレイアウトを
-
SwiftでMisterFusionを使って再現した例 -
Swiftで使わずに再現した例 -
Objecive-CでMisterFusionを使って再現した例 -
Objecive-Cで使わずに再現した例
という形で書いていきます。

Swift
MisterFusionを使ったコード
上記のレイアウトをMisterFusionを使って再現すると、以下のようなコードになります。まずは使いたいクラスの中で、import MisterFusionをしてください。
let redView = UIView()
redView.backgroundColor = .redColor()
self.view.addLayoutSubview(redView, andConstraints:
    redView.Top   |+| 10,
    redView.Right |-| 10,
    redView.Left  |+| 10
)

let yellowView = UIView()
yellowView.backgroundColor = .yellowColor()
self.view.addLayoutSubview(yellowView, andConstraints:
    yellowView.Top    |==| redView.Bottom |+| 10,
    yellowView.Left   |+|  10,
    yellowView.Bottom |-|  10,
    yellowView.Height |==| redView.Height
)

let greenView = UIView()
greenView.backgroundColor = .greenColor()
self.view.addLayoutSubview(greenView, andConstraints:
    greenView.Top    |==| redView.Bottom    |+| 10,
    greenView.Left   |==| yellowView.Right  |+| 10,
    greenView.Bottom |-|  10,
    greenView.Right  |-|  10,
    greenView.Width  |==| yellowView.Width,
    greenView.Height |==| yellowView.Height
)
一般的なNSLayoutConstraintを使ったコード
このコードは上記のコードと全く同じレイアウトになる例です。上記と比べると見難いのは一目瞭然です。
let redView = UIView()
redView.backgroundColor = .redColor()
self.view.addSubview(redView)
redView.translatesAutoresizingMaskIntoConstraints = false
self.view.addConstraints([
    NSLayoutConstraint(item: redView, attribute: .Top,   relatedBy: .Equal, toItem: self.view, attribute: .Top,   multiplier: 1, constant: 10),
    NSLayoutConstraint(item: redView, attribute: .Right, relatedBy: .Equal, toItem: self.view, attribute: .Right, multiplier: 1, constant: -10),
    NSLayoutConstraint(item: redView, attribute: .Left,  relatedBy: .Equal, toItem: self.view, attribute: .Left,  multiplier: 1, constant: 10)
])

let yellowView = UIView()
yellowView.backgroundColor = .yellowColor()
self.view.addSubview(yellowView)
yellowView.translatesAutoresizingMaskIntoConstraints = false
self.view.addConstraints([
    NSLayoutConstraint(item: yellowView, attribute: .Top,    relatedBy: .Equal, toItem: redView,   attribute: .Bottom, multiplier: 1, constant: 10),
    NSLayoutConstraint(item: yellowView, attribute: .Left,   relatedBy: .Equal, toItem: self.view, attribute: .Left,   multiplier: 1, constant: 10),
    NSLayoutConstraint(item: yellowView, attribute: .Bottom, relatedBy: .Equal, toItem: self.view, attribute: .Bottom, multiplier: 1, constant: -10),
    NSLayoutConstraint(item: yellowView, attribute: .Height, relatedBy: .Equal, toItem: redView,   attribute: .Height, multiplier: 1, constant: 0)
])

let greenView = UIView()
greenView.backgroundColor = .greenColor()
self.view.addSubview(greenView)
greenView.translatesAutoresizingMaskIntoConstraints = false
self.view.addConstraints([
    NSLayoutConstraint(item: greenView, attribute: .Top,    relatedBy: .Equal, toItem: redView,    attribute: .Bottom, multiplier: 1, constant: 10),
    NSLayoutConstraint(item: greenView, attribute: .Left,   relatedBy: .Equal, toItem: yellowView, attribute: .Right,  multiplier: 1, constant: 10),
    NSLayoutConstraint(item: greenView, attribute: .Bottom, relatedBy: .Equal, toItem: self.view,  attribute: .Bottom, multiplier: 1, constant: -10),
    NSLayoutConstraint(item: greenView, attribute: .Right,  relatedBy: .Equal, toItem: self.view,  attribute: .Right,  multiplier: 1, constant: -10),
    NSLayoutConstraint(item: greenView, attribute: .Width,  relatedBy: .Equal, toItem: yellowView, attribute: .Width,  multiplier: 1, constant: 0),
    NSLayoutConstraint(item: greenView, attribute: .Height, relatedBy: .Equal, toItem: yellowView, attribute: .Height, multiplier: 1, constant: 0)
])
Objective-C
使いたいクラスの中で、#import <MisterFusion/MisterFusion-Swift.h>をすることで、Objective-Cでも使用できるようになります。
MisterFusionを使ったコード
MisterFusionを使って、Swiftのサンプルコードと同じものをObjective-Cで書くと以下のようになります。
Objective-Cでも"."を使ってチェインができるので、煩わしい"[ ]"を使わなくて済むようになります。
UIView *redView = [UIView new];
redView.backgroundColor = [UIColor redColor];
[self.view addLayoutSubview:redView andConstraints:@[
    redView.Top  .Constant(10.0f),
    redView.Right.Constant(-10.0f),
    redView.Left .Constant(10.0f)
]];

UIView *yellowView = [UIView new];
yellowView.backgroundColor = [UIColor yellowColor];
[self.view addLayoutSubview:yellowView andConstraints:@[
    yellowView.Top   .Equal(redView.Bottom).Constant(10.0f),
    yellowView.Left  .Constant(10.0f),
    yellowView.Bottom.Constant(-10.0f),
    yellowView.Height.Equal(redView.Height)
]];

UIView *greenView = [UIView new];
greenView.backgroundColor = [UIColor greenColor];
[self.view addLayoutSubview:greenView andConstraints:@[
    greenView.Top   .Equal(redView.Bottom)  .Constant(10.0f),
    greenView.Left  .Equal(yellowView.Right).Constant(10.0f),
    greenView.Bottom.Constant(-10.0f),
    greenView.Right .Constant(-10.0f),
    greenView.Width .Equal(yellowView.Width),
    greenView.Height.Equal(yellowView.Height)
]];
一般的なNSLayoutConstraintを使ったコード
上記のコードと同じレイアウトになりますが、Swiftと同様に明らかに見難いですね。
UIView *redView = [UIView new];
redView.backgroundColor = [UIColor redColor];
[self.view addSubview:redView];
redView.translatesAutoresizingMaskIntoConstraints = NO;
[self.view addConstraints:@[
    [NSLayoutConstraint constraintWithItem:redView attribute:NSLayoutAttributeTop   relatedBy:NSLayoutRelationEqual toItem:self.view attribute:NSLayoutAttributeTop   multiplier:1.0f constant:10.0f],
    [NSLayoutConstraint constraintWithItem:redView attribute:NSLayoutAttributeRight relatedBy:NSLayoutRelationEqual toItem:self.view attribute:NSLayoutAttributeRight multiplier:1.0f constant:-10.0f],
    [NSLayoutConstraint constraintWithItem:redView attribute:NSLayoutAttributeLeft  relatedBy:NSLayoutRelationEqual toItem:self.view attribute:NSLayoutAttributeLeft  multiplier:1.0f constant:10.0f]
]];

UIView *yellowView = [UIView new];
yellowView.backgroundColor = [UIColor yellowColor];
[self.view addSubview:yellowView];
yellowView.translatesAutoresizingMaskIntoConstraints = NO;
[self.view addConstraints:@[
    [NSLayoutConstraint constraintWithItem:yellowView attribute:NSLayoutAttributeTop    relatedBy:NSLayoutRelationEqual toItem:redView   attribute:NSLayoutAttributeBottom  multiplier:1.0f constant:10.0f],
    [NSLayoutConstraint constraintWithItem:yellowView attribute:NSLayoutAttributeLeft   relatedBy:NSLayoutRelationEqual toItem:self.view attribute:NSLayoutAttributeLeft    multiplier:1.0f constant:10.0f],
    [NSLayoutConstraint constraintWithItem:yellowView attribute:NSLayoutAttributeBottom relatedBy:NSLayoutRelationEqual toItem:self.view attribute:NSLayoutAttributeBottom  multiplier:1.0f constant:-10.0f],
    [NSLayoutConstraint constraintWithItem:yellowView attribute:NSLayoutAttributeHeight relatedBy:NSLayoutRelationEqual toItem:redView   attribute:NSLayoutAttributeHeight  multiplier:1.0f constant:0.0f]
]];

UIView *greenView = [UIView new];
greenView.backgroundColor = [UIColor greenColor];
[self.view addSubview:greenView];
greenView.translatesAutoresizingMaskIntoConstraints = NO;
[self.view addConstraints:@[
    [NSLayoutConstraint constraintWithItem:greenView attribute:NSLayoutAttributeTop    relatedBy:NSLayoutRelationEqual toItem:redView    attribute:NSLayoutAttributeBottom multiplier:1.0f constant:10.0f],
    [NSLayoutConstraint constraintWithItem:greenView attribute:NSLayoutAttributeLeft   relatedBy:NSLayoutRelationEqual toItem:yellowView attribute:NSLayoutAttributeRight  multiplier:1.0f constant:10.0f],
    [NSLayoutConstraint constraintWithItem:greenView attribute:NSLayoutAttributeBottom relatedBy:NSLayoutRelationEqual toItem:self.view  attribute:NSLayoutAttributeBottom multiplier:1.0f constant:-10.0f],
    [NSLayoutConstraint constraintWithItem:greenView attribute:NSLayoutAttributeRight  relatedBy:NSLayoutRelationEqual toItem:self.view  attribute:NSLayoutAttributeRight  multiplier:1.0f constant:-10.0f],
    [NSLayoutConstraint constraintWithItem:greenView attribute:NSLayoutAttributeWidth  relatedBy:NSLayoutRelationEqual toItem:yellowView attribute:NSLayoutAttributeWidth  multiplier:1.0f constant:0.0f],
    [NSLayoutConstraint constraintWithItem:greenView attribute:NSLayoutAttributeHeight relatedBy:NSLayoutRelationEqual toItem:yellowView attribute:NSLayoutAttributeHeight multiplier:1.0f constant:0.0f]
]];
MisterFusionの導入方法
Cocoapodsから導入することで、SwiftからもObjective-Cからも使用することができます。Podfileに下記の一行を書き加えてください。
pod 'MisterFusion'
最後に
このようにMisterFusionを使うことで、見易くわかりやすくすることができました。是非コードでAutoLayoutを実装する際は、導入を検討してみてはいかがでしょうか。
追記 (2015/11/19)
追加したNSLayoutConstraintを以下のように取得できるようになりました。
Swift
let topConstraint = self.view.addLayoutSubview(yellowView, andConstraints:
    yellowView.Top    |==| redView.Bottom |+| 10,
    yellowView.Left   |+|  10,
    yellowView.Bottom |-|  10,
    yellowView.Height |==| redView.Height
).firstAttribute(.Top).first
Objective-C
NSLayoutConstraint *topConstraint = [self.view addLayoutSubview:yellowView andConstraints:@[
    yellowView.Top   .Equal(redView.Bottom).Constant(10.0f),
    yellowView.Left  .Constant(10.0f),
    yellowView.Bottom.Constant(-10.0f),
    yellowView.Height.Equal(redView.Height)
]].FirstAttribute(NSLayoutAttributeTop).firstObject;
AutoLayoutが適用されたViewをアニメーションさせたい場合などに、任意のNSLayoutConstraintが取得可能になります。
追記(2015/12/11)
Size Classに対応しました。

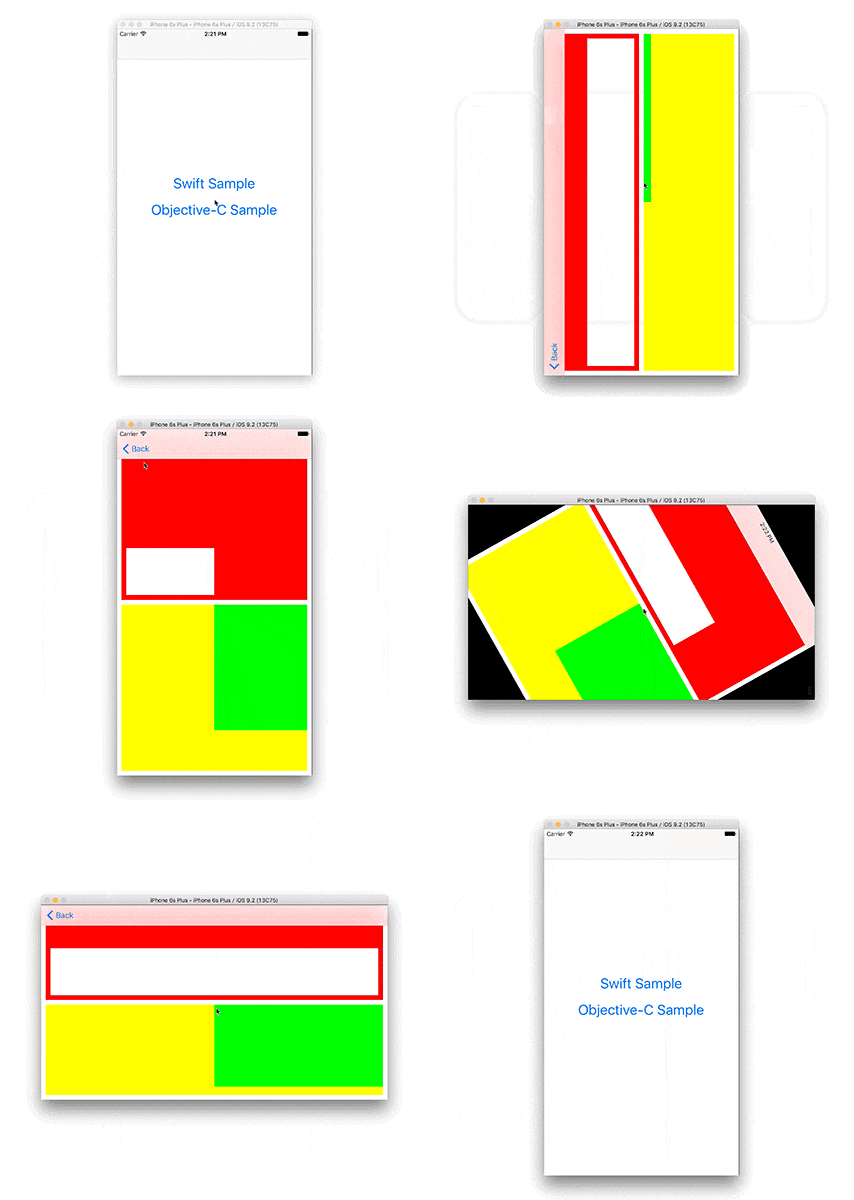
以下の例は、iPhone6s+の縦表示(V:Regular, H:Compact)と横表示(V:Compact, H:Regular)によって白いViewのサイズが可変になるものです。
traitCollectionDidChangeが呼ばれた際にMisterFusionを再生成しています。
Size Classによるif文やswitch-case文の分岐がなくなるので、コードもすっきりします。
Swift
override func traitCollectionDidChange(previousTraitCollection: UITraitCollection?) {
    guard let whiteView = whiteView, redView = redView else { return }
    if let whiteViewHeightConstraint = whiteViewWidthConstraint {
        redView.removeConstraint(whiteViewHeightConstraint)
    }
    self.whiteViewWidthConstraint = redView.addLayoutConstraints(
        whiteView.Width |-| 20 <|> .Compact <-> .Regular,
        whiteView.Width |*| 0.5 |-| 10 <|> .Regular <-> .Compact
    ).firstAttribute(.Width).first
}
Objective-C
- (void)traitCollectionDidChange:(UITraitCollection *)previousTraitCollection {
    [self.redView removeConstraint:self.whiteViewWidthConstraint];
    self.whiteViewWidthConstraint = [self.redView addLayoutConstraints:@[
        self.whiteView.Width.Multiplier(0.5f).Constant(-10).VerticalSizeClass(UIUserInterfaceSizeClassRegular).HorizontalSizeClass(UIUserInterfaceSizeClassCompact),
        self.whiteView.Width.Constant(-20).VerticalSizeClass(UIUserInterfaceSizeClassCompact).HorizontalSizeClass(UIUserInterfaceSizeClassRegular)
    ]].FirstAttribute(NSLayoutAttributeWidth).firstObject;
}
追記(2016/08/31)
Swift3に対応しました。beta/swift3
Objective-C向けに提供しているpropertyやmethodは
@available(iOS, unavailable)
として定義することで、Swift側から見えなくしています。
また
@objc(insertLayoutSubview:atIndex:andConstraint:)
public func insertLayoutSubview(_ subview: UIView, at index: Int, andConstraint misterFusion: MisterFusion) -> NSLayoutConstraint?
として定義することで、SwiftのAPI Design Guidelinesに沿った記法にしつつ、Objective-Cの記法に沿ったものも提供しています。
