この記事はGithubで公開中の画像フィルタライブラリSharakuの中身と作り方を解説した記事になっています。記事内容としては
- CocoaPodsを用いたライブラリの作成方法
- Core ImageのCIFilterの使い方
などが主になっています。
手っ取り早く画像フィルタ機能を使いたいという方はpod 'Sharaku'をpodfileに追加して使ってみてください。
ライブラリのGithubはこちら。
https://github.com/makomori/Sharaku
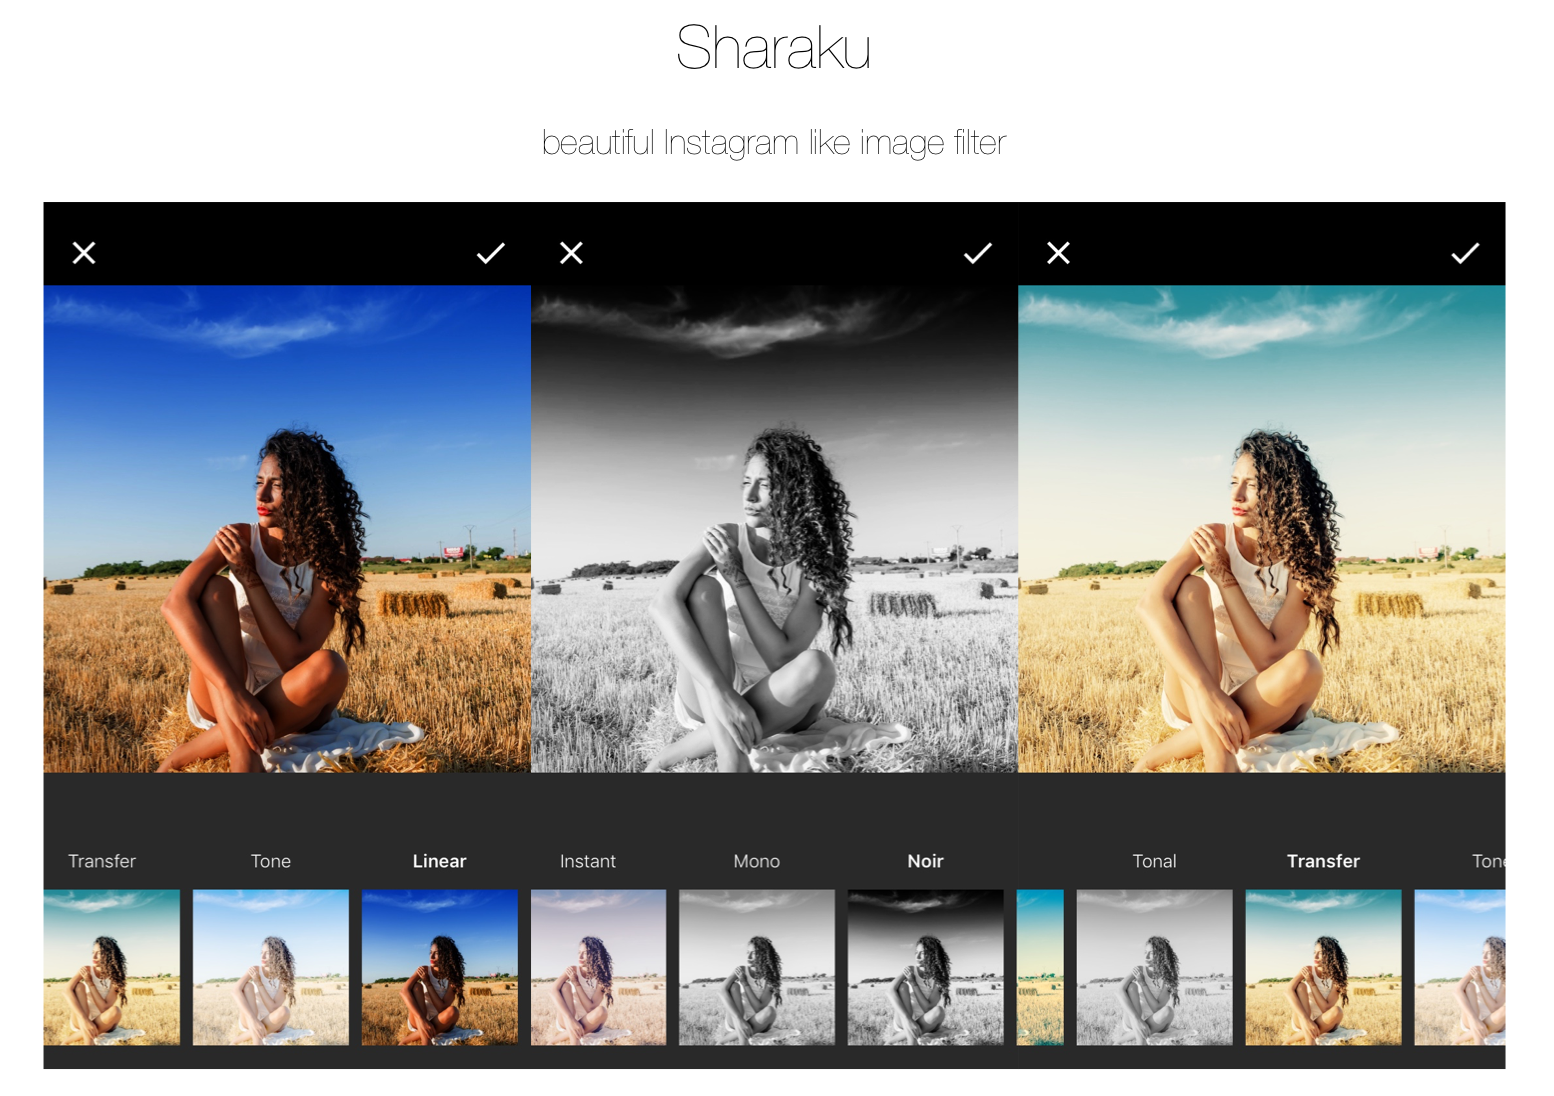
完成形
作り方
CocoaPodsによるプロジェクトの作成
pod lib create Sharaku
上記のコマンドを実行すると、ライブラリのテンプレートが作られます。色々と聞かれるので適宜答えていきましょう。「demo applicationを含める」にYesと答えるとExample for Sharakuというディレクトリが作られるのでそこにサンプルアプリを書いていき、Podsの中に入っているDevelopment Podsで実際のライブラリの開発を行います。
画像フィルタ機能の作成
肝心のUIImageのフィルタ機能に関してはCore ImageのCIFilterというクラスを使います。このクラスを使うとInstagramっぽいフィルタを数行で作ることができます。
Sharakuでは以下のようなメソッドを作って画像にフィルタをかけています。
func createFilteredImage(filterName: String, image: UIImage) -> UIImage {
        // 1 - create source image
        let sourceImage = CIImage(image: image)

        // 2 - create filter using name
        let filter = CIFilter(name: filterName)
        filter?.setDefaults()

        // 3 - set source image
        filter?.setValue(sourceImage, forKey: kCIInputImageKey)

        // 4 - output filtered image as cgImage with dimension.
        let outputCGImage = context.createCGImage((filter?.outputImage!)!, from: (filter?.outputImage!.extent)!)

        // 5 - convert filtered CGImage to UIImage
        let filteredImage = UIImage(cgImage: outputCGImage!)

        return filteredImage
    }
Sharakuで使用しているフィルタの一覧は以下の通りです。
"CIPhotoEffectChrome",
"CIPhotoEffectFade",
"CIPhotoEffectInstant",
"CIPhotoEffectMono",
"CIPhotoEffectNoir",
"CIPhotoEffectProcess",
"CIPhotoEffectTonal",
"CIPhotoEffectTransfer",
"CILinearToSRGBToneCurve",
"CISRGBToneCurveToLinear"
UIImageViewにUIGestureRecognizerを乗せて左右のスワイプジェスチャーを取得する
@IBAction func imageViewDidSwipeLeft() {
    if filterIndex == filterNameList.count - 1 {
        filterIndex = 0
        imageView?.image = image
    } else {
        filterIndex += 1
    }
    if filterIndex != 0 {
        applyFilter()
    }
    updateCellFont()
    scrollCollectionViewToIndex(itemIndex: filterIndex)
}
メインのImageViewに適用されているフィルタと下のCollectionViewを連動させる
extension  SHViewController: UICollectionViewDataSource, UICollectionViewDelegate
{
    public func collectionView(_ collectionView: UICollectionView, cellForItemAt indexPath: IndexPath) -> UICollectionViewCell {
        let cell = collectionView.dequeueReusableCell(withReuseIdentifier: "cell", for: indexPath) as! SHCollectionViewCell
        var filteredImage = smallImage
        if indexPath.row != 0 {
            filteredImage = createFilteredImage(filterName: filterNameList[indexPath.row], image: smallImage!)
        }

        cell.imageView.image = filteredImage
        cell.filterNameLabel.text = filterDisplayNameList[indexPath.row]
        updateCellFont()
        return cell
    }

    public func collectionView(_ collectionView: UICollectionView, numberOfItemsInSection section: Int) -> Int {
        return filterNameList.count
    }

    public func collectionView(_ collectionView: UICollectionView, didSelectItemAt indexPath: IndexPath) {
        filterIndex = indexPath.row
        if filterIndex != 0 {
            applyFilter()
        } else {
            imageView?.image = image
        }
        updateCellFont()
        scrollCollectionViewToIndex(itemIndex: indexPath.item)
    }
}
選択されているフィルタに応じてLabelのfont-sizeを変える
func updateCellFont() {
    // update font of selected cell
    if let selectedCell = collectionView?.cellForItem(at: IndexPath(row: filterIndex, section: 0)) {
        let cell = selectedCell as! SHCollectionViewCell
        cell.filterNameLabel.font = UIFont.boldSystemFont(ofSize: 14)
    }

    for i in 0...filterNameList.count - 1 {
        if i != filterIndex {
            // update nonselected cell font
            if let unselectedCell = collectionView?.cellForItem(at: IndexPath(row: i, section: 0)) {
                let cell = unselectedCell as! SHCollectionViewCell
                if #available(iOS 8.2, *) {
                    cell.filterNameLabel.font = UIFont.systemFont(ofSize: 14.0, weight: UIFontWeightThin)
                } else {
                    // Fallback on earlier versions
                    cell.filterNameLabel.font = UIFont.systemFont(ofSize: 14.0)
                }
            }
        }
    }
}
選択されているフィルタの変更に応じてCollectionViewを動かす
func scrollCollectionViewToIndex(itemIndex: Int) {
    let indexPath = IndexPath(item: itemIndex, section: 0)
    self.collectionView?.scrollToItem(at: indexPath, at: .centeredHorizontally, animated: true)
}
主なプログラムは以上になります。CIFilterを知るまでは何か難しそうに感じていた画像フィルタも実際に作ってみると一瞬でした。
ライブラリの宣伝の仕方
- Cocoacontrolsに投稿する。(これが一番効果的でした。)
- Githubのトレンドに載る。(Cocoacontrolsなどからの流入で1日50starほど付けば上位に上がってくるのでstarが付きやすいです。)
- awesome-iosなどのレポジトリに載せてもらう。
ライブラリを宣伝する他の良い方法などご存知の方いらっしゃいましたら是非教えてください。
余談
ちなみにこのライブラリはインスタグラムライクなカメラ機能を提供してくれるライブラリfusumaにインスパイアされて作りました。「シンプルで、綺麗なフィルタを導入したい。」そんなニーズに応える小規模なUIライブラリになっています。
ソースコードが良くない、こんな機能が欲しい、など何かご意見がございましたらQiitaもしくはGithubどちらでも構いませんので是非ご指摘ください!