勉強会用資料です.
django1.8のチュートリアルを辿りつつ説明していきます.
https://docs.djangoproject.com/en/1.8/intro/tutorial03/
日本語の公式ドキュメントはバージョン1.4が最新なので若干違いが有りますが大まかな流れは一緒なので一読するのもいいと思います.
http://django-docs-ja.readthedocs.org/en/latest/intro/tutorial03.html
チュートリアル1
チュートリアル2
→ チュートリアルまとめ
概要
今回のチュートリアルではviewとurlの説明をします.
viewと言ってますが,一般的なMVCでいうとコントローラに相当し,
MVCのViewに相当するものはviewから呼び出すtemplateです.
#MVCについては若干適当に言ってるので軽く聞き流しといてください.
viewの作成とurlの接続
ドキュメント→https://docs.djangoproject.com/en/1.8/intro/tutorial03/#write-your-first-view
ソース→ 7f5128a→3efdc15
本チュートリアルではチュートリアル(1)で説明したアプリケーション作成の5〜7の部分について説明します.
その前にdjangoでアプリケーションを作成する流れについて説明しておきます.
-
$ ./manage.py startapp appnameでアプリケーションを追加する.
-
appname/models.pyにそのアプリで使用するモデル(データベースのテーブル)を記述する.
-
project/settings.pyに作成したアプリを追加する
- データベース更新
-
appname/views.pyにモデルの表示や操作(追加,編集など)を記述する.
使用するhtmlもここで用意. -
appname/urls.pyを記述し,urlとviewsを紐付ける -
project/urls.pyからappname/urls.pyを読み込む.
viewの追加
viewはHttpRequestを受け取ってHttpResponseを返す関数です.
さっそく本家チュートリアルに習ってview関数を書いてみましょう.
from django.http import HttpResponse


def index(request):
    return HttpResponse("Hello, world. You're at the polls index.")
viewメソッドは第1引数に必ずHttpRequestクラスを受け取ります.
また,戻り値としてHttpResponseクラス(もしくはそれを継承したクラス)を返す必要があります.
これだけでは当然動作がわからないのでurlとviewを結びつけましょう.
urlの設定
urlの設定方法,概念がdjango1.8で大きく変わっているので本家日本語のチュートリアル(django1.4)を見ながら進めている人は注意してください.
djangoへのアクセス時には最初にROOT_URLCONF(デフォルトではproject/urls.py,今回のチュートリアルではtutorial/urls.py)を確認し,どのviewを呼び出すかを確認します.
urls.pyにはurlpatternsという配列が設定されています.
配列の要素はurl関数で追加していきます.
中身は
urlresolverですが,マニアックな話になるので割愛します.
url関数ではurlとview,もしくはurlと他のurlpatternsを結びつけます.
実際にソースを見てみましょう.
from django.conf.urls import url

from . import views


urlpatterns = [
    url(r'^$', views.index, name='index'),  # urlとviewの結びつけ
]
この段階でpolls.views.indexとpollsのurlが接続されましたが,polls.urlsはroot_urlではないため
まだブラウザから確認することはできません.
from django.conf.urls import include, url
from django.contrib import admin

urlpatterns = [
    url(r'^admin/', include(admin.site.urls)),
    url(r'^polls/', include('polls.urls')),  # urlと他のurlpatternsとの結びつけ
]
root_urlを更新した状態です.
これでpolls/ に一致するurlはpolls.urlsを呼び出すようになり,ブラウザで確認できるようになります.
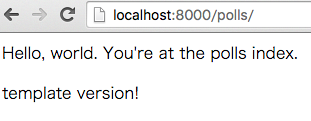
http://localhost:8000/polls/ にアクセスしてみましょう.
無事接続できているようです.
url関数
url関数は第1引数にurlの正規表現を記述し,第2引数にview関数,もしくはinclude関数の戻り値を渡します.
r''と書いていると正規表現と勘違いされるかもしれませんが,raw文字列のことです.
\をエスケープ文字ではなくそのまま出力するようになります.
第3引数のname='index')はurlの逆引き用です.別viewへのリダイレクトやtemplate内でのリンクに使用します.
includeを使用した場合,matchした文字列を取り除いた部分を次のurlpatternsに渡します.
templateの利用
ドキュメント→https://docs.djangoproject.com/en/1.8/intro/tutorial03/#a-shortcut-render
ソース→3efdc15→18eb3f6
urlとviewの接続が無事にできましたが,Responseの文字列を手書きはあんまりなので
次はtemplateを使いましょう.
templateはapp/templates/app/以下に設置します.
形式は一般的なhtmlとほぼ変わりませんが{{ var }}のように中括弧2つで囲むと
pythonから渡された値を使用できます.
また,{% func %}の形式でテンプレートタグと呼ばれる関数を実行することができます.
まずは通常のhtmlを使用して作成していきます.
<html>
<body>
  <p>Hello, world. You're at the polls index.</p>
  <p>template version!</p>
</body>
</html>
続いてviewを書き換えます.
本家チュートリアルではtemplateを使用して文字列作成をする方法を紹介していますが,
今回はそれを飛ばしてrender関数を使用する方法を紹介します.
この関数はrequest, テンプレートパスを渡すとそのテンプレートを使用したレンダリング結果を
HttpResponseとして返してくれます.
ソースは以下のように変更してブラウザで確認してみましょう.
from django.shortcuts import render


def index(request):
    return render(request, 'polls/index.html')
ちゃんとtemplateを使って文字列を返してくれているようです.
templateへの値渡し
ソース→1ade762→c49d0c6
ここまでで静的なページは作れるようになったと思います.
次に動的なページを作っていきましょう.
renderの第3引数に辞書を渡すことでtemplateに値を渡すことができます.
template内で渡された値を使う場合は{{ var }}の形式で書きます.
viewを書き換えて適当な値を渡してみましょう.
from django.shortcuts import render


def index(request):
    return render(request, 'polls/index.html', {
        'hoge': 'test string',
        'fuga': '<br>tag</br>',
    })
次にhtmlを書き換えて受け取った値を表示させてみます.
<html>
<body>
  <p>Hello, world. You're at the polls index.</p>
  <p>template version!</p>
  <p>{{ hoge }}</p>
  <p>{{ fuga }}</p>
</body>
</html>
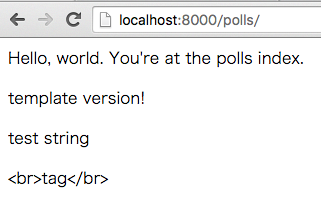
受け取った値がちゃんと表示されているようです.
ただ,fugaは<br>タグがエスケープされて出力されてしまっています.
セキュリティ的には嬉しいですが,タグを出力したい時に困ります.
タグを出力する場合にはdjango.utils.html.mark_safe関数を使用します.
この関数は名前の通り,文字列が安全であるという印をつけ,それ以上エスケープされないようにします.
新たにpiyoにmark_sakeをつけた文字列を渡して出力してみましょう.
from django.shortcuts import render
from django.utils.html import mark_safe


def index(request):
    return render(request, 'polls/index.html', {
        'hoge': 'test string',
        'fuga': '<br>tag</br>',
        'piyo': mark_safe('<br>tag</br>'),
    })
<html>
<body>
  <p>Hello, world. You're at the polls index.</p>
  <p>template version!</p>
  <p>{{ hoge }}</p>
  <p>{{ fuga }}</p>
  <p>{{ piyo }}</p>
</body>
</html>
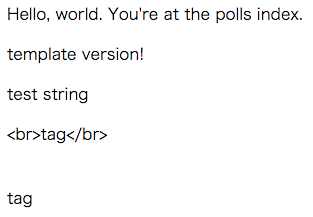
piyoのタグはエスケープされず出力されたようです.
モデルとの連携
ソース→c49d0c6→95339e5
文字列にはだいぶ満足してきたので,今度はQuestionモデルを表示させてみましょう.
と言っても,文字列の代わりにモデルのインスタンスか,クエリーセットを渡すだけです.
クエリーセットの詳しい説明は後ほど行います.
ひとまずModel.objectsでそのモデルのクエリーセットを取得できるということを抑えておいてください.
すぐ知りたい方は本家ドキュメントを参考にしてください.
→ https://docs.djangoproject.com/en/1.8/ref/models/querysets/
試しにtemplateにquestionsという名前でQuestionモデルの全オブジェクトを渡してみましょう.
from django.shortcuts import render

from .models import Question


def index(request):
    return render(request, 'polls/index.html', {
        'questions': Question.objects.all(),
    })
htmlで表示するようにし,ブラウザで確認してみます.
<html>
<body>
  {{ questions }}
</body>
</html>
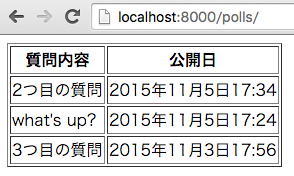
少しかっこ悪いですが,ちゃんと出ているようです.
template表示の修正
ソース→95339e5→943e24b
questionsは配列なのでtemplateに標準で用意されている{% for %}関数を使って見栄えをよくしましょう.
<html>
<body>
  <table border="1">
    <tr>
      <th>質問内容</th>
      <th>公開日</th>
    </tr>
    {% for question in questions %}
    <tr>
      <td>{{ question.question_text }}</td>
      <td>{{ question.pub_date }}</td>
    </tr>
    {% endfor %}
  </table>
</body>
</html>
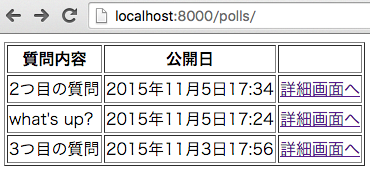
なかなかそれっぽい見た目になってきました.
詳細画面の追加
ソース→943e24b→e86d795
一覧画面はとりあえずいいとして,今度は個別の詳細画面を作ってみましょう.
流れとしては変わらず,viewを用意して,urlをつなぐだけですが,
詳細画面なのでモデル中の特定のオブジェクトを指定する必要があります.
今回はdjangoの一般的な方法としてオブジェクトのpkを受け取るようにします.
viewとしてはこんな感じです.
...
def detail(request, pk):
    return render(request, 'polls/detail.html', {
        'question': Question.objects.get(pk=pk)
    })
viewから呼び出されるdetail.htmlも忘れずに用意しましょう.
<html>
<body>
  {{ question }}
</body>
</html>
次にurlを変更します.
urlは(?P<kwarg>pattern)の形式でurl中の文字列を引数としてview関数に渡すことができます.
...
urlpatterns = [
    url(r'^$', views.index, name='index'),
    url(r'(?P<pk>\d+)/$', views.detail, name='poll_detail'),
]
この場合は http://localhost:8000/polls/1/ や http://localhost:8000/polls/3/ のような
1や3という数字をpkという引数としてdetail関数に渡す,という意味になります.
なんちゃって詳細ページの完成です.
404ページ追加
ソース→e86d795→da8d171
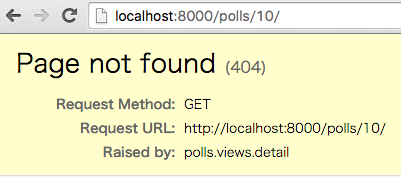
詳細画面はできましたが,10など,存在しないpkをURLに入力すると以下の様な画面になります.
Model.objects.getメソッドは指定された条件でオブジェクトが取得できない場合にDoesNotExistという例外を吐くため,このような画面になってしまいます.
view関数の戻り値はHttpResponseでないとダメなので,例外をキャッチして404ページを表示するように修正してみましょう.
from django.shortcuts import Http404
...
def detail(request, pk):
    try:
        obj = Question.objects.get(pk=pk)
    except Question.DoesNotExist:
        raise Http404
    return render(request, 'polls/detail.html', {
        'question': obj,
    })
HttpResponseじゃなくてHttp404例外を投げてるじゃないか と突っ込まれそうですが,
Http404例外をraiseするとmiddlewareがキャッチして404用のページを作ってくれるようになります.
もう少し便利な404ページ
ソース→da8d171→2b823b3
オブジェクトを主キーなどで取得しようとし,なければ404を返す,というのは一般的な動作なので
便利なショートカット関数が用意されています.
どのモデルからどういう条件で取得するかを書くだけでtry-exceptで行ったのと同じ動作を書くことができます.
from django.shortcuts import get_object_or_404
...
def detail(request, pk):
    obj = get_object_or_404(Question, pk=pk)
    return render(request, 'polls/detail.html', {
        'question': obj,
    })
一覧ページから詳細画面への接続
ドキュメント→https://docs.djangoproject.com/en/1.8/intro/tutorial03/#removing-hardcoded-urls-in-templates
ソース→2b823b3→99b01e3
一覧ページと詳細画面ができたので,一覧ページから詳細画面へのリンクを貼ってみましょう.
html内にリンクを埋め込むには{% url %}タグを使います.
このタグの引数にurlの名前を渡すことでurlを生成してくれます.
ここでいうurlの名前とはurl関数の第3引数で指定した,name='hoge'のことです.
ここまでのチュートリアルではindexという名前とpoll_detailという名前を設定しています.
今回はpoll_detailへのリンクをindex.html内に作ることになります.
なお,poll_detailはquestionオブジェクトのpkを引数で受け取る必要があります.
<html>
<body>
  <table border="1">
    <tr>
      <th>質問内容</th>
      <th>公開日</th>
      <th></th>
    </tr>
    {% for question in questions %}
    <tr>
      <td>{{ question.question_text }}</td>
      <td>{{ question.pub_date }}</td>
      <td><a href="{% url 'poll_detail' question.pk %}">詳細画面へ</a></td>
    </tr>
    {% endfor %}
  </table>
</body>
</html>
無事詳細画面へのリンクが貼れました.
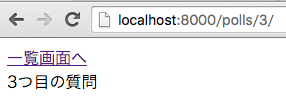
ついでに詳細画面から一覧画面へのリンクも貼っておきましょう.
<html>
<body>
  <a href="{% url 'index' %}">一覧画面へ</a><br>
  {{ question }}
</body>
</html>
これでURLを直打ちする必要がなくなりました.
--
少し本家のチュートリアルと説明の順番が前後したりしましたが,次回のチュートリアルではフォームを扱っていきます.

