HemeshはProcessingで3Dオブジェクトを作る時に役に立つライブラリです。
githubはこちら
基本的な紹介
Hemeshはhalf-edged mesh geometryの略で、立体を表現する際にhalf-edged mesh geometryという方式を利用しています。
(half-edged mesh geometryについてはこちら)
Hemeshで扱うクラスには基本的に4種類あって、全ての形を
- HE_ : メッシュ関係のデータ
- HEC_ : 基本的な幾何学・配置
の2種類のクラスで作ります。
そして、HEM_クラスで変形等を指定します。WBクラスというものが演算・レンダリングを担当します。
基本ロジック
HE_Meshでメッシュ初期化して、HEC_でメッシュを作るというのが基本。
HE_Meshではコアとなるデータにアクセスできるし、HEC_ではいろんな形と、それに関係するメソッドにアクセスできます。
例えばHEC_Cubeクラスを使うとedge, segment height, width, depth, inner/mid/outer radius等のメソッドを使うことができます。
サンプルプログラム
/*
PLEASE READ INTRO TAB
*/

/////////////////////////// GLOBALS ////////////////////////////
// LIBRARY IMPORT
import wblut.math.*;
import wblut.processing.*;
import wblut.core.*;
import wblut.hemesh.*;
import wblut.geom.*;
import processing.opengl.*;

// HEMESH CLASSES & OBJECTS
HE_Mesh MESH; // Our mesh object
WB_Render RENDER; // Our render object

// CAM
import peasy.*;
PeasyCam CAM;

/////////////////////////// SETUP ////////////////////////////

void setup() {
  size(800, 600, OPENGL);
  CAM = new PeasyCam(this, 150);

  // OUR CREATOR
  HEC_Cube creator = new HEC_Cube();

  //CREATOR PARMAMETERS
  creator.setEdge(70); // edge length in pixels

  MESH = new HE_Mesh(creator); // add our creator object to our mesh object
  RENDER = new WB_Render(this); // RENDER object initialise
}

/////////////////////////// DRAW ////////////////////////////
void draw() {
  background(255);
  // CAMERA
  CAM.beginHUD(); // this method disables PeasyCam for the commands between beginHUD & endHUD
  directionalLight(255, 255, 255, 1, 1, -1);
  directionalLight(127, 127, 127, -1, -1, 1);
  CAM.endHUD();

  // HEMESH
  // We draw our faces using the RENDER object
  noStroke();
  fill(0, 255, 255);
  RENDER.drawFaces( MESH ); // Draw MESH faces

  stroke(255, 0, 0);
  RENDER.drawEdges( MESH ); // Draw MESH edges
}
実行結果
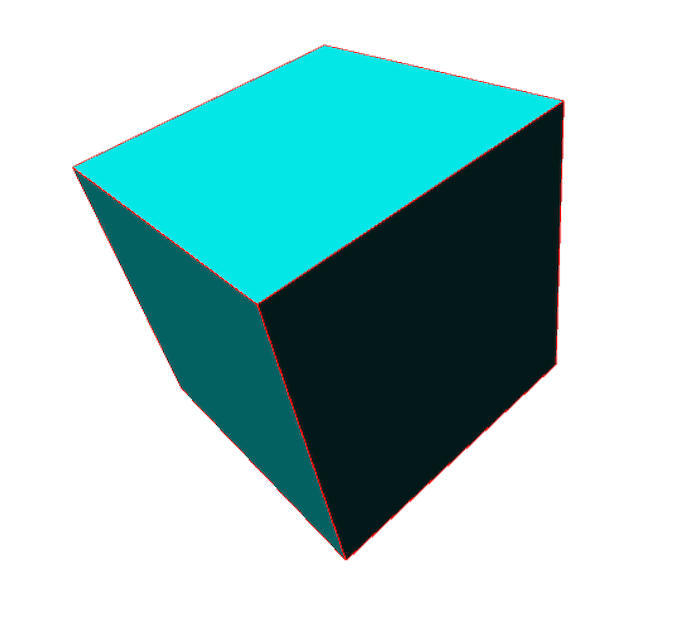
セットアップ
まずglobalで
HE_Mesh MESH;
を宣言。
そして、processingのsetup()関数内で
HEC_Cube creator = new HEC_Cube();
のようにメッシュを作るobjectをつくった後、
MESH = new HE_Mesh(creator);
としてHE_Meshインスタンスとしてコールします。
また、WB_Renderクラスはライブラリ内の全ての関数を提供するもので、コードの最初に初期化しておきます。画面への結果表示にも使います。
- globalで WB_Render RENDER;
- setup();で RENDER = new WB_Render(this);
- draw();で RENDER.drawFaces( MESH ); // Notice we add the mesh object within the parentheses.
PeasyCam
座標変換やマウスとのインタラクション用にPeasyCamライブラリも使うと吉です。
http://mrfeinberg.com/peasycam/
基本メソッド
HEC_Cube creatorのメソッドを紹介します。
/*
PLEASE READ INTRO TAB
*/

/////////////////////////// GLOBALS ////////////////////////////
// LIBRARY IMPORT
import wblut.math.*;
import wblut.processing.*;
import wblut.core.*;
import wblut.hemesh.*;
import wblut.geom.*;
import processing.opengl.*;

// HEMESH CLASSES & OBJECTS
HE_Mesh MESH; // Our mesh object
WB_Render RENDER; // Our render object

// CAM
import peasy.*;
PeasyCam CAM;

/////////////////////////// SETUP ////////////////////////////

void setup() {
  size(800, 600, OPENGL);
  CAM = new PeasyCam(this, 150);

  // OUR CREATOR
  HEC_Cube creator = new HEC_Cube();

  //CREATOR PARMAMETERS
  creator.setEdge(70); // edge length in pixels
  creator.setWidthSegments(4).setHeightSegments(4).setDepthSegments(4); // keep these small

  //alternatively
  //creator.setRadius(50);
  //creator.setInnerRadius(50);// radius of sphere inscribed in cube
  //Try these two
  //creator.setOuterRadius(25);// radius of sphere circumscribing cube
  //creator.setMidRadius(10);// radius of sphere tangential to edges

  // These params set the initial position & need to be initialised seperately
  // from other params such as height / setWidthSegments / edges ...
  creator.setCenter(0, 0, 0).setZAxis(1, 1, 1).setZAngle(PI/4);

  MESH = new HE_Mesh(creator);

  //MESH.triangulate(); // this is one of many methods we can access from the HE_Mesh class
  RENDER = new WB_Render(this); // RENDER object initialise
}

/////////////////////////// DRAW ////////////////////////////
void draw() {
  background(255);
  // CAMERA
  CAM.beginHUD(); // this method disables PeasyCam for the commands between beginHUD & endHUD
  directionalLight(255, 255, 255, 1, 1, -1);
  directionalLight(127, 127, 127, -1, -1, 1);
  CAM.endHUD();

  // HEMESH
  // We draw our faces, vertices and edges using the RENDER object
  noStroke();
  fill(0, 0, 255);
  RENDER.drawFaces( MESH ); // Draw MESH faces

  fill(0, 255, 0);
  RENDER.drawVertices( 2, MESH ); // Draw MESH vertices


  stroke(255,0,0);
  RENDER.drawEdges( MESH ); // Draw MESH edges
  //RENDER.drawFaceNormals( 10, MESH );
}

void keyPressed() {
    if (key == 's') {
    saveFrame("screenShot_###.png");
    println("screen shot taken");
   }

}
実行結果
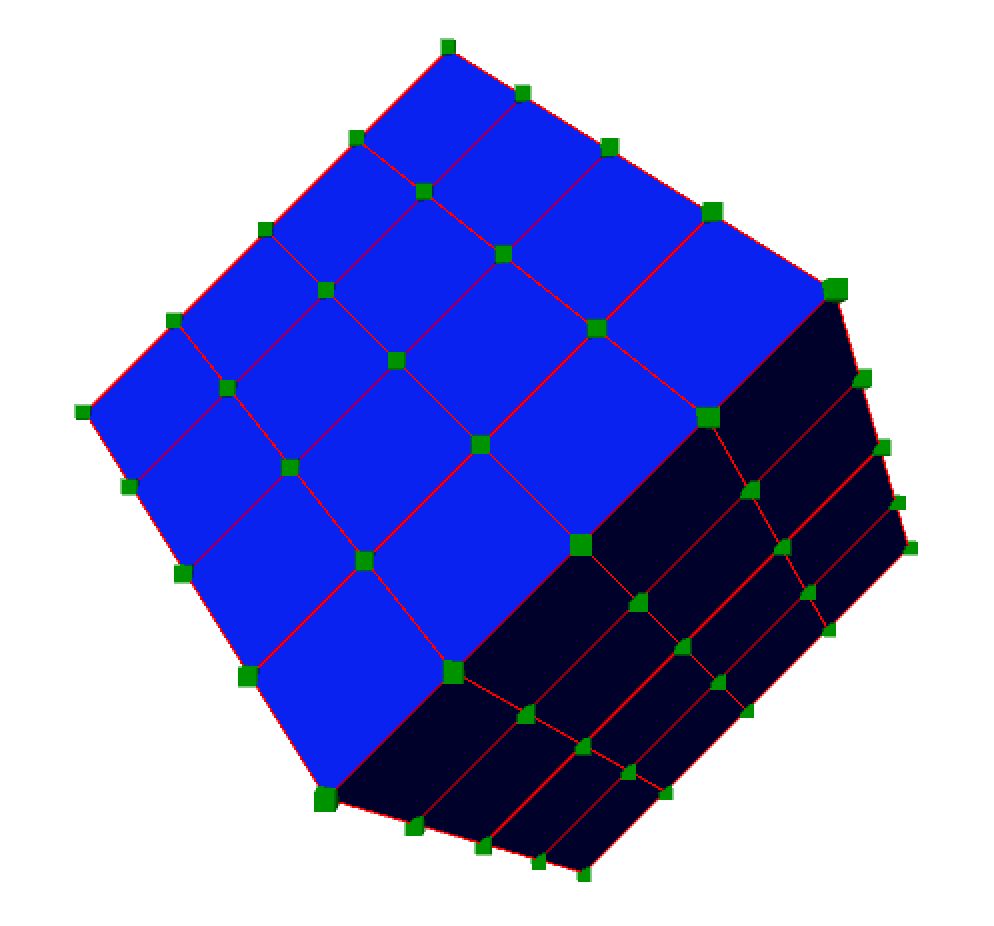
draw();内にfaces, edges, vertices, normals(法線)を見るためのメソッドも含んでいます。
RENDER.drawFaces( MESH );
RENDER.drawVertices( 2, MESH );
RENDER.drawEdges( MESH );
RENDER.drawFaceNormals( 10, MESH );
setup()でコメントアウトしているtriangulationメソッドをアクティベートすると、cubesが違う方法で描画されるようになるのがわかります。上記メソッドはデパッグにも便利です。
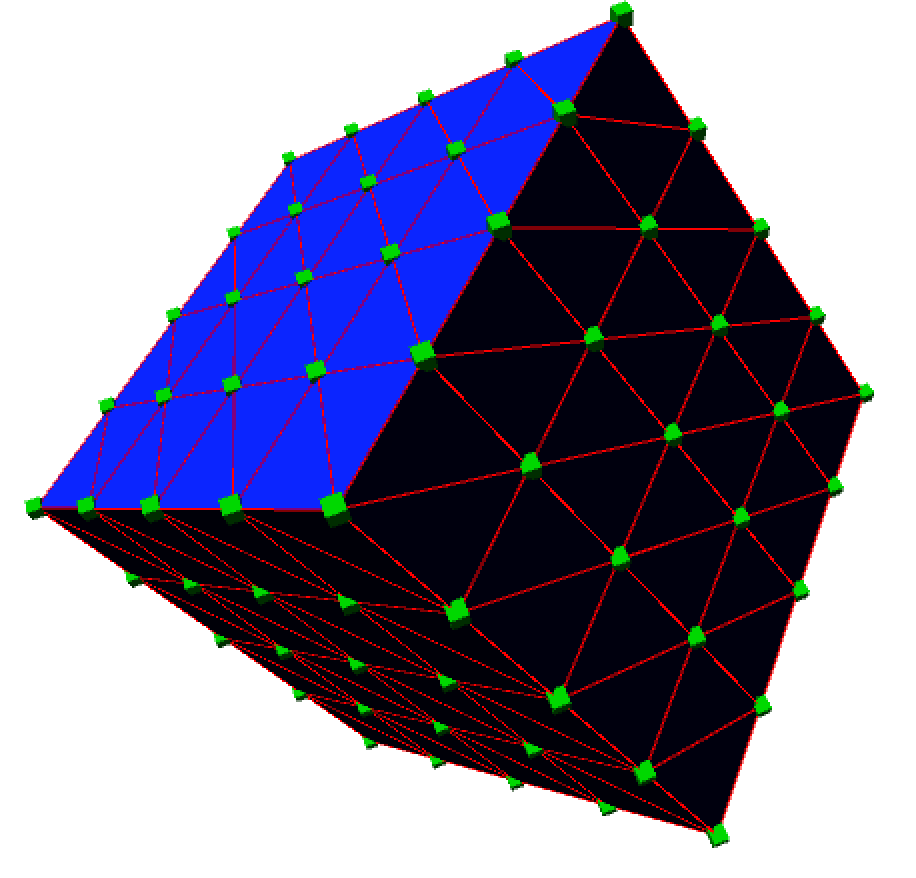
drawVertex, drawVertexNormalsとかも便利そうです。
Modifires
Modifiersを使うには、まずHEM_modifierクラスを選択して、いろいろパラメータをいじって、modify()を実行してメッシュに反映させます。
/*
PLEASE READ INTRO TAB
 */

/////////////////////////// GLOBALS ////////////////////////////
// LIBRARY IMPORT
import wblut.math.*;
import wblut.processing.*;
import wblut.core.*;
import wblut.hemesh.*;
import wblut.geom.*;
import processing.opengl.*;

// HEMESH CLASSES & OBJECTS
HE_Mesh MESH; // Our mesh object
WB_Render RENDER; // Our render object

// CAM
import peasy.*;
PeasyCam CAM;

/////////////////////////// SETUP ////////////////////////////

void setup() {
  size(800, 600, OPENGL);
  CAM = new PeasyCam(this, 400);

  // OUR CREATOR
  HEC_Cube creator = new HEC_Cube();

  //CREATOR PARMAMETERS
  creator.setEdge(70);
  creator.setCenter(0, 0, 0).setZAxis(1, 1, 1).setZAngle(PI/4);
  // Activate this line to see what happens
  //creator.setWidthSegments(4).setHeightSegments(4).setDepthSegments(4); // keep these small

  MESH = new HE_Mesh(creator); // add our creator object to our mesh object

  // MODIFIER : SIMPLE EXTRUSION MODIFIER
  HEM_Extrude extrude = new HEM_Extrude().setDistance(70);
  MESH.modify( extrude ); // ADD OUR MODIFIER TO THE MESH

  RENDER = new WB_Render(this);
}

/////////////////////////// DRAW ////////////////////////////
void draw() {
  background(255);
  // CAMERA
  CAM.beginHUD();
  directionalLight(255, 255, 255, 1, 1, -1);
  directionalLight(127, 127, 127, -1, -1, 1);
  CAM.endHUD();

  // HEMESH
  // To visualise better what is happening, I've activated the edges and disactivated the faces.
  /*
  noStroke();
  fill(0, 0, 255);
  RENDER.drawFaces( MESH ); // Draw MESH faces
  */

  stroke(0, 0, 255);
  strokeWeight(5);
  RENDER.drawEdges( MESH ); // Draw MESH edges
}

void keyPressed() {
  if (key == 'r') {
    setup();
  }
  if (key == 's') {
    saveFrame("screenShot.png");
  }
}
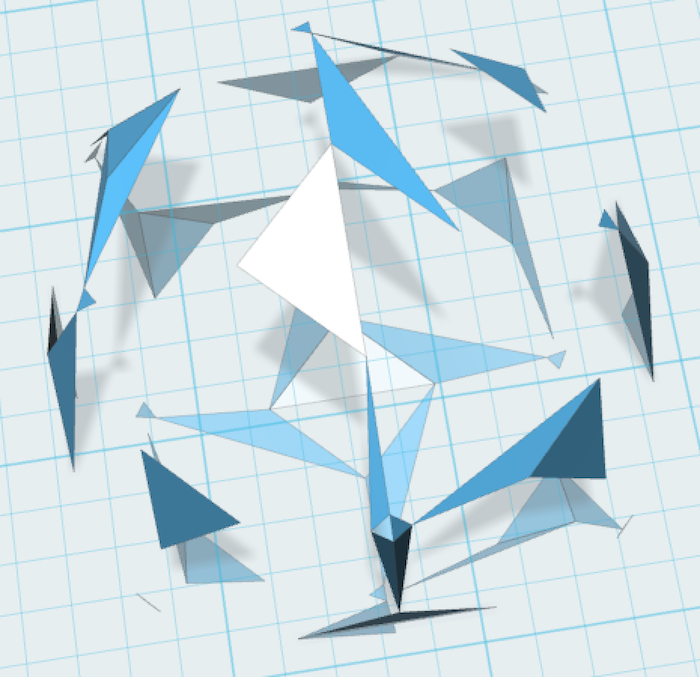
実行結果

要は押し出しです
HEM_Extrude extrude = new HEM_Extrude().setDistance(70);
MESH.modify( extrude ); // ADD OUR MODIFIER TO THE MESH
segment width, height, depthはデフォルトでは1です。
creator.setWidthSegments(4).setHeightSegments(4);
などと指定すると、
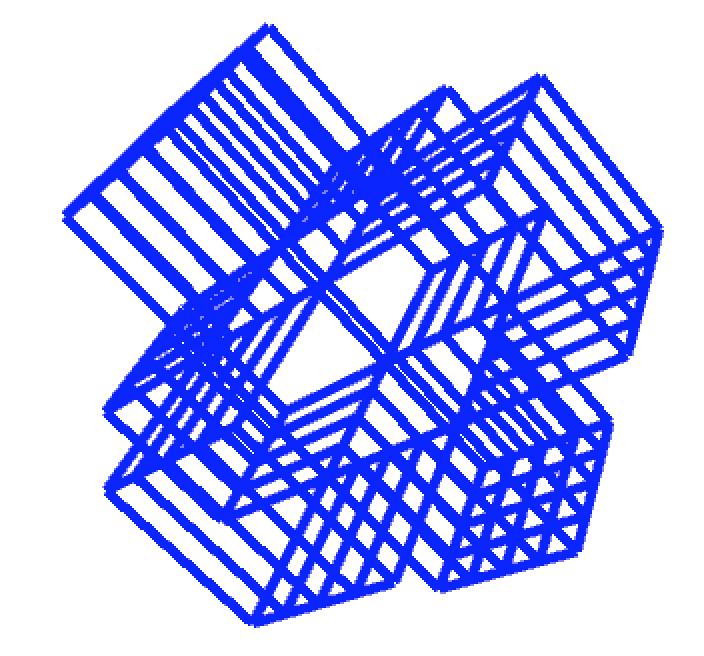
こんな風になります。
Modifierの組み合わせ
/*
PLEASE READ INTRO TAB
 */

/////////////////////////// GLOBALS ////////////////////////////
// LIBRARY
import wblut.math.*;
import wblut.processing.*;
import wblut.core.*;
import wblut.hemesh.*;
import wblut.geom.*;
import processing.opengl.*;


// HEMESH CLASSES & OBJECTS
HE_Mesh MESH; // Our mesh object
WB_Render RENDER; // Our render object
HEC_Cube creator; // Our creator object

// CAM
import peasy.*;
PeasyCam CAM;

/////////////////////////// SETUP ////////////////////////////

void setup() {
  size(800, 600, OPENGL);
  CAM = new PeasyCam(this, 150);

  creator = new HEC_Cube(); // Our creator

  //CREATOR PARMAMETERS
  creator.setEdge(60);
  MESH = new HE_Mesh(creator);  // ADD OUR CREATOR PARAMETERS TO OUR MESH

  // SIMPLE CHAMFER MODIFIER
  HEM_ChamferCorners chamfer = new HEM_ChamferCorners().setDistance(20);
  HEM_ChamferEdges edges = new HEM_ChamferEdges().setDistance(5);

  MESH.modify( chamfer ); // ADD OUR MODIFIER TO THE MESH
  MESH.modify( edges );

  RENDER = new WB_Render(this); // RENDER MESH
}

/////////////////////////// DRAW ////////////////////////////
void draw() {
  background(255);
  //CAMERA
  CAM.beginHUD(); // this method disables PeasyCam for the commands between beginHUD & endHUD
  directionalLight(255, 255, 255, 1, 1, -1);
  directionalLight(127, 127, 127, -1, -1, 1);
  CAM.endHUD();

  //HEMESH
  /*
  noStroke();
  fill(0, 0, 255);
  RENDER.drawFaces( MESH ); // Draw MESH faces
*/

  stroke(0, 0, 255);
  strokeWeight( 5 );
   RENDER.drawEdges( MESH ); //Draw MESH edges

}

// SOME KEYS INTERACTION
void keyPressed() {

  if (key == 'e') {
    // Hemesh includes a method for exporting geometry
    // in stl file format wich is very handy for 3D printing ;–)
    HET_Export.saveToSTL(MESH, sketchPath("export.stl"), "test");
  }

   if (key == 's') {
    saveFrame("screenShot_###.png");
    println("screen shot taken");
   }
  if (key == 'o') {
    // reset camera origin positions  - do this before
    // exporting your shape so your shape is positioned
    // on a flat plane ready for 3D printing
    CAM.reset(1000);
  }
  // Print camera position - could be helpful
  if (key == 'p') {
    float[] camPos = CAM.getPosition();
    println(camPos);
  }
}
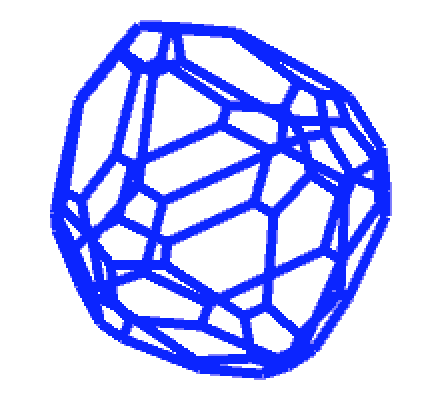
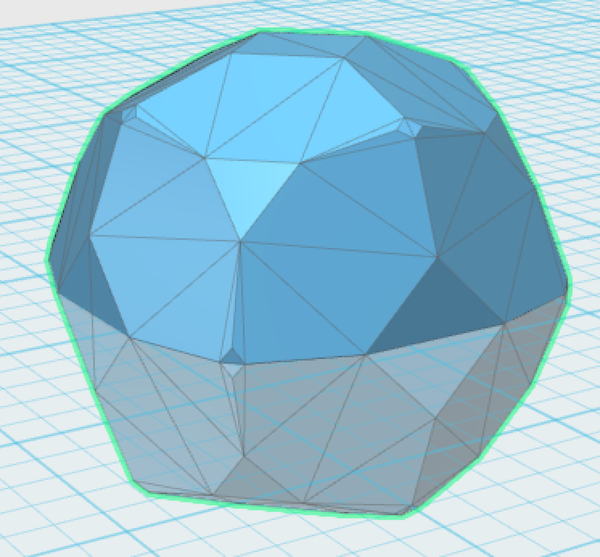
実行結果
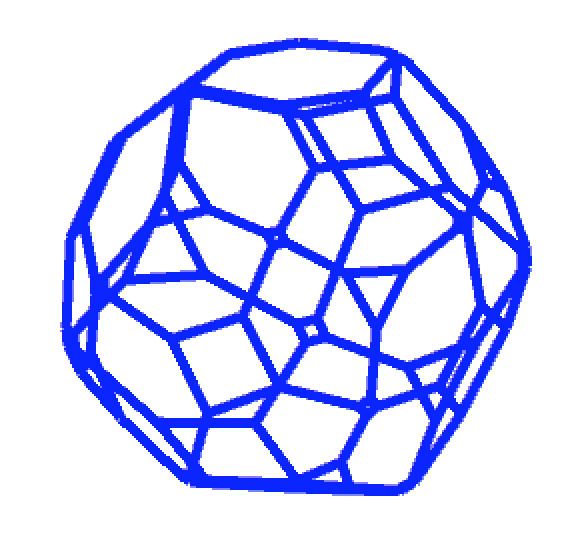
chamferの数値をいじるとちがった形にもなります。
ここでstlに書き出そうとすると、壊れてしまいました。
これは保存する前にMESH.triangulate()を実行することで解決できました。
ここにチュートリアルがあります。