【ASP.NET Core】PowerShellからScaffoldする【MVC】
目的
ASP.NET Core Webアプリケーション(MVC)にて、
コマンドライン操作とコード修正のみでScaffoldを行い、CRUDアプリケーションを生成します。
基本的にコードは修正のみで、ほとんど記述しません。
実験環境
- Windows 10 ( Anniversary Update )
Windows PowerShellを用いてコマンド操作を行っています。 - ASP.NET Core 1.0.0 preview2
- Microsoft SqlServer 2014
手順
プロジェクトの生成
-
適当なフォルダを作成します。このフォルダはプロジェクトフォルダとなり、
今後、dotnetコマンドはここから発行します。
今回のプロジェクト名は「DotNetCode」とします。> mkdir DotNetCode -
プロジェクトフォルダに移動し、PowerShellから下記コマンドを入力します。
> cd .\DotNetCode\
> dotnet new -t web
> dotnet restore
ちなみに、PowerShellの呼び出し方ですが、エクスプローラからプロジェクトフォルダを開き、

ディレクトリ入力欄に「powershell」と入力することで立ち上げることも出来ます。
データベースの生成
-
SqlServerにデータベースを作成します。
今回のデータベース名は、「CoreDB」とします。CREATE DATABASE CoreDB -
作成したデータベース内に適当なテーブルを作成します。
CREATE TABLE person ( id int IDENTITY(1,1) NOT NULL, name VARCHAR(50) NOT NULL, age int NOT NULL, CONSTRAINT PK_Person1 PRIMARY KEY CLUSTERED ( id ASC ) ) -
テーブルの中身もいくつか入れておきます。
INSERT INTO person VALUES('yamada', 10);
INSERT INTO person VALUES('matsuda', 20);
INSERT INTO person VALUES('yoshida', 30);
モデル層の作成(データファースト)
作成したデータベースの内容をモデル層に反映させます。
-
プロジェクトフォルダ内に生成されたproject.jsonのdependencies内に、
Microsoft.EntityFrameworkCore.SqlServerとMicrosoft.EntityFrameworkCore.SqlServer.Design
の2項目を追加します。"dependencies": { "Microsoft.EntityFrameworkCore.SqlServer": "1.0.1", "Microsoft.EntityFrameworkCore.SqlServer.Design": { "version": "1.0.1", "type": "build" } } -
プロジェクトをリストアします。下記コマンドをPowerShellから入力します。
> dotnet restore -
モデル層を生成します。下記コマンドをPowerShellから入力します。
> dotnet ef dbcontext scaffold "Server=実行中のサーバ名;Database=CoreDB;Trusted_Connection=True" Microsoft.EntityFrameworkCore.SqlServer -o Models
コントローラ・ビューの作成
作成したモデル層を利用してコントローラとビューを作成します。
-
project.jsonのdependencies内、"Microsoft.VisualStudio.Web.CodeGeneration.Tools"と
"Microsoft.VisualStudio.Web.CodeGenerators.Mvc"のversionの末尾をfinalに書き換えます。"Microsoft.VisualStudio.Web.CodeGeneration.Tools": { "version": "1.0.0-preview2-final", "type": "build" }, "Microsoft.VisualStudio.Web.CodeGenerators.Mvc": { "version": "1.0.0-preview2-final", "type": "build" } -
プロジェクトをリストアします。下記コマンドをPowerShellから入力します。
> dotnet restore -
コントローラとビューを生成します。下記コマンドをPowerShellから入力します。
> dotnet aspnet-codegenerator --project "./" controller --force --controllerName PersonController --model DotNetCode.Models.Person --relativeFolderPath Controllers --controllerNamespace DotNetCode.Controllers --referenceScriptLibraries --useDefaultLayout --dataContext DotNetCode.Models.CoreDBContext
接続情報の切り出し
このままでは接続文字列がソースコード内に埋まっており、データ操作が出来ないため
接続情報をappsettingsに切り出していきます。
-
CoreDBContext.csの修正
//baseを利用したコンストラクタを追加 public CoreDBContext(DbContextOptions<CoreDBContext> options):base(options) { } //OnConfiguringの中をコメントアウト protected override void OnConfiguring(DbContextOptionsBuilder optionsBuilder) { // #warning To protect potentially sensitive information in your connection string, you should move it out of source code. See http://go.microsoft.com/fwlink/?LinkId=723263 for guidance on storing connection strings. // optionsBuilder.UseSqlServer(@"Server=サーバ名;Database=CoreDB;Trusted_Connection=True"); } -
Startup.csにDBへのアクセス情報を追加
public void ConfigureServices(IServiceCollection services) { // Add framework services. services.AddDbContext<ApplicationDbContext>(options => options.UseSqlite(Configuration.GetConnectionString("DefaultConnection"))); services.AddIdentity<ApplicationUser, IdentityRole>() .AddEntityFrameworkStores<ApplicationDbContext>() .AddDefaultTokenProviders(); //AddMVCの前にDBへのアクセス情報を追加 services.AddDbContext<CoreDBContext>(options => options.UseSqlServer(Configuration.GetConnectionString("DBConnection"))); services.AddMvc(); // Add application services. services.AddTransient<IEmailSender, AuthMessageSender>(); services.AddTransient<ISmsSender, AuthMessageSender>(); } -
appsetting.jsonのConnectionStringsにDBConnectionを追加
"ConnectionStrings": {
    "DefaultConnection": "Server=(localdb)\\mssqllocaldb;Database=CoreDBContext-ba895596-744a-42e6-81ab-b23617fa2fb3;Trusted_Connection=True;MultipleActiveResultSets=true",
    "DBConnection" : "Server=サーバ名;Database=CoreDB;Trusted_Connection=True"
},
これで警告が解消され、DBへのアクセスを行うことが出来るようになります。
動作確認
-
プロジェクトフォルダに移動し、PowerShellから下記コマンドを入力します。
> dotnet run -
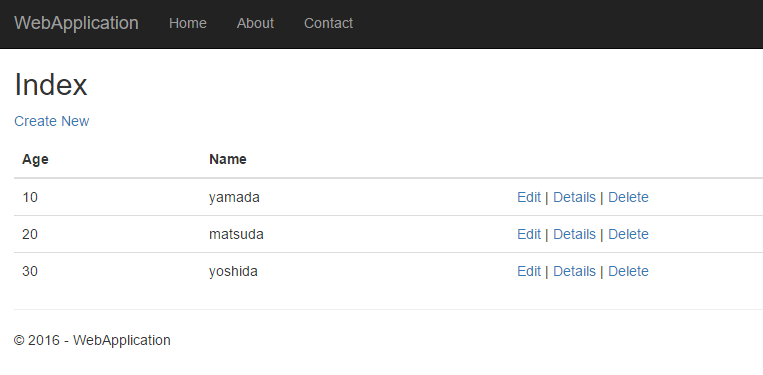
ブラウザから下記URLへアクセスします
http://localhost:5000/Person
感想
VisualStudio2015上でしかコントローラとビューのScaffoldを作成したことが無かったので、
今回PowerShellから色々頑張ってなんとかしたのは良い経験になりました。
Linuxなど他プラットフォームでのC#稼働が.NET Coreにより現実的になってきたので、
これからもっとC#が盛り上がってきたらいいな、と。
