はじめに
WindowsのMIDI APIを使うと、c/c++言語プログラムでMIDI音源を制御することができます。また、MATLABのMEX機能を用いることで、C/C++言語で記述されたプログラムを、MATLAB環境に取り込むことができます。ここでは、Visual Studio環境でMIDI出力をテストし、MATLAB環境へ移植する手順を概説します。
Visual Studio環境でテスト
使用コマンド、用語など
以下のプログラムをVisual Studio環境でコンパイルし、動作を確認します。以下は、プログラム内のコマンド、用語のポイント。
- mmsystem.h: MIDIコマンドに関する情報の格納されたヘッダファイル。
- argv[] : コマンドライン入力字に文字列が格納される配列。
- HMIDIOUT: MIDIハンドルの定義。
- midiOutOpen: MIDIデバイスのオープン。第一引数はMIDIハンドルのポインタ、第二引数はデバイスID。MIDI_MAPPERは、"デフォルトのデバイス"の意味。
- midiOutClose: MIDIデバイスのクローズ。引数はMIDIハンドル。
- midiOutShortMsg: MIDIメッセージの送信。第一引数はMIDIハンドル、第二引数はMIDIメッセージ
- MIDIメッセージ: 4バイト信号を16進数で表現。最下位(一番右)1バイトがステータスバイト。
-
ステータスバイト: メッセージの種別を示す。ここでは以下の三種類を使用
- 0x90: ノートオン(発音の開始)。上位バイトで音程、さらに上位バイトで音量情報を与える。
- 0x80: ノートオフ(発音の終了)。上位バイトで、該当する音程情報を与える。
- 0xC0: プログラムチェンジ。上位バイトで、音色番号を与える。
Cプログラム
#include <stdio.h>
#include "stdafx.h"
#include <Windows.h>
#include <mmsystem.h>
#pragma comment(lib, "winmm.lib")

int main(int argc, char *argv[])
{
	HMIDIOUT hmo;	// MIDI out handle

	int pitch;	// 音程(0~127: C-1~G9)
	int duration;	// 音の長さ(msec)
	int velocity;	// ベロシティ(音量)
	int timbre;	// 音色

	pitch	 = atoi(argv[1]); //コマンドライン入力の文字列をinteger型へ変換
	duration = atoi(argv[2]);
	velocity = atoi(argv[3]);
	timbre   = atoi(argv[4]);

	midiOutOpen(&hmo, MIDI_MAPPER, 0, 0, 0); // MIDIデバイスオープン
	midiOutShortMsg(hmo, 0xC0 | (timbre << 8)); // 0xC*: プログラムチェンジ

	midiOutShortMsg(hmo, 0x90 | (velocity << 16) | (pitch << 8)); // 0x90: ノートオン
	Sleep(duration);
	midiOutShortMsg(hmo, 0x80 | (pitch << 8));     // 0x80: ノートオフ

	midiOutClose(hmo);                             // MIDIデバイスクローズ
}
テスト
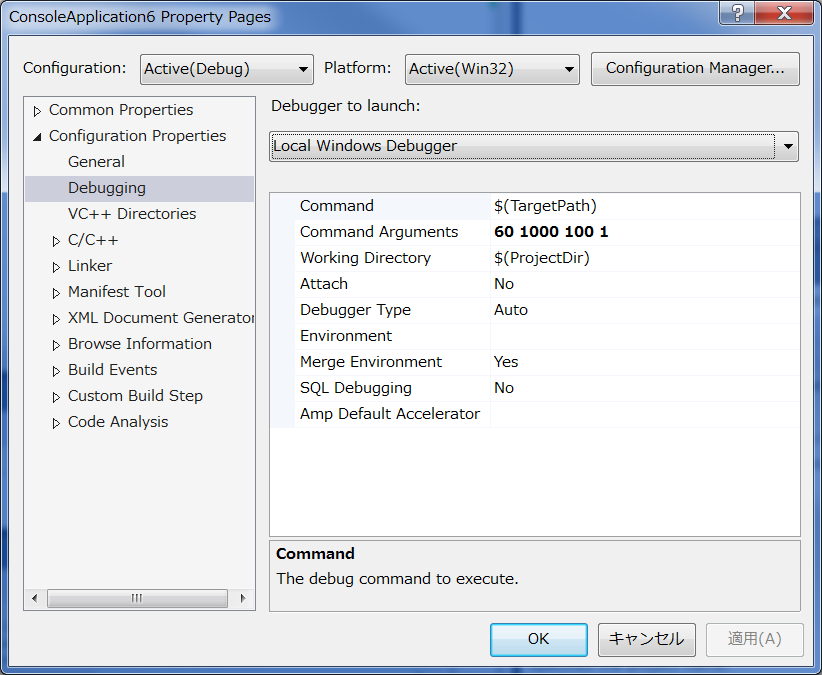
Visual Studio内でコマンドライン引数を与えて評価する場合は、
「Solution Explorerペインでプロジェクト名を右クリック」
⇒ Propertiesを選択
⇒ Debugging
⇒ Command Argumentsに、引数を記入(複数ある場合は、スペースで区切る)
ここでは、以下の引数をテストしています。
- 第一引数:60(音程:C4、ド)
- 第二引数:1000(長さ:1000[msec]発音)
- 第三引数:100(音量:maxは127)
- 第四引数:1(音色:GM音源では1番はグランドピアノ)
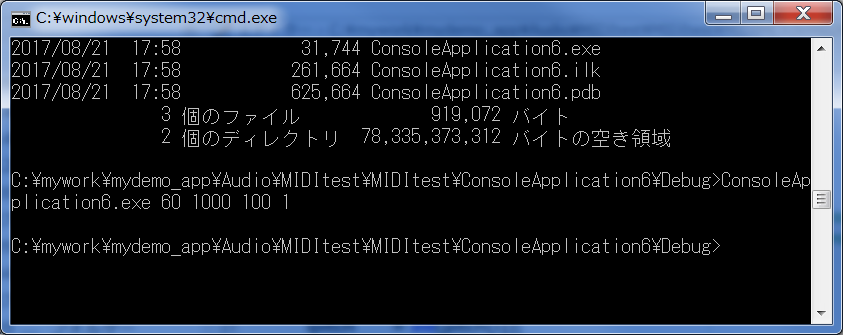
Visual Studio環境でテスト後、DOS窓等で実行する場合は、実行ファイル名の後、スペース区切りで引数を羅列して入力します。
MATLAB環境へ移植
コマンド・用語等
以下のプログラム例の様に、mexFunction(ゲートウェイルーチン)を介すことで、C/C++言語で記述されたプログラムを、MATLABで実行できる形式にコンパイルすることができます。以下は、プログラム内のコマンド、用語のポイント
- miditest(): 実際の処理部(オリジナルのプログラムに該当)。コマンドライン引数の受け渡しに関連する部分は削除し、MATLAB環境で受け取る形式に修正。それ以外は変更なし。
- mexFunction(int nlhs, mxArray *plhs[], int nrhs, const mxArray *prhs[]): MATLABと上記"実際の処理部"との間を取り持つゲートウェイルーチン。お約束なので、このまま使用。
- mxGetScalar(prhs[n]): n番目の右辺入力引数を取得。
MATLAB環境でコンパイルするために修正したプログラム
#include "mex.h"
#include <stdio.h>
#include <Windows.h>
#include <mmsystem.h>

#pragma comment(lib, "winmm.lib")

int miditest(int pitch, int duration, int velocity, int timbre)
{
	HMIDIOUT hmo;     // MIDI out handle

	midiOutOpen(&hmo, MIDI_MAPPER, 0, 0, 0);    // open MIDI out device
	midiOutShortMsg(hmo, 0xC0 | (timbre << 8)); // 0xC*: program change

	midiOutShortMsg(hmo, 0x90 | (velocity << 16 | pitch << 8)); // 0x90: note on
	Sleep(duration);
	midiOutShortMsg(hmo, 0x80 | (pitch << 8));   // 0x80: note off
	midiOutClose(hmo);                           // close MIDI out device

	return 0;
}

void mexFunction(int nlhs, mxArray *plhs[], int nrhs, const mxArray *prhs[])
{
	int pitch, duration, velocity, timbre;

	pitch		= mxGetScalar(prhs[0]); //右辺入力取得(0番目)
	duration	= mxGetScalar(prhs[1]); //右辺入力取得(1番目)
	velocity	= mxGetScalar(prhs[2]); //右辺入力取得(2番目)
	timbre		= mxGetScalar(prhs[3]); //右辺入力取得(3番目)

	miditest(pitch, duration, velocity, timbre);
}
テスト
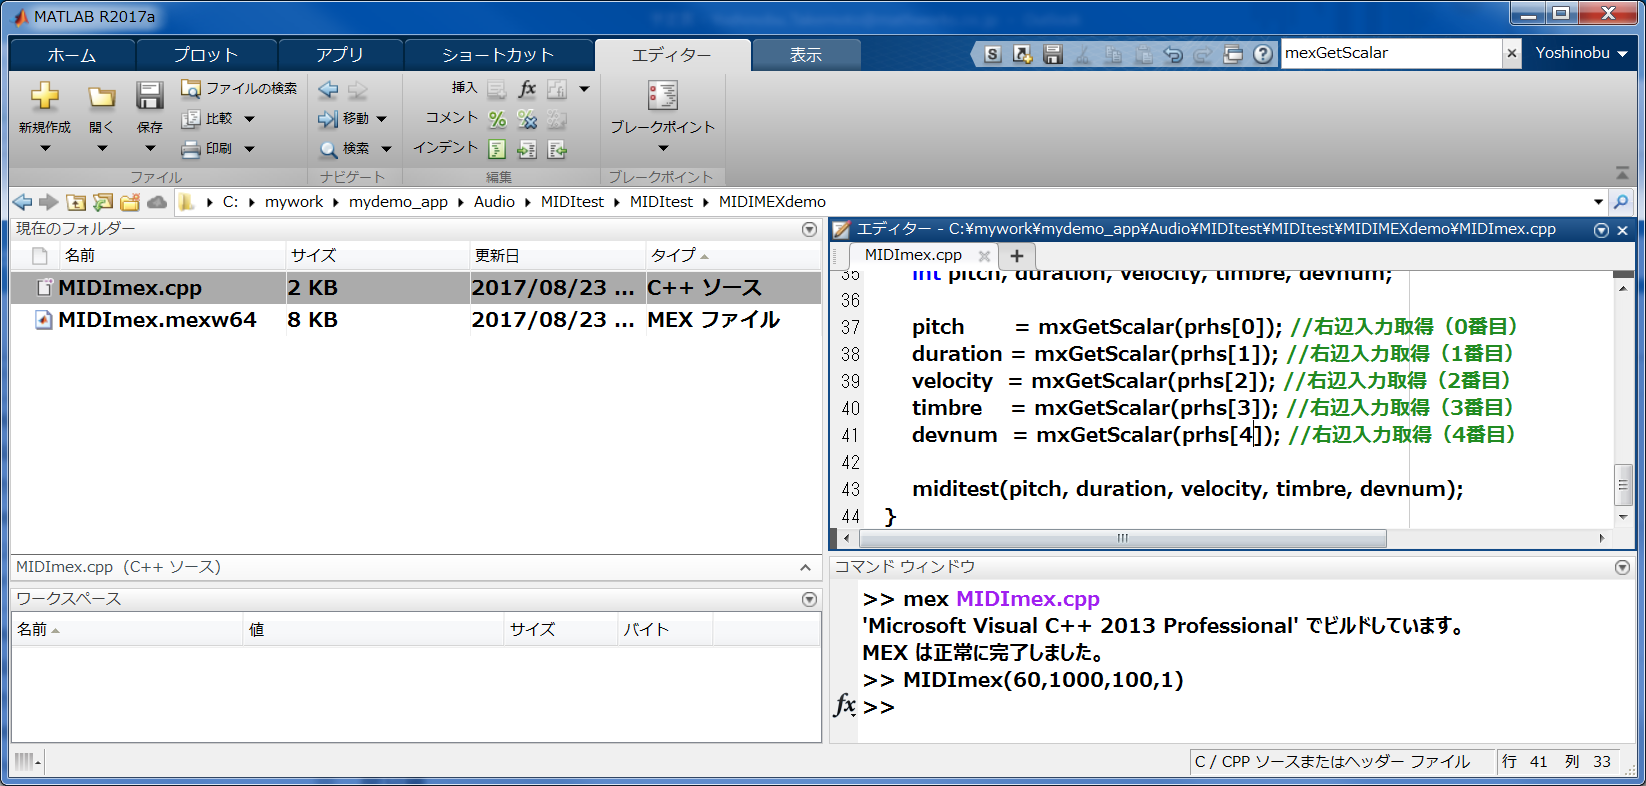
MATLABのコマンドウィンドウで、以下の様にmexコマンドを実行し、上記プログラムをコンパイルします。
>>mex filename.cpp
ビルドに成功すると、"MEXは正常に完了しました"というメッセージが表示され、Cコードと同じディレクトリに、"mexw64"という拡張子を持つファイル(一般に、"MEXファイル"と呼ばれる)が現れます。後は、MATLABのコマンドウィンドウで、以下の様にMEXファイルに必要な引数を与えることで、MATLAB環境からMIDI音源を鳴らすことができます。
まとめ
Windows環境において、非常に短い記述でMIDI音源を鳴らすことができました。またMATLABへの移植も大きな修正は不要です。ここでの例は非常にシンプルですが、同様の手順で、複数音源の同時再生や、MIDIファイルを読み込んで再生することも可能でしょう。


