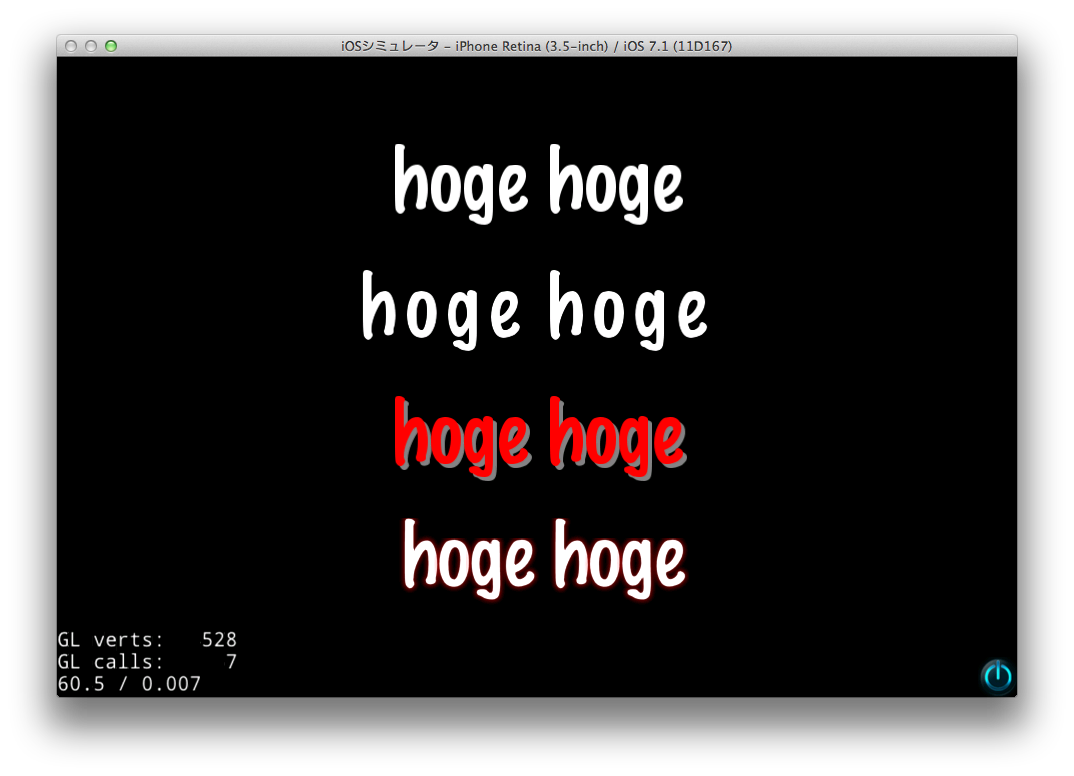
cocos2d::Labelクラスが結構rc2で変わってて、公式のdoxygenしかなかったのでちょっと検証してみました。
そのまとめです。
参考
TTFConfigについて
以前は、LabelTTFをcreateするときにフォントサイズとかフォント名などをcreateの引数で渡していましたが、rc2からTTFConfigという構造体が追加されてよく使うLabelを楽に作れるようになりました。
TTFConfigの詳細はこちら
検証コード
- 普通にTTFフォントを使って表示
- 文字と文字の間隔を4文字分くらいで設定(アウトライン)
- 文字に影をつける(x=4, y=-4の位置に影を置く)
- 文字の周りにオーラっぽいのを表示(アウトラインと併用できないので注意)
HelloWorldScene.cpp
int HelloWorldScene::init()
{
    // 〜 省略 〜

    const int fontSize = 80;

    // デフォルトで入ってるMarker Felt.ttfフォントの設定を作る
    TTFConfig ttfConfig("fonts/Marker Felt.ttf",
                        fontSize,
                        GlyphCollection::DYNAMIC);
    // 1. 普通にTTFフォントを使って表示
    auto label = Label::createWithTTF(ttfConfig, "hoge hoge");
    label->setPosition(Point(visibleSize.width/2 + origin.x, visibleSize.height * 0.8 + origin.y));
    this->addChild(label);

    const int height = label->getContentSize().height * 1.5;

    // 2. 文字と文字の間隔を設定(アウトライン)
    TTFConfig ttfConfigOutLine(ttfConfig);
    // 文字の間隔を指定(フォントサイズの幅っぽい)
    ttfConfigOutLine.outlineSize = 4;
    auto labelOutLine = Label::createWithTTF(ttfConfigOutLine, "hoge hoge");
    labelOutLine->setPosition(Point(label->getPosition() - Point(0, height)));
    this->addChild(labelOutLine);

    // 3. 文字に影をつける(x=4, y=-4の位置に影を置く)
    auto labelShadow = Label::createWithTTF(ttfConfig, "hoge hoge");
    labelShadow->setPosition(Point(labelOutLine->getPosition() - Point(0, height)));
    labelShadow->setColor(Color3B::RED);
    // 半透明の影を(x = 4, y = -4)の位置へ指定
    labelShadow->enableShadow(Color4B(255,255,255,128), Size(4, -4));
    this->addChild(labelShadow);

    // 4. 文字の周りにオーラっぽいのを表示(アウトラインと併用できないので注意)
    TTFConfig ttfConfigEffect(ttfConfig);
    // Glowの有効(_useDistanceField = distanceFieldEnabled;されます)
    ttfConfigEffect.distanceFieldEnabled = true;
    auto labelEffect = Label::createWithTTF(ttfConfigEffect, "hoge hoge");
    labelEffect->setPosition(Point(labelShadow->getPosition() - Point(0, height)));
    // 赤いオーラを指定
    labelEffect->enableGlow(Color4B::RED);
    this->addChild(labelEffect);

    // 〜 省略 〜
}
こんな感じになります
enableGlowがアウトラインと併用できない件について
ソースコードを実際に追ったところ、アウトライン指定と併用できないよう制御されてました。
レンダリングの都合とかで無理なのかな?(そこまで追うのはまた別の機会にでも...)
以下、抜粋ですが併用できないようにしているコードです。
CCLabel.cpp抜粋
// TTFConfigの設定
bool Label::setTTFConfig(const TTFConfig& ttfConfig)
{
    FontAtlas *newAtlas = FontAtlasCache::getFontAtlasTTF(ttfConfig);

    if (!newAtlas)
    {
        reset();
        return false;
    }

    _currentLabelType = LabelType::TTF;
    setFontAtlas(newAtlas,ttfConfig.distanceFieldEnabled,true);

    _fontConfig = ttfConfig;
    // ★ アウトラインを指定しているとここで、_useDistanceFieldがfalseになる
    if (_fontConfig.outlineSize > 0)
    {
        _fontConfig.distanceFieldEnabled = false;
        _useDistanceField = false;
        _useA8Shader = false;
        _currLabelEffect = LabelEffect::OUTLINE;
        updateShaderProgram();
    }
    else
    {
        _currLabelEffect = LabelEffect::NORMAL;
        updateShaderProgram();
        if(ttfConfig.distanceFieldEnabled)
        {
            this->setFontScale(1.0f * ttfConfig.fontSize / DistanceFieldFontSize);
        }
    }

    return true;
}

// オーラっぽいのを表示するメソッド
void Label::enableGlow(const Color4B& glowColor)
{
    // ★ ここでさっきfalseにしたやつで制御してます
    if(! _useDistanceField)
        return;
    _currLabelEffect = LabelEffect::GLOW;
    _effectColor = glowColor;
    _effectColorF.r = _effectColor.r / 255.0f;
    _effectColorF.g = _effectColor.g / 255.0f;
    _effectColorF.b = _effectColor.b / 255.0f;
    _effectColorF.a = _effectColor.a / 255.0f;
    updateShaderProgram();
}
おわり
検証したコードをgithubにあげてますので、よかったらどうぞ
