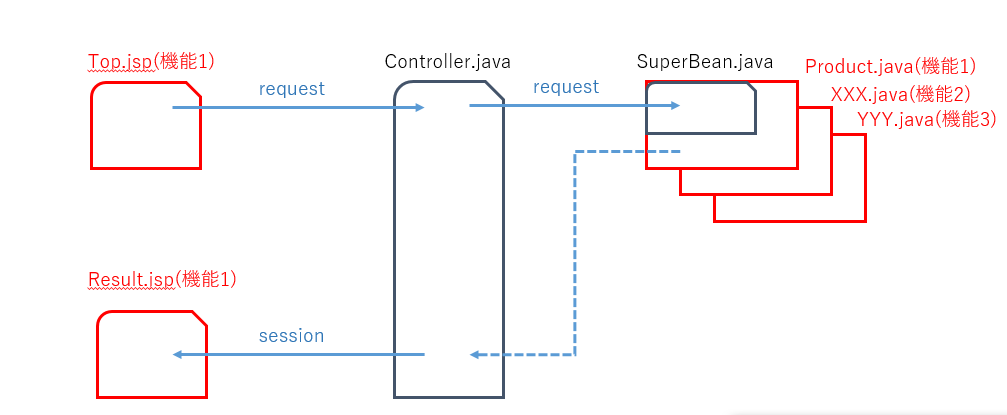
↑今回のフレームワークのイメージ図
はじめに
今回が山場です。あまり頭に入ってこないとは思いますが最初はそんなもんです。がんばりましょう。
やること
掲題のフレームワークを使って、Webサイトを作ってみましょう
全4回の内訳
1. View jspでフロントのページを作る
2. Model JavaBeansでモデルを作る
3. Controller VとMを繋ぐServletを作る
4. ModelでDB2にアクセスするメソッドを作る
前提
- Eclipse導入済み
- DB2インストール済み(4回目に必要)
手順
jspの修正
Top.jsp
<%@ page language="java" contentType="text/html; charset=UTF-8"
    pageEncoding="UTF-8"%><!-- 文字コード指定 -->
<!DOCTYPE html PUBLIC "-//W3C//DTD HTML 4.01 Transitional//EN" "http://www.w3.org/TR/html4/loose.dtd">
<html>
<head>
<meta http-equiv="Content-Type" content="text/html; charset=ISO-8859-1">
<title>Top</title>
<h1>top</h1>
</head>
<body>

<form action="/MVC/Controller" method="post">   <!-- postで↓の情報を送信することの宣言 【追加】actionの値をControllerに -->
    <input type="text" name="keyword">   <!--検索キーワード入力欄-->
    <input type="hidden" name="beanid" value="practice.Product"><!--【追加】使用するBeanを宣言しておく-->
    <input type="hidden" name="pageto" value="Result.jsp"><!--【追加】遷移先の指定-->
    <input type="submit" value="Search"> <!-- キーワード送信ボタン -->
</form>

</body>
</html>
Modelの作成(一部再掲)
Product.java
package practice;


public class Product extends SuperBean{
        //メンバ変数はprivateにしておきましょう
    private int price;
    private int weight;
    private String name;
    private String material1;
    private String category;

    public void runBean(){//【変更】setAllからメソッド名を変更しました。
        String keyword = (String) super.request.getParameter("keyword");//【変更】受け取った値を出力して確認
        System.out.println("検索キーワードは"+keyword+"でした。今度コレを使ってDB検索しますよ");

        //今回はDB接続をしないので、直接値をbeanの各属性にsetします。
        this.price=1404;
        this.weight=300;
        this.name="「私の消滅」中村 文則";
        this.material1="paper";
        this.category="book";

    }


    public int getPrice() {
        return price;
    }
    public int getWeight() {
        return weight;
    }
    public String getName() {
        return name;
    }
    public String getMaterial1() {
        return material1;
    }
    public String getCategory() {
        return category;
    }
}
SuperBeanの作成
Beanの共通処理を親クラスにまとめるために作成
SuperBean.java
package practice;

import javax.servlet.http.HttpServletRequest;

public abstract class SuperBean {
    protected HttpServletRequest request;//requestを保持します
    void setJspInfo(HttpServletRequest request){
        this.request = request;
    }
    protected void runBean(){//beanを実行

    }

}
Controllerの作成
Controllerは以後、機能(jsp,beans)を追加する場合でも編集が不要な設計になっています。今は書くのが大変だと思いますが、機能を追加する場合に便利になります。
サーブレットは、practiceパッケージを右クリック→新規→サーブレットから作成してください
Controller.java
package practice;

import java.io.IOException;

import javax.servlet.RequestDispatcher;
import javax.servlet.ServletException;
import javax.servlet.annotation.WebServlet;
import javax.servlet.http.HttpServlet;
import javax.servlet.http.HttpServletRequest;
import javax.servlet.http.HttpServletResponse;
import javax.servlet.http.HttpSession;
/**
 * Servlet implementation class Controller
 */
@WebServlet("/Controller")
public class Controller extends HttpServlet {
    private static final long serialVersionUID = 1L;

    /**
     * Default constructor.
     */
    public Controller() {
        // TODO Auto-generated constructor stub
    }

    /**
     * @see HttpServlet#doGet(HttpServletRequest request, HttpServletResponse response)
     */
    protected void doGet(HttpServletRequest request, HttpServletResponse response) throws ServletException, IOException {
        // TODO Auto-generated method stub
        doPost(request,response);
    }

    /**
     * @see HttpServlet#doPost(HttpServletRequest request, HttpServletResponse response)
     */
    protected void doPost(HttpServletRequest request, HttpServletResponse response) throws ServletException, IOException {
        // TODO Auto-generated method stub


        //セッション(jsp側にインスタンスを返すときの入れ物)を生成。
        HttpSession session= request.getSession();

            //変数としてBean名を受け取り、そのBeanをインスタンス化してあげます。これにより、getterなどのメソッドが使えるようになります。ここではProductクラスがインスタンス化されています。
            //文字コード指定
            request.setCharacterEncoding("UTF-8");
            String beanid = (String)request.getParameter("beanid");
            String pageto = (String)request.getParameter("pageto");
            try {
                SuperBean bean = (SuperBean) Class.forName(beanid).newInstance();


            //jspから受け取った情報をBeanに渡す
            bean.setJspInfo(request);

            //beanを実行する
            bean.runBean();

            //sessionにbeanを格納
            session.setAttribute("bean", bean);

            //遷移
            RequestDispatcher rd =request.getRequestDispatcher(pageto);
            rd.forward(request, response);
            } catch (InstantiationException e) {
                // TODO 自動生成された catch ブロック
                e.printStackTrace();
            } catch (IllegalAccessException e) {
                // TODO 自動生成された catch ブロック
                e.printStackTrace();
            } catch (ClassNotFoundException e) {
                // TODO 自動生成された catch ブロック
                e.printStackTrace();
            }


    }

}
結果出力ページの作成
Result.jsp
<%@ page language="java" contentType="text/html; charset=UTF-8"
pageEncoding="UTF-8" import="practice.Product"%>
<!DOCTYPE html PUBLIC "-//W3C//DTD HTML 4.01 Transitional//EN" "http://www.w3.org/TR/html4/loose.dtd">
<%request.setCharacterEncoding("UTF-8"); %>
<%Product bean = (Product)session.getAttribute("bean"); %>
<html>
<head>
<meta http-equiv="Content-Type" content="text/html; charset=ISO-8859-1">
<title>Insert title here</title>
</head>
<body>
商品名:<%=bean.getName() %><br>
価格:\ <%=bean.getPrice() %><br>
重量:<%=bean.getWeight() %><br>
商品カテゴリ:<%=bean.getCategory() %><br>
</body>
</html>
これでDB接続を除いたMVCが完了です。
今までに比べて今回の内容はすごく難しかったですよね。お疲れ様でした。
エラーにぶち当たりまくると思うので、質問お待ちしています。