この記事では、Rails で書いた JSON API サーバそれ自体の API エンドポイント仕様ドキュメントを OpenAPI 形式の JSON データとして生成し、そのデータを API 自体から取得する方法を説明します。
つまり、次のようなエンドポイント
GET /api-docs.json
を叩くと、その API の仕様が次のような OpenAPI 形式の JSON で返ってくるようになります。
{
  "swagger": "2.0",
  "info": {
    "version": "1.0.0",
    "title": "Sample App",
    "description": "This is a sample app.",
    "contact": {
      "name": "@kymmt90"
    },
    "license": {
      "name": "MIT"
    }
  },
  // ...
  "paths": {
    "/users": {
      "post": {
        "description": "Creates a user",
        "operationId": "create_user",
        "parameters": [
          {
            "$ref": "#/parameters/user"
          }
        ],
        "responses": {
          "201": {
            "description": "Created user",
            "schema": {
              "$ref": "#/definitions/UserOutput"
            }
          },
  // ...
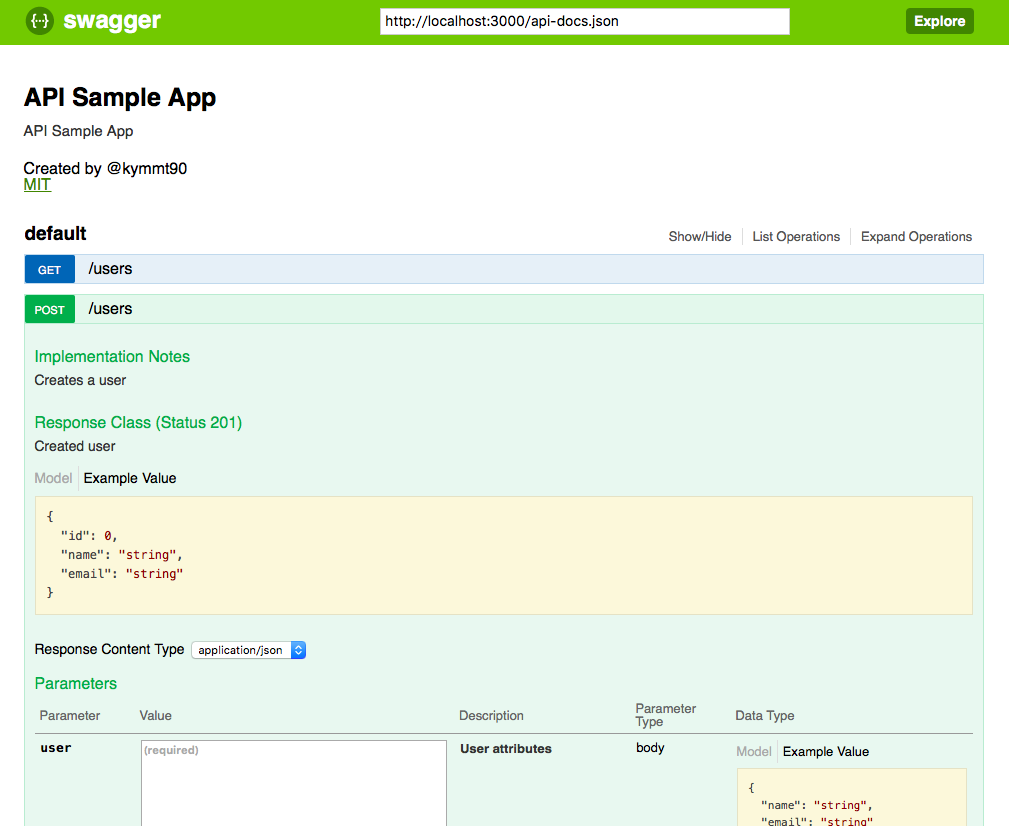
API からそれ自身の仕様を JSON データとして取得できるようにすることで、Swagger UI や ReDoc といった OpenAPI 形式のデータをブラウジングするアプリケーションを自由に選び、API ドキュメントを作れるようになります。例えば、API から取得できる JSON をもとに、Swagger UI で次のようにブラウジングできます。
作りかた
今回は swagger-blocks という gem を利用して、Rails で書いた JSON API サーバのエンドポイント仕様を OpenAPI 形式で記述していきます。
Rails は v5.0.2, swagger-blocks は v2.0.0 を利用します。
OpenAPI とは
OpenAPI は API 記述方法についての仕様の一つであり、2015 年まで Swagger と呼ばれていたものです。詳しくはこちらを参照してください。
swagger-blocks とは
swagger-blocks は OpenAPI 形式の API 仕様を Ruby の DSL としてコード内に記述するための gem です。
サーバを立ち上げっぱなしでもコードを書き換えると生成できるドキュメントも更新されたり、内部 DSL(すなわち Ruby)なのでモジュール化もかんたんだったりと、新規に Ruby 製 Web アプリケーションフレームワークの API ドキュメントを書く場合は便利かと思います。
swagger-blocks v2.0.0 は 2017 年 3 月現在最新である OpenAPI v2.0 に対応しています。類似する gem である swagger-docs は OpenAPI v1.2 までしか対応していないので、現状は swagger-blocks を使うのがよいと思います。
JSON API サーバを書く
Rails で API サーバを書きます。今回は User の CRUD だけができる単純なエンドポイントがあるとします。
GET /usersGET /users/:idPOST /usersPATCH /users/:idDELETE /users/:id
今回は説明用なので scaffold を使って作成したアプリケーションに対して作業していくと仮定します。認証なども省きます。
$ rails new api_sample_app --api
$ cd api_sample_app
$ bin/rails g scaffold User name:string email:string
$ bin/rails db:migrate
CORS を有効にする
今回作る OpenAPI 形式の JSON を返すエンドポイントは別オリジンから叩かれることが多いので、rack-cors を導入して CORS を有効にしておきます。
Gemfile でコメントアウトされている rack-cors のコメントアウトを外し、次の設定を config/application.rb へ追加します。
config.middleware.insert_before 0, Rack::Cors do
  allow do
    origins '*'
    resource '*', :headers => :any, :methods => [:get, :post, :options]
  end
end
API 仕様を swagger-blocks の DSL で書く
なにはなくとも swagger-blocks を導入します。
gem 'swagger-blocks' # 追加
そして、API の仕様を swagger-blocks の DSL で書いていきます。OpenAPI 自体の仕様は仕様書を、swagger-blocks の利用例は GitHub の fotinakis/swagger-blocks にあるペットストアの例を見るとよいでしょう。
コントローラで Swagger:Blocks をインクルードし、DSL で仕様を記述するのが基本的な使いかたです。
def UsersController < ApplicationController
  include Swagger::Blocks

  swagger_path '/users/{id}' do

    # GET /users/:id エンドポイントの定義
    operation :get do
      key :description, 'Find a user by ID'
      key :operationId, :find_user_by_id

      # パスパラメータ id の定義
      parameter name: :id do
        key :in, :path
        key :description, 'User ID'
        key :required, true
        key :type, :integer
        key :format, :int64
      end

      # 成功レスポンスの定義
      response 200 do
        key :description, 'User'
        schema do
          key :required, [:id, :name]
          property :id do
            key :type, :integer
            key :format, :int64
          end
          property :name do
            key :type, :string
          end
        end
      end
    end
  end

  def show
    # ...
  end

  # ...
end
API 仕様が記述されたモデル、コントローラのクラス名を格納した配列を Swagger::Blocks.build_root_json に渡すことで OpenAPI 形式の JSON を表すハッシュを作成します。
Swagger::Blocks.build_root_json([User, UserController])
あとは、このメソッドで作成したハッシュを JSON として返すアクションを持つコントローラを作ることで、その API 自身のドキュメントを返すエンドポイント GET /api-docs.json を実現します。
get 'api-docs', to: 'api_docs#index' # この行を追加
class ApiDocsController < ApplicationController
  include Swagger::Blocks

  swagger_root do
    # API 名やバージョンなどのメタ情報を定義
  end

  def index
    render json: Swagger::Blocks.build_root_json([User, UsersController])
  end
end
それでは、ベターと思われる swagger-blocks の使いかたについて、いくつか説明します。
仕様を concern に書く
API の仕様をコントローラの中に書いていくこともできますが、仕様はコントローラごとに別モジュールに書き、コントローラでそのモジュールを include したほうが見通しがよいと思います。また、Swagger::Blocks への依存解決で楽をするために concern にしておきましょう。
たとえば、UsersController の各アクションに対応するエンドポイントの仕様は app/controllers/concerns/swagger/users_api.rb に次のような concern として作成します。
module Swagger::UsersApi
  extend ActiveSupport::Concern
  include Swagger::Blocks

  included do
    swagger_path '/users/{id}' do
      parameter :user_id do
        key :name, :id
      end

      operation :get do
        key :description, 'Finds the specified user'
        key :operationId, :find_user_by_id

        response 200 do
          key :description, 'User specified by its ID'
          schema do
            key :'$ref', :UserOutput
          end
        end
      end
      # ...

    end
  end
end
そして、コントローラ内で include すると、API 仕様の記述とコントローラ処理の記述を分離できます。
class UsersController < ApplicationController
  include Swagger::UsersApi

  # ...
end
レスポンス、パラメータの記述を DRY にする
レスポンスやパラメータの記述は各 API で重複しがちです。これらは別途スキーマを定義して、JSON Schema の $ref などを利用して参照することで DRY になるようにしましょう。
たとえば、API のレスポンスとしての User と ErrorOutput を次のように定義します。
module Swagger::UserSchema
  extend ActiveSupport::Concern
  include Swagger::Blocks

  included do
    swagger_schema :User do
      key :required, [:name, :email]
      property :name do
        key :type, :string
      end
      property :email do
        key :type, :string
      end
    end
  end
end
# User を表す仕様を include しておく
class User < ApplicationRecord
  include Swagger::UserSchema
end
module Swagger::ErrorSchema
  extend ActiveSupport::Concern
  include Swagger::Blocks

  included do
    swagger_schema :ErrorOutput do
      key :required, [:errors]
      property :errors do
        key :type, :array
        items do
          key :type, :string
        end
      end
    end
  end
end
また、入力パラメータを次のように定義します。
module Swagger::Parameters
  def self.extended(base)
    base.parameter :user_id do
      key :in, :path
      key :description, 'User ID'
      key :required, true
      key :type, :integer
      key :format, :int64
    end
  end
end
入力パラメータと同じ要領で、エラーレスポンスも次のように定義します。
module Swagger::ErrorResponses
  module NotFoundError
    def self.extended(base)
      base.response 404 do
        key :description, 'Resource not found'
        schema do
          key :'$ref', :ErrorOutput # 別途定義したエラーを参照
        end
      end
    end
  end

  # ...
end
これで、次のように、定義したパラメータやエラーレスポンスを別の場所から参照し、記述の重複を防ぐことができます。
# Parameters は swagger_root 内で extend しておく
module Swagger::SampleAppRoot
  extend ActiveSupport::Concern
  include Swagger::Blocks

  included do
    swagger_root do
      # ...

      extend Swagger::Parameters
    end
  end
end
module Swagger::UsersApi
  extend ActiveSupport::Concern
  include Swagger::Blocks

  included do
    include Swagger::ErrorSchema

    swagger_path '/users/{id}' do
      parameters :user_id # root で定義されたパラメータを取り込む

      operation :get do
        key :description, 'Returns the specified user'
        key :operationId, :find_user_by_id

        response 200 do
          key :description, 'User specified by its ID'
          schema do
            key :'$ref', :User # 別途定義した User を参照
          end
        end

        # 別途定義したエラーレスポンスを取り込む
        extend Swagger::ErrorResponses::NotFoundError
      end
    end
  end
end
swagger-blocks による API 仕様記述のサンプル
上述した方針で swagger-blocks を使って書いた API 仕様を含む Rails アプリケーションのサンプルを GitHub で公開しています。
app 配下の今回手を加えたディレクトリ構成は次のようになっています。concerns/swagger 配下のファイル群が API 仕様を記述したモジュールを含むファイルです。
app/controllers
├── api_docs_controller.rb
├── application_controller.rb
├── concerns
│   └── swagger
│       ├── api_docs.rb
│       ├── error_responses.rb
│       ├── parameters.rb
│       └── users_api.rb
└── users_controller.rb

app/models
├── application_record.rb
├── concerns
│   └── swagger
│       ├── error_schema.rb
│       └── user_schema.rb
└── user.rb
OpenAPI 形式の API ドキュメントを返すエンドポイントを叩く
今回作った API ドキュメント取得用のエンドポイントを試しに叩いてみます。
$ bin/rails s
$ curl http://localhost:3000/api-docs.json | jq .
すると、次のような OpenAPI 形式の JSON データが取得できています。あとは、Swagger UI などのドキュメンテーションツールからこの JSON を取得すれば OK です。
{
  "swagger": "2.0",
  "info": {
    "version": "1.0.0",
    "title": "API Sample App",
    "description": "API Sample App",
    "contact": {
      "name": "@kymmt90"
    },
    "license": {
      "name": "MIT"
    }
  },
  "basePath": "/",
  "consumes": [
    "application/json"
  ],
  "produces": [
    "application/json"
  ],
  "parameters": {
    "user_id": {
      "in": "path",
      "description": "User ID",
      "required": true,
      "type": "integer",
      "format": "int64"
    },
    "user": {
      "name": "user",
      "in": "body",
      "description": "User attributes",
      "required": true,
      "schema": {
        "$ref": "#/definitions/UserInput"
      }
    }
  },
  "paths": {
    "/users": {
      "get": {
        "description": "Get all users",
        "operationId": "get_all_user",
        "responses": {
          "200": {
            "description": "All users",
            "schema": {
              "type": "array",
              "items": {
                "$ref": "#/definitions/UserOutput"
              }
            }
          }
        }
      },
      "post": {
        "description": "Creates a user",
        "operationId": "create_user",
        "parameters": [
          {
            "$ref": "#/parameters/user"
          }
        ],
        "responses": {
          "201": {
            "description": "Created user",
            "schema": {
              "$ref": "#/definitions/UserOutput"
            }
          },
          "400": {
            "description": "Invalid parameters",
            "schema": {
              "$ref": "#/definitions/ErrorOutput"
            }
          }
        }
      }
    },
    "/users/{id}": {
      "parameters": [
        {
          "$ref": "#/parameters/user_id",
          "name": "id"
        }
      ],
      "get": {
        "description": "Finds the specified user",
        "operationId": "find_user_by_id",
        "responses": {
          "200": {
            "description": "User specified by its ID",
            "schema": {
              "$ref": "#/definitions/UserOutput"
            }
          },
          "404": {
            "description": "Resource not found",
            "schema": {
              "$ref": "#/definitions/ErrorOutput"
            }
          }
        }
      },
      "patch": {
        "description": "Updates the user",
        "operationId": "update_user",
        "parameters": [
          {
            "$ref": "#/parameters/user"
          }
        ],
        "responses": {
          "200": {
            "description": "Updated user",
            "schema": {
              "$ref": "#/definitions/UserOutput"
            }
          },
          "400": {
            "description": "Invalid parameters",
            "schema": {
              "$ref": "#/definitions/ErrorOutput"
            }
          },
          "404": {
            "description": "Resource not found",
            "schema": {
              "$ref": "#/definitions/ErrorOutput"
            }
          }
        }
      },
      "delete": {
        "description": "Deletes the user",
        "operationId": "delete_user",
        "responses": {
          "204": {
            "description": "The user was deleted"
          },
          "404": {
            "description": "Resource not found",
            "schema": {
              "$ref": "#/definitions/ErrorOutput"
            }
          }
        }
      }
    }
  },
  "definitions": {
    "UserInput": {
      "required": [
        "name",
        "email"
      ],
      "properties": {
        "name": {
          "type": "string"
        },
        "email": {
          "type": "string"
        }
      }
    },
    "UserOutput": {
      "required": [
        "id",
        "name",
        "email"
      ],
      "properties": {
        "id": {
          "type": "integer",
          "format": "int64"
        },
        "name": {
          "type": "string"
        },
        "email": {
          "type": "string"
        }
      }
    }
  }
}