UnityのMapEditor
ちょっとググってみると
RPG Map Editor
2D Tile Map Editor
Tiled Map Editor
このようなものがありました。
ゲームデザインをするにあたり、こういったツールは活用した方が良いと思っています。
が、有料であったり、ゲームに対して機能がそぐわなかったりする場合があります。
Editor拡張で作る
UnityにはEditor拡張という機能があるので、
それを利用して作ってみましたので、公開します。
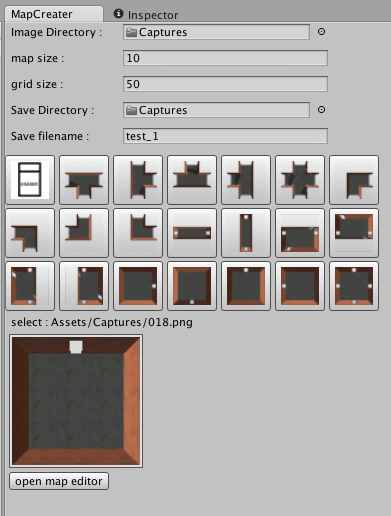
画像一覧から画像を選択して、
グリッド画面でマップを作り、
テキストでデータを出力、
という流れになります。
画像一覧ウィンドウ
コード全体はgithubを参考にしてください。
指定したディレクトリから画像データを探して、
それをButtonにしてウィンドウに表示。
csharp;MapCreater.cs
    // 画像一覧をボタン選択出来る形にして出力
    private void DrawImageParts(){
        if(imgDirectory != null){
            float x = 0.0f;
            float y = 00.0f;
            float w = 50.0f;
            float h = 50.0f;
            float maxW = 300.0f;

            string path = AssetDatabase.GetAssetPath(imgDirectory);
            string[] names = Directory.GetFiles (path , "*.png");
            EditorGUILayout.BeginVertical();
            foreach (string d in names) {
                if(x > maxW){
                    x = 0.0f;
                    y += h;
                    EditorGUILayout.EndHorizontal();
                }
                if(x == 0.0f){
                    EditorGUILayout.BeginHorizontal();
                }
                GUILayout.FlexibleSpace();
                Texture2D tex = (Texture2D)AssetDatabase.LoadAssetAtPath(d , typeof(Texture2D));
                if(GUILayout.Button(tex , GUILayout.MaxWidth(w) , GUILayout.MaxHeight(h) , GUILayout.ExpandWidth(false) , GUILayout.ExpandHeight(false))){
                    selectedImagePath = d;
                }
                GUILayout.FlexibleSpace();
                x += w;
            }
            EditorGUILayout.EndVertical();
        }
    }
EdirorウィンドウからさらにEditorウィンドウを
開く場合はこんな感じで呼び出せます。
MapCreater.cs
    // マップウィンドウを開くボタンを生成
    private void DrawMapWindowButton(){
        EditorGUILayout.BeginVertical();
        GUILayout.FlexibleSpace();
        if(GUILayout.Button("open map editor")){
            if(subWindow == null){
                subWindow = MapCreaterSubWindow.WillAppear(this);
            }else{
                subWindow.Focus();
            }
        }
        EditorGUILayout.EndVertical();
    }
MapCreater.cs
    // サブウィンドウを開く
    public static MapCreaterSubWindow WillAppear(MapCreater _parent){
        MapCreaterSubWindow window = (MapCreaterSubWindow)EditorWindow.GetWindow(typeof(MapCreaterSubWindow) , false);
        window.Show();
        window.minSize = new Vector2(WINDOW_W ,WINDOW_H);
        window.SetParent (_parent);
        window.init ();
        return window;
    }
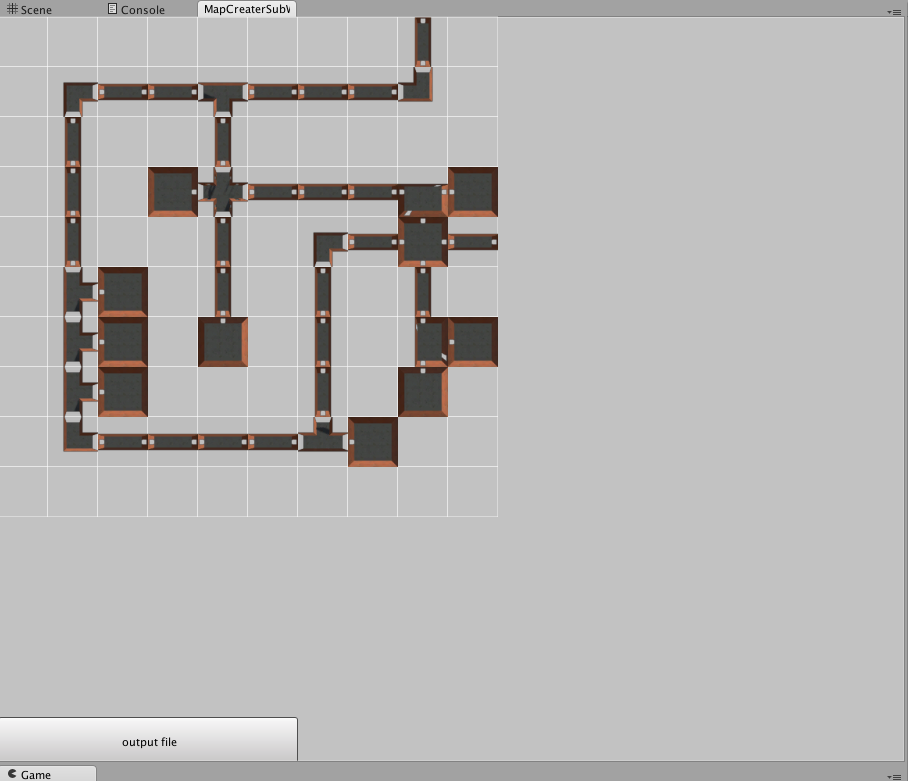
マップウィンドウ
グリッドのどこをクリックしたか?
を判別するために、予めグリッドをRectで生成しておいて、
クリック位置からどのグリッドをクリックしたかを算出します。
MapCreater.cs
    // グリッドデータを生成
    private Rect[,] CreateGrid(int div){
        int sizeW = div;
        int sizeH = div;

        float x = 0.0f;
        float y = 0.0f;
        float w = gridSize;
        float h = gridSize;

        Rect[,] resultRects = new Rect[sizeH ,sizeW];

        for(int yy = 0 ; yy < sizeH ; yy++){
            x = 0.0f;
            for(int xx = 0 ; xx < sizeW ; xx++){
                Rect r = new Rect(new Vector2(x , y) , new Vector2(w , h));
                resultRects[yy , xx] = r;
                x += w;
            }
            y += h;
        }

        return resultRects;
    }
クリック位置を探す箇所はこんな感じです。
MapCreater.cs
        // クリックされた位置を探して、その場所に画像データを入れる
        Event e = Event.current;
        if(e.type == EventType.MouseDown){
            Vector2 pos = Event.current.mousePosition;
            int xx;
            // x位置を先に計算して、計算回数を減らす
            for(xx = 0 ; xx < mapSize ; xx++){
                Rect r = gridRect[0 ,xx];
                if(r.x <= pos.x && pos.x <= r.x + r.width){
                    break;
                }
            }

            // 後はy位置だけ探す
            for(int yy = 0 ; yy < mapSize ; yy++){
                if(gridRect[yy,xx].Contains(pos)){
                    // 消しゴムの時はデータを消す
                    if(parent.SelectedImagePath.IndexOf("000") > -1){
                        map[yy,xx] = "";
                    }else{
                        map[yy,xx] = parent.SelectedImagePath;
                    }
                    Repaint();
                    break;
                }
            }
        }
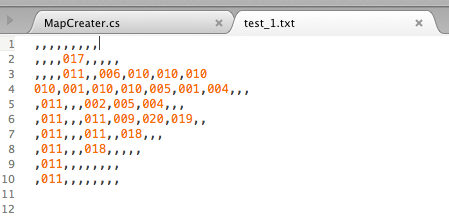
ファイルで出力
そのままだとフルパスになってしまうので、
文字列を削ってファイル名(拡張子抜き)を抽出しています。
ここはプロジェクトによって変えていくのが良いと思います。
MapCreater.cs
    // ファイルで出力
    private void OutputFile(){
        string path = parent.OutputFilePath();

        FileInfo fileInfo = new FileInfo(path);
        StreamWriter sw = fileInfo.AppendText();
        sw.WriteLine(GetMapStrFormat());
        sw.Flush();
        sw.Close();

        // 完了ポップアップ
        EditorUtility.DisplayDialog("MapCreater" , "output file success\n" + path , "ok");
    }

    // 出力するマップデータ整形
    private string GetMapStrFormat(){
        string result = "";
        for (int i = 0; i < mapSize; i++) {
            for(int j = 0 ; j < mapSize ; j++){
                result += OutputDataFormat(map[i,j]);
                if(j < mapSize - 1){
                    result += ",";
                }
            }
            result += "\n";
        }
        return result;
    }

    private string OutputDataFormat(string data){
        if(data != null && data.Length > 0){
            string[] tmps = data.Split('/');
            string fileName = tmps[tmps.Length - 1];
            return fileName.Split('.')[0];
        }else{
            return "";
        }
    }
補足
3Dモデルのマップを作ることも可能です。
その場合、エディタに表示する画像を作るのが少し面倒です。
なので、こんなものも作りました。