最近こんな記事を見かけて、フーンと思いながら眺めていたら、便利そうな内容(Ease debugging of Backbone events)を見かけたので、自分なりにアレンジしてみました。
Backbone.jsで作成したオブジェクトで発火した全イベントをこんな感じでconsoleに出力してくれます。
ソースは以下(コメントの指摘を受けて一行修正しました)。
(function () {
  'use strict';

  // ログのスタイル
  var logStyles = {
    timestamp: {
      color: 'gray'
    },
    label: {
      color: 'white',
      'border-radius': '2px'
    },
    event: {
      color: 'blue',
      'font-weight': 'bold',
      'font-size': '110%'
    }
  };

  // ラベルの色
  var labelColors= {
    Model: 'red',
    Collection: 'purple',
    View: 'green',
    Router: 'black'
  };

  function debugEvents(parts) {
    return function (prefix) {
      this.__debugEvents = this.__debugEvents || {};
      if (prefix === false) { return this.off('all', this.__debugEvents.log, this); }
      else if (prefix !== true) { this.__debugEvents.prefix = prefix || ''; }

      if ('log' in this.__debugEvents) {
        // イベント登録済チェック(二重登録防止)
        if ('_events' in this && 'all' in this._events) {
          var exists = _.some(this._events.all, function (item) {
            return item.callback === this.__debugEvents.log && item.context === this;
          }, this);
          if (exists) { return; }
        }
      } else {
        // イベント発火時の関数作成
        var labelCss = _.extend(logStyles.label, { background: labelColors[parts] });
        var css = {
          timestamp: _.map(logStyles.timestamp, function (val, key) { return key + ':' + val; }).join(';'),
          label: _.map(labelCss, function (val, key) { return key + ':' + val; }).join(';'),
          event: _.map(logStyles.event, function (val, key) { return key + ':' + val; }).join(';')
        };

        this.__debugEvents.log = function(eventName) {
          var labelName = parts;
          if (this.__debugEvents.prefix) { labelName += ':' + this.__debugEvents.prefix; }

          console.debug(
            '%c%s %c%s%c %s',
            css.timestamp, new Date().toString().match(/(\d+:\d+:\d+)/)[1],
            css.label, ' ' + labelName + ' ',
            css.event, eventName,
            Array.prototype.slice.call(arguments, 1)
          );
          // この行いらない(コメント参照) → if (eventName === 'remove') { this.off('all', this.__debugEvents.log, this); }
        };
      }
      this.on('all', this.__debugEvents.log, this);
    };
  }

  // Backboneの各クラスのプロトタイプにdebugEvents()メソッド付加
  _.each(labelColors, function(val, key) {
    Backbone[key].prototype.debugEvents = debugEvents(key);
  });
})();
アレンジってレベルじゃねーぞ!感がありますが、気にせずにいきましょう。
使用方法
このスクリプトを「backbone.debug.js」みたいなファイル名で保存して、htmlで読み込みます。
<script type="text/javascript" src="backbone.js">
<script type="text/javascript" src="backbone.debug.js">
「backbone.debug.js」を読み込んだ事により、Backboneの各オブジェクトでdebugEvents()というメソッドが使用可能になります。
で、イベントログを出力したいオブジェクトのdebugEvents()メソッドを実行します。
var user = new Backbone.Model();
user.debugEvents('hoge');
引数の'hoge'はログ出力時にどのオブジェクトのログかを識別できるように表示する文字列です。なくても構いません。
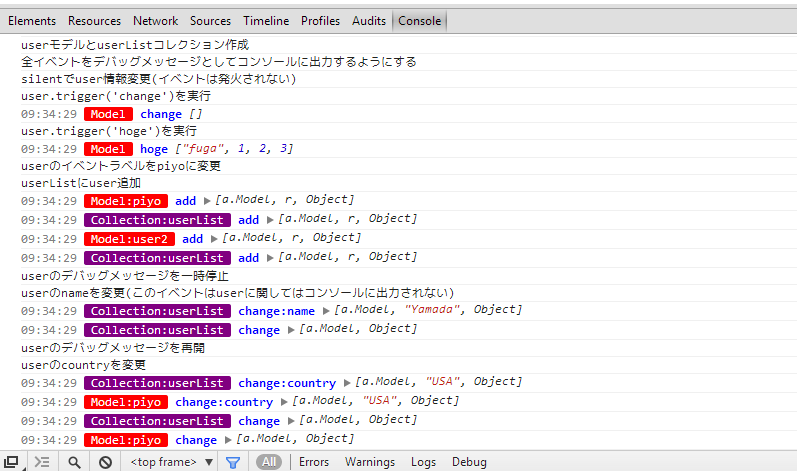
これで、最初に紹介したスクリーンショットみたいなログをイベントの度にバンバン出力してくれます。
一時的にイベント表示をオフにしたい場合は、
user.debugEvents(false);
というように引数にfalseを入れると、そのオブジェクトに関するログ出力はストップします。また、
user.debugEvents(true);
で、ログ出力を再開できます。
ここが便利
イベントログはconsole.debug()で出力するので、Chromeの開発者ツールやFirefoxのFirebugのログフィルタでイベントログだけ見ることができます。Chromeではイベントログを除いたログを表示するフィルタもあるみたいです。
カスタマイズ
色が目に優しくない、ダサいという場合は、ソースの頭にあるlogStylesとlabelColorsを変更してみてください。CSS形式の定義です。
念のため
debugEvents()を実行したオブジェクトには__debugEventsというプロパティが作成されます。かぶる事はないとは思いますが一応。
デバッグ消し忘れの悲劇防止
開発時にdebugEvents()を使って、本番前に消し忘れた場合、本番では「backbone.debug.js」は読み込まないと思うのでエラーが発生してしまいます。本番環境ではこんな感じの空関数を定義しておけばdebugEvents()を消し忘れても安心。
Backbone.Model.prototype.debugEvents =
Backbone.Collection.prototype.debugEvents =
Backbone.View.prototype.debugEvents =
Backbone.Router.prototype.debugEvents = function () {};
大事な事を忘れていた
consoleの機能が貧弱なIEでは動きません。console.debugの部分をconsole.logに変えればとりあえず動きますが、スタイル設定に対応していないので表示が残念になります。FirefoxもFirebugでない標準の開発者ツールだとスタイル対応していないみたいです。
まとめ
ネタ元のhttp://jules.boussekeyt.org/では、他にも役立つ情報が色々とあったので興味があったらご覧になる事をオススメしますです。
追記(2013/11/11)
(@pchw)さんがbower component化してくれました。
https://github.com/pchw/backbone-event-logger
AMD/RequireJS対応もしているようです。