クラウド時代の運用監視サービス「New Relic」にMySQLを監視するためのPLUGINをインストールする方法をまとめてみました。
前提
- New Relicのアカウントを取得済みであること
- まだ取得されてない方はこちらをどうぞ
- 動作環境
- 監視エージェントを実行するサーバにJava1.6以上がインストールされていること
- 監視エージェントを実行するサーバにMySQLクライアントがインストールされていること
- 監視対象のMySQLが5.0以上であること
事前準備
MySQLに監視用アカウントの作成を行います
mysql> CREATE USER newrelic@'%' IDENTIFIED BY 'himitsu';
mysql> GRANT PROCESS,REPLICATION CLIENT ON *.* TO newrelic@'%';
ユーザ名や接続許可するネットワークなどは適宜変更してください
New Relic Platform Installerのインストール
- New RelicのPluginsを簡単に導入することができるインストーラーです。通称npiと云います
- npiのインストールにはNew Relicのライセンスキーが必要です
- 各プラットフォームごとにインストーラーが用意されていますので、こちらのページから監視エージェントを稼働させるサーバに適したものを選択してください
- 下記はRed Hat/CentOSのx64でのインストール例です
- YOUR_KEY_HEREにあなたのNew Relicのライセンスキーに置き換えてください
- デフォルトでは**$HOME**にインストールされますが、PREFIXを指定することで任意のディレクトリにインストールすることができます
$ LICENSE_KEY=YOUR_KEY_HERE bash -c "$(curl -sSL https://download.newrelic.com/npi/release/install-npi-linux-redhat-x64.sh)"

You are about to download the New Relic Platform Installer v0.1.5.
This will download the 'npi' tool from the following URL: https://download.newrelic.com/npi/v0.1.5/platform_installer-linux-x64-v0.1.5.tar.gz
It will place the tool at '/home/foo/newrelic-npi'.  It will not affect your path or global settings.

Are you sure you want to continue? (y/n) y
Setting default configurations
  user -> foo
  license_key -> YOUR_KEY_HERE
  distro -> redhat
Successfully setup the New Relic Platform Installer!

Next steps:
  - Navigate to the directory: '/home/foo/newrelic-npi'
  - Run './npi available' to get a list of available plugins
  - Run './npi install <plugin>' to download, configure and start a plugin
  - For additional help run the following './npi --help'
MySQL Pluginのインストール
インストール手順
対話型インストーラーで必要な情報を入力していきます
$ /home/foo/newrelic-npi
$ ./npi install nrmysql
Enter your New Relic license key (YOUR_KEY_HERE): →初期値と異なるNew Relicライセンス設定する場合はここから入力してください
[08:58:11] [INFO] operations - Using license key: YOUR_KEY_HERE
[08:58:11] [INFO] operations - Fetching the plugin to your file system...
You are about to download the following plugin:
- com.newrelic.plugins.mysql.instance:
  - Details:
      download_url           https://github.com/newrelic-platform/newrelic_mysql_java_plugin/raw/master/dist/newrelic_mysql_plugin-2.0.0.tar.gz
      implementation         Java
      publisher_name         New Relic Inc.
      publisher_support_url  https://support.newrelic.com/home
      version                2.0.0

Are you sure you want to continue? (y/n): y
[08:58:16] [INFO] platform_helpers - Downloading compressed archive for 'com.newrelic.plugins.mysql.instance'...
[08:58:24] [INFO] platform_helpers - Extracting archive for 'com.newrelic.plugins.mysql.instance'...

Current state for the plugin: com.newrelic.plugins.mysql.instance
- com.newrelic.plugins.mysql.instance:
  - State:
      Downloaded   [x]
      Prepared     [ ]
      Installed    [ ]
      Running      [ ]

[08:58:24] [INFO] operations - Configuring the plugin to run...
[08:58:24] [INFO] operations - Generating 'newrelic.json' file for plugin...
Configure the plugin in a text editor before continuing? (y/n): y →監視対象のDB情報を設定します

Current state for the plugin: com.newrelic.plugins.mysql.instance
- com.newrelic.plugins.mysql.instance:
  - State:
      Downloaded   [x]
      Prepared     [x]
      Installed    [ ]
      Running      [ ]

[08:59:13] [INFO] operations - Setting the plugin as a background process...
Do you want to set this plugin as a background process? (y/n): y  ←ここでyとすれば監視エージェントがバックグラウンドで起動します
設定ファイル
対話インストール中に編集するplugin.jsonファイル
{
  "agents": [
    {
      "name"    : "Localhost",  →監視画面の表示に使う表示名
      "host"    : "localhost",   →監視対象のサーバ名
      "metrics" : "status,newrelic",
      "user"    : "USER_NAME_HERE",   →監視用のデータベース接続ユーザ名
      "passwd"  : "USER_PASSWD_HERE"   →監視用ユーザのパスワード
    }
  ]
}
複数データベースの監視
複数のデータベースサーバを監視したい場合は下記のようにします
{
  "agents": [
    {
      "name"    : "DBmaster",
      "host"    : "192.168.1.10",
      "metrics" : "status,newrelic",
      "user"    : "USER_NAME_HERE",
      "passwd"  : "USER_PASSWD_HERE"
    }
    {
      "name"    : "DBslave",
      "host"    : "192.168.1.11",
      "metrics" : "status,newrelic",
      "user"    : "USER_NAME_HERE",
      "passwd"  : "USER_PASSWD_HERE"
    }
  ]
}
取得項目の変更
metricsのパラメーターによって取得項目を変更することができます
| 項目 | 内容 |
|---|---|
| status | 一般的な情報 |
| master | マスターならではの情報 |
| slave | スレーブならではの情報 |
| buffer_pool_stats | バッファプールの詳細情報 |
| innodb_status | InnoDBのステータス情報 |
| innodb_metrics | InnoDBのinformation情報(MySQL5.6以上) |
| innodb_mutex | InnoDBのMUTEX情報 |
デーモン化
監視エージェントをデーモン化してサーバ起動時にも自動的に立ち上がるようにしましょう
ここでは伝統的な/etc/init.dに起動ファイルを作成して、そこから起動します
# vi /etc/init.d/nrmysql
# chmod +x /etc/init.d/nrmysql
# /etc/init.d/nrmysql start
下記はRedHat系の起動ファイルテンプレートです
PLUGIN_DIRを書き換えて使ってください
/etc/init.d/nrmysql
# !/bin/bash
#
#
# chkconfig:   2345 80 20
# description: Starts and stops the New Relic MySQL Plugin
# processname: java-newrelic-mysql-plugin


# Source function library.
FUNCTIONS="/etc/init.d/functions"
[ -s "${FUNCTIONS}" ] && . ${FUNCTIONS}

# Program Specific Variables
PROGRAM="newrelic-mysql-plugin"
LOCK_FILE="/var/lock/subsys/${PROGRAM}"
PID_FILE="/var/run/${PROGRAM}.pid"

# Set this to the plugin directory
[ -z "${PLUGIN_DIR}" ] && PLUGIN_DIR="/usr/local/newrelic-mysql"

# Logging
[ -z "${LOG_DIR}" ] && LOG_DIR="/var/log"
LOG_FILE="${LOG_DIR}/${PROGRAM}.log"

# Java Process
JAVA=`which java 2>/dev/null`
[ -z "${JAVA}" ] && echo "java not found in the PATH" && exit 1

# Plugin Location verification
[ -z "${PLUGIN_DIR}" ] && echo "PLUGIN_DIR must be defined" && exit 2
[ ! -d "${PLUGIN_DIR}" ] && echo "PLUGIN_DIR '${PLUGIN_DIR}' is not a directory" && exit 3

# New Relic MySQL Jar verification
cd ${PLUGIN_DIR}
JAR=`ls *.jar 2>/dev/null | head -1`
[ -z "${JAR}" ] && echo "No New Relic jar found in '${PLUGIN_DIR}'" && exit 4

start() {
        # Start daemons.
        echo -n $"Starting ${PROGRAM}: "
        nohup ${JAVA} -jar ${JAR} > ${LOG_FILE} 2>&1 &
	RETVAL=$?
        echo $! > ${PID_FILE}
        echo
	[ $RETVAL -eq 0 ] && touch ${LOCK_FILE}
	return $RETVAL
}

stop() {
        echo -n $"Shutting down ${PROGRAM}: "
        [ ! -s "${PID_FILE}" ] && echo "No pid file found" && exit 1
        PID=`cat ${PID_FILE}`
	#killproc -p ${PID}
        kill -9 ${PID} > /dev/null 2>&1
	RETVAL=$?
        echo
	[ $RETVAL -eq 0 ] && rm -f ${LOCK_FILE} ${PID_FILE}
	return $RETVAL
}

# See how we were called.
case "$1" in
  start)
	start
	;;
  stop)
	stop
	;;
  status)
	status $PROGRAM
	;;
  restart|force-reload)
	stop
	start
	;;
  try-restart|condrestart)
	if status $PROGRAM > /dev/null; then
	    stop
	    start
	fi
	;;
  reload)
	exit 3
	;;
  *)
	echo $"Usage: $0 {start|stop|status|restart|try-restart|force-reload}"
	exit 2
esac
debian系やUpstartを使う場合の起動ファイルのテンプレートは下記から入手可能です。
https://github.com/newrelic-platform/newrelic_mysql_java_plugin/tree/master/scripts
管理画面にアクセス
管理画面にアクセスし、情報が表示されていることを確認します
メニューの「PLUGINS」をクリックし、「MySQL」を選択します
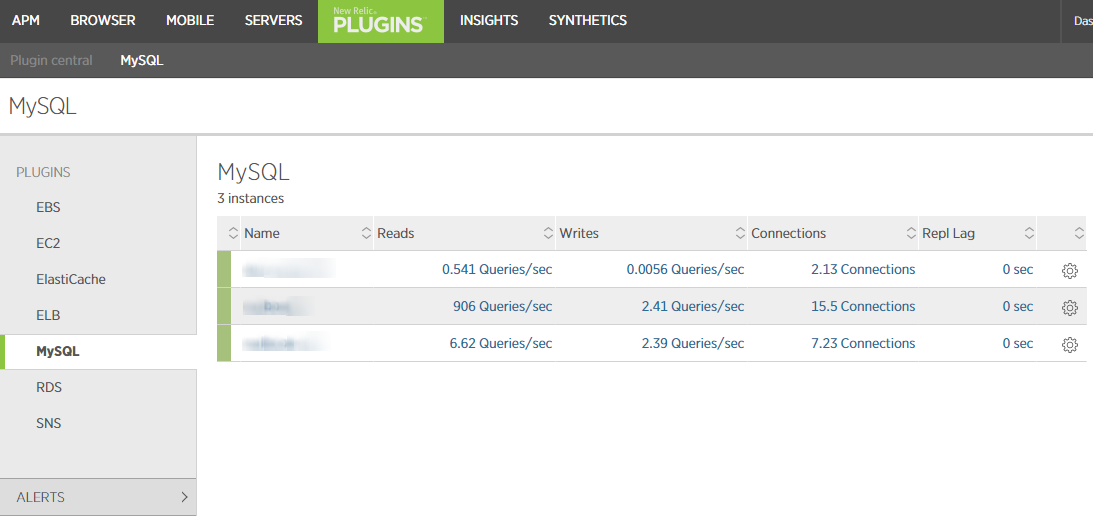
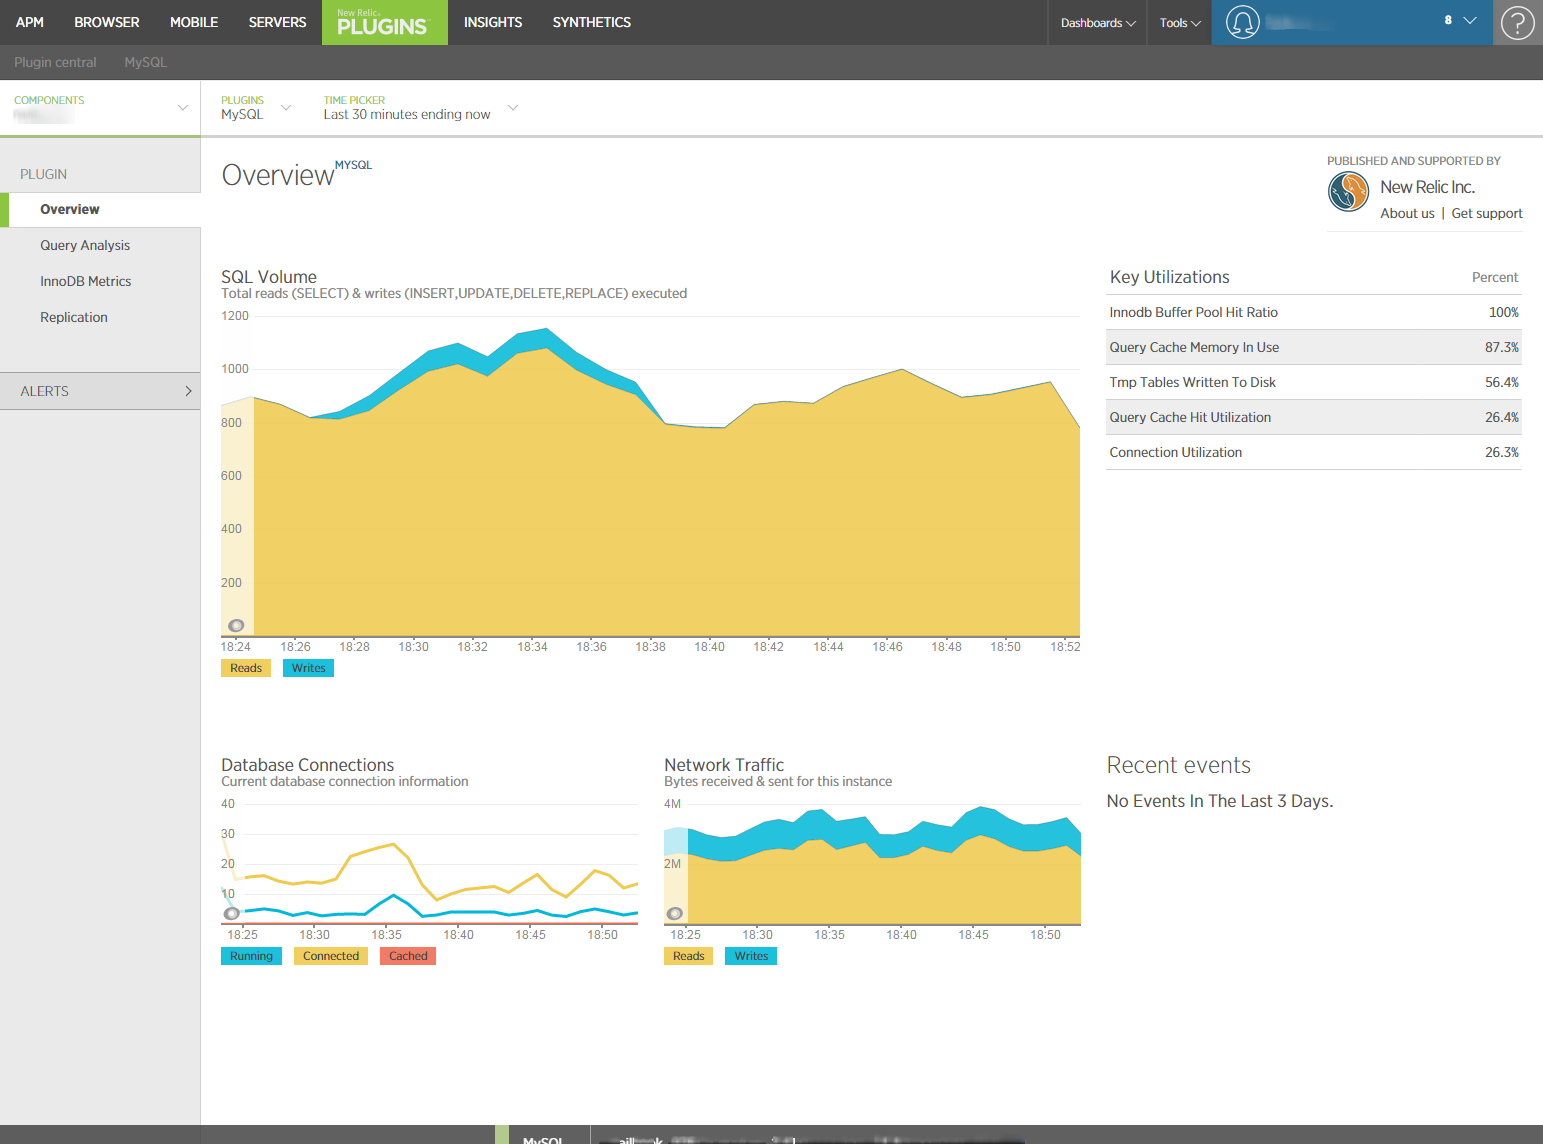
これで終了!
(おまけ)監視エージェントの操作
npiコマンドで行います
設定ファイルの編集
$ ./npi prepare nrmysql
[18:48:24] [INFO] operations - Generating 'newrelic.json' file for plugin...
Configure the plugin in a text editor before continuing? (y/n): y
Sucessfully prepared 'com.newrelic.plugins.mysql.instance'!

Next steps:
  Test the plugin:                    npi start com.newrelic.plugins.mysql.instance --foreground
  Setup and run in background:        npi add-service com.newrelic.plugins.mysql.instance --start
設定ファイルの動作確認
監視エージェントをforegroudで起動しエラーメッセージが出力されていないか確認します
$ ./npi start nrmysql --foreground
[18:50:04] [INFO] operations - Starting plugin 'com.newrelic.plugins.mysql.instance' in foreground...
[18:50:04] [INFO] operations - Please visit https://rpm.newrelic.com to verify that the plugin is successfully reporting to your account. It may take a few minutes to become visible.
INFO: Using configuration file /home/foo/newrelic-npi/plugins/com.newrelic.plugins.mysql.instance/newrelic_mysql_plugin-2.0.0/config/newrelic.json
INFO: Using configuration file /home/foo/newrelic-npi/plugins/com.newrelic.plugins.mysql.instance/newrelic_mysql_plugin-2.0.0/config/plugin.json
INFO: New Relic monitor started
エラーが出力されていなかったらCtl-cで中断し、監視エージェントをバックグラウンドで起動します
$ ./npi stop nrmysql
[18:52:07] [INFO] platform_helpers - Attempting to stop service for 'com.newrelic.plugins.mysql.instance'
Stopping newrelic_plugin_com.newrelic.plugins.mysql.instance
$ ./npi start nrmysql
[18:52:11] [INFO] operations - Starting plugin 'com.newrelic.plugins.mysql.instance' in background...
[18:52:11] [INFO] operations - Please visit https://rpm.newrelic.com to verify that the plugin is successfully reporting to your account. It may take a few minutes to become visible.
[18:52:11] [INFO] platform_helpers - Attempting to start service for 'com.newrelic.plugins.mysql.instance'...
Starting newrelic_plugin_com.newrelic.plugins.mysql.instance
上記の例では念のために再起動(stop-start)しました