前書き
s3fs を使って s3 をマウントしていましたが、s3fs より高速な巷で話題の goofys 試してみました。
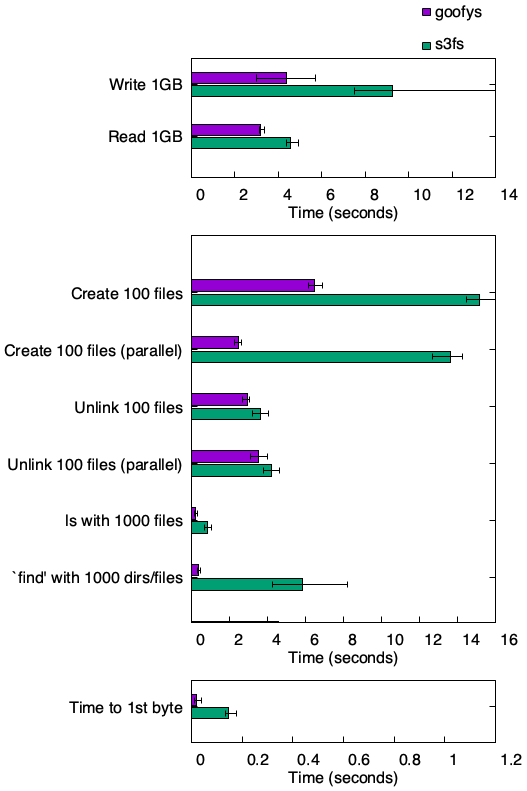
公式ページのベンチマークを見て分かる通り s3fs との速度差は歴然です。
OS 環境
DISTRIB_ID=Ubuntu
DISTRIB_RELEASE=14.04
DISTRIB_CODENAME=trusty
DISTRIB_DESCRIPTION="Ubuntu 14.04.4 LTS"
ポケモンGo
インストール
$ sudo add-apt-repository ppa:ubuntu-lxc/lxd-stable
$ sudo apt-get update
$ sudo apt-get install golang
確認
$ go version
go version go1.6 linux/amd64
PATH の設定
$ [ ! -e ~/go/ ] && mkdir ~/go
$ export GOPATH=$HOME/go
$ export PATH="$PATH:$GOPATH/bin"
起動時に PATH を通したい場合は ~/.profile に以下のように追記します。
...
if [ -d "$HOME/go" ] ; then
    GOPATH="$HOME/go"
fi
if [ -d "$GOPATH/bin" ] ; then
    PATH="$PATH:$GOPATH/bin"
fi
確認
$ echo $GOPATH
/home/vagrant/go
$ echo $PATH
/usr/local/sbin:/usr/local/bin:/usr/sbin:/usr/bin:/sbin:/bin:/usr/games:/usr/local/games:/home/vagrant/go/bin
git
インストール
$ sudo apt-get install git
確認
$ git --version
git version 1.9.1
goofys
インストール
$ go get github.com/kahing/goofys
$ go install github.com/kahing/goofys
確認
$ goofys -h
Error: goofys takes exactly two arguments.

NAME:
   goofys - Mount an S3 bucket locally

USAGE:
   goofys [global options] bucket[:prefix] mountpoint

VERSION:
   0.0.6

GLOBAL OPTIONS:
   --help, -h              Print this help text and exit successfuly.
   -o value                Additional system-specific mount options. Be careful!
   --dir-mode value        Permissions bits for directories. (default: 0755) (default: 493)
   --file-mode value       Permission bits for files (default: 0644) (default: 420)
   --uid value             UID owner of all inodes. (default: 1000)
   --gid value             GID owner of all inodes. (default: 1000)
   --endpoint value        The non-AWS endpoint to connect to. Possible values: http://127.0.0.1:8081/
   --region value          The non-AWS endpoint to connect to. Possible values: us-east-1, us-west-1, us-west-2, eu-west-1, eu-central-1, ap-southeast-1, ap-southeast-2, ap-northeast-1, sa-east-1, cn-north-1 (default: "us-west-2")
   --storage-class value   The type of storage to use when writing objects. Possible values: REDUCED_REDUNDANCY, STANDARD, STANDARD_IA. (default: "STANDARD")
   --use-path-request      Use a path-style request instead of virtual host-style. (deprecated, always on)
   --profile value         Use a named profile from $HOME/.aws/credentials instead of "default"
   --use-content-type      Set Content-Type according to file extension and /etc/mime.types (default: off)
   --stat-cache-ttl value  How long to cache StatObject results and inode attributes. (default: 1m0s)
   --type-cache-ttl value  How long to cache name -> file/dir mappings in directory inodes. (default: 1m0s)
   --debug_fuse            Enable fuse-related debugging output.
   --debug_s3              Enable S3-related debugging output.
   -f                      Run goofys in foreground.
   --version, -v           print the version
AWS CLI
インストール
apt-get で AWS CLI をインストールすることも可能ですが、インストールされるバージョンが低いため、 aws configure コマンドで設定しても ~/.aws/credentials は作成されず ~/.aws/config の一ファイルのみが作成されます。
以下の記載通り、 Go の AWS SDK は ~/.aws/credentials をサポートしており、 ~/.aws/config はサポートされていません。
そのため今回は pip でインストールします。
aws/aws-sdk-go: AWS SDK for the Go programming language.
AWS CLI config file (
~/.aws/config)
The AWS SDK for Go does not support the AWS CLI's config file. The SDK will not use any contents from this file. The SDK only supports the shared credentials file (~/.aws/credentials). #384 tracks this feature request discussion.
$ sudo apt-get install python-pip
$ sudo pip install awscli
確認
$ aws --version
aws-cli/1.10.50 Python/2.7.6 Linux/3.13.0-43-generic botocore/1.4.40
設定
$ aws configure
AWS Access Key ID [None]:
AWS Secret Access Key [None]:
Default region name [None]:
Default output format [None]:
s3 のマウントとアンマウント
マウント
$ goofys bucket /mnt/mountpoint
-f オプションをつけてフォアグランドで実行することも可能です。
--debug_fuse --debug_s3 オプションをつけてデバッグを行う際は -f オプションをつける必要があります。
$ goofys -f bucket /mnt/mountpoint
アンマウント
$ sudo umount /mnt/mountpoint
確認
$ df -h
Filesystem      Size  Used Avail Use% Mounted on
udev            240M   12K  240M   1% /dev
tmpfs            49M  352K   49M   1% /run
/dev/sda1        40G  2.0G   36G   6% /
none            4.0K     0  4.0K   0% /sys/fs/cgroup
none            5.0M     0  5.0M   0% /run/lock
none            245M     0  245M   0% /run/shm
none            100M     0  100M   0% /run/user
vagrant         233G  211G   22G  91% /vagrant
bucket          1.0P     0  1.0P   0% /mnt/mountpoint
サーバー起動時の自動マウント設定
AWS CLI の設定
サーバー起動時は root で処理が実行されるめ、 root の AWS CLI を設定します。
$ sudo su
# aws configure
AWS Access Key ID [None]:
AWS Secret Access Key [None]:
Default region name [None]:
Default output format [None]:
サーバー起動時の自動マウント設定は以下の 2 通りで設定可能です。
2 通りの設定
/etc/fstab を設定
設定
/home/vagrant/go/bin/goofys#goofysbucket /mnt/mountpoint fuse _netdev,allow_other,--file-mode=0666,--uid=0,--gid=0 0 0
goofysを使ってAmazon LinuxにS3をマウントする。 - Qiita
| オプション | 説明 |
|---|---|
| _netdev | ネットワークが有効になるまでマウントを待つためのオプション。ネットワーク経由のデバイスを起動時にマウントさせたい場合などに指定する。 |
| allow_other | 他のユーザーでも利用できるようにする。 |
| --file-mode | マウントする際のファイル権限を設定する。 |
| --uid | マウントするユーザーIDを指定する。 |
| --gid | マウントするグループIDを指定する。 |
以下のコマンドで id の確認が可能です。
$ id
uid=1000(vagrant) gid=1000(vagrant) groups=1000(vagrant)
$ id root
uid=0(root) gid=0(root) groups=0(root)
$ id www-data
uid=33(www-data) gid=33(www-data) groups=33(www-data)
確認
$ sudo mount -a
注意点
サーバー再起動時、以下のエラーが発生しマウントされない場合があります。
$ mountpoint /mnt/mountpoint
mountpoint: /mnt/mountpoint: Transport endpoint is not connected
以下のようにアンマウントし、再度マウントすることで解決します。
/etc/rc.local に以下のコマンドを記載することで再起動時に自動的にリマウントされます。
$ sudo umount /mnt/mountpoint
$ goofys bucket /mnt/mountpoint
/etc/rc.local を設定
設定
/etc/rc.local に記載したコマンドが起動時に自動的に実行されます。
...
MOUNT_POINT=/mnt/mountpoint
BUCKET=bucket
OPTION="-o allow_other --file-mode=0666 --uid=0 --gid=0"

/bin/umount ${MOUNT_POINT}
/home/vagrant/go/bin/goofys ${OPTION} ${BUCKET} ${MOUNT_POINT}
確認
$ sh /etc/rc.local
再起動
エラーが出なければ、サーバーを再起動しマウントされていることを確認して下さい。
$ sudo reboot
予期せずマウントが外れた際の対策
ShellScript を作成
[s3fs] s3fsが予期せずアンマウントされた場合への対策
を参考にさせていただき以下の ShellScript を作成しました。
マウントされている場合はその状態を保持し、マウントされていない場合は再度マウントするスクリプトです。
因みに筆者は、 /etc/rc.local でこのスクリプトを呼び出してサーバー起動時の自動マウント設定を行っています。
# !/bin/sh
# check mount s3 via goofys and remount if mount is broken

# need for english error message
LANG=C

MOUNT_POINT=/mnt/mountpoint
BUCKET=goofysbucket
OPTION="-o allow_other --file-mode=0666 --uid=0 --gid=0"

# check, whether a mount point is mounted
/bin/mountpoint ${MOUNT_POINT}
if [ 0 = $? ]
then
    echo `date --rfc-2822` ": keeping mount s3 via goofys"
    return 0
else
    echo `date --rfc-2822` ": unexpected umount s3" 1>&2

    # try re-mount
    echo "try remount goofys..." 1>&2
    /bin/umount ${MOUNT_POINT}
    /home/vagrant/go/bin/goofys ${OPTION} ${BUCKET} ${MOUNT_POINT}
    if [ 0 = $? ]
    then
      echo "success remount goofys" 1>&2
    else
      echo "failed remount goofys" 1>&2
    fi
    return 1
fi
実行権限を追加することを忘れないで下さい。
$ sudo chmod 755 /usr/local/bin/remount-goofys
デモ
マウントされている場合
$ sudo remount-goofys
/mnt/mountpoint is a mountpoint
Wed, 27 Jul 2016 09:01:33 +0000 : keeping mount s3 via goofys
マウントが外れている場合
$ sudo remount-goofys
mountpoint: /mnt/mountpoint: Transport endpoint is not connected
Wed, 27 Jul 2016 09:00:38 +0000 : unexpected umount s3
try re-mount goofys...
success remount goofys
対策
Zabbix 等の監視ツールでマウント状態を監視し、マウントが外れた際にトリガーとして作成したスクリプトを実行するのがベストだと思います。
※ 検証していない為、出来るか分かりません…。
cron で定期的に作成したスクリプトを実行したりと対策方法は沢山ありそうです。オススメの方法があれば教えて下さい!
