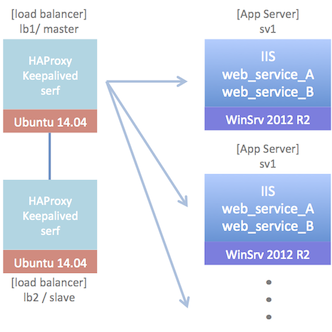
ハードウェアのロードバランサは予算上厳しくなりそうだったので、仮想サーバで動作するOSSのロードバランサを構築することにした。今回検証を行ったので、その共有です。
構成
ロードバランサ
- Ubuntu Server 14.04 LTS
- HAProxy v1.5.2
- keepalived v1.2.7
- serf v0.6.3
負荷分散するアプリサーバ
- Windows Server 2012 R2 or Windows Server 2008 R2 (どちらも standard edition)
- IIS
- web service A(独自)※ここでは名前をWSA、使用するポートを1111とします
- web service B(独自)※ここでは名前をWSB、使用するポートを2222とします
インストール
すでに多くの方が書かれていますが、参考までに。
ロードバランサ
haproxy
sudo apt-get install -y build-essential
sudo apt-get install -y libpcre3-dev
sudo apt-get install -y libghc-zlib-dev
wget http://www.haproxy.org/download/1.5/src/haproxy-1.5.1.tar.gz
tar zxf haproxy-1.5.1.tar.gz
cd haproxy-1.5.1
make TARGET=linux2628 CPU=native USE_PCRE=1 USE_ZLIB=1  # openssl support is disabled
sudo make install

# 最新版が不要な方は下記でOKです
sudo apt-get install -y haproxy
keepalived
sudo apt-get install -y keepalived
serf
wget https://dl.bintray.com/mitchellh/serf/0.6.3_linux_amd64.zip
sudo apt-get install -y unzip
sudo apt-get install -y ruby2.0 # イベントをトリガとしてRubyスクリプトを実行します
sudo gem install serf_handler # serf イベントを処理するライブラリです
unzip 0.6.3_linux_amd64.zip
sudo cp serf /usr/local/sbin/
sudo mkdir /etc/serf/
sudo mkdir /var/log/serf/
アプリサーバ
serf
- https://dl.bintray.com/mitchellh/serf/0.6.3_windows_amd64.zip をダウンロード
- 適当なフォルダ(C:¥APP¥serf)を作成し、上記を展開して serf.exe を配置
設定
こちらも参考までに。
ロードバランサ
haproxy
IISはあるURLを2秒間隔でチェックし、応答がなかった場合にそのサーバを負荷分散対象から外します。負荷分散対象が0になると、指定したSorryサーバへリダイレクトします。Web Service AとWeb Service Bは負荷分散していますが、すべてのサーバがNGになってもリダイレクトを行うことはしません(クライアント側で処理できるよう独自実装をしているため)。
なお、IISとWeb Service Bのヘルスチェックはステータスコードで判定し、Web Service AはResponseのBodyに含まれるキーワード(rstringを使っているので正規表現で指定)で死活判定を行っています。
さらに、監視のみ行うBackendの設定も行っています。
global
   log      127.0.0.1   local0 info
   user     root
   group    root
   daemon

defaults
   log      global
   mode     http
   option   httplog
   option   dontlognull
   option   redispatch
   balance  leastconn
   retries  3
   maxconn  4092
   timeout  connect  5000
   timeout  client   50000
   timeout  server   50000
   stats    enable

frontend frontend_iis
   bind     :80
   acl      is_iis_available nbsrv(lb-iis) eq 0
   redirect location http://SORRY_SERVER_URL if is_iis_available
   use_backend lb-iis

backend  lb-iis
   option   httpchk GET /IIS_URL
   option   httpclose
   rspidel  ^Set-cookie:\ IP=
# additional-iis-server

listen  lb-wsa :1111
   option   httpchk
   option   httpchk GET /WEB_SERVICE_A_URL
   http-check expect rstring RETURN_STRING_OF_WEB_SERVICE_A_RESPONSE
   option   httpclose
   rspidel  ^Set-cookie:\ IP=
# additional-lb-web_service_a-server

listen  lb-wsb :2222
   option   httpchk GET /WEB_SERVICE_B_URL
   option   httpclose
   rspidel  ^Set-cookie:\ IP=
# additional-lb-web_service_b-server

backend  lb-wsa :1111
   option   httpchk
   option   httpchk GET /WEB_SERVICE_A_URL
   http-check expect rstring RETURN_STRING_OF_WEB_SERVICE_A_RESPONSE
   option   httpclose
   rspidel  ^Set-cookie:\ IP=
# additional-monitor-web_service_a-server

backend  lb-wsb :2222
   option   httpchk GET /WEB_SERVICE_B_URL
   option   httpclose
   rspidel  ^Set-cookie:\ IP=
# additional-monitor-web_service_b-server
haproxyはSyslogにログ出力するようになっているので、Syslogの設定をします。
$ModLoad imudp
$UDPServerAddress 127.0.0.1
$UDPServerRun 514
local0.* -/var/log/haproxy.log
さらにログをローテートする設定もします。
/var/log/haproxy.log {
    daily
    missingok
    rotate 30
    compress
    ifempty
    sharedscripts
    postrotate
        /etc/init.d/haproxy reload
    endscript
}
keepalived
/etc/keepalivedの配下に下記コンフィグを配置します。
vrrp_script chk_haproxy {
  script "killall -0 haproxy"
  interval 2
  weight 2
}

vrrp_instance VI_1 {
  interface eth0
  state MASTER
  virtual_router_id 51
  priority 101
  virtual_ipaddress {
    VIRTUAL_SERVER_IP
  }
  track_script {
    chk_haproxy
  }
}
vrrp_script chk_haproxy {
  script "killall -0 haproxy"
  interval 2
  weight 2
}

vrrp_instance VI_1 {
  interface eth0
  state SLAVE
  virtual_router_id 51
  priority 100
  virtual_ipaddress {
    VIRTUAL_SERVER_IP
  }
  track_script {
    chk_haproxy
  }
}
serf
サーバ起動時にserfもあわせて起動するよう、Upstartで設定します。
description "serf, the cluster orchestration tool"
author "xxxx"
start on stopped rc
stop on runlevel [!2345]
script
  /usr/local/bin/serf agent -config-file /etc/serf/proxy.json > /var/log/serf/serf.out &
end script
pre-stop script
  /usr/local/bin/serf leave > /var/log/serf/serf.out &
end script
Upstartを有効にします。
sudo initctl reload-configuration
sudo initctl list | grep serf
sudo initctl start serf
serfを起動するときの設定。LB1_IPはロードバランサ(Master)に割り当てられているIPです。
なお、masterとslaveで若干設定内容が異なるので注意です。
{
    "tags": {
            "role": "lb"
    },
    "bind": "LB1_IP",
    "event_handlers": [
            "ruby /etc/serf/handler.rb"
    ]
}
{
    "tags": {
            "role": "lb"
    },
    "bind": "LB2_IP",
    "start_join": [
            "LB1_IP"
    ],
    "event_handlers": [
            "ruby /etc/serf/handler.rb"
    ]
}
アプリサーバ起動時にhaproxyのコンフィグを変更するスクリプトです。
こちらのサイトを大いに参考にさせていただきました。
# handler.rb
# serf agent -config-file=proxy.json
# serf agent -config-file=web.json
#
# for maintenance
#  leave cluster temporarily
#   serf event pause "SERVER_HOSTNAME IP ROLE"
#  rejoin cluster
#   serf event resume "SERVER_HOSTNAME IP ROLE"
require 'yaml'
require 'fileutils'
require 'serf_handler'

# load balancer handler
class LBHandler < SerfHandler
  # location of haproxy configration file
  CONFIGFILE = '/etc/haproxy/haproxy.cfg'
  TMP_CONFIGFILE = '/tmp/haproxy.cfg'
  LOGFILE = '/data/log/serf/handler.log'
  ROLEFILE = '/etc/serf/role.yml'
  RETRY_COUNT = 3

  # specifying the marker to append server
  MARKER = Regexp.compile('^# additional-(.+)-(.+)-server$')

  METHOD_NAME = %w( member_join member_leave pause resume )
  ACTION = { 'member_join' => :join, 'member_leave' => :leave,
             'pause' => :leave, 'resume' => :join }

  def initialize
    super(LOGFILE)
    @roles = YAML.load_file(ROLEFILE)
    @wflg = true
  end

  # **** generate serf standard event processing methods ****
  METHOD_NAME.each do |name|
    define_method(name) do
      exit 0 unless member_info
      info "node: #{@node}, role: #{@role}, event #{@event}"
      rewrite_config ACTION["#{name}"]
    end
  end

  # get information of the server which joined the cluster
  def member_info
    STDIN.each_line do |line|
      @node, @ip, @role, _ = line.split(' ')
    end
    @role == ENV['SERF_SELF_ROLE'] ? false : true
  end

  def rm(file)
    FileUtils.rm(file) if File.exist?(file)
  end

  def generate_target
    v = @roles[@role]['interval']
    info "#{@node} #{@ip} #{v}"
    { iis:   "   server  #{@node} #{@ip}:80 check inter #{v} rise 2 fall 2",
      web_service_a:  "   server  #{@node} #{@ip}:1111 check inter #{v} rise 2 fall 2",
      web_service_b:   "   server  #{@node} #{@ip}:2222 check inter #{v} rise 2 fall 2",
      mongo: "   server  #{@node} #{@ip}:27017 check inter #{v} rise 2 fall 2" }
  end

  def generate_line(line, target)
    @wflg = false if target.value?(line.chomp)
    if (m = MARKER.match(line.chomp))
      services = @roles[@role][m[1]]
      line = target[m[2].to_sym] + "\n" + line if services.include?(m[2]) && @wflg
      @wflg = true
    end
    line
  end

  def generate_tmpcfg(action, target)
    File.open(TMP_CONFIGFILE, 'w') do |f|
      File.open(CONFIGFILE, 'r').each do |line|
        case action
        when :join then line = generate_line line, target
        when :leave then next if target.value?(line.chomp)
        end
        f.write line
      end
    end
  end

  def rewrite_config(action)
    exit 0 unless @roles.key?(@role)
    rm TMP_CONFIGFILE

    generate_tmpcfg action, generate_target
    FileUtils.mv TMP_CONFIGFILE, CONFIGFILE

    rm TMP_CONFIGFILE
    reload_proxy
  end

  def reload_proxy
    info 'rewrite config: done.'
    `/etc/init.d/haproxy reload`
    info "execute #{command} => result: #{$CHILD_STATUS}"
  end
end

if __FILE__ == $PROGRAM_NAME
  handler = SerfHandlerProxy.new
  handler.register 'lb', LBHandler.new
  handler.run
end
# service: iis, mongo, none(nothing to healthcheck)
web:
    lb:
        - iis
    monitor:
        - none
    interval: 60s
A:
    lb:
        - web_service_a
    monitor:
        - mongo
    interval: 60s
B:
    lb:
        - web_service_b
    monitor:
        - mongo
    interval: 60s
test:
    lb:
        - none
    monitor:
        - iis
        - mongo
    interval: 300s
アプリサーバ
serf
まずは起動・停止スクリプト。 gpedit.msc でローカルグループポリシーエディターを起動し、コンピューターの構成>Windowsの設定>スクリプト(スタートアップ/シャットダウン)で、スタートアップに join-cluster.bat を、シャットダウンに leave-cluster.bat をそれぞれ登録します。これでWindows起動時・シャットダウン時 serfクラスタへ参加・離脱ができます。なお、MY_IPには自サーバのIPアドレスを設定します。
{
    "tags": {
            "role": "web"
    },
    "bind": "MY_IP",
    "start_join": [
            "LB1_IP"
    ]
}
{
    "tags": {
            "role": "A"
    },
    "bind": "MY_IP",
    "start_join": [
            "LB1_IP"
    ]
}
set SERF_HOME=C:\APP\serf
%SERF_HOME%\serf.exe agent -config-file=%SERF_HOME%\web.json
set SERF_HOME=C:\APP\serf
%SERF_HOME%\serf.exe leave
また、今回はメンテナンス時は負荷分散先から外すようにしたいため、serfのユーザイベントを使い、かつイベント発生時に呼び出される前述した handler.rb で対応するにようにしています。メンテナンス開始時に pause.bat 、終了時に resume.bat を実行することで可能にします。
set SERF_HOME=C:\APP\serf
for /f "usebackq delims=: tokens=2*" %%i in (`ipconfig.exe ^| findstr.exe /r /c:"IPv4 .*"`) do (set IP=%%i)
%SERF_HOME%\serf.exe event pause "%COMPUTERNAME% %IP% web"
set SERF_HOME=C:\APP\serf
for /f "usebackq delims=: tokens=2*" %%i in (`ipconfig.exe ^| findstr.exe /r /c:"IPv4 .*"`) do (set IP=%%i)
%SERF_HOME%\serf.exe event resume "%COMPUTERNAME% %IP% web"
使ってみて
haproxyは以前LVSやUltramonkeyと比較したことがあり、設定の柔軟さ・扱いやすさを高く評価していました。ただ、当時はまだヘルスチェックのResponseの戻り値判定がステータスコードのみだったということもあり、強くおすすめしたい!というところまでもう一歩という製品でした。今回検証してみて、そういったところもずいぶん改善されており、よくできているなと改めて思いました。
注意
動作は確認していますが、保証するものではありません。実際お試しになる場合は正しく動作しない可能性もありますので、ご留意ください。
内容で間違っている部分等ありましたらご指摘いただけるとうれしいです。
参考にさせていただいたサイト
- SerfでHAProxyの更新 on Vagrant
- Serf+HAProxyで作るAutomatic Load Balancer
- その他各ソフトウェアの公式サイト
