以前書いた Rundeck のメモです。死蔵しておいてももったいないので Qiita で公開します。
内容は多少古くなっているので注意しください。
ジョブの作成
Jobs 画面を開いて、「Create Job」から「+New Job…」を選択します。

Job Name には pstree を指定します。
Workflow では、Add a Step で Command を選択します。
Command として pstree -p --show-parents $$ を指定します。
Nodes では、それぞれのノードにコマンドを発行するため Dispatch to Nodes
を選択します。
Node Filter に . * を入力し、Set Filter をクリックします。
ほかの項目はデフォルトにままでかまいません。
これで Create をクリックしてジョブを作成します。
ジョブの実行
作成したジョブを実行します。
ジョブの一覧から先ほど作成したpstreeを選択します。
psteeジョブの画面に切り替わります。
Run Job Now をクリックします。
ジョブが実行される様子が表示されます。
今回のジョブはステップが一つしかないのですぐに終了するでしょう。
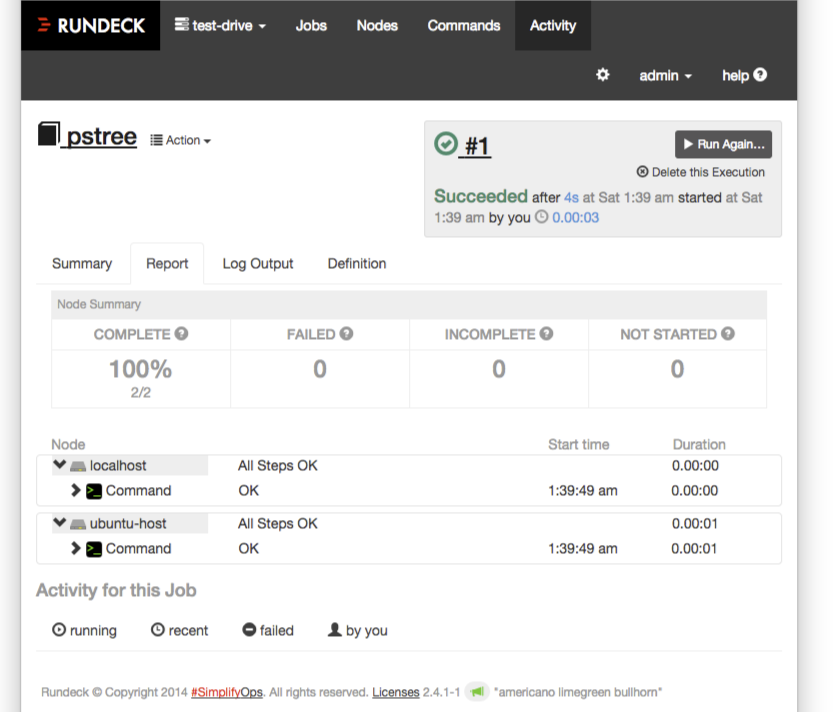
実行結果が表示されます。
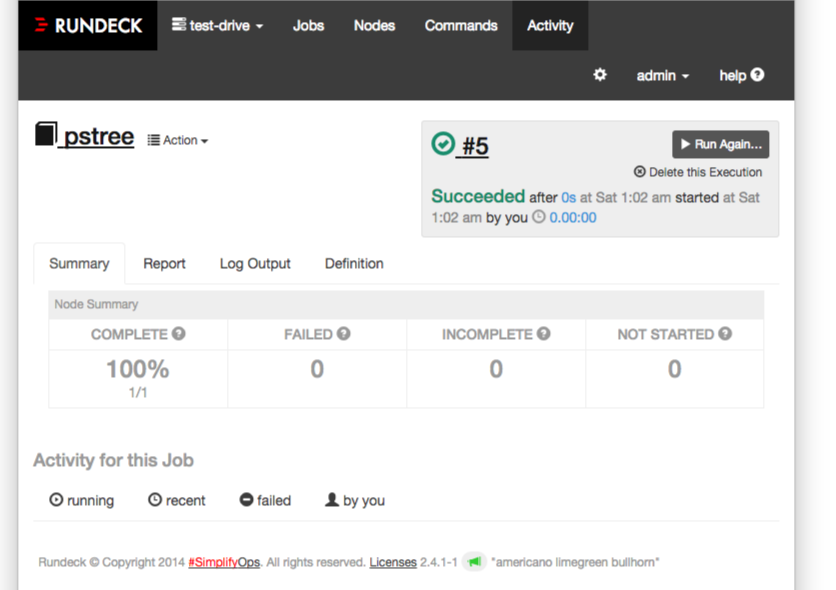
Summary
実行結果の要約です。
Report
ジョブの実行結果をノードやステップごとに確認できます。
Log Output
ジョブの出力が確認できます。
Definition
ジョブを実行したときのワークフローの定義が表示されます。
ジョブの実行対象ノード
Nodes の Change the Target Nodes
にチェックを入れると、実行対象のノードを限定することができます。
ノード localhost だけを選んで実行してみます。
Summary画面ではわかりにくいですが、よく見ると Complete 100% 1/1
と、対象1ノードで、成功1ノードになっています。
ジョブの詳細設定
実行対象
ジョブを発行する対象は
- Nodes のところで Dispatch to Nodes(各ノードに対しSSH経由で実行),
- Execute locally(Rundeckサーバ上で実行)
から選択します。
Dispatch to Nodesを選択したときは、Node Filter
で実行対象のノードを選択します。このときの指定には次のような方法があります。Node
Filter の「?」をクリックすればヘルプが表示されます。
**Select nodes by name:**名前を列挙する
mynode1 mynode2This will select both nodes.
**Filter nodes by attribute value:**属性値で選択する
- Include:
attribute: value- Exclude:
!attribute: value**Use Regular Expressions:**正規表現で選択することができる
hostname: dev( d+).test.com.Regex syntax checking:
attribute: /regex/
attribute: /regex/Examples:
All nodesすべてのノード
~ name: . *
**Nodes tagged "production" 「**production」というタグがついたノード
~ tags: production
Unix nodes OSが「unix」のノード
~ osFamily: unix
実行コマンド
実行するコマンド列はWorkflowとして設定します。
ステップには2種類のタイプがあります。
- Node Steps : 各ノードごとに実行する
- Workflow Steps : ノードに関係なく1度だけ実行する
各Node Steps は、以下の中から選択します。Workflow Steps
のときに選択できるのはJob Reference のみです。
** Command - Execute a remote command
** Script - Execute an inline script
** Script file or URL - Execute a local script file or a script from
a URL
Job Reference - Execute another Job for each Node
2 Node Step Plugins
** Copy File - Copy a file to a destination on a remote node.
** Local Command - Run a command locally on the server
error hander で、ステップがエラー終了したとき、ワークフローを打ち切るか、実行を続けるかを指定できます。また、エラー処理のためのコマンドを実行することもできます。
コマンド実行
Commandで指定したコマンドは ssh node
'コマンド'**のように実行されます。コマンドはリモートホスト上でシェルが評価して実行されます。
一方、Local Commandでは、コマンドは空白で分割されたのち、直接 exec(3) される形で実行されます。このときシェルは介在しないため、単純コマンドしか実行できません。パラメータ置換やパイプライン、コマンドリストなどが必要であれば、sh -c 'コマンド' のように指定してください。
引数
Optionsでジョブの引数を宣言することができます。
引数が取り得る値は、Allowed
Valuesで指定します。GUIからジョブを実行するときに、この値を選択することができます。
引数はステップでは次のようにして参照できます。
The option values will be available to scripts in these forms:
Bash:
$RD_OPTION_NAME
(ローカル実行のみ。環境変数として渡されます。)
Commandline Arguments:
${option.name}
Script Content:
@option.name@
Node Filter で name:${option.name} のようにして使うこともできます。
ジョブの名前
ジョブの名前は任意に指定できます。後から変更することもできます。
ただしJob Referenceで参照しているジョブの名前を変更すると、無効な参照となるため注意が必要です。
自動実行
Schedule to run repeatedly?
からジョブの繰り返し実行のスケジュールを設定できます。
Crontab 形式での指定は、通常の crontab
での設定とは異なり拡張されています。
秒 分 時 日 月 曜 年
先頭に秒、末尾に年が増えています。
以下は設定画面にある See: Cron
reference
for formatting
helpのリンク先からの転載です。
Quartz Scheduler を使っているのでしょうか?
Format
A cron expression is a string comprised of 6 or 7 fields separated by
white space. Fields can contain any of the allowed values, along with
various combinations of the allowed special characters for that field.
The fields are as follows:
>   Field Name     Mandatory   Allowed Values     Allowed Special Characters
>   -------------- ----------- ------------------ ----------------------------
>   Seconds        YES         0-59               , -  * /
>   Minutes        YES         0-59               , -  * /
>   Hours          YES         0-23               , -  * /
>   Day of month   YES         1-31               , -  * ? / L W
>   Month          YES         1-12 or JAN-DEC    , -  * /
>   Day of week    YES         1-7 or SUN-SAT     , -  * ? / L  #
>   Year           NO          empty, 1970-2099   , -  * /
So cron expressions can be as simple as this:
* * * * ? *or more complex, like this:
0/5 14,18,3-39,52 * ? JAN,MAR,SEP MON-FRI 2002-2010Special characters
*
("all values") - used to select all values within a field. For
example, "*" in the minute field means "every minute".?
("no specific value") - useful when you need to specify
something in one of the two fields in which the character is
allowed, but not the other. For example, if I want my trigger to
fire on a particular day of the month (say, the 10th), but don't
care what day of the week that happens to be, I would put "10" in
the day-of-month field, and "?" in the day-of-week field. See the
examples below for clarification.-
- used to specify ranges. For example, "10-12" in the hour field
means "the hours 10, 11 and 12".,
- used to specify additional values. For example, "MON,WED,FRI" in
the day-of-week field means "the days Monday, Wednesday, and
Friday"./
- used to specify increments. For example, "0/15" in the seconds
field means "the seconds 0, 15, 30, and 45". And "5/15" in the
seconds field means "the seconds 5, 20, 35, and 50". You can
also specify '/' after the '' character - in this case '' is
equivalent to having '0' before the '/'. '1/3' in the day-of-month
field means "fire every 3 days starting on the first day of the
month".L
("last") - has different meaning in each of the two fields in
which it is allowed. For example, the value "L" in the
day-of-month field means "the last day of the month" - day 31
for January, day 28 for February on non-leap years. If used in the
day-of-week field by itself, it simply means "7" or "SAT". But if
used in the day-of-week field after another value, it means "the
last xxx day of the month" - for example "6L" means "the last
friday of the month". When using the 'L' option, it is important
not to specify lists, or ranges of values, as you'll get confusing
results.W
("weekday") - used to specify the weekday (Monday-Friday)
nearest the given day. As an example, if you were to specify "15W"
as the value for the day-of-month field, the meaning is: "the
nearest weekday to the 15th of the month". So if the 15th is a
Saturday, the trigger will fire on Friday the 14th. If the 15th is
a Sunday, the trigger will fire on Monday the 16th. If the 15th is
a Tuesday, then it will fire on Tuesday the 15th. However if you
specify "1W" as the value for day-of-month, and the 1st is a
Saturday, the trigger will fire on Monday the 3rd, as it will not
'jump' over the boundary of a month's days. The 'W' character can
only be specified when the day-of-month is a single day, not a
range or list of days.The 'L' and 'W' characters can also be combined in the day-of-month
field to yield 'LW', which translates to *"last weekday of the
month" *.
#
- used to specify "the nth" XXX day of the month. For example, the
value of "6 #3" in the day-of-week field means*"the third Friday
of the month"* (day 6 = Friday and " #3" = the 3rd one in the
month). Other examples: "2 #1" = the first Monday of the month and
"4 #5" = the fifth Wednesday of the month. Note that if you
specify " #5" and there is not 5 of the given day-of-week in the
month, then no firing will occur that month.The legal characters and the names of months and days of the week
are not case sensitive.
MON
is the same as
mon.
実行結果
実行結果は履歴として残り、後からAcutivity画面を見れば確認できます。
結果には、実行時のワークフローの定義も一緒に記録されています。
過去の実行履歴をみると、その時、どのような定義のワークフローで実行したかもわかるようになっています。これは、ワークフローを後から変更したときでも、過去の実行履歴は独立した記録になっていて、影響を受けないということであり、大変重要なことです。


