概要
横スクロールするメニュー+メニューに連動してメインビューが切り替わる、
SmartNews等のアプリで見られるような、簡易なサンプルを作ってみました。
ポイントはこんな感じです。
・可能な限りStoryboadを使う(+Swift)
・横スクロールするメニュー⇒ScrollView+StackView
・メインビュー⇒ContainerView+PageView
このあたりの記事を参考にさせていただきました。
http://crossbridge-lab.hatenablog.com/entry/2015/12/26/210600
http://qiita.com/nofrmm/items/5cc122876b6c3af7a21e
ソース
ざっくりとした内容しか記載していないのでソース見たい方はこちらからどうぞ
https://github.com/koji-nishida/scrollmenu-container-pageview
完成イメージ
全体図


メニュー部の作成
ScrollView、StackView、Buttonを配置
Constraintsは下図のような感じ(Buttonは特に制約なし)
これで端末幅に合わせて横スクロールするメニューが完成


ScrollViewのConstraints
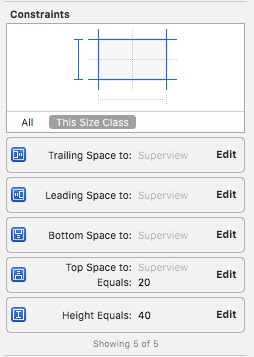
StackViewのConstraints
メインビュー部の作成
図のようにメニューの下にContainerViewを配置。
配置時点ではUIViewControllerがembedされているので、
UIViewControllerを消して、UIPaveViewControllerを配置しなおします。
ここでUIPaveViewControllerのCustom ClassにPageViewController.swiftを指定しておく。

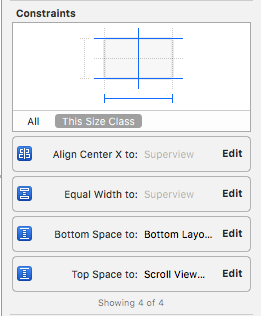
ContainerViewのConstraints
実装部(PageViewにViewControllerをセット)
    var pageViewController: PageViewController!
    var menuViewControllers: Array<UIViewController> = []
    var selected: Int!

    override func viewDidLoad() {
        super.viewDidLoad()

        // PageViewControllerを取得する
        for vc in childViewControllers {
            if vc is PageViewController {
                pageViewController = vc as! PageViewController
            }

        }

        // PageViewにセットするViewControllerを生成して配列に入れる
        let storyboard = UIStoryboard(name: "Main", bundle: nil)
        let firstViewController = storyboard.instantiateViewControllerWithIdentifier("FirstViewController") as! FirstViewController
        let secondViewController = storyboard.instantiateViewControllerWithIdentifier("SecondViewController") as! SecondViewController
        let thirdViewController = storyboard.instantiateViewControllerWithIdentifier("ThirdViewController") as! ThirdViewController
        let fourthViewController = storyboard.instantiateViewControllerWithIdentifier("FourthViewController") as! FourthViewController
        menuViewControllers.append(firstViewController)
        menuViewControllers.append(secondViewController)
        menuViewControllers.append(thirdViewController)
        menuViewControllers.append(fourthViewController)

        // 初期表示をメニュー2(SecondViewController)にする
        pageViewController.setViewControllers([menuViewControllers[1]], direction: .Forward, animated: false, completion: nil)
        selected = 1
    }


puts 'The best way to log and share programmers knowledge.'
ポイント
・childViewControllersからPageViewControllerを探す
もっといい方法があれば誰か教えて下さい
・各ViewControllerをStoryboardから生成して配列で保持しておく
・初期表示するViewControllerをセット
実装部(メニュー切り替え部)
@IBAction func actionMenu1(sender: AnyObject) {
        self.btnMenu1.enabled = false
        self.btnMenu2.enabled = true
        self.btnMenu3.enabled = true
        self.btnMenu4.enabled = true

        // 一番左までスクロール
        scrollViewMenu.setContentOffset(CGPointMake(0, 0), animated: true);

        // 表示切り替え
        pageViewController!.setViewControllers([menuViewControllers[0]], direction: .Reverse, animated: true, completion: nil)

        selected = 0

    }

    @IBAction func actionMenu2(sender: AnyObject) {
        self.btnMenu1.enabled = true
        self.btnMenu2.enabled = false
        self.btnMenu3.enabled = true
        self.btnMenu4.enabled = true

        // 一番左までスクロール
        scrollViewMenu.setContentOffset(CGPointMake(0, 0), animated: true);

        // 表示切り替え(前回選択していたメニューの位置に応じてアニメーションの向きを設定)
        if (selected < 1) {
            pageViewController!.setViewControllers([menuViewControllers[1]], direction: .Forward, animated: true, completion: nil)
        } else {
            pageViewController!.setViewControllers([menuViewControllers[1]], direction: .Reverse, animated: true, completion: nil)
        }

        selected = 1

    }

    @IBAction func actionMenu3(sender: AnyObject) {
        self.btnMenu1.enabled = true
        self.btnMenu2.enabled = true
        self.btnMenu3.enabled = false
        self.btnMenu4.enabled = true

        // 一番右までスクロール
        let scrollWidth = scrollViewMenu.contentSize.width - scrollViewMenu.frame.size.width
        scrollViewMenu.setContentOffset(CGPointMake(scrollWidth, 0), animated: true);

        // 表示切り替え(前回選択していたメニューの位置に応じてアニメーションの向きを設定)
        if (selected < 2) {
            pageViewController!.setViewControllers([menuViewControllers[2]], direction: .Forward, animated: true, completion: nil)
        } else {
            pageViewController!.setViewControllers([menuViewControllers[2]], direction: .Reverse, animated: true, completion: nil)
        }

        selected = 2

    }

    @IBAction func actionMenu4(sender: AnyObject) {
        self.btnMenu1.enabled = true
        self.btnMenu2.enabled = true
        self.btnMenu3.enabled = true
        self.btnMenu4.enabled = false

        // 一番右までスクロール
        let scrollWidth = scrollViewMenu.contentSize.width - scrollViewMenu.frame.size.width
        scrollViewMenu.setContentOffset(CGPointMake(scrollWidth, 0), animated: true);

        // 表示切り替え
        pageViewController!.setViewControllers([menuViewControllers[3]], direction: .Forward, animated: true, completion: nil)

        selected = 3

    }
ポイント
・特になし笑
最後に
Storyboardもずいぶん便利になったなーというのが一番の感想ですかね。
一昔前ではコードをがりがり書かないとできなかったようなことが、
Storyboardでこんなに簡単に作れるようになったなーという印象です。
今回は、メニューボタンのアクションによる画面切り替えしか対応していないので、
メインビュー部分をスクロールさせることでも画面がスライドするようにしないとですね。
ContainerViewのジェスチャーをとって、画面を切り替えるという感じでしょうか。
以上