[2017.02.09 Swift3.0に対応]
・ラベルの追加参考サイト
・println を printに変更
などなど
Xcodeのstoryboardを使用しないやり方です。
storyboardを使用して開発する方は、参考サイトが役立ちます。
はじめに
アプリ内でUITextFieldをタップすると下からニョキッとキーボードが出て来ます。
この時、UITextFieldがキーボードに隠れてしまい、
自分が何を入力しているのかが確認できなくなってしまうため、その解決方法を載せます。
ソースコードだけ見たい方は、一番下に完成コードを載せているので、そちらをどうぞ。
解決方法
UIScrollViewを使用します。
TextFieldの下辺とキーボードの上辺が重なったら、ScrollViewで指定した長さずらしてあげます。
そうすれば、TextFeildはキーボードに隠れません。
実装
それでは、以下の順に実装していきましょう。
1. プロジェクトの作成
今回はUITextFieldとUIScrollViewしか使用しないため、
Single View Applicationを選択してプロジェクトを作成します。
2. UITextFeild
2-1. UITextfieldの追加
text1とtext2の2つのUITextFieldを追加する。
class ViewController: UIViewController {
    let text1: UITextField = UITextField(frame: CGRect(x: 0,y: 0,width: 200,height: 30))
    let text2: UITextField = UITextField(frame: CGRect(x: 0,y: 0,width: 200,height: 30))

    override func viewDidLoad() {
        super.viewDidLoad()
        // Do any additional setup after loading the view, typically from a nib.

        // 表示する文字を代入する.
        text1.text = ""
        text2.text = ""

        // 枠を表示する.
        text1.borderStyle = UITextBorderStyle.RoundedRect
        text2.borderStyle = UITextBorderStyle.RoundedRect

        // UITextFieldの表示する位置を設定する.
        text1.layer.position = CGPoint(x:self.view.bounds.width/2,y:500);
        text2.layer.position = CGPoint(x:self.view.bounds.width/2,y:100);

        self.view.addSubview(text1)
        self.view.addSubview(text2)
    }

    override func didReceiveMemoryWarning() {
        super.didReceiveMemoryWarning()
        // Dispose of any resources that can be recreated.
    }
}
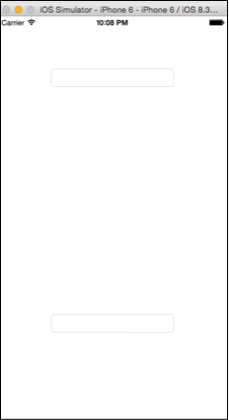
これで実行すると下記のようになる。
text1が一番下でtext2が一番上のTextFieldです。
もし、text1とtext2のTextFieldを押してもキーボードが出てこない場合、Xcodeの設定を確認してみましょう。参考サイト
これだけだと、
TextFieldのキーボードのEnterを押してもキーボードが閉じません
2-2. Enterを押したらキーボードが閉じるようにする
下記の関数をViewController.swift内に追加する
    //改行ボタンが押された際に呼ばれる.
    func textFieldShouldReturn(textField: UITextField) -> Bool {
        textField.resignFirstResponder()

        return true
    }
これで、TextFieldのキーボードのEnterを押したらキーボードが閉じるようになりました。
3. UIScrollView
このままだとtext1がキーボードに隠れているため、UIScrollViewで隠れないようにします。
3-1 UIScrollViewの追加
UIScrollViewを使用するために必要な処理を書いていきます。
以下が追加された後のViewController.swiftです。
import UIKit

class ViewController: UIViewController, UITextFieldDelegate, UIScrollViewDelegate{
    let text1: UITextField = UITextField(frame: CGRectMake(0,0,200,30))
    let text2: UITextField = UITextField(frame: CGRectMake(0,0,200,30))
    let sc = UIScrollView();

    override func viewDidLoad() {
        super.viewDidLoad()
        // Do any additional setup after loading the view, typically from a nib.

        sc.frame = self.view.frame;
        sc.backgroundColor = UIColor.red;
        sc.delegate = self;

        //textfileの位置を指定する
        sc.contentSize = CGSize(width: 250,height: 1000)
        self.view.addSubview(sc);

        // 表示する文字を代入する.
        text1.text = ""
        text2.text = ""

        // Delegateを設定する.
        text1.delegate = self
        text2.delegate = self

        // 枠を表示する.
        text1.borderStyle = UITextBorderStyle.roundedRect
        text2.borderStyle = UITextBorderStyle.roundedRect

        // UITextFieldの表示する位置を設定する.
        text1.layer.position = CGPoint(x:self.view.bounds.width/2,y:500);
        text2.layer.position = CGPoint(x:self.view.bounds.width/2,y:100);

        self.view.addSubview(text1)
        self.view.addSubview(text2)

        // Viewに追加する
        sc.addSubview(text1)
        sc.addSubview(text2)

    }

    //改行ボタンが押された際に呼ばれる.
    func textFieldShouldReturn(_ textField: UITextField) -> Bool {
        textField.resignFirstResponder()

        return true
    }

    override func didReceiveMemoryWarning() {
        super.didReceiveMemoryWarning()
        // Dispose of any resources that can be recreated.
    }

}
UIScrollViewの範囲を確認できるように、
sc.backgroundColor = UIColor.redColor();
を追加したため、背景が赤色になっています。
4. TextFieldを上にスクロールさせる処理
ここから、TextFieldとキーボードが重なったときにスクロールさせる処理を書いていきます。
4.1 UITextFieldの情報を格納する
UITextFieldの情報を格納するための変数を定義します。
var txtActiveField = UITextField()
text1またはtext2のUITextFieldが押されたとき、
その情報をtxtActiveFieldへ格納するための関数を以下に示します。
//UITextFieldが編集された直後に呼ばれる.
func textFieldShouldBeginEditing(_ textField: UITextField) -> Bool {

txtActiveField = textField
   return true
}
4.2 UITextFieldの下辺とキーボードの上辺が重なっているかどうか調べるための処理
override func viewWillAppear(_ animated: Bool) {

    super.viewWillAppear(animated)

    let notificationCenter = NotificationCenter.default
    notificationCenter.addObserver(self, selector: #selector(ViewController.handleKeyboardWillShowNotification(_:)), name: NSNotification.Name.UIKeyboardWillShow, object: nil)
    notificationCenter.addObserver(self, selector: #selector(ViewController.handleKeyboardWillHideNotification(_:)), name: NSNotification.Name.UIKeyboardWillHide, object: nil)

}

func handleKeyboardWillShowNotification(_ notification: Notification) {


    let userInfo = notification.userInfo!
    let keyboardScreenEndFrame = (userInfo[UIKeyboardFrameEndUserInfoKey] as! NSValue).cgRectValue
    let myBoundSize: CGSize = UIScreen.main.bounds.size

    var txtLimit = txtActiveField.frame.origin.y + txtActiveField.frame.height + 8.0
    let kbdLimit = myBoundSize.height - keyboardScreenEndFrame.size.height


     print("テキストフィールドの下辺:(\(txtLimit))")
     print("キーボードの上辺:(\(kbdLimit))")


    if txtLimit >= kbdLimit {
        sc.contentOffset.y = txtLimit - kbdLimit
    }
}


func handleKeyboardWillHideNotification(_ notification: Notification) {


    sc.contentOffset.y = 0
}
4.3 スクロールする領域を知りたい場合は下記の関数を書けばLogで確認することが出来ます。
func scrollViewDidScroll(scrollView: UIScrollView)
{
        // scroll領域取得
        NSLog("%f %f", scrollView.contentOffset.x,scrollView.contentOffset.y);
}
完成版ソースコード
完成したプログラムを以下に示します。
新しく作ったプロジェクトのViewController.swiftファイルを
以下のコードに書き換えるだけで、
UITextFieldがキーボードに隠れないようにするやり方を確認することが出来ます。
import UIKit

class ViewController: UIViewController, UITextFieldDelegate, UIScrollViewDelegate{
    let text1: UITextField = UITextField(frame: CGRect(x: 0,y: 0,width: 200,height: 30))
    let text2: UITextField = UITextField(frame: CGRect(x: 0,y: 0,width: 200,height: 30))
    let sc = UIScrollView();
    var txtActiveField = UITextField()

    override func viewDidLoad() {
        super.viewDidLoad()
        // Do any additional setup after loading the view, typically from a nib.

        sc.frame = self.view.frame;
        sc.backgroundColor = UIColor.red;
        sc.delegate = self;

        //textfileの位置を指定する
        sc.contentSize = CGSize(width: 250,height: 1000)
        self.view.addSubview(sc);

        // 表示する文字を代入する.
        text1.text = ""
        text2.text = ""

        // Delegateを設定する.
        text1.delegate = self
        text2.delegate = self

        // 枠を表示する.
        text1.borderStyle = UITextBorderStyle.roundedRect
        text2.borderStyle = UITextBorderStyle.roundedRect

        // UITextFieldの表示する位置を設定する.
        text1.layer.position = CGPoint(x:self.view.bounds.width/2,y:500);
        text2.layer.position = CGPoint(x:self.view.bounds.width/2,y:100);

        self.view.addSubview(text1)
        self.view.addSubview(text2)

        // Viewに追加する
        sc.addSubview(text1)
        sc.addSubview(text2)

    }

    //改行ボタンが押された際に呼ばれる.
    func textFieldShouldReturn(_ textField: UITextField) -> Bool {
        textField.resignFirstResponder()

        return true
    }

    //UITextFieldが編集された直後に呼ばれる.
    func textFieldShouldBeginEditing(_ textField: UITextField) -> Bool {
        txtActiveField = textField
        return true
    }

    override func viewWillAppear(_ animated: Bool) {
        super.viewWillAppear(animated)

        let notificationCenter = NotificationCenter.default
        notificationCenter.addObserver(self, selector: #selector(ViewController.handleKeyboardWillShowNotification(_:)), name: NSNotification.Name.UIKeyboardWillShow, object: nil)
        notificationCenter.addObserver(self, selector: #selector(ViewController.handleKeyboardWillHideNotification(_:)), name: NSNotification.Name.UIKeyboardWillHide, object: nil)
    }

    func handleKeyboardWillShowNotification(_ notification: Notification) {

        let userInfo = notification.userInfo!
        let keyboardScreenEndFrame = (userInfo[UIKeyboardFrameEndUserInfoKey] as! NSValue).cgRectValue
        let myBoundSize: CGSize = UIScreen.main.bounds.size
        var txtLimit = txtActiveField.frame.origin.y + txtActiveField.frame.height + 8.0
        let kbdLimit = myBoundSize.height - keyboardScreenEndFrame.size.height

        print("テキストフィールドの下辺:(\(txtLimit))")
        print("キーボードの上辺:(\(kbdLimit))")

        if txtLimit >= kbdLimit {
            sc.contentOffset.y = txtLimit - kbdLimit
        }
    }

    func handleKeyboardWillHideNotification(_ notification: Notification) {
        sc.contentOffset.y = 0
    }


    override func didReceiveMemoryWarning() {
        super.didReceiveMemoryWarning()
        // Dispose of any resources that can be recreated.
    }

}
ダウンロードしてそのまま実行させて確認したいって方は下からどうぞ。
https://github.com/chankei1/scroll_sample
参考サイト
「Swiftでテキストフィールドがキーボードに隠れないようにしてみた」
URL:http://ameblo.jp/hayashidesuga/entry-11971210696.html
「Xcode 6のiOS Simulatorでキーボードが表示されない場合の対処法」
URL:http://yutaihara.com/archives/147