概要
GASと言えば、「Google Apps Script」のGASです。
「Apps Script Execution API」という新しいAPIが使えるようになったそうなので、このAPIを使って、外部環境からGASの関数を実行するというサンプルをご紹介します。
特にスプレッドシートをクラウド型の簡易データベースのように使えることも想定して、
とりあえず表からJSON出力して、「Execution API」で外部のNode.jsから実行するという内容をやってみました。
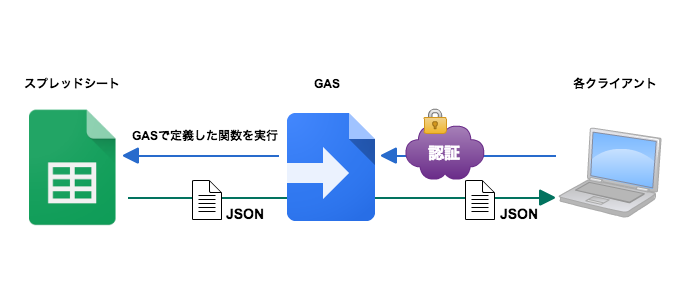
以下は実装のイメージです。
要は外部から実行する上で「認証」のあたりが重要なポイントで、この「Execution API」を使う事でOAuth認証で気軽に外部からGASにアクセスが可能となります。
今回はGASでスプレッドシートにアクセスしていますが、もちろんGASはカレンダーとか他のアプリケーションの操作もできます。
クライアント側で使用する言語はNode.jsです。なのでNode.jsが使える環境を用意しておいてください。
必要条件
このサンプルを試すには以下の条件が必要となります。
- Googleアカウントを持っている。
- Node.jsのがインストールされている。
- Node.jsのパッケージ管理ツールnpmが使える状態である。
と簡単に概要を説明したところで、ここから実際の作業に入っていきます。
スプレッドシートで表を作る
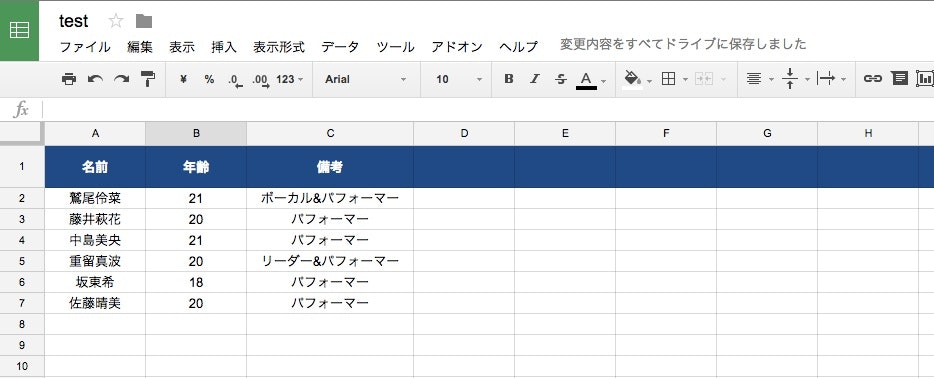
まず、新規のスプレッドシートで以下のような表を作ります。
1列以上あれば、列の項目はいくつでもかまわないです。(後から増やす事も可能です)
この辺りはRDBの考え方と何ら変わりはありません。要は列が「カラム」で、行が「ロー」です。
1行目はタイトル行(JSONのキーに該当)で、2行目以降がデータ行になります。
人気グループ、Flowerのメンバーを表にしてみました。
ウェブに公開する
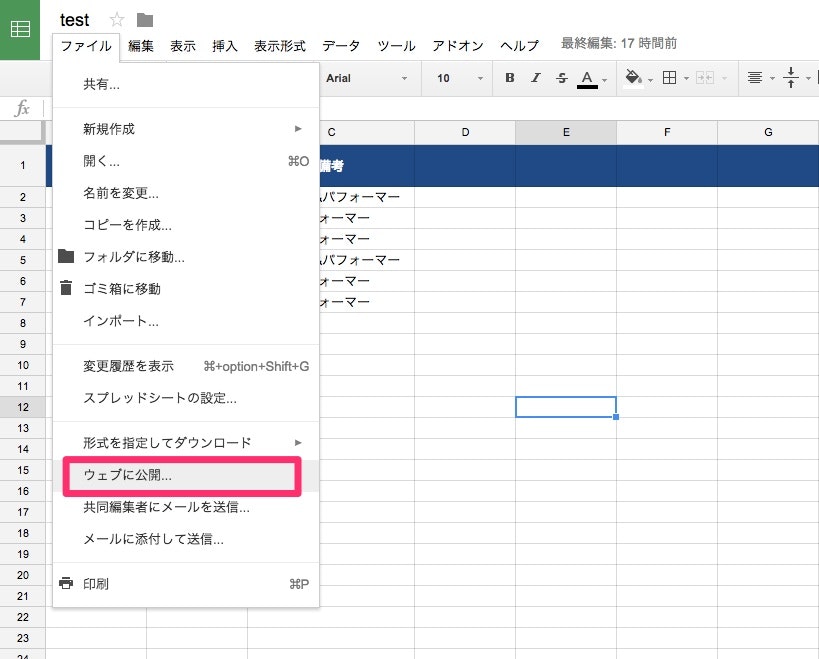
表が完成すれば、「ファイル」→「ウェブに公開」で公開し、公開用のURLを控えておきます。(公開範囲はご自身の用途に合わせてください)
GASでJSON出力する関数を書く
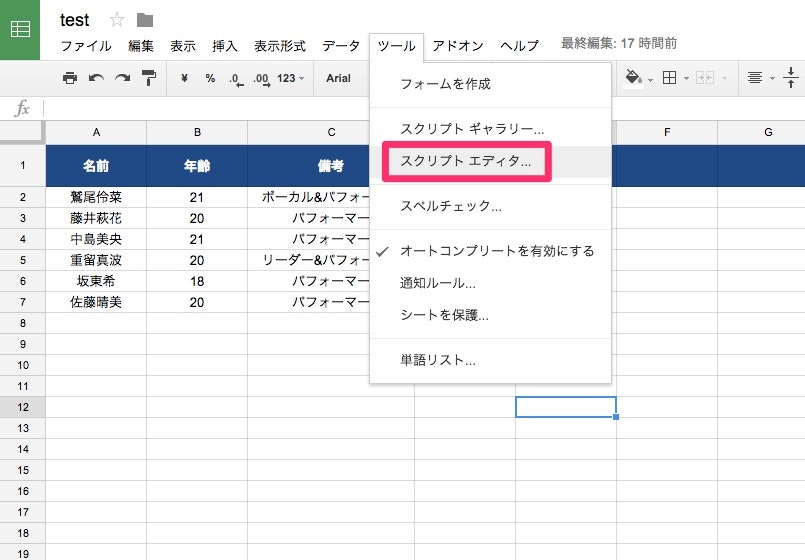
次に「ツール」→「スクリプトエディタ…」でGASを書くためのエディタを開きます。
このようにしてスプレッドシートからスクリプトエディタを開くと、スプレッドシートとGASのプロジェクトが紐付けられる形になりますが、別に分けてそれぞれ作成しても問題ありません。
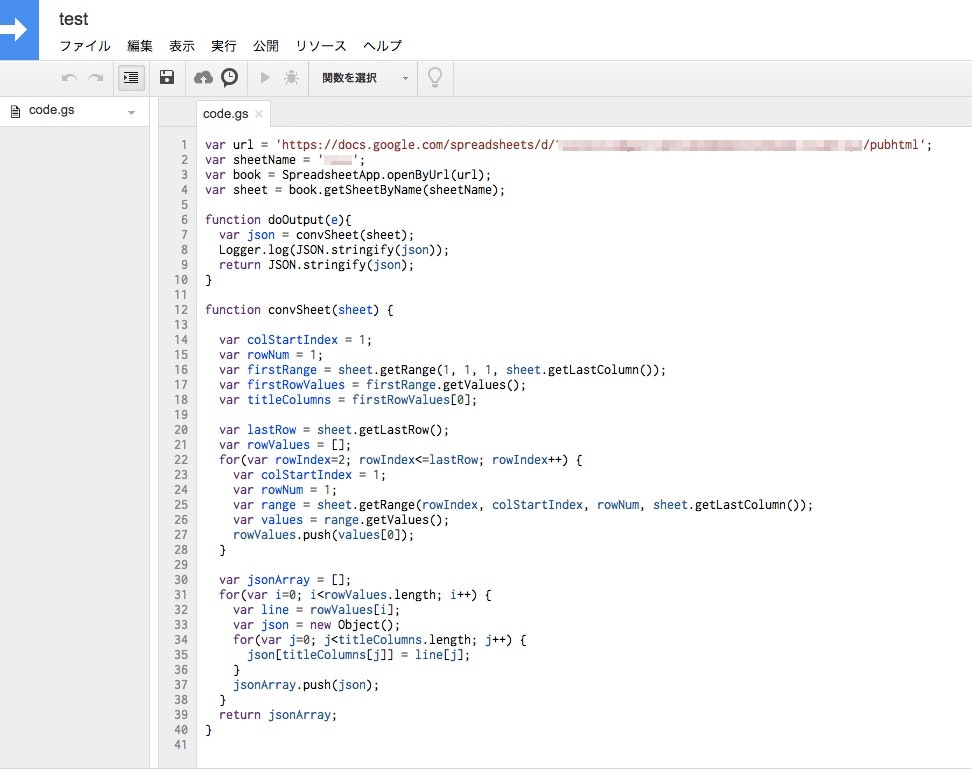
そのエディタに以下のようなコードを書きます。
最初の変数の宣言で、url にはスプレッドシートを公開した際に控えておいた**「公開用URL」**を、sheetName には、表を作成した「シート名」を定義します。
doOutput という関数が、この表をJSON出力するもので、外部から指定して実行する際に必要なので覚えておいてください。
var url = 'https://docs.google.com/spreadsheets/d/***スプレッドシートID***/pubhtml';
var sheetName = '***シート名***';
var book = SpreadsheetApp.openByUrl(url);
var sheet = book.getSheetByName(sheetName);

function doOutput(e){
  var json = convSheet(sheet);
  Logger.log(JSON.stringify(json));
  return JSON.stringify(json);
}

function convSheet(sheet) {

  var colStartIndex = 1;
  var rowNum = 1;
  var firstRange = sheet.getRange(1, 1, 1, sheet.getLastColumn());
  var firstRowValues = firstRange.getValues();
  var titleColumns = firstRowValues[0];

  var lastRow = sheet.getLastRow();
  var rowValues = [];
  for(var rowIndex=2; rowIndex<=lastRow; rowIndex++) {
    var colStartIndex = 1;
    var rowNum = 1;
    var range = sheet.getRange(rowIndex, colStartIndex, rowNum, sheet.getLastColumn());
    var values = range.getValues();
    rowValues.push(values[0]);
  }

  var jsonArray = [];
  for(var i=0; i<rowValues.length; i++) {
    var line = rowValues[i];
    var json = new Object();
    for(var j=0; j<titleColumns.length; j++) {
      json[titleColumns[j]] = line[j];
    }
    jsonArray.push(json);
  }
  return jsonArray;
}
参考: Google Apps ScriptでspreadsheetのデータをJSONとして読み込む
##ログに出力してみる
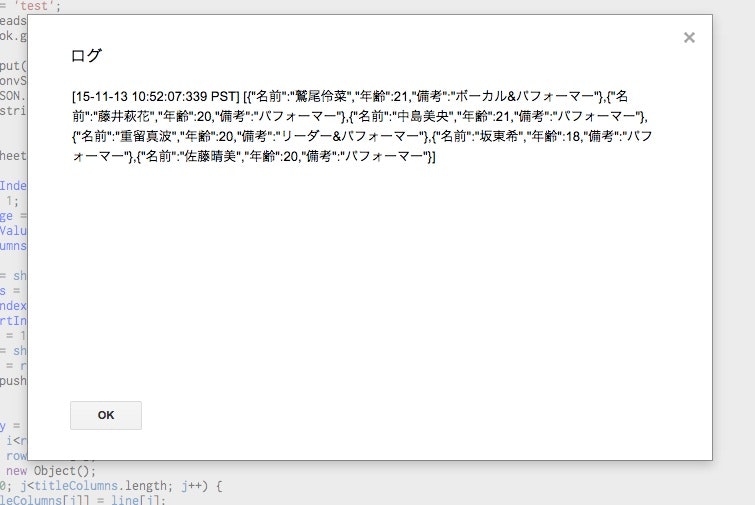
Logger.log で取得したJSONデータをログに表示するようにしてあるので、
「関数を選択」から doOutput を指定して、実行ボタンを押してみましょう。
ログは「表示」→「ログ」で確認できます。
以下のように、表の1行目が「キー」になった状態でJSON形式で表示できていれば大丈夫。
ここまで作って、以前でもdoGetやdoPostという関数名で「アプリケーションとして公開」してJSONを引っ張ることはやってたんですが、そもそもOAuth認証が無かったり、色々と微妙だったのですが、ここからは違います。
APIで外部から関数を実行できるようにする
ここから手順が多くなり少し面倒ですが、、
まあ理解できて慣れれば一瞬でできますよ。
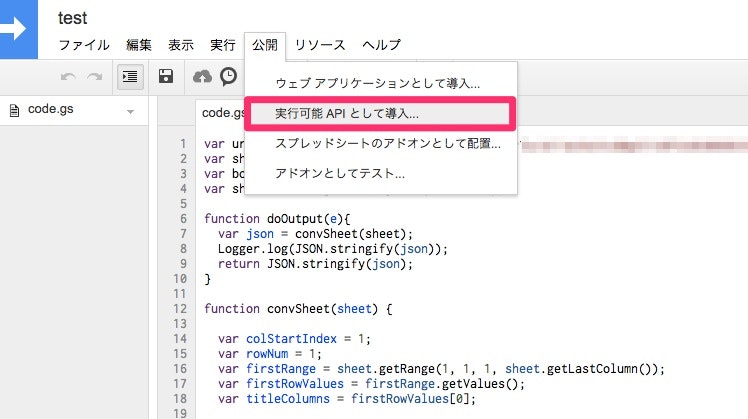
まず「公開」→「実行可能APIとして導入」を選択して、このスクリプトに対してAPIで実行できるようにします。
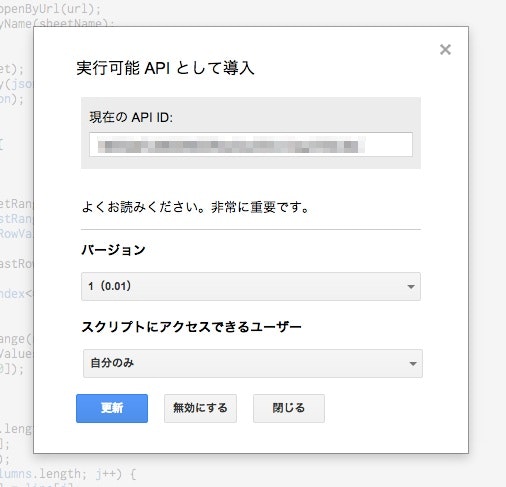
以下のように**「現在のAPI ID」**が表示されるので、これをコピペして控えておきます。
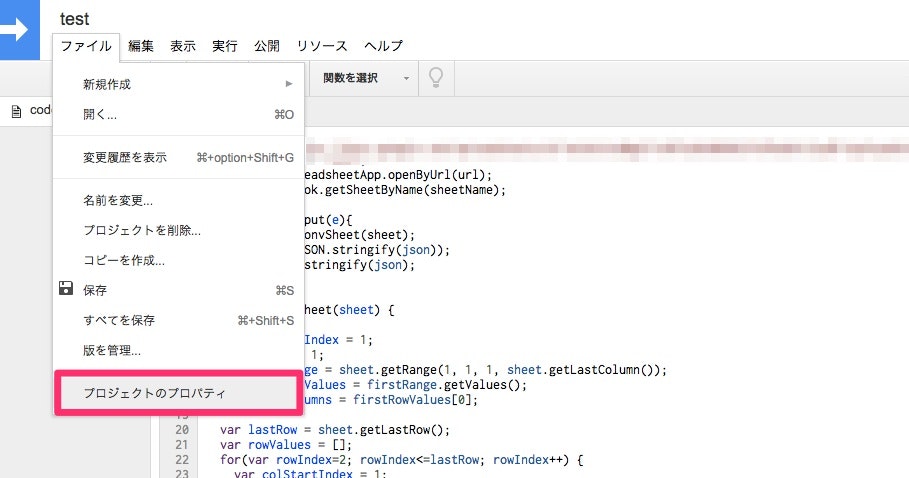
次に「ファイル」→「プロジェクトのプロパティ」を開きます。
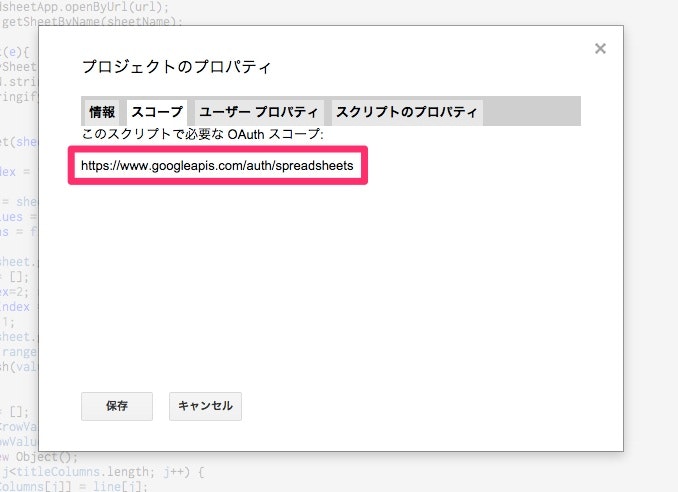
タブ切り替えでスコープを選択して、そこに表示されている**「OAuthスコープ」**をこれまたコピペで控えておきます。
ここでのスコープはスプレッドシートにアクセスする為のものになってますが、例えばGASからカレンダーにアクセスするといった場合のときは、カレンダー用のスコープになります。
Developers Consoleに移動してExecution APIを使えるようにする
Developers Consoleのほうに移り、Execution APIが使えるように設定していきます。
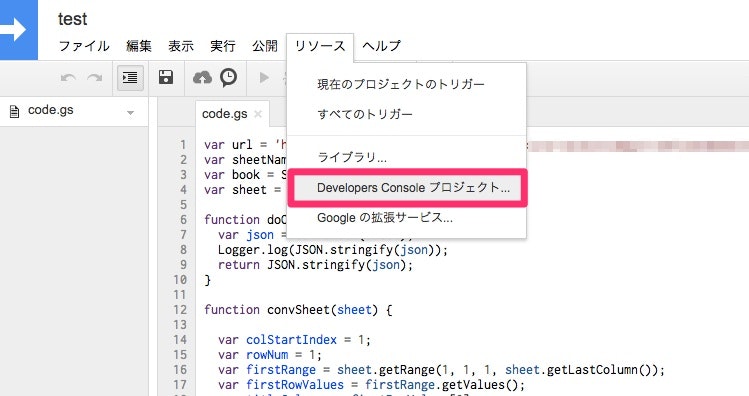
「リソース」→「Developer Console プロジェクト…」を選択。
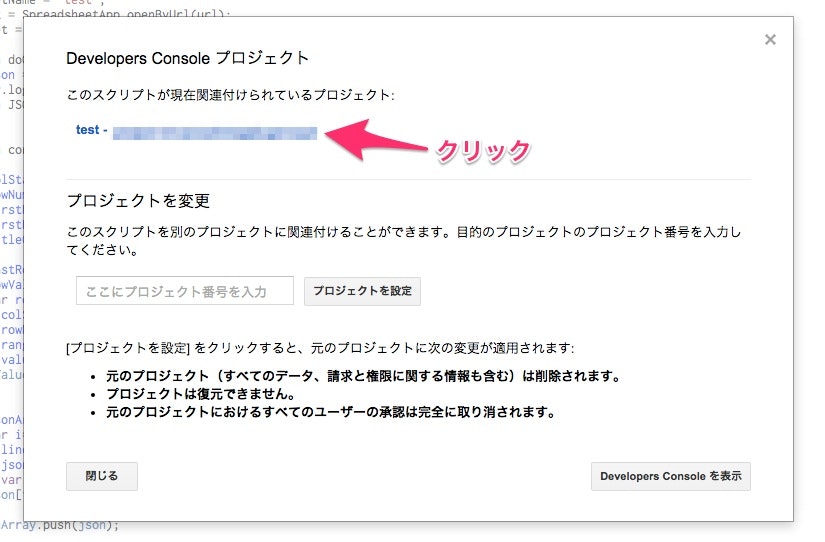
そして、開かれたダイアログに書かれているリンクをクリックすると、このGASに紐づかれているプロジェクトのページに遷移します。
ここからは、Developer Console上での操作です。
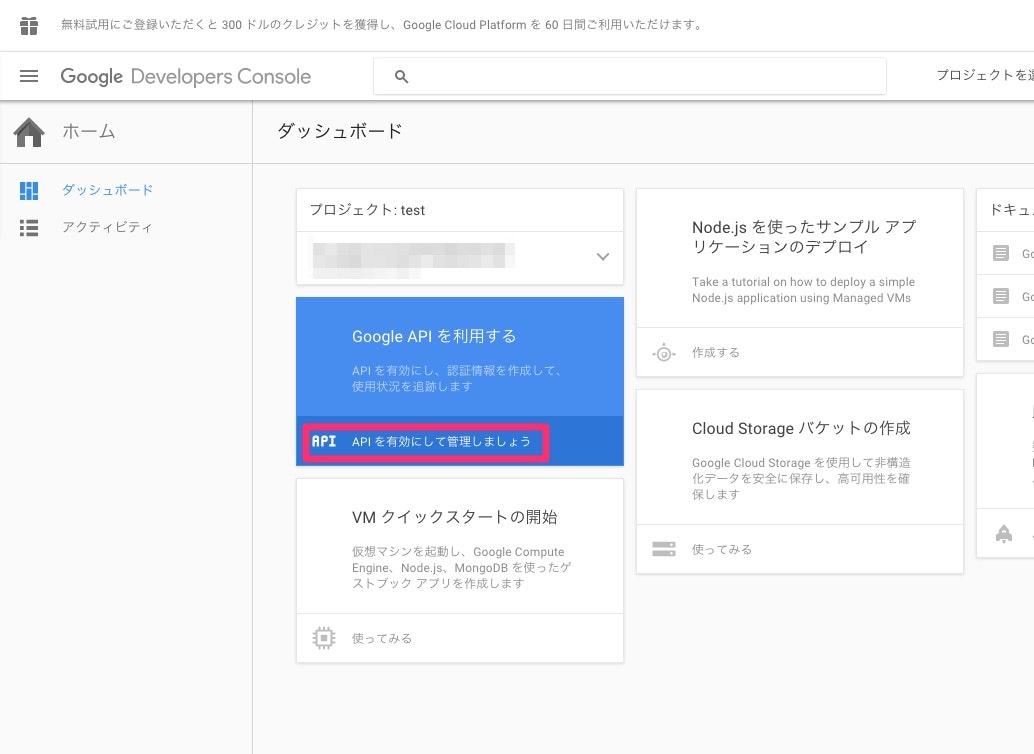
まずは「Google APIを利用するという項目を選択します。
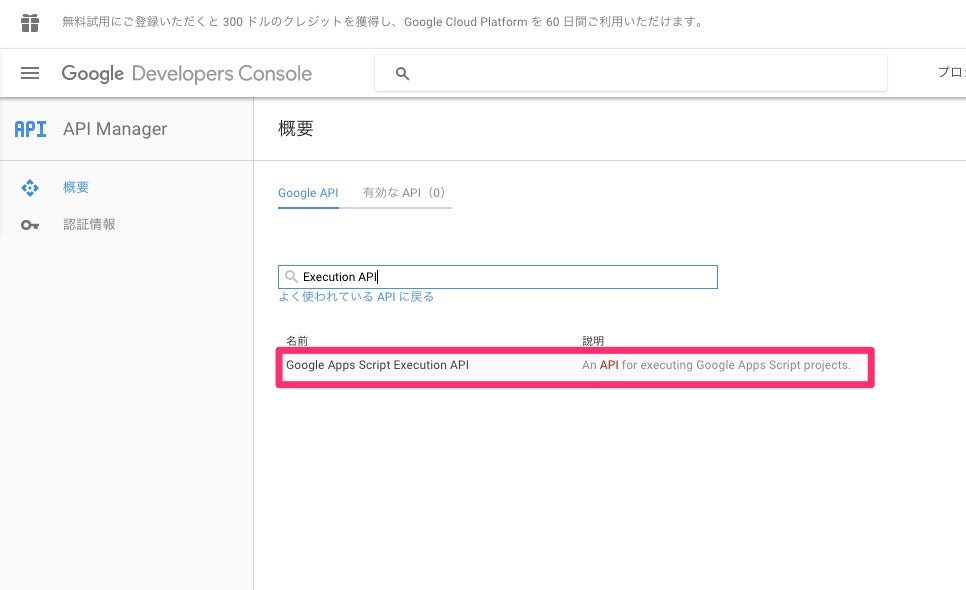
そうすると、Googleが提供する数多くのAPIの中から使いたいAPIを検索する画面に移るので、
検索窓に「Execution API」と入力して、
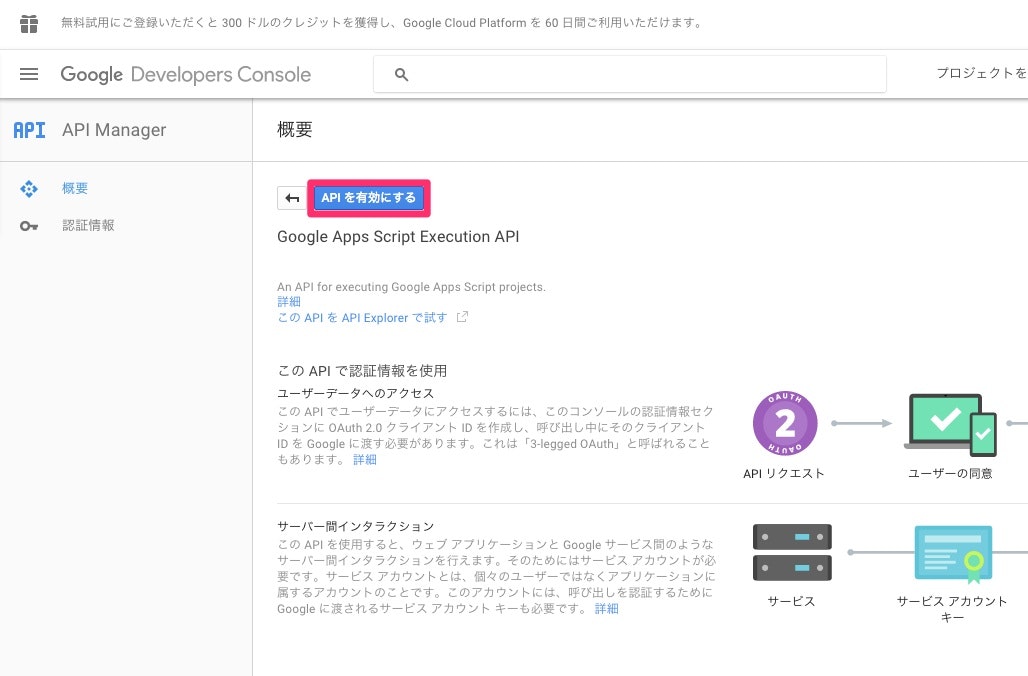
結果表示された**「Google Apps Script Execution API」**をクリックして「APIを有効にする」で有効状態にします。
認証の為のクライアントIDを発行
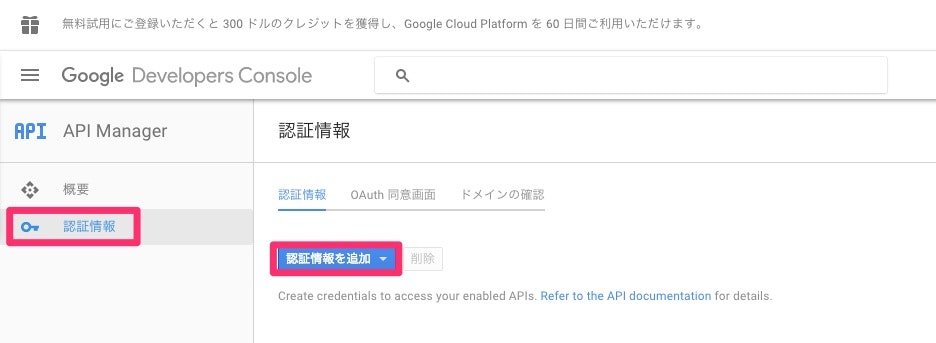
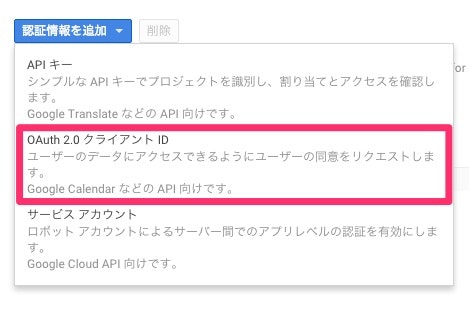
左サイドの「認証情報」から「認証情報を追加」を選択
開かれたウィンドウの真ん中にある「OAuth 2.0 クライアントID」を選択
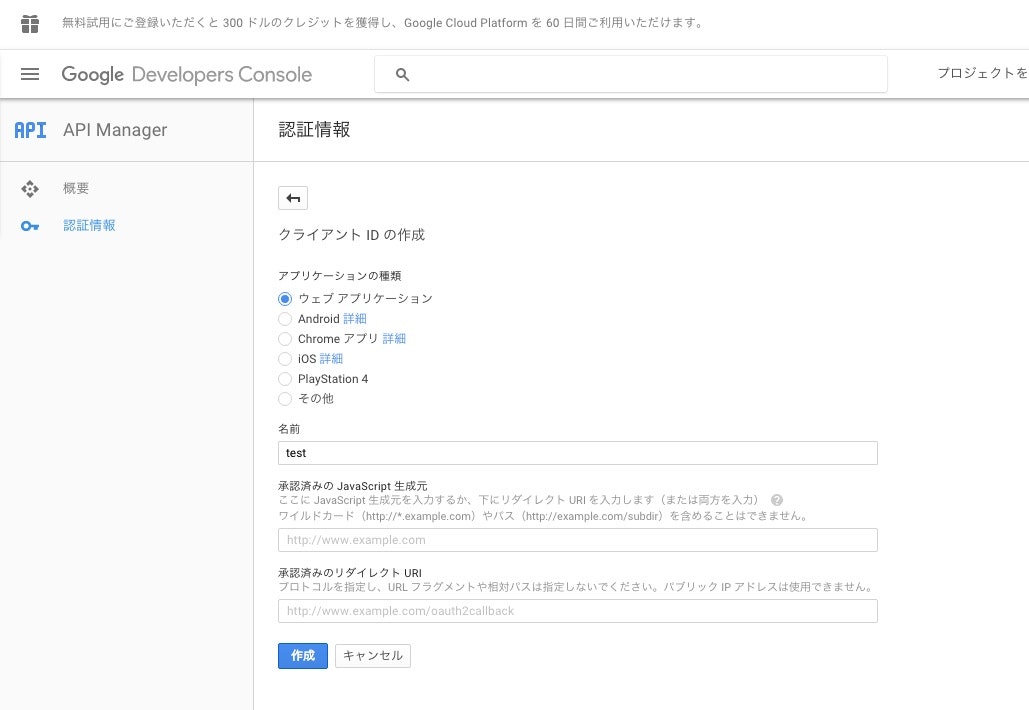
順番に認証情報を設定していきます。
1.「アプリケーションの種類」
→ ウェブアプリケーション
2.「名前」
→ 任意の名前
3.「承認済みJavascript 生成元」
→ 通常は認可するURIを設定
→ 例) http://kingpanda.com (ローカル開発環境など)
→ ご自身の実行環境を設定してください
4.「承認済みのリダイレクト URI」
→ 承認後のリダイレクト先
→ 上に同じ
→ 空でもOK
設定が終われば、「作成」ボタンをクリックします。
すると、**「クライアントID」と「クライアントシークレット」**の2つの認証情報が発行されます。
認証情報が書かれたJSONファイルをダウンロード
Node.jsで認証情報を読み込む際に必要なので、「JSONをダウンロード」ボタンからダウンロードします。
ダウンロードしたJSONファイルを作業ディレクトリに移動させ、名前を**「client_secret.json」**に変更します。
このダウンロードしたJSONファイルの中に書かれた「クライアント ID」や「クライアント シークレット」はとても重要なもので、これがあるという事はExecution APIから起動されるGAS関数の実行権限を持っているという事になるので、もし実案件で使う場合は流出しないように気をつけて保管してください。
これで準備は終わりです。あとはNode.jsのコードを用意して実行するだけです。
APIを叩く上で必要なライブラリをインストール
npmを使用して次のコマンドを実行し、以下のライブラリをインストールします。
npm install googleapis --save
npm install google-auth-library --save
それぞれの詳細はリンク先で。
サンプルコードを設定
今回のこのサンプルではクライアントにNode.jsを使用していますが、クライアントはNode.jsだけではなく、以下のクライアントが使用可能で、公式の方でサンプルコードも用意されています。
- .NET
- Android
- Go
- iOS
- Java
- JavaScript
- PHP
- Python
- Ruby
ここではNode.jsを使うので、その公式からサンプルコードを持ってきました。
注) サンプルコードを持ってきて、認証の部分は殆どそのままですが、公式のサンプルとはGASの関数が違うので、少しコードを修正しています。
var fs = require('fs');
var readline = require('readline');
var google = require('googleapis');
var googleAuth = require('google-auth-library');

var SCOPES = ['https://www.googleapis.com/auth/spreadsheets'];
var TOKEN_DIR = (process.env.HOME || process.env.HOMEPATH ||
    process.env.USERPROFILE) + '/.credentials/';
var TOKEN_PATH = TOKEN_DIR + 'script-nodejs-quickstart.json';

// Load client secrets from a local file.
fs.readFile('client_secret.json', function processClientSecrets(err, content) {
  if (err) {
    console.log('Error loading client secret file: ' + err);
    return;
  }
  // Authorize a client with the loaded credentials, then call the
  // Google Apps Script Execution API.
  authorize(JSON.parse(content), callAppsScript);
});

/**
 * Create an OAuth2 client with the given credentials, and then execute the
 * given callback function.
 *
 * @param {Object} credentials The authorization client credentials.
 * @param {function} callback The callback to call with the authorized client.
 */
function authorize(credentials, callback) {
  var clientSecret = credentials.web.client_secret;
  var clientId = credentials.web.client_id;
  var redirectUrl = credentials.web.redirect_uris[0];
  var auth = new googleAuth();
  var oauth2Client = new auth.OAuth2(clientId, clientSecret, redirectUrl);

  // Check if we have previously stored a token.
  fs.readFile(TOKEN_PATH, function(err, token) {
    if (err) {
      getNewToken(oauth2Client, callback);
    } else {
      oauth2Client.credentials = JSON.parse(token);
      callback(oauth2Client);
    }
  });
}

/**
 * Get and store new token after prompting for user authorization, and then
 * execute the given callback with the authorized OAuth2 client.
 *
 * @param {google.auth.OAuth2} oauth2Client The OAuth2 client to get token for.
 * @param {getEventsCallback} callback The callback to call with the authorized
 *     client.
 */
function getNewToken(oauth2Client, callback) {
  var authUrl = oauth2Client.generateAuthUrl({
    access_type: 'offline',
    scope: SCOPES
  });
  console.log('Authorize this app by visiting this url: ', authUrl);
  var rl = readline.createInterface({
    input: process.stdin,
    output: process.stdout
  });
  rl.question('Enter the code from that page here: ', function(code) {
    rl.close();
    oauth2Client.getToken(code, function(err, token) {
      if (err) {
        console.log('Error while trying to retrieve access token', err);
        return;
      }
      oauth2Client.credentials = token;
      storeToken(token);
      callback(oauth2Client);
    });
  });
}

/**
 * Store token to disk be used in later program executions.
 *
 * @param {Object} token The token to store to disk.
 */
function storeToken(token) {
  try {
    fs.mkdirSync(TOKEN_DIR);
  } catch (err) {
    if (err.code != 'EEXIST') {
      throw err;
    }
  }
  fs.writeFile(TOKEN_PATH, JSON.stringify(token));
  console.log('Token stored to ' + TOKEN_PATH);
}

/**
 * Call an Apps Script function to list the folders in the user's root
 * Drive folder.
 *
 * @param {google.auth.OAuth2} auth An authorized OAuth2 client.
 */
function callAppsScript(auth) {
  var scriptId = '***scriptId***';
  var script = google.script('v1');

  // Make the API request. The request object is included here as 'resource'.
  script.scripts.run({
    auth: auth,
    resource: {
      function: 'doOutput'
    },
    scriptId: scriptId
  }, function(err, resp) {
    if (err) {
      // The API encountered a problem before the script started executing.
      console.log('The API returned an error: ' + err);
      return;
    }
    if (resp.error) {
      // The API executed, but the script returned an error.

      // Extract the first (and only) set of error details. The values of this
      // object are the script's 'errorMessage' and 'errorType', and an array
      // of stack trace elements.
      var error = resp.error.details[0];
      console.log('Script error message: ' + error.errorMessage);
      console.log('Script error stacktrace:');

      if (error.scriptStackTraceElements) {
        // There may not be a stacktrace if the script didn't start executing.
        for (var i = 0; i < error.scriptStackTraceElements.length; i++) {
          var trace = error.scriptStackTraceElements[i];
          console.log('\t%s: %s', trace.function, trace.lineNumber);
        }
      }
    } else {
      // The structure of the result will depend upon what the Apps Script
      // function returns. Here, the function returns an Apps Script Object
      // with String keys and values, and so the result is treated as a
      // Node.js object (folderSet).
      var folderSet = resp.response.result;
      console.log(resp.response.result);
    }

  });
}
チェックするポイント
var SCOPESの変数の宣言部分は予め控えておいた**「OAuthスコープ」**に置き換えてください。
var scriptIdの変数の宣言部分は予め控えておいた**「API ID」**に置き換えてください。
中段あたりで、実行する関数 doOutput を指定しています。
resource: {
      function: 'doOutput',
      //body:'hogehoge'
},
パラメータとしてbodyを付ければ送信できる(たぶん)
サンプルを実行します
node quickstart.js
このサンプルを初めて使用する場合、アクセスを許可するように求められます。(よくあるやつ)
以下の手順が必要です。
-
まずURLが返ってくるので、そのURLをブラウザで開きます。
-
Googleアカウントにログインしていない場合は、ログインダイアログが表示されるのでログインします。
-
複数のGoogleアカウントにログインしている場合は、承認のために使用する1つのアカウントを選択するように求められます。
-
承諾ボタンをクリックします。
-
URLに表示されているコードをコピペします。
-
コマンドライン上で
Enter the code from that page here:と入力を求められていると思うので、先ほどのコピペしたコードを貼り付けて、Enterキーを押して入力します。
上記の操作は初回だけなので、以降は下図のように普通にコマンドを打てば、表のJSONが返ってきます。
[
    {
        "名前": "鷲尾伶菜",
        "年齢": 21,
        "備考": "ボーカル&パフォーマー"
    },
    {
        "名前": "藤井萩花",
        "年齢": 20,
        "備考": "パフォーマー"
    },
    {
        "名前": "中島美央",
        "年齢": 21,
        "備考": "パフォーマー"
    },
    {
        "名前": "重留真波",
        "年齢": 20,
        "備考": "リーダー&パフォーマー"
    },
    {
        "名前": "坂東希",
        "年齢": 18,
        "備考": "パフォーマー"
    },
    {
        "名前": "佐藤晴美",
        "年齢": 20,
        "備考": "パフォーマー"
    }
]
長々と書き連ねましたが以上です。
おつかれしたー
まとめ
サンプルをやって頂くと分かると思いますが、GAS+Execution APIは便利です。
GASを使ってスプレッドシートをDB化したり、その他のアプリと連携するだけで業務用ツールが簡単に作れるし、どこからでもそのGASというサーバーサイドのスクリプトにアクセスできるという利点は大きい。
これからグングン増えるであろうIoT機器との連携を考えるとかなりの可能性を秘めていると思いますし、今後その活用が広がっていけばいいんじゃないかと。
