概要
本記事では、SoftLayer上でPXEブートができるか確認してみたいと思います。
PXEブートとは
OSイメージを持たずに、ネットワーク経由でOSを起動することです。
今回の例で言えば、OSなしのベアメタルを他サーバーにあるOSイメージを使って起動します。
利点としては、以下のようなことが考えられます。
- カスタマイズOSの展開(OS管理)
- 起動時にOSを選択可能(OS利用)
PXEブートの仕組み
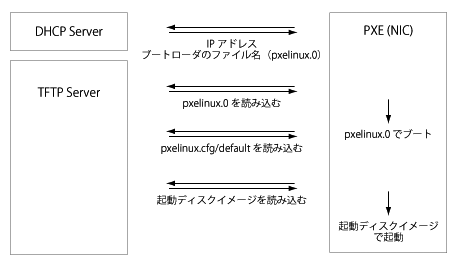
まず最初のブロードキャスト通信によってDHCPサーバーからIPアドレスを取得し、相手先とのIP通信を確認します。
このブロードキャスト通信ができる範囲がクラウド上では重要になります。(Subnet?、VLAN?、DC内?)
あとはTFTPプロトコルを使用したファイルのやり取りが発生します。
今回はDHCP/TFTPサーバー(仮想)、PXEクライアント(物理)の2台のサーバーを使用して行います。
必要なもの
材料はSoftLayer上ですべて無料で手に入ります!
(PXEブート対応のNICを備えた物理サーバーが必要になります。)
今回は、同Subnet内に2台のサーバーを配置しました。
- 仮想サーバー(SoftLayerフリートライアルで入手)
- 物理サーバー(SoftLayer$500ドルキャンペーンで入手)
それでは、PXEサーバー(仮想サーバー)の設定を行いましょう。
TFTPサーバー設定
まずはインストール
yum -y install tftp-server
起動するように設定し、確認
chkconfig tftp on
chkconfig --list | grep tftp
xinetd を再起動し TFTP サーバを有効化(xinetdサービスに含まれています)
/etc/init.d/xinetd restart
設定内容は以下の通りです。
server_argsの「/tftpboot」がTFTP通信を行う際のルートディレクトリになります。
cat /etc/xinetd.d/tftp
# default: off
# description: The tftp server serves files using the trivial file transfer \
#	protocol.  The tftp protocol is often used to boot diskless \
#	workstations, download configuration files to network-aware printers, \
#	and to start the installation process for some operating systems.
service tftp
{
	disable	= no
	socket_type		= dgram
	protocol		= udp
	wait			= yes
	user			= root
	server			= /usr/sbin/in.tftpd
	server_args		= -v -s /tftpboot
	per_source		= 11
	cps			= 100 2
	flags			= IPv4
}
Linuxブートローダの配置
syslinux をインストール(pxelinux.0 が含まれています)
Linux のブートローダである pxelinux.0 を /tftpboot/pxeboot/ に配置します。
yum install syslinux
mkdir -p /tftpboot/pxeboot
cp /usr/share/syslinux/pxelinux.0 /tftpboot/pxeboot/
DHCPサーバー設定
まずはインストール
yum install dhcp
サンプルの設定ファイルをコピー
cp /usr/share/doc/dhcp-4.1.1/dhcpd.conf.sample /etc/dhcp/dhcpd.conf
設定内容(現在の環境に応じて適宜設定してください)
authoritative;
subnet 10.xx.xx.xx netmask 255.255.255.192 {
  range 10.xx.xx.xx 10.xx.xx.xx;
  option domain-name-servers ns1.softlayer.com;
  option domain-name "cloud.com";
  option routers 10.xx.xx.xx;
  option broadcast-address 10.xx.xx.xx;
  default-lease-time 600;
  max-lease-time 7200;
  filename "/pxeboot/pxelinux.0";
}
dhcp起動確認(起動できない場合は/var/log/messagesを確認!)
/etc/init.d/dhcpd start
chkconfig dhcpd on
OS起動イメージを用意
起動イメージをダウンロードします
mkdir -p /tftpboot/pxeboot/{i386,x86_64}
cd /tftpboot/pxeboot/i386
wget http://ftp.riken.jp/Linux/fedora/releases/23/Server/i386/os/images/pxeboot/initrd.img
wget http://ftp.riken.jp/Linux/fedora/releases/23/Server/i386/os/images/pxeboot/vmlinuz
cd /tftpboot/pxeboot/x86_64
wget http://ftp.riken.jp/Linux/fedora/releases/23/Server/x86_64/os/images/pxeboot/initrd.img
wget http://ftp.riken.jp/Linux/fedora/releases/23/Server/x86_64/os/images/pxeboot/vmlinuz
以上で、PXEサーバー(仮想サーバー)の設定は完了です。
PXE ブート時の起動イメージの指定
物理サーバーを再起動してみましょう。
KVM Console経由で起動時の様子をみられます。
無事DHCP/TFTPの手順が終わると「boot:」プロンプトが表示されます。
以下を指定すると、起動が始まります!
boot: i386/vmlinuz initrd=i386/initrd.img
boot: x86_64/vmlinuz initrd=x86_64/initrd.img
まとめ
今回は同SubnetにPXEサーバーとクライアントを配置した構成ですが、VLAN、DCとネットワークを拡大したときに、どこまでブロードキャスト通信可能か、という点も次の記事で確かめてみたいと思います。
参考文献
PXEの設定は、こちらを参考にさせていただきました
http://www.maruko2.com/mw/PXE%E3%83%96%E3%83%BC%E3%83%88%E7%94%A8%E3%82%B5%E3%83%BC%E3%83%90%E3%82%92%E6%A7%8B%E7%AF%89%E3%81%99%E3%82%8B