Dropbox APIv2 がローンチされたので Swift 用ライブラリの SwiftyDropbox を触ってみました。
簡単なデモアプリを作りながら各機能について説明していきます。
今回実装する機能
以下の機能を実装します。
- ログイン
- アップロード
- ダウンロード
- ファイル一覧の取得
- 削除
準備
Dropboxにアプリ登録
以前までのバージョンのAPIと同様の手順なので使ったことある方は飛ばしても大丈夫です。
- https://www.dropbox.com/developers/apps を開く
- ページ右上の"Create app"ボタンをクリック
- 左側の"Dropbox API"を選択
- "App folder"を選択
- 適当にユニークなアプリの名前を付ける
- 利用規約に同意できるなら同意して
- 右下"Create app"ボタンをクリック
これでアプリ登録が完了しました。
後で完了後に遷移されるページの"App key"を使いますのでどこかにコピーしておくと便利です。
Xcodeプロジェクト作成
適当に"Single View Application"のプロジェクトを作成してください。
ライブラリのインストール
https://www.dropbox.com/developers/documentation/swift#install
公式の通りですが Podfile はこんな感じです。
Cocoapods が初めての方は上記ページに従ってください。
platform :ios, '8.0'
use_frameworks!
pod 'SwiftyDropbox', '~> 1.0.1'
pod install
URL scheme の設定
- "プロジェクト名.xcworkspace"ファイルをXcodeで開く
- "Info.plist"を選択
- "Information Property List"以下に"LSApplicationQueriesSchemes"を"Array"として追加する
- 作成した"LSApplicationQueriesSchemes"の"+"ボタンをクリックする
- 作成した"Item 0"の"Value"に"dbapi-2"と入力する
- "Information Property List"以下に"URL types"を追加する
- 作成した"URL types"以下の"Item 0"以下に"URL Schemes"を追加する
- "URL Schemes"以下の"Item 0"の"Value"に"db-AppKey"を入力する
最後の db-AppKey は Dropboxに登録したアプリページに記載がありますのでコピーしてきてください。("db-hogehogehoge"みたいになります。)
最終的にはこんな感じになってるかと思います。
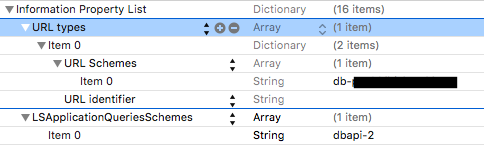
dbapi-2 の方は Dropboxアプリとの連携の際に必要で、db-AppKey の方は Dropboxアプリがインストールされてなかったときに必要です。
Dropboxにログインする
"App key"を設定する。
import UIKit
import SwiftyDropbox // 追記

@UIApplicationMain
class AppDelegate: UIResponder, UIApplicationDelegate {

  var window: UIWindow?
  func application(application: UIApplication, didFinishLaunchingWithOptions launchOptions: [NSObject: AnyObject]?) -> Bool {
    Dropbox.setupWithAppKey("APP_KEY") // 追記
    return true
  }
"APP_KEY"の部分はDropbox ( https://www.dropbox.com/developers/apps ) の登録したアプリページに記載がありますのでコピーしてきてください。
URL scheme とは違って"db-"部分は不要です。
ログイン後の処理を追加
func application(app: UIApplication, openURL url: NSURL, options: [String : AnyObject]) -> Bool {

  if let authResult = Dropbox.handleRedirectURL(url) {
    switch authResult {
    case .Success(let token):
      print("Success! User is logged into Dropbox with token: \(token)")
    case .Error(let error, let description):
      print("Error \(error): \(description)")
    }
  }
  return false
}
ログインボタンを追加
ボタンを追加します。
override func viewDidLoad() {
  super.viewDidLoad()

  // ログインボタンを追加
  let signInButton = UIButton(type: UIButtonType.System)
  signInButton.frame = CGRectMake(10, 30, 100, 30)
  signInButton.setTitle("Sign In", forState: .Normal)
  signInButton.addTarget(self, action: "signInDropbox", forControlEvents: .TouchUpInside)
  self.view.addSubview(signInButton)
}
ログインボタンの処理を追加します。
func signInDropbox() {
  if let _ = Dropbox.authorizedClient {
    Dropbox.unlinkClient() // 既にログイン済みだとクラッシュするのでログアウトする
  }
  Dropbox.authorizeFromController(self)
}
実行してログインしてみる
"Sign In"ボタンが表示されてるかと思うのでクリックすると、以下のようにログイン画面が表示されます。(もしくは Dropbox アプリの類似画面)
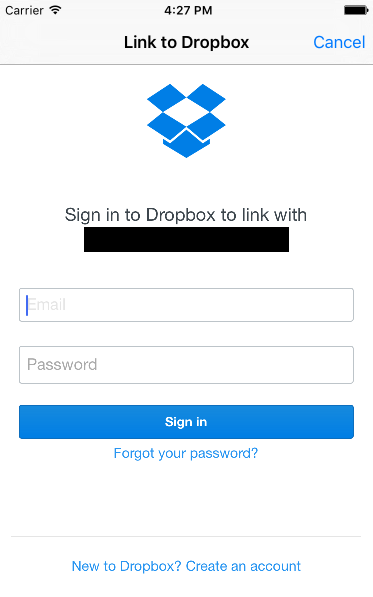
アプリを作成したのと同じ Dropbox アカウントの Email と Password を入力して、コンソールに以下のように表示されていればログイン成功です。
Success! User is logged into Dropbox with token: XXXXXXXXXXXXXXXXXXXXXX
ファイルをアップロードする
アップロードするファイルはなんでもいいのですが、せっかくなので UITextFiled に入力した文字列をテキストファイルにしてアップロードします。
テキスト入力欄と保存ボタンを追加
テキスト入力欄とボタンを追加します。
class ViewController: UIViewController {

  let textField = UITextField() // 追記

  override func viewDidLoad() {
    super.viewDidLoad()

    /* 省略 */

    // テキスト入力欄を追加
    textField.frame = CGRectMake(10, 70, 300, 30)
    textField.borderStyle = UITextBorderStyle.RoundedRect
    self.view.addSubview(textField)

    // テキスト保存ボタンを追加
    let saveButton = UIButton(type: UIButtonType.System)
    saveButton.frame = CGRectMake(10, 110, 100, 30)
    saveButton.setTitle("Save", forState: .Normal)
    saveButton.addTarget(self, action: "saveText", forControlEvents: .TouchUpInside)
    self.view.addSubview(saveButton)

  }
  /* 省略 */
テキスト保存ボタンの処理を追加します。
func saveText() {
  let tmpURL = NSURL(fileURLWithPath: NSTemporaryDirectory())
  let fileURL = tmpURL.URLByAppendingPathComponent("sample.txt")
  do {
    try textField.text?.writeToURL(fileURL, atomically: true, encoding: NSUTF8StringEncoding)
    print("Save text file")
  } catch {
    // 失敗
  }
}
アップロードボタンを追加
ボタンを追加します。
override func viewDidLoad() {
  super.viewDidLoad()

  /* 省略 */

  // アップロードボタンを追加
  let uploadButton = UIButton(type: UIButtonType.System)
  uploadButton.frame = CGRectMake(10, 150, 100, 30)
  uploadButton.setTitle("Upload", forState: .Normal)
  uploadButton.addTarget(self, action: "uploadToDropbox", forControlEvents: .TouchUpInside)
  self.view.addSubview(uploadButton)
}
アップロードボタンの処理を追加します。ようやく SwiftyDropbox の関数が出てきます。
func uploadToDropbox() {
  let tmpURL = NSURL(fileURLWithPath: NSTemporaryDirectory())
  let fileURL = tmpURL.URLByAppendingPathComponent("sample.txt")

  if let client = Dropbox.authorizedClient {
    client.files.upload(path: "/sample.txt", mode: Files.WriteMode.Overwrite, autorename: true, clientModified: NSDate(), mute: false, body: fileURL).response { response, error in
      if let metadata = response {
        print("Uploaded file name: \(metadata.name)")
      } else {
        print(error!)
      }
    }
  }
}
引数が多くてごちゃっとしてますが、処理はとてもシンプルです。引数の "mode" で上書きか常に新しいファイルとして追加するかを変更出来ます。
今回は"Files.WriteMode.Overwrite"で上書きとしてアップロードをしていますが、"Files.WriteMode.Add"で、既に同じ名前のファイルが Dropbox にある場合、"sample (1).txt"のようなファイル名でアップロードされます。
実行してアップロードしてみる
"Sign In"ボタンの下にテキスト入力欄と"Save"ボタン、"Upload"ボタンが表示されているかと思います。
- "Sign In"ボタンでログイン
- テキスト入力欄に何かしら入力
- "Save"ボタンをタップ
- "Upload"ボタンをタップ
以上の操作で Dropbox に sample.txt がアップロードされ、コンソールに以下のようなメッセージが表示されていれば成功です。
Uploaded file name: sample.txt
実際に Dropbox ( https://www.dropbox.com/home/Apps ) の今回のアプリフォルダの中を見てみると sample.txt がアップロードされているのが確認できます。
ファイルをダウンロードする
アップロードした sample.txt を今度はダウンロードします。
ダウンロードボタンを追加
ボタンを追加します。
override func viewDidLoad() {
  super.viewDidLoad()

  /* 省略 */

  // ダウンロードボタンを追加
  let downloadButton = UIButton(type: UIButtonType.System)
  downloadButton.frame = CGRectMake(10, 190, 100, 30)
  downloadButton.setTitle("Download", forState: .Normal)
  downloadButton.addTarget(self, action: "downloadDropboxFile", forControlEvents: .TouchUpInside)
  self.view.addSubview(downloadButton)
}
ダウンロードボタンの処理を追加します。
func downloadDropboxFile() {

  if let client = Dropbox.authorizedClient {

    // ダウンロード先URLを設定
    let destination : (NSURL, NSHTTPURLResponse) -> NSURL = { temporaryURL, response in
      let directoryURL = NSFileManager().URLsForDirectory(.DocumentDirectory, inDomains: .UserDomainMask)[0]
      let pathComponent = "\(NSUUID().UUIDString)-\(response.suggestedFilename!)"
      return directoryURL.URLByAppendingPathComponent(pathComponent)
    }

    client.files.download(path: "/sample.txt", destination: destination).response { response, error in
      if let (metadata, url) = response {
        print("Downloaded file name: \(metadata.name)")
      } else {
        print(error!)
      }
    }
  }
}
アップロード処理よりは長めですが、ダウンロード処理も同様にシンプルに記述できます。
ファイル内容を表示するラベルを追加
ここまでで実行してもダウンロード自体は可能ですが、せっかくなのでダウンロード後にファイル内容を表示する処理を追加します。
ラベルを追加します。
class ViewController: UIViewController {

  let textField = UITextField()
  let messageLabel = UILabel() // 追記

  override func viewDidLoad() {
    super.viewDidLoad()

    /* 省略 */

    // ファイル内容表示ラベルを追加
    messageLabel.frame = CGRectMake(10, 230, 300, 30)
    self.view.addSubview(messageLabel)
  }

/* 省略 */
ファイル内容表示処理を追加します。
func downloadDropboxFile() {

  if let client = Dropbox.authorizedClient {

    /* 省略 */

    client.files.download(path: "/sample.txt", destination: destination).response { response, error in
      if let (metadata, url) = response {
        print("Downloaded file name: \(metadata.name)")

        // ファイル内容を表示
        if let data = NSData(contentsOfURL: url) {
          self.messageLabel.text = String(data: data, encoding: NSUTF8StringEncoding)
        }
      } else {
        print(error!)
      }
    }
  }
}
実行してダウンロードしてみる
- "Sign In"ボタンでログイン
- "Download"ボタンをタップ
以上の操作でダウンロードが始まり、"Download"ボタンの真下に先ほどアップロードしたテキストが表示されていれば成功です。
ファイル一覧を取得する
任意のフォルダ内のファイル名を取得します。
ファイル一覧取得ボタンを追加
ボタンを追加します。
override func viewDidLoad() {
  super.viewDidLoad()

  /* 省略 */

  // ファイル一覧取得ボタンを追加
  let getEntriesButton = UIButton(type: UIButtonType.System)
  getEntriesButton.frame = CGRectMake(120, 150, 100, 30)
  getEntriesButton.setTitle("Get Filenames", forState: .Normal)
  getEntriesButton.addTarget(self, action: "getDropboxEntries", forControlEvents: .TouchUpInside)
  self.view.addSubview(getEntriesButton)
}
ファイル一覧取得ボタンの処理を追加します。
func getDropboxEntries() {
  if let client = Dropbox.authorizedClient {
    client.files.listFolder(path: "").response { response, error in
      if let metadata = response {
        print("Entries: \(metadata.entries)")
      } else {
        print(error!)
      }
    }
  }
}
実行してファイル一覧を取得してみる
- "Sign In"ボタンでログイン
- "Get Filenames"ボタンをタップ
以上の操作で Dropbox ( https://www.dropbox.com/home/Apps ) の今回のアプリフォルダ内のファイル名がコンソールに表示されます。
削除する
削除ボタンを追加
ボタンを追加します。
override func viewDidLoad() {
  super.viewDidLoad()

  /* 省略 */

 // 削除ボタンを追加
  let deleteButton = UIButton(type: UIButtonType.System)
  deleteButton.frame = CGRectMake(120, 190, 100, 30)
  deleteButton.setTitle("Delete", forState: .Normal)
  deleteButton.addTarget(self, action: "deleteDropboxFile", forControlEvents: .TouchUpInside)
  self.view.addSubview(deleteButton)
}
削除ボタンの処理を追加します。
func deleteDropboxFile() {
  if let client = Dropbox.authorizedClient {
    client.files.delete(path: "/sample.txt").response { response, error in
      if let metadata = response {
        print("Deleted file name: \(metadata.name)")
      } else {
        print(error!)
      }
    }
  }
}
アップロード、ダウンロードとほぼ同様です。
実行して削除してみる
- "Sign In"ボタンでログイン
- "Delete"ボタンをタップ
以上の操作で Dropbox 上の"sample.txt"が削除されます。試しにこの状態で"Download"ボタンをタップしてみるとダウンロードに失敗します。
実際に Dropbox ( https://www.dropbox.com/home/Apps ) の今回のアプリフォルダの中を見てみると sample.txt が削除されていることが確認できます。
まとめ
はじめて SwiftyDropbox 触りましたが、Documentation ( http://dropbox.github.io/SwiftyDropbox/api-docs/latest/ ) 読みながら特にはまらずに実装できました。アプリデータのバックアップやデータの受け渡しに利用するには簡単に実装出来ていいんじゃないかと思います。
簡単ですがどなたかの参考になれば幸いです。