最近噂を聞きつけたnotMNISTデータセットをPythonで扱うための処理を書きましたので公開します ![]()
MNISTは機械学習を学んでいる方であればご存知の方も多い、手書き数字のテストデータセットなのですが、このnotMNISTは手書き数字ではなく、様々なフォントで表されたアルファベットの画像データセットです。
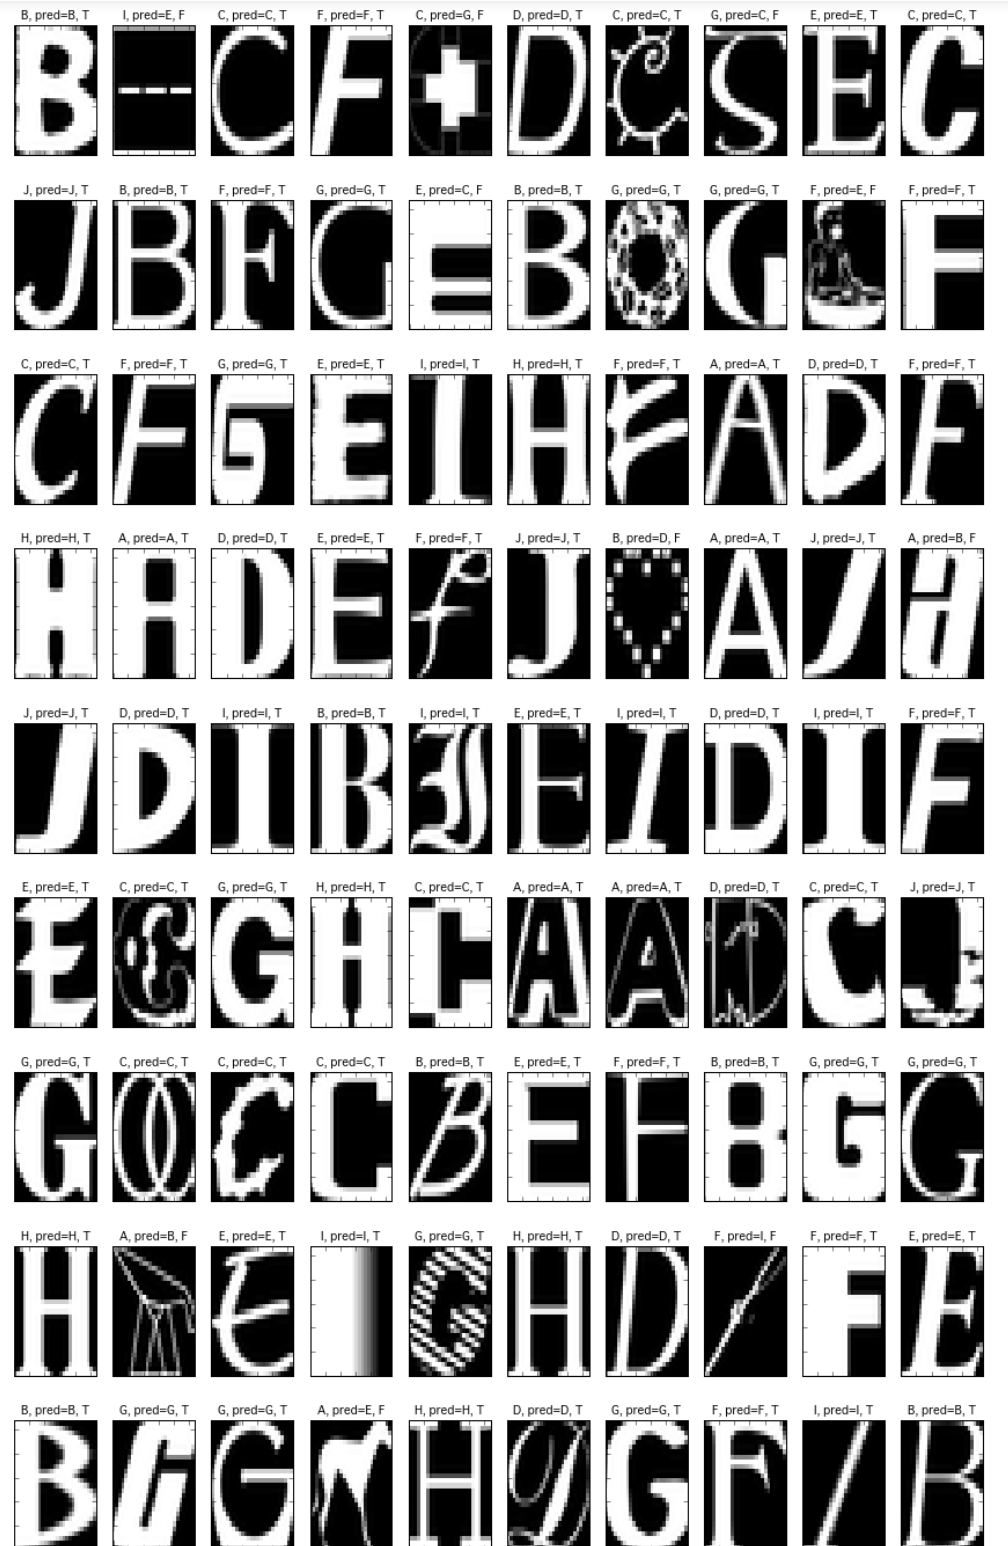
中身を可視化してみると下記のようなデータセットになります。画像の頭にある文字がその画像が表しているアルファベットでそれに対応した画像を表示しています。
1行目の右から2番目をみてください。どう見ても"I"には見えません、家ですよねコレ ![]()
そんな感じで1行に1つくらい人が見ても怪しいデータが入っているのですが、なかなか面白そうな題材ではないかと思います。
notMNISTのオフィシャルなページは
http://yaroslavvb.blogspot.jp/2011/09/notmnist-dataset.html
で、Yaroslav Bulatovさんという方が作られています。
1. データのダウンロード
まずは
http://yaroslavvb.com/upload/notMNIST/
にアクセスして、そこにある
notMNIST_large.tar.gz
からデータをダウンロードしてください。
tar.gzで圧縮されているので、適宜解凍ツール等で解凍をすると
notMNIST_large
というフォルダができてそのサブフォルダにA, B, C …のアルファベット毎のフォルダが作られています。
これをPythonで読み込む処理を書いていきます。私はJupyter Notebookを使っているのですが、その場合このnotMNIST_largeフォルダと同じディレクトリに.ipynbファイルができるようにします。.pyの場合も同様に同じディレクトリに.pyファイルができるようにしてください。
2.Pythonコード
コードの一式は Githubにもアップロードしてますが、ここにも書いていきます。
各種ライブラリをインストールして、
from __future__ import division
import sys, os, pickle

import numpy as np
import numpy.random as rd

from scipy.misc import imread

import matplotlib.pyplot as plt
%matplotlib inline
pickle用の関数や、画像を表示するための関数等を定義します。
image_size = 28
depth = 255

def unpickle(filename):
    with open(filename, 'rb') as fo:
        _dict = pickle.load(fo)
    return _dict

def to_pickle(filename, obj):
    with open(filename, 'wb') as f:
        #pickle.dump(obj, f, -1)
        pickle.Pickler(f, protocol=2).dump(obj)

def count_empty_file(folder):
    cnt = 0
    for file in os.listdir(folder):
        if os.stat(os.path.join(folder, file)).st_size == 0:
            cnt += 1
    return cnt
ラベルをint型で保存したいので、変換用の辞書を用意します。
label_conv = {a: i for a, i in zip('ABCDEFGHIJ', range(10))}
num2alpha = {i: a for i,a in zip(range(10), 'ABCDEFGHIJ')}
フォルダ内の各イメージファイルを読み込み、numpyのndarrayとして保存していきます。同時にフォルダ名をラベルとしたラベルデータも用意します。読み込んだ後は辞書形式にして'data'にイメージデータを、'target'にラベルデータを格納して、そのオブジェクトをpickleでファイル保存します。たまに壊れたファイルがあってサイズが0で読み込めないので、そういったものや読み込みエラーとなるものの対策としてスキップ処理を入れておきます。
# 読み込み対象フォルダの存在チェック
assert os.path.exists('notMNIST_large')
# assert os.path.exists('notMNIST_small')  # smallも読み込むときはチェック用に復活させてください。

for root_dir in ['notMNIST_large']: # ['notMNIST_small', 'notMNIST_large']: # smallも使う場合は両方選択する
    folders = [os.path.join(root_dir, d) for d in sorted(os.listdir(root_dir))
               if os.path.isdir(os.path.join(root_dir, d))]
    # 枠を作る
    file_cnt = 0
    for folder in folders:

        label_name = os.path.basename(folder)
        file_list = os.listdir(folder)
        file_cnt += len(file_list)-count_empty_file(folder)

    dataset = np.ndarray(shape=(file_cnt, image_size*image_size), dtype=np.float32)
    labels  = np.ndarray(shape=(file_cnt), dtype=np.int)

    last_num = 0  # 前の文字の最終インデックス

    for folder in folders:

        file_list = os.listdir(folder)
        file_cnt = len(file_list)-count_empty_file(folder)

        label_name = os.path.basename(folder)
        labels[last_num:(last_num+file_cnt)] = label_conv[label_name]
        #label = np.array([label_name] * file_cnt)

        skip = 0
        for i, file in enumerate(file_list):

            # ファイルサイズが0のものはスキップ
            if os.stat(os.path.join(folder, file)).st_size == 0:
                skip += 1
                continue
            try:
                data = imread(os.path.join(folder, file))
                data   = data.astype(np.float32)
                data  /= depth     # 0-1のデータに変換
                dataset[last_num+i-skip, :] = data.flatten()
            except:
                skip += 1
                print 'error {}'.format(file)
                continue
        last_num += i-skip

    notmnist = {}
    notmnist['data'] = dataset
    notmnist['target'] = labels
    to_pickle('{}.pkl'.format(root_dir), notmnist)
3. 使用方法
使うときは、unpickleしてファイルを読み込み、オブジェクトとして取り出してください。
必要に応じて値の幅を0-1に変えたり、学習データと検証データに分割したりします。
from sklearn.cross_validation import train_test_split

notmnist = unpickle('notMNIST_large.pkl')   # 同じフォルダにnotMNIST_large.pkl が入っているとする。
notmnist_data = notmnist['data']
notmnist_target = notmnist['target']


notmnist_data   = notmnist_data.astype(np.float32)
notmnist_target   = notmnist_target.astype(np.int32)
notmnist_data  /= 255     # 0-1のデータに変換

# 学習用データを 75%、検証用データを残りの個数と設定

x_train, x_test, y_train, y_test = train_test_split(notmnist_data, notmnist_target)
読み込んだ画像がどんなものかを可視化してみてみたいときは、下記の関数で表示処理を行ってみます。
def draw_digit(digits):
    size = 28
    plt.figure(figsize=(len(digits)*1.5, 2))
    for i, data in enumerate(digits):
        plt.subplot(1, len(digits), i+1)
        X, Y = np.meshgrid(range(size),range(size))
        Z = data[0].reshape(size,size)   # convert from vector to 28x28 matrix
        Z = Z[::-1,:]             # flip vertical
        plt.xlim(0,27)
        plt.ylim(0,27)
        plt.pcolor(X, Y, Z)
        plt.gray()
        plt.title(num2alpha[data[1]])
        plt.tick_params(labelbottom="off")
        plt.tick_params(labelleft="off")

    plt.show()
10行10列で表示します。
[draw_digit2([[notmnist_data[idx], notmnist_target[idx]] for idx in rd.randint(len(dataset), size=10)]) for i in range(10)]
4. 試しに分類してみる
せっかく読み込んだのでRandomForestで分類を試してみます。
(弱学習機の数を多目の100にしたのでちょっと学習に時間がかかります。)
from sklearn.ensemble import RandomForestClassifier

clf = RandomForestClassifier(n_estimators=100)
clf = clf.fit(x_train, y_train)
とりあえず、再代入誤り率を見てみましょう。
# 再代入誤り率
pred = clf.predict(x_train)
result = [y==p for y, p in zip(y_train,pred)]
np.sum(result)/len(pred)
0.99722555413319358
# 汎化性能チェック
pred = clf.predict(x_test)
result = [y==p for y, p in zip(y_test,pred)]
np.sum(result)/len(pred)
汎化性能も91%と良好です。
0.91262407487205077
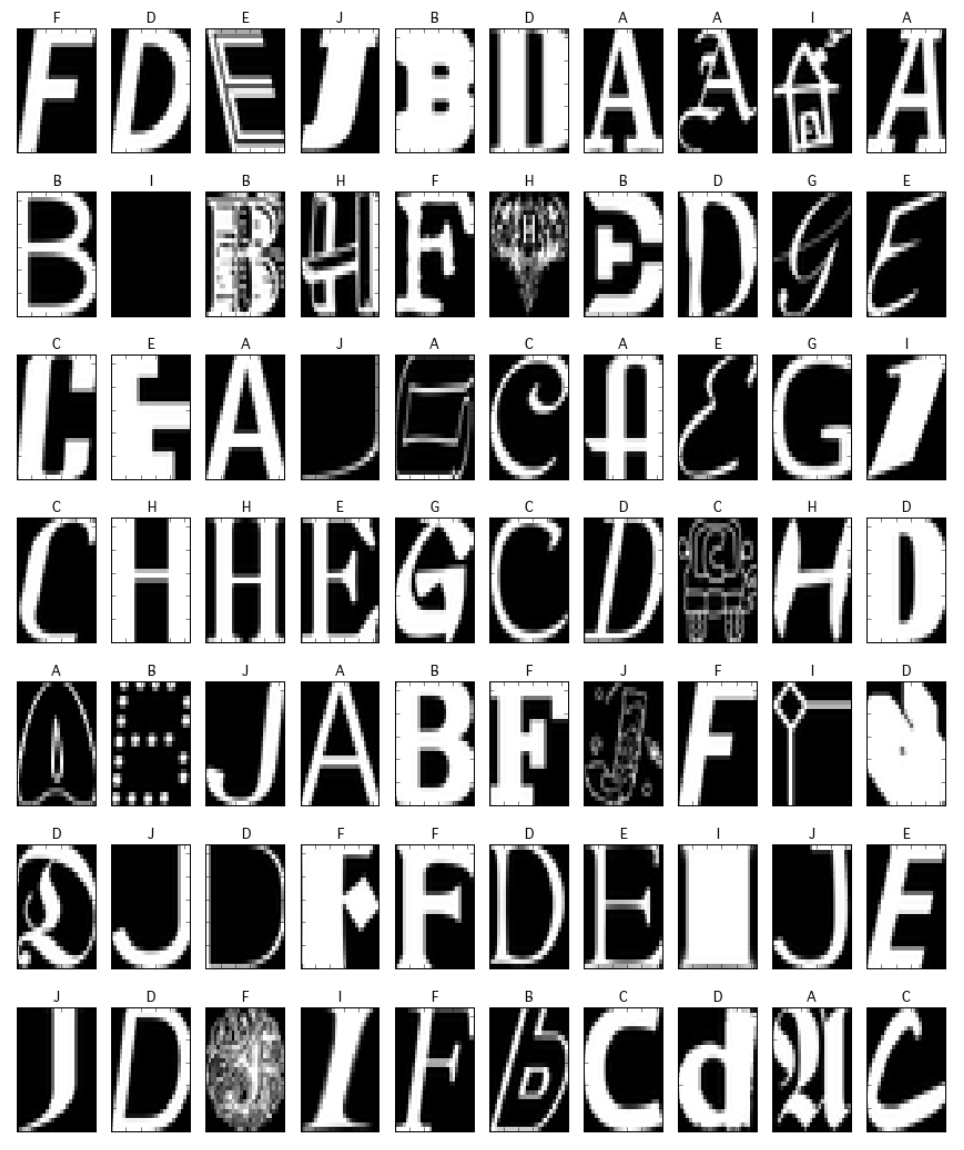
predictionの結果を可視化してみます。
# 結果を可視化
rd.seed(123)
[draw_digit([[x_test[idx], y_test[idx], pred[idx]] for idx in rd.randint(len(x_test), size=10)]) for i in range(10)]
だいたい人の目でも間違いそうなものは不正解、アルファベットと認識できるものはほぼ正解できていますね ![]()