2014年11月にElectronic Frontier Foundation、Mozilla、Cisco Systems、ミシガン大学などが共同で立ち上げた「Let's Encrypt」。最近では、GoogleがSSLを推奨しており、サイトをSSL対応しておかないと検索順位に影響すると言われています。そんな中、Let's Encryptは無料で使えるということもあり、導入しているサイトも増えてきています。個人でSSLを導入してhttp2.0対応するにはちょうど良いですね。
ここでは、「Let's Encrypt」をインストール&h2oに設定してhttp2.0に対応させる方法を説明します。
インストールに使用した環境
Amazon Linux AMI release 2016.09
h2o 2.1.0
h2oがインストールされており、80番ポート、443番ポートともに通信可能になっていることが前提となります。ファイアウォールで80、443が遮断されているとインストールできませんのでご注意下さい。
インストール手順
ソースコード取得
Let's Encryptのソースコードをgithubのリポジトリから取得してきます。
以下の例では、ホームディレクトリにcloneしていますが、場所はどこでもかまいません。
cd ~
git clone https://github.com/letsencrypt/letsencrypt
インストール
letsencrypt-autoというコマンドが用意されているのでこれを使用します。
必要なパッケージ類を一通りインストールしてくれます。
rootユーザーで実行する必要がありますので、sudoをつけましょう。
cd ./letsencrypt
sudo ./letsencrypt-auto --debug --help
実行中に
「Installing Python packages…」でしばらく止まります。少し待ちましょう。。
以下のようなメッセージが表示されたらインストール完了です。
Installation succeeded.

  letsencrypt-auto [SUBCOMMAND] [options] [-d DOMAIN] [-d DOMAIN] ...

Certbot can obtain and install HTTPS/TLS/SSL certificates.  By default,
it will attempt to use a webserver both for obtaining and installing the
cert. The most common SUBCOMMANDS and flags are:

obtain, install, and renew certificates:
    (default) run   Obtain & install a cert in your current webserver
    certonly        Obtain or renew a cert, but do not install it
    renew           Renew all previously obtained certs that are near expiry
   -d DOMAINS       Comma-separated list of domains to obtain a cert for

  --apache          Use the Apache plugin for authentication & installation
  --standalone      Run a standalone webserver for authentication
  --nginx           Use the Nginx plugin for authentication & installation
  --webroot         Place files in a server's webroot folder for authentication
  --manual          Obtain certs interactively, or using shell script hooks

   -n               Run non-interactively
  --test-cert       Obtain a test cert from a staging server
  --dry-run         Test "renew" or "certonly" without saving any certs to disk

manage certificates:
    certificates    Display information about certs you have from Certbot
    revoke          Revoke a certificate (supply --cert-path)
    delete          Delete a certificate

manage your account with Let's Encrypt:
    register        Create a Let's Encrypt ACME account
  --agree-tos       Agree to the ACME server's Subscriber Agreement
   -m EMAIL         Email address for important account notifications

More detailed help:

  -h, --help [TOPIC]    print this message, or detailed help on a topic;
                        the available TOPICS are:

   all, automation, commands, paths, security, testing, or any of the
   subcommands or plugins (certonly, renew, install, register, nginx,
   apache, standalone, webroot, etc.)
証明書発行
次に、letsencrypt-autoコマンドを使って証明書の発行を行います。
パラメータに、h2o.confで設定されているホームディレクトリ、ドメイン名(FQDN)、管理者のメールアドレスを指定します。
sudo ./letsencrypt-auto certonly _
  --webroot -w [h2oホームディレクトリのパス] _
  -d [ドメイン名(FQDN)] _
  -m [管理者のメールアドレス] _
  --agree-tos
コマンドを実行すると、以下のディレクトリに証明書とキーファイルが作成されます。
/etc/letsencrypt/live/[ドメイン名]/fullchain.pem
/etc/letsencrypt/live/[ドメイン名]/privkey.pem
h2o.confの設定
作成された証明書をh2o.confに設定します。
併せてhttpでアクセスがあった場合に自動的にhttpsに301リダイレクトする設定にします。
pid-file: /etc/h2o/pid-file
user: root
access-log: /var/log/h2o/access-log
error-log: /var/log/h2o/error-log
file.index: [ 'index.php', 'index.html' ]

listen: 80
listen:
  port: 443
  ssl:
        # 作成した証明書ファイルを設定
    certificate-file: /etc/letsencrypt/live/[ドメイン名]/fullchain.pem
    key-file:  /etc/letsencrypt/live/[ドメイン名]/privkey.pem

hosts:
    # httpでアクセスがあった場合、httpsに301リダイレクトする
  "[ドメイン名]:80":
    paths:
      "/":
        redirect:
          url: https://[ドメイン名]/
          status: 301

    # httpsでアクセスがあった場合はホームディレクトリへ
  "[ドメイン名]:443":
    paths:
      "/":
        file.dir: [ホームディレクトリ]
h2o.confのテスト
設定ファイルに問題が無いかチェックします。
sudo service h2o configtest
証明書を設定してconfigtestを行うと、証明書ファイルのチェックもしてくれます。
結果の中に以下が表示されていれば、正しく証明書が発行されています。
... 略

/etc/letsencrypt/live/[ドメイン名]/fullchain.pem: good

... 略

/etc/letsencrypt/live/[ドメイン名]/fullchain.pem: good

... 略

configuration OK
                                                           [  OK  ]
h2o再起動
configtestに成功したらh2oを再起動しましょう。
sudo service h2o restart
動作確認
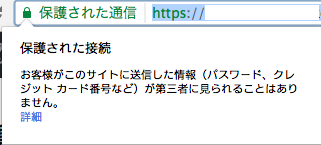
ブラウザからhttpsでアクセスして動作を確認します。
以下のように「保護された通信」と緑色で表示されればOKです。
また、httpでアクセスすると、自動的にhttpsにリダイレクトされるかもチェックしておきましょう。
併せてアクセスログを見て、http2.0通信になっているか確認します。
XXX.XXX.XXX.XXX - - [15/Jan/2017:23:19:48 +0900] "GET / HTTP/2" 200 43306 "" "Mozilla/5.0 (Macintosh; Intel Mac OS X 10_9_5) AppleWebKit/537.36 (KHTML, like Gecko) Chrome/55.0.2883.95 Safari/537.36"
http2.0で通信されていれば、アクセスログに「HTTP/2」と表示されます。
まとめ
Let's Encryptを使うことで、コストをかけること無くSSL通信に対応することが出来ます。また、h2o等のサーバに設定することによってhttp2.0にも対応することが出来るのでとても便利です。是非一度お試し下さい。
最後に注意点
Let's Encryptは他の証明書とは異なり、3ヶ月に1回更新が必要となります。
無料で使える代わりに管理者の所在確認をまめに行う必要があると言ったところでしょうか。。
しかし3ヶ月に1回更新する手間を考えても、無料で使えるというのは大きなメリットだと思います。