記事の内容。
- BootじゃないSpringでThymeleafを使う
- Layout Dialectを使う
Thymeleafなんぞや
テンプレートエンジン。→JSPはもうやめよう。
基本的なことは、他にいっぱい記事があるので省略。
BootじゃないSpringでThymeleafを使う
Bootの情報はいっぱいあるのでそっちを見てね。
Bootじゃないほうの情報がちょっと探しにくかったので自分でまとめました。
逐一動作確認しながら書いてるのでちゃんと動くはず。少なくとも自分の環境では。
環境
- Spring4
- Maven3
- Thymeleaf3
SpringMVCプロジェクトを作成
- 任意の環境でプロジェクトを作成
-
web.xml 作成
webapp/WEB-INF/web.xml<?xml version="1.0" encoding="UTF-8"?> <web-app version="3.1" xmlns="http://xmlns.jcp.org/xml/ns/javaee" xmlns:xsi="http://www.w3.org/2001/XMLSchema-instance" xsi:schemaLocation=" http://xmlns.jcp.org/xml/ns/javaee http://xmlns.jcp.org/xml/ns/javaee/web-app_3_1.xsd"> <display-name>ThymeleafSample</display-name> <!-- エンコード設定のフィルタ --> <filter> <filter-name>CharacterEncodingFilter</filter-name> <filter-class>org.springframework.web.filter.CharacterEncodingFilter</filter-class> <init-param> <param-name>encoding</param-name> <param-value>UTF-8</param-value> </init-param> <init-param> <param-name>forceEncoding</param-name> <param-value>true</param-value> </init-param> </filter> <filter-mapping> <filter-name>CharacterEncodingFilter</filter-name> <url-pattern>/*</url-pattern> </filter-mapping> <!-- applicationContext の設定 --> <listener> <listener-class>org.springframework.web.context.ContextLoaderListener</listener-class> </listener> <context-param> <param-name>contextConfigLocation</param-name> <param-value>/WEB-INF/spring/applicationContext.xml</param-value> </context-param> <!-- DispacherServlet の設定 --> <servlet> <servlet-name>dispatcher</servlet-name> <servlet-class>org.springframework.web.servlet.DispatcherServlet</servlet-class> <init-param> <param-name>contextConfigLocation</param-name> <param-value>/WEB-INF/spring/dispatcher-servlet.xml</param-value> </init-param> <load-on-startup>1</load-on-startup> </servlet> <servlet-mapping> <servlet-name>dispatcher</servlet-name> <url-pattern>/</url-pattern> </servlet-mapping> </web-app> -
applicationContext.xml 作成
webapp/WEB-INF/wpring/applicationContext.xml<?xml version="1.0" encoding="UTF-8"?> <beans xmlns="http://www.springframework.org/schema/beans" xmlns:xsi="http://www.w3.org/2001/XMLSchema-instance" xmlns:context="http://www.springframework.org/schema/context" xmlns:mvc="http://www.springframework.org/schema/mvc" xsi:schemaLocation=" http://www.springframework.org/schema/beans http://www.springframework.org/schema/beans/spring-beans-4.2.xsd http://www.springframework.org/schema/context http://www.springframework.org/schema/context/spring-context-4.2.xsd http://www.springframework.org/schema/mvc http://www.springframework.org/schema/mvc/spring-mvc-4.2.xsd"> <mvc:annotation-driven /> <mvc:default-servlet-handler /> </beans> -
dispatcher-servlet.xml の作成
webapp/WEB-INF/spring/dispatcher-servlet.xml<?xml version="1.0" encoding="UTF-8"?> <beans xmlns="http://www.springframework.org/schema/beans" xmlns:xsi="http://www.w3.org/2001/XMLSchema-instance" xmlns:context="http://www.springframework.org/schema/context" xmlns:mvc="http://www.springframework.org/schema/mvc" xsi:schemaLocation=" http://www.springframework.org/schema/beans http://www.springframework.org/schema/beans/spring-beans-4.2.xsd http://www.springframework.org/schema/context http://www.springframework.org/schema/context/spring-context-4.2.xsd http://www.springframework.org/schema/mvc http://www.springframework.org/schema/mvc/spring-mvc-4.2.xsd"> <context:component-scan base-package="dev.kishibashi.thymeleafsample" /> <mvc:annotation-driven /> <!-- 以下、JSP利用時の設定 --> <mvc:resources mapping="/resources/**" location="/WEB-INF/resources/" /> <bean id="ViewResolver" class="org.springframework.web.servlet.view.InternalResourceViewResolver"> <property name="prefix" value="/WEB-INF/views/" /> <property name="suffix" value=".jsp" /> </bean> </beans>
Thymeleaf用のtemplatesフォルダを作成
HTMLテンプレートを置く場所です。
JSPで言う WEB-INF/views のことです。
webapp/
    └ WEB-INF/
        └ templates
Thymeleafの依存性を追加
<dependencies>
      :
    <dependency>
        <groupId>org.thymeleaf</groupId>
        <artifactId>thymeleaf</artifactId>
        <version>3.0.1.RELEASE</version>
    </dependency>
    <dependency>
        <groupId>org.thymeleaf</groupId>
        <artifactId>thymeleaf-spring4</artifactId>
        <version>3.0.1.RELEASE</version>
    </dependency>
      :
</dependencies>
ViewResolverを変更
<?xml version="1.0" encoding="UTF-8"?>
<beans xmlns="http://www.springframework.org/schema/beans"
    xmlns:xsi="http://www.w3.org/2001/XMLSchema-instance"
    xmlns:context="http://www.springframework.org/schema/context"
    xmlns:mvc="http://www.springframework.org/schema/mvc"
    xsi:schemaLocation="
        http://www.springframework.org/schema/beans
        http://www.springframework.org/schema/beans/spring-beans-4.2.xsd
        http://www.springframework.org/schema/context
        http://www.springframework.org/schema/context/spring-context-4.2.xsd
        http://www.springframework.org/schema/mvc
        http://www.springframework.org/schema/mvc/spring-mvc-4.2.xsd">

    <context:component-scan base-package="dev.kishibashi.thymeleafsample" />

    <mvc:annotation-driven />

    <!-- 以下、JSP利用時の設定 -->
    <!-- コメントアウト
    <mvc:resources mapping="/resources/**" location="/WEB-INF/resources/" />

    <bean id="ViewResolver" class="org.springframework.web.servlet.view.InternalResourceViewResolver">
        <property name="prefix" value="/WEB-INF/views/" />
        <property name="suffix" value=".jsp" />
    </bean>
    -->

    <!-- 以下、Thymeleaf利用時の設定を追加 -->
    <bean id="templateResolver" class="org.thymeleaf.spring4.templateresolver.SpringResourceTemplateResolver">
        <property name="prefix" value="/WEB-INF/templates/" />      <!-- 作成したtemplatesフォルダを指定 -->
        <property name="suffix" value=".html" />
        <property name="templateMode" value="HTML" />               <!-- HTML5だと、XHTMLが利用できず動かない -->
        <property name="characterEncoding" value="UTF-8" />
    </bean>

    <bean id="templateEngine" class="org.thymeleaf.spring4.SpringTemplateEngine">
        <property name="enableSpringELCompiler" value="true" />
        <property name="templateResolver" ref="templateResolver" />
    </bean>

    <bean class="org.thymeleaf.spring4.view.ThymeleafViewResolver">
        <property name="templateEngine" ref="templateEngine" />
        <property name="characterEncoding" value="UTF-8" />
    </bean>

</beans>
Controllerを作成
画面を表示するだけ。
package dev.kishibashi.thymeleafsample;

import org.springframework.stereotype.Controller;
import org.springframework.web.bind.annotation.RequestMapping;

/**
 *
 * @author kishibashi
 */
@Controller
@RequestMapping(value="/")
public class IndexController {

    @RequestMapping(value="/")
    public String sendToIndex() {
        return "index";
    }
}
index.htmlを作成
XHTML形式なので、metaタグとかも閉じた方がいい(はず)。
th:text属性によって、サーバから開いた場合のみ "dynamic text" が表示される。
HTMLファイルを直接開いた場合は、元々の内容 "static text" が表示される。
→画面モックに使える。
<!DOCTYPE html>
<html xmlns="http://www.w3.org/1999/xhtml"
      xmlns:th="http://www.thymeleaf.org">
<head>
    <meta charset="UTF-8" />
    <title>Thymeleaf Page</title>
</head>
<body>
    <h1>Thymeleaf Sample</h1>
    <h2>Thymeleaf Page</h2>

    <p th:text="'dynamic text'">static text</p>

</body>
</html>
サーバを起動し、ブラウザで開く
<br>
.jpg](https://qiita-user-contents.imgix.net/https%3A%2F%2Fqiita-image-store.s3.amazonaws.com%2F0%2F129796%2Fbd0f61e9-3a96-85ea-74ff-91e623d54c57.jpeg?ixlib=rb-4.0.0&auto=format&gif-q=60&q=75&s=7652928e4817f400b806467a4ba24323)
OK!
javascriptやcssを使う
下記のようにフォルダを作成。
Spring Bootを利用した場合src/main/resources/static/ がデフォルトになるらしいので、それに従っておく。
src/
  └ main/
      └ resources/
          └ static
              ├ js
              └ css
Bean定義ファイルに設定を追記。
        :
    <!-- 以下、Thymeleaf利用時の設定 -->
    <mvc:resources mapping="/js/**" location="classpath:/static/js/" />
    <mvc:resources mapping="/css/**" location="classpath:/static/css/" />

    <bean id="templateResolver" class="org.thymeleaf.spring4.templateresolver.SpringResourceTemplateResolver">
        <property name="prefix" value="/WEB-INF/templates/" />      <!-- 作成したtemplatesフォルダを指定 -->
        <property name="suffix" value=".html" />
        <property name="templateMode" value="HTML" />               <!-- HTML5だと、XHTMLが利用できず動かない -->
        <property name="characterEncoding" value="UTF-8" />
    </bean>
        :
例.Bootstrapを使う
<!DOCTYPE html>
<html xmlns="http://www.w3.org/1999/xhtml"
      xmlns:th="http://www.thymeleaf.org">
<head>
    <meta charset="UTF-8" />
    <title>Thymeleaf Page</title>
    <link rel="stylesheet" href="../../resources/static/css/bootstrap.min.css"
          th:href="@{/css/bootstrap.min.css}" />
    <script src="../../resources/static/js/jquery-3.2.1.min.js"
            th:src="@{/js/jquery-3.2.1.min.js}"></script>
    <script src="../../resources/static/js/bootstrap.min.js"
            th:src="@{/js/bootstrap.min.js}"></script>
</head>
<body class="panel panel-info">
    <header class="panel panel-heading">
        <h1>Thymeleaf Sample</h1>
    </header>
    <main class="panel panel-body">
        <h2>Thymeleaf Page</h2>
    </main>
    <footer class="panel panel-footer">
        @ 2017 kishibashi.
    </footer>
</body>
</html>
OK!
includeやreplaceを使う
Layout Dialectの前に、Thymeleafネイティブの th:include や th:recplace を使ってみる。
- th:include そのタグの内側の要素を差し替える
- th:replcace そのタグごと要素を差し替える
header, footer を共通ファイルに切り出す。
th:fragment で名前を付ける。
<header class="panel panel-heading" th:fragment="common_header">
    <h1>Thymeleaf Sample</h1>
</header>
<footer class="panel panel-footer" th:fragment="common_footer">
    @ 2017 kishibashi.
</footer>
呼び出し側でfragment名を指定して、差し替え。
th:replace="ファイルパス(※)::fragment名" で指定。
※templateResolver で指定している prefix, saffix が適用される。
:
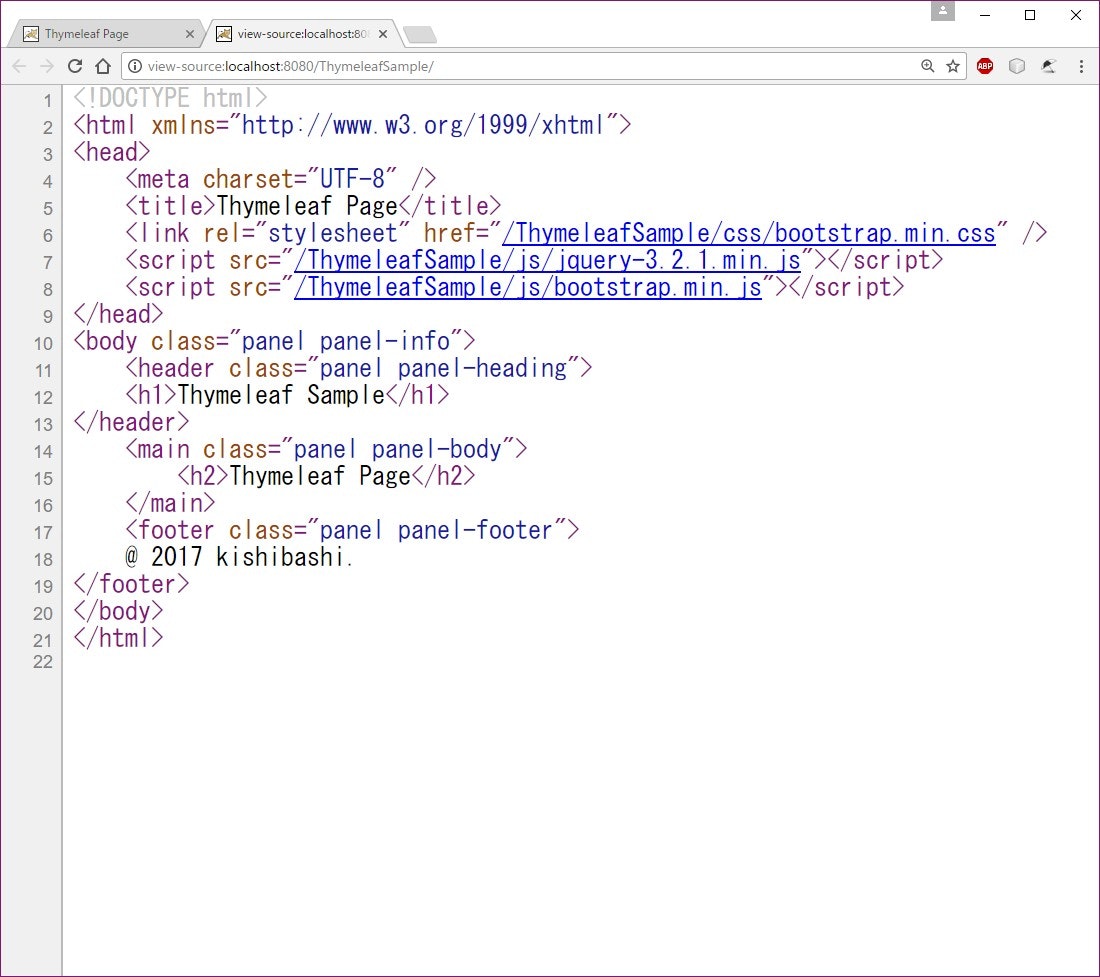
<body class="panel panel-info">
<header th:replace="common/header::common_header"></header>
<main class="panel panel-body">
<h2>Thymeleaf Page</h2>
</main>
<footer th:replace="common/footer::common_footer"></footer>
</body>
:
サーバを起動してページを表示、ソースを見る。
th:includeは省略。
Layout Dialect を使う
replaceだと...
毎回headerとfooterのreplace書くの?メンドイ。
むしろガワを1ファイルだけ作って、コンテンツだけをファイルに記述したい。
そこでLayout Dialect。
依存性を追加
Springのstarterモジュールに入ってるから個別追加はいらないよ!とかって記事を見て試してたら動かない...よく見たらSpring Bootの話だったでござる。
Bootじゃない場合ちゃんと追加が必要。
    :
<dependency>
    <groupId>nz.net.ultraq.thymeleaf</groupId>
    <artifactId>thymeleaf-layout-dialect</artifactId>
    <version>2.2.2</version>
</dependency>
    :
Bean定義ファイルに設定を追加。
dispatcher-servlet.xmlのTemplateEngineのところに、下記のように追加。
(additionalDialectsのデフォルトの設定を上書きしちゃってないかは不明。)
    :
<bean id="templateEngine" class="org.thymeleaf.spring4.SpringTemplateEngine">
    <property name="enableSpringELCompiler" value="true" />
    <property name="templateResolver" ref="templateResolver" />
    <property name="additionalDialects">
        <set>
            <bean class="nz.net.ultraq.thymeleaf.LayoutDialect" />
        </set>
    </property>
</bean>
    :
共通レイアウトとなるファイルを作成
<!DOCTYPE html>
<html xmlns="http://www.w3.org/1999/xhtml"
      xmlns:th="http://www.thymeleaf.org"
      xmlns:layout="http://www.ultraq.net.nz/thymeleaf/layout">
<head>
    <meta charset="UTF-8" />
    <title>Layout Dialect</title>
    <link rel="stylesheet" href="../../resources/static/css/bootstrap.min.css"
          th:href="@{/css/bootstrap.min.css}" />
    <script src="../../resources/static/js/jquery-3.2.1.min.js"
            th:src="@{/js/jquery-3.2.1.min.js}"></script>
    <script src="../../resources/static/js/bootstrap.min.js"
            th:src="@{/js/bootstrap.min.js}"></script>
</head>
<body class="panel panel-info">
    <header class="panel panel-heading">
        <h1>Thymeleaf Sample</h1>
    </header>
    <main class="panel panel-body" layout:fragment="main" data-include=""></main>
    <footer class="panel panel-footer">
        @ 2017 kishibashi.
    </footer>
</body>
</html>
ポイントは2点。
-
layoutの名前空間を記述する。
<html ... xmlns:layout="http://www.ultraq.net.nz/thymeleaf/layout"> -
差し替えたい部分にfragment名を指定する。
<main ... layout:fragment="main" ...></main>
コンテンツごとのファイルを作成
<!DOCTYPE html>
<html xmlns="http://www.w3.org/1999/xhtml"
      xmlns:th="http://www.thymeleaf.org"
      xmlns:layout="http://www.ultraq.net.nz/thymeleaf/layout"
      layout:decorator="base">
<head>
    <title>index</title>
</head>
<body>
    <main layout:fragment="main" data-replace="">
        <h2>Layout Dialect Index Page</h2>
    </main>
</body>
</html>
ポイントは同じく2点。
-
layout:decoratorで、共通レイアウトのファイルを指定する。(よくわからないが、layout:decorateでも同様に動く模様。)
<html ... xmlns:layout="http://www.ultraq.net.nz/thymeleaf/layout" layout:decorator="base"> -
fragment名を指定。base.htmlと同じ書き方でよい。(ゆえにちょっと混乱する。)
    <main layout:fragment="main" data-replace="">
        <h2>Layout Dialect Index Page</h2>
    </main>
ページを表示
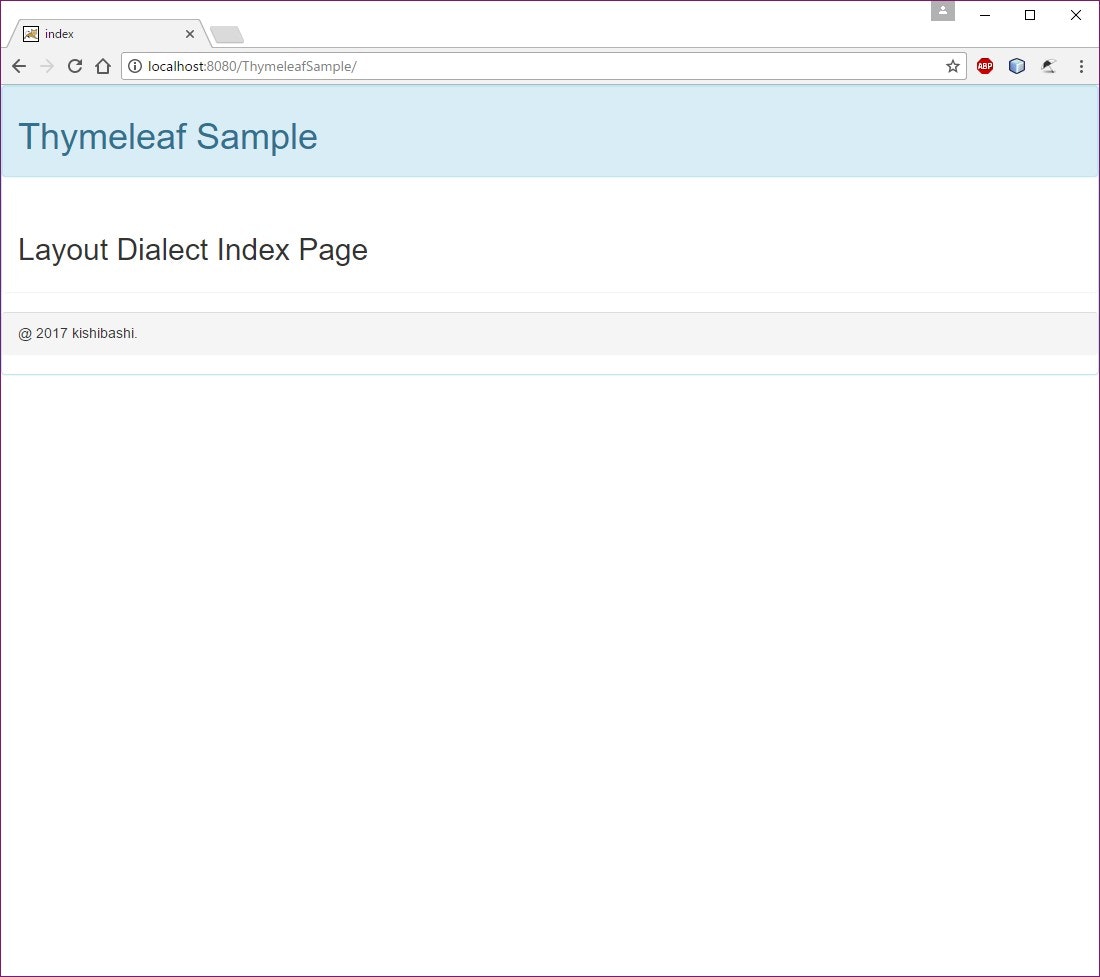
OK!
ソースを確認。
includeなのかreplaceなのか確認するためにdata属性を付けていたので、それもチェック。
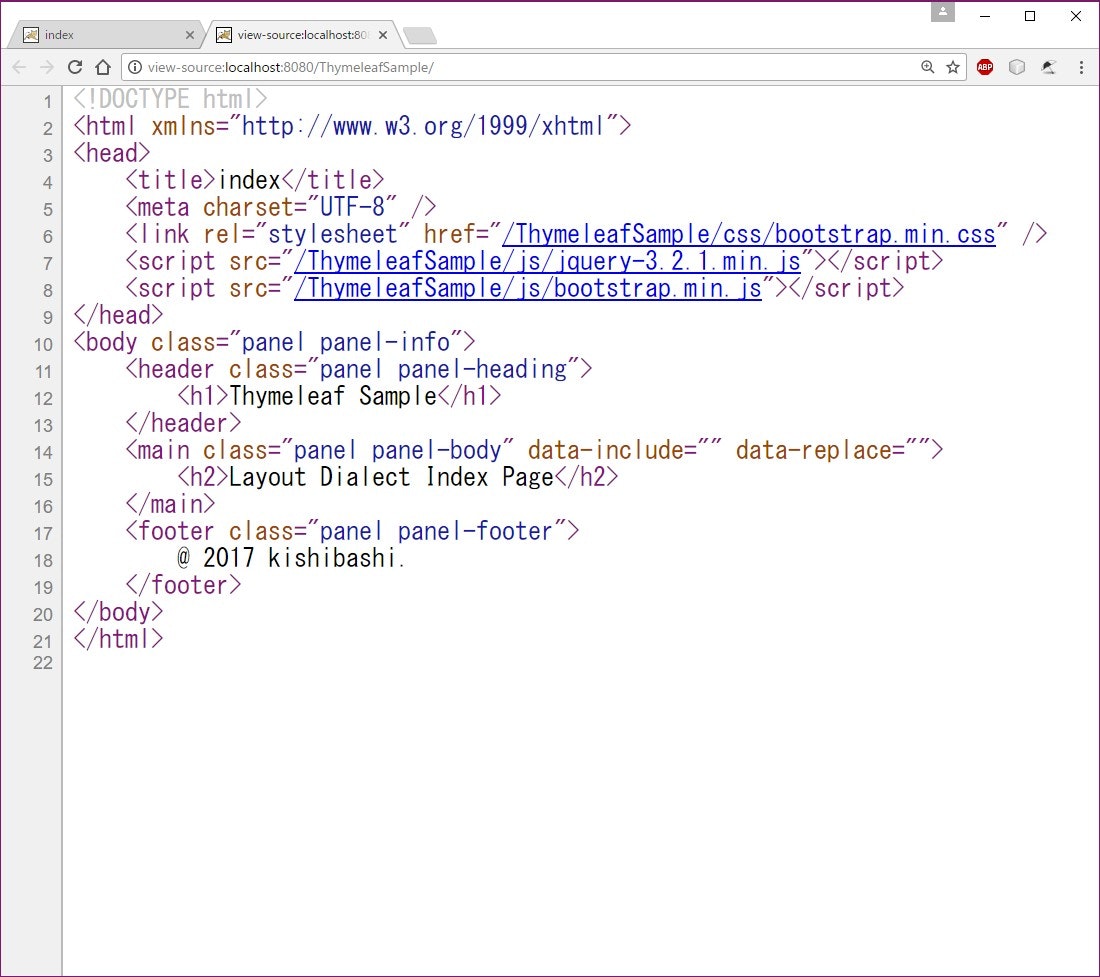
!?
両方...だと...!?
後述するかも。
javascriptやcssも共通にできるの? 個別にもできるの?
できます。
Layout Dialectは、head要素内とbody要素内で動作が異なります。
body要素内はすでに見てもらった通り、layout:fragmentで差し替えます。
head要素内はというと...
ページ固有のcssを作って読み込んでみます。
@charset "UTF-8";

.message {
    color: red;
    font-size: 2em;
}
コンテンツ側のHTMLにcssを追加。
<!DOCTYPE html>
<html xmlns="http://www.w3.org/1999/xhtml"
      xmlns:th="http://www.thymeleaf.org"
      xmlns:layout="http://www.ultraq.net.nz/thymeleaf/layout"
      layout:decorator="base">
<head>
    <meta charset="UTF-8" />
    <title>index</title>
    <link rel="stylesheet" href="../../resources/static/css/index.css"
          th:href="@{/css/index.css}" />
</head>
<body>
    <main layout:fragment="main" data-replace="">
        <h2>Layout Dialect Index Page</h2>

        <p class="message">hello!</p>

    </main>
</body>
</html>
ページを表示。
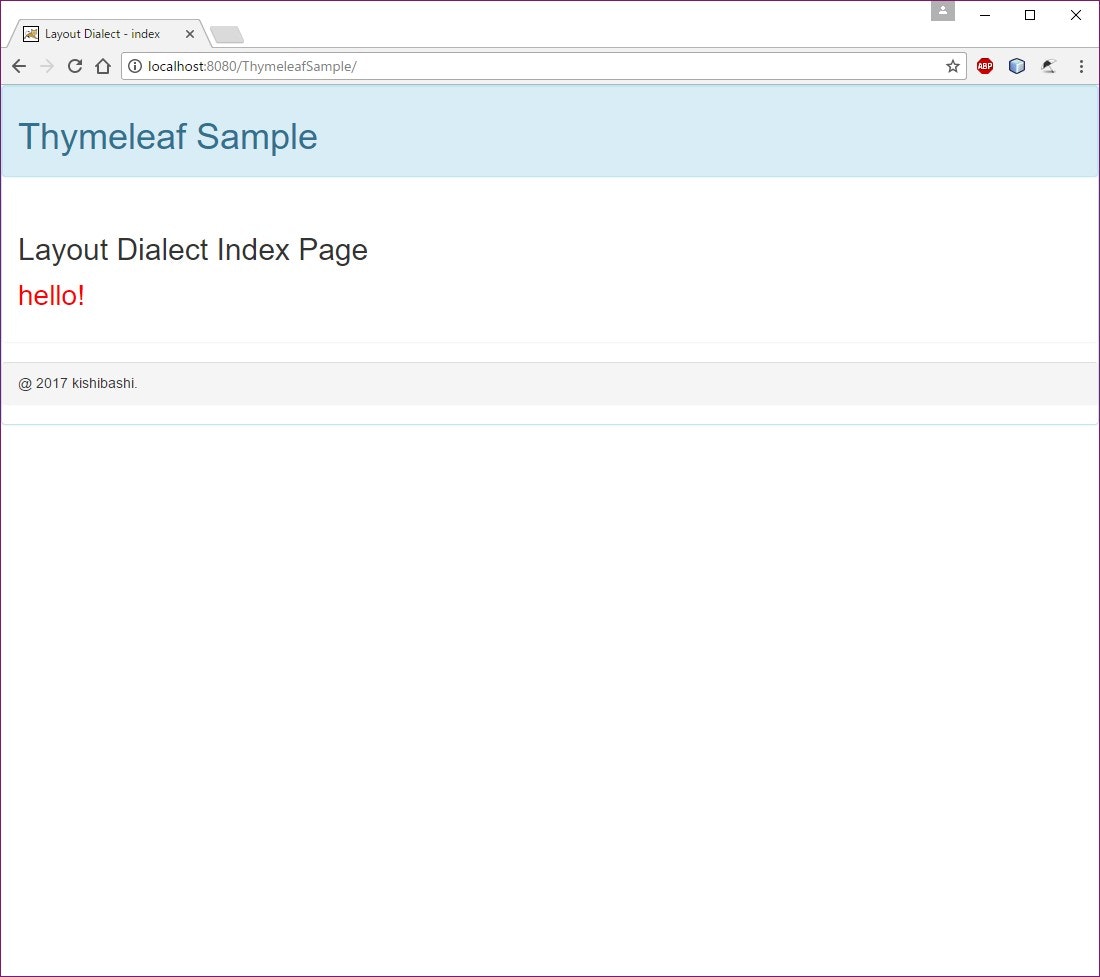
OK!
ソースはどうなっているのか...?
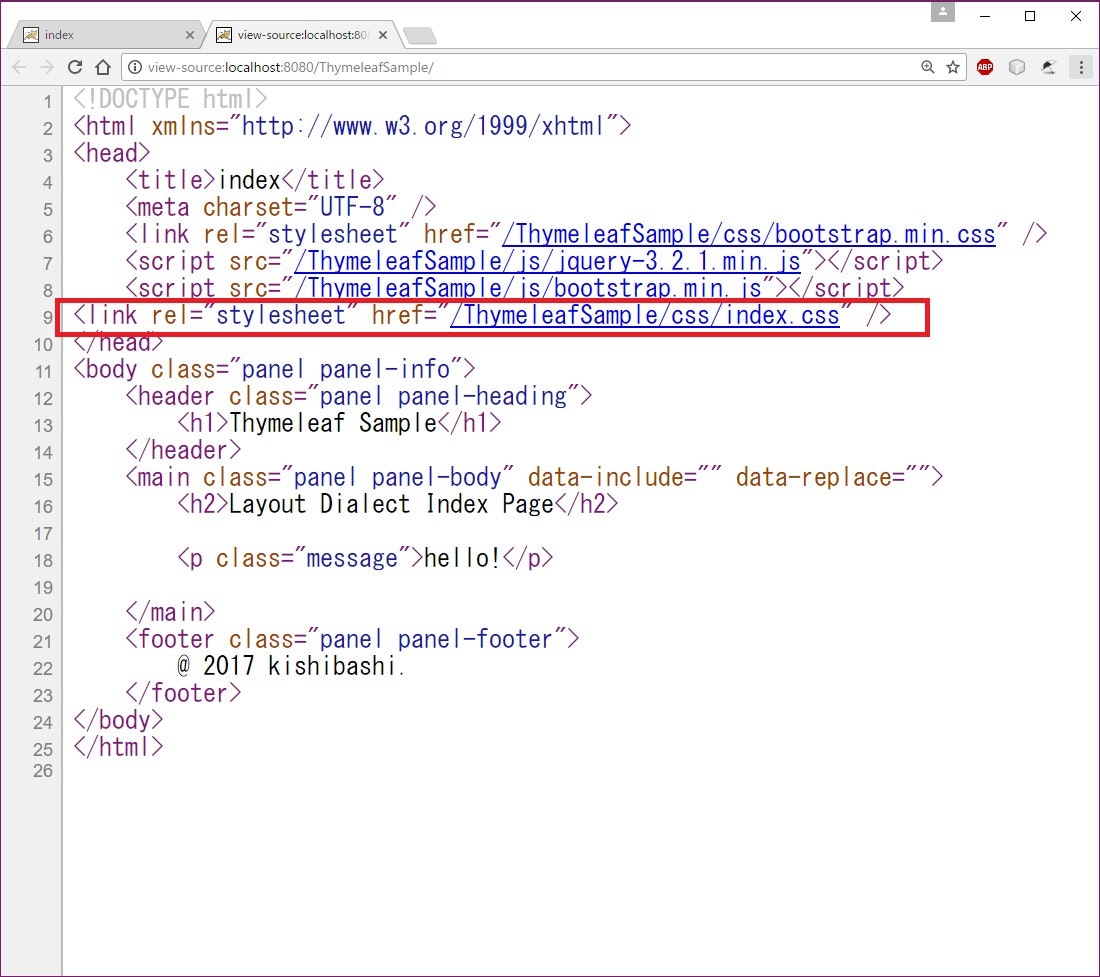
共通レイアウト側の link, script タグの下に、ページ固有の link タグが追加されています。
head要素内は、その他のタグも同様の動作をします。
body要素内でdata属性が両方読み込まれた件も同じく理屈...?
詳しくは調査中。
ちなみに、title要素をページごとに変更したい場合は...
<title layout:title-pattern="$DECORATOR_TITLE - $CONTENT_TITLE">Layout Dialect</title>
<title>index</title>
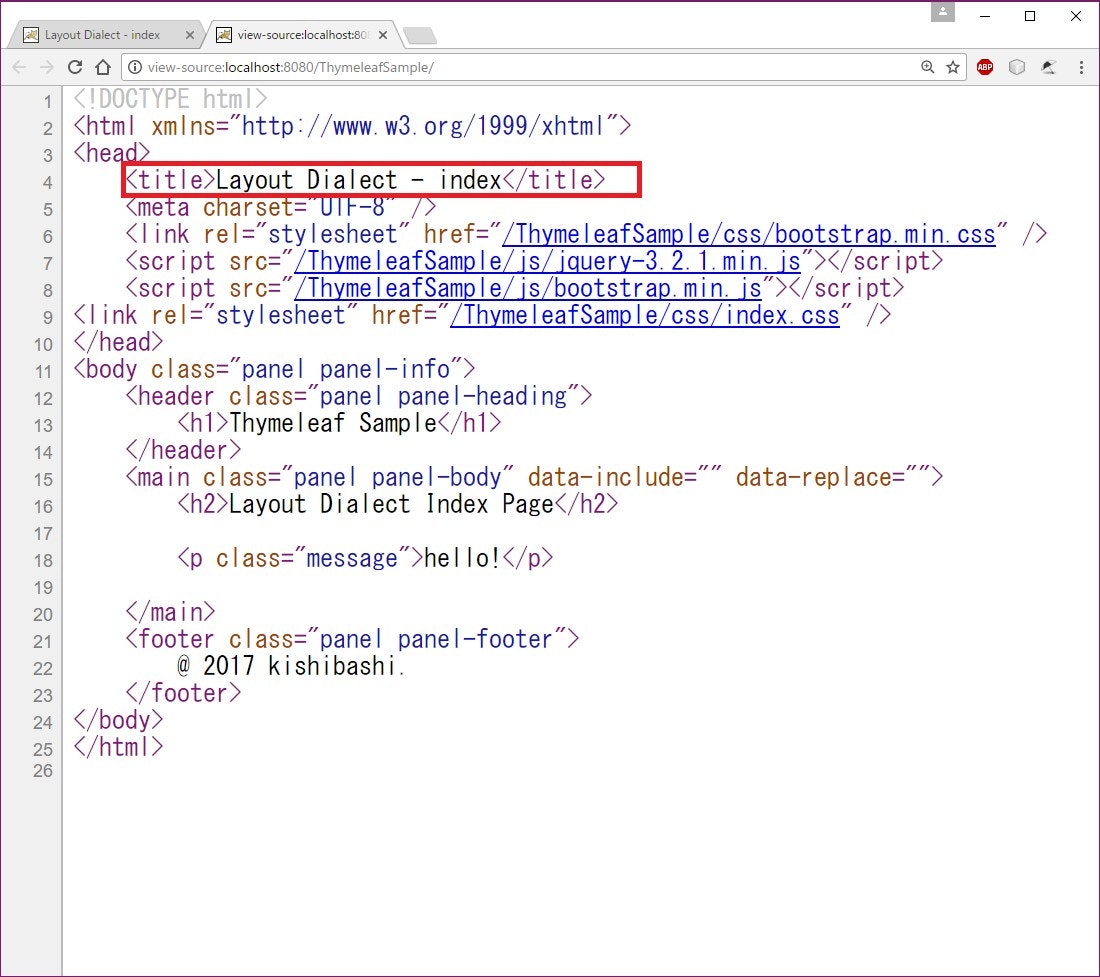
上記の記法だと、"共通タイトル - ページ固有タイトル" という形になります。
以上、Layout Dialect を使ってみる。でした。