前回までRiotの公式ページの内容を読んできましたが、いまひとつわかりづらいので、Getting Startedを自分で作成し、復習することにしました。
なお環境はCloud9です。サーバの起動などは省略しますのでローカルで試す方は自身でサーバを立てるなどしてください。
Getting Started for Riot
Riotは簡単にいうとHTMLのカスタムタグを作成するためのUI用軽量JavaScriptライブラリです。そのサイズは他のライブラリと比べて桁違いに小さく3.5kb(6.7kb?)です。また高速に動作し、さらにブラウザ上でコンパイル可能です。詳しくはRiot 2.0 のホームページを読んでみるを参照ください。
Hallo World for Riot
まずお約束のHallo Worldからいきましょう。任意のフォルダに以下の2ファイルを用意してください。
- hallo.tag:カスタムタグを定義するファイル
- index.html:カスタムタグを使用するファイル
<hello>
  <h3>Hello World for Riot</h3>
</hello>
<html>
  <head>
    <title>Getting Started for Riot</title>
    <script src="https://cdn.jsdelivr.net/g/riot@2.0(riot.min.js+compiler.min.js)"></script>
    <script src="hallo.tag" type="riot/tag"></script>
   </head>
  <body>
    <hello></hello>
    <script>
      riot.mount("*");
    </script>
  </body>
</html>
サーバを起動し、index.htmlにアクセスしましょう。Cloud9上ならindex.htmlを開いた状態でRunボタンを押せば起動できます。うまくいけば以下の画面が表示されます。

では解説に移ります。
Riotを使用するにはライブラリが必要になります。今回はCDN上のライブラリを使用しました。
・・・
<script src="https://cdn.jsdelivr.net/g/riot@2.0(riot.min.js+compiler.min.js)"></script>
・・・
hello.tagは見たまんまです。<hello>タグを定義しています。今回はレイアウト(HTML)のみですがロジック(JavaScript)も一緒に定義できます。それについては次項で説明します。
そしてindex.htmlではhelloタグを使用しています。
・・・
    <hello></hello>
    <script>
      riot.mount("*");
    </script>
・・・
カスタムタグの使用には次の3ステップが必要です。
- カスタムタグを使用する箇所に配置する
<hello></hello> - タグの実装を読み込む
<script src="hallo.tag" type="riot/tag"> - タグに実装をマウントする
riot.mount("*");
これだけです。簡単ですね。
ToDo List
では次にToDoリストを作成してみましょう。
なお今回はサーバサイドは扱いませんので、データの保存等はしません。
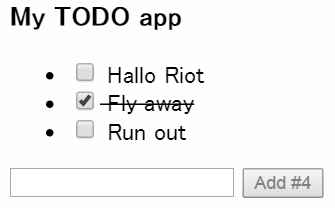
最終的には以下のような画面になります。

todo-listタグの作成
まずファイルtodo-list.tagを作成し、index.htmlに読み込ませましょう。
<todo-list>
  <h3>My TODO app</h3>
</todo-list>
<html>
  <head>
    <title>Getting Started for Riot</title>
    <script src="https://cdn.jsdelivr.net/g/riot@2.0(riot.min.js+compiler.min.js)"></script>
    <script src="todo-list.tag" type="riot/tag"></script>
   </head>
  <body>
    <todo-list></todo-list>
    <script>
      riot.mount("*");
    </script>
  </body>
</html>
先ほどのhelloをtodo-listに置き換えた形になります。今の画面は以下のようにToDoのタイトルだけ表示されていると思います。

しかし、これではtodo-listタグのタイトルが"My TODO app"に固定されてしまいます。再利用性の観点から、これはあまりよろしくありません。タグの利用者(index.html)が好きなタイトルをつけられるよう変更しましょう。
<todo-list>
  <h3>{ opts.title }</h3>
</todo-list>
 ・・・
    <todo-list title="My TODO app"></todo-list>
・・・
カスタムタグは変数optsを利用してタグ属性にアクセスできます。また{ }はJavaScript式の結果をHTMLに埋め込みます。これでタグの利用者が好きなタイトルを付けられるようになりました。
しかし、<h3>{ opts.title }</h3>という記述は可読性が欠けています。そこで次のようにtodo-list.tagを変更しましょう。
<todo-list>
  <h3>{ title }</h3>

  this.title = opts.title;
</todo-list>
<h3>{ title }</h3>と書けてレイアウトの可読性が向上しました。
さて、ここで初めてロジック(JavaScript)が登場しました。このようにレイアウト(HTML)のあとにロジックを書くことができます。この記述はシンプルですが重要な事項をいくつか含んでいます。
- {}内では、
{ title }のように、thisのメンバに直接アクセスできる - {}が解決される前にロジック(
this.title = opts.title;)が実行される
タスクリストの表示
では次にタスクリストを表示しましょう。データをまずはハードコーディングで作成します。しかし、例によってtodo-list.tagに直書きするのはモジュール化の妨げになるため、index.htmlから渡したいと思います。
・・・
    <script>
      riot.mount("todo-list",{
        tasks:[
          { done: false, title:"Hallo Riot" },
          { done: true, title:"Fly away" },
          { done: false, title:"Run out" },
        ]
      });
    </script>
・・・
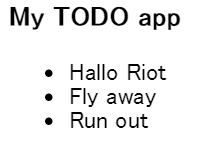
先ほどはタグ属性からデータを渡しましたが、上記のようにマウント時に引数としてオプションを渡すことが可能です。カスタムタグ側は同様にopts変数を経由してデータにアクセスできます。
ではtodo-list.tagをリストを表示するように書き換えましょう。
<todo-list>
  <h3>{ title }</h3>
  <ul>
    <li each={ tasks }>
        { title }
    </li>
  </ul>
  this.title = opts.title;
  this.tasks = opts.tasks;
</todo-list>
ここでループ機能eachが登場しました。eachは与えられた配列をもとに、その要素ごとにタグを繰り返します。またeach内ではコンテキストがその要素に変更されます。そのため、<li each={ tasks }>{ title }</li>のtitleはtasksの要素のtitleを指します。
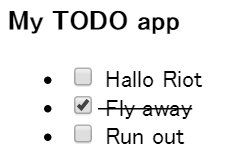
チェックボックスと打消し線の追加
ではチェックボックスを追加して、終了済みのタスクに打消し線をつける機能を実装しましょう。
<todo-list>
  <style>
    label.completed { text-decoration: line-through; }
  </style>
  <h3>{ title }</h3>
  <ul>
    <li each={ tasks }>
      <label class={ completed: done }>
        <input type="checkbox"
               checked={ done }
               onclick={ parent.toggle }>
        { title }
      </label>
    </li>
  </ul>
  this.title = opts.title;
  this.tasks = opts.tasks;

  toggle(e) {
    var item = e.item
    item.done = !item.done
    return true
  }

</todo-list>
ここでもまた重要な要素がいくつかあります
- styleタグは自動的にheadに移動される
-
toggle(e){}のようにES6のメソッド記法が可能 - each内ではコンテキストが変わるため、親メソッドを呼ぶには
parent.toggleのようにする - each内で親メソッドが呼ばれた場合、
e.itemで呼び出したeach要素にアクセスできる -
class={ completed: done }のようにdoneがtrueの場合のみ、class属性にcompletedクラスを設定するようにできる。 -
checked={ done }のようにdoneがtrueの場合のみ、checked, selectedなどのBoolean属性を付加するようにできる
タスク登録フォームの追加
では最後にタスク追加用のフォームを作成しましょう。
ハードコードしていたデータはもう必要ないので削除します。
<html>
  <head>
    <title>Getting Started for Riot</title>
    <script src="https://cdn.jsdelivr.net/g/riot@2.0(riot.min.js+compiler.min.js)"></script>
    <script src="todo-list.tag" type="riot/tag"></script>
   </head>
  <body>
    <todo-list title="My TODO app"></todo-list>
    <script>
      riot.mount("todo-list");
    </script>
  </body>
</html>
そして、todo-list.tagに入力フォームを追加します。
this.tasksの初期化が地味に変わっているので気を付けてください。
<todo-list>
  <style>
    label.completed { text-decoration: line-through; }
  </style>
  <h3>{ title }</h3>
  <ul>
    <li each={ tasks }>
      <label class={ completed: done }>
        <input type="checkbox"
               checked={ done }
               onclick={ parent.toggle }>
        { title }
      </label>
    </li>
  </ul>
  <form onsubmit={ add }>
    <input name="input" onkeyup={ edit }>
    <button disabled={ !text }>Add #{ nextNumber }</button>
  </form>

  this.title = opts.title;
  this.tasks = opts.tasks || [];

  this.on("update", function(){
    this.nextNumber = this.tasks.length + 1;
  });

  toggle(e) {
    var item = e.item
    item.done = !item.done
    return true
  }

  edit(e) {
    this.text = e.target.value
  }

  add(e) {
    if (this.text) {
      this.tasks.push({ title: this.text })
      this.text = this.input.value = ''
    }
  }

</todo-list>
ここで注意すべき点はイベントハンドラの設定とupdateイベントです。
イベントハンドラはonsubmit={ add }のような形で設定できます。そして、updateイベントはイベントハンドラが呼ばれた時に自動的に呼ばれます。
このupdateイベントが起こると画面の再描画が実行されます。この場合、onkeyupハンドラがインプットに設定されているため、テキスト欄に文字を打つたびにupdateイベントが発生しています。
またAjaxなどUIイベントが関係しない場合はthis.update()で強制的に呼ぶことができます。
なおupdateイベントにはリスナーの登録が可能です。
{}内の式が長くなる場合などは、例のようにupdateイベントのリスナーで設定するとよいでしょう。
これでToDoアプリは完成です。あとは適当にデータをいれてみてください。
以上になります。わかりにくい点などありましたら直したいと思います。また途中間違いに気づき、戻って直したりしたため、おかしな箇所が残っているかもしれません。もしありましたらご指摘願います。
お疲れ様でした。


