今回は、「Spring Security OAuthで認可コードグラントフローを体感しよう」の第二回で、ま〜とりあえずSpring Security OAuth + Spring Bootを使用して認可コードグラントフローでREST APIの認証・認可を行うアプリ作ってみることにします。
アプリケーションの機能要件
今回作成するアプリケーションの機能要件は・・・
Service Provider
Service Providerは、ユーザ単位でタスク情報(タイトル、詳細、期限日、完了フラグ、登録日時、更新日時)の管理(登録・更新・削除・参照)を行うREST APIを提供し、REST APIへのアクセスは、OAuth 2.0の認可コードグラントフローで発行したアクセストークンを使用して認証・認可を行う。
という要件にします。
本来であればService Provider側にもタスク情報を管理するためのWeb UIを用意したいところですが、Service Provider側のWeb UIは本エントリーのフォーカス外として説明も割愛させてもらいます。
Resource Server
リソースオーナのタスク情報を管理するためのAPIとして、以下のAPIを作成します。
| API名 | API概要 | アクセスを許可するスコープ |
|---|---|---|
| GET /api/tasks | タスク情報の一覧を取得するAPI | read |
| POST /api/tasks | タスク情報を登録するAPI | write |
| GET /api/tasks/{id} | タスク情報を取得するAPI | read |
| PUT /api/tasks/{id} | タスク情報を更新するAPI | write |
| DELETE /api/tasks/{id} | タスク情報を削除するAPI | write |
Authorization Server
タスク情報へのアクセスをリソースオーナから許可してもらうために、以下のエンドポイント(以降、「認可エンドポイント」と呼ぶ)を提供します。このエンドポイントは、Spring Security OAuthが提供してくれるため、開発者が作成する必要はありません。
| エンドポイント名 | エンドポイント概要 | アクセスを許可する条件 |
|---|---|---|
| GET /oauth/authorize | リソースオーナからの認可を得るための画面(以降、「認可画面」と呼ぶ)を表示するためのエンドポイント | 認証済みのリソースオーナ |
| POST /oauth/authorize?user_oauth_approval | リソースオーナからの認可指示(許可・拒否)を受けて認可グラント(認可コード)を発行するためのエンドポイント | 認証済みのリソースオーナ |
Clientがリソースオーナから取得した認可グラント(認可コード)をもとにアクセストークンを発行するために、以下のエンドポイント(以降、「トークンエンドポイント」と呼ぶ)を作成します。このエンドポイントは、Spring Security OAuthが提供してくれるため、開発者が作成する必要はありません。
| エンドポイント名 | エンドポイント概要 | アクセスを許可する条件 |
|---|---|---|
| POST /oauth/token | リソースオーナから取得した認可グラント(認可コードなど)をもとにアクセストークンを発行するためのエンドポイント | 認証済みのClient |
Note: 各種エンドポイントへの認証・認可
本エントリーでは・・・Spring Securityが提供しているBasic認証を利用して、これらのエンドポイントに対してリソースオーナ及びClientの認証を行います。
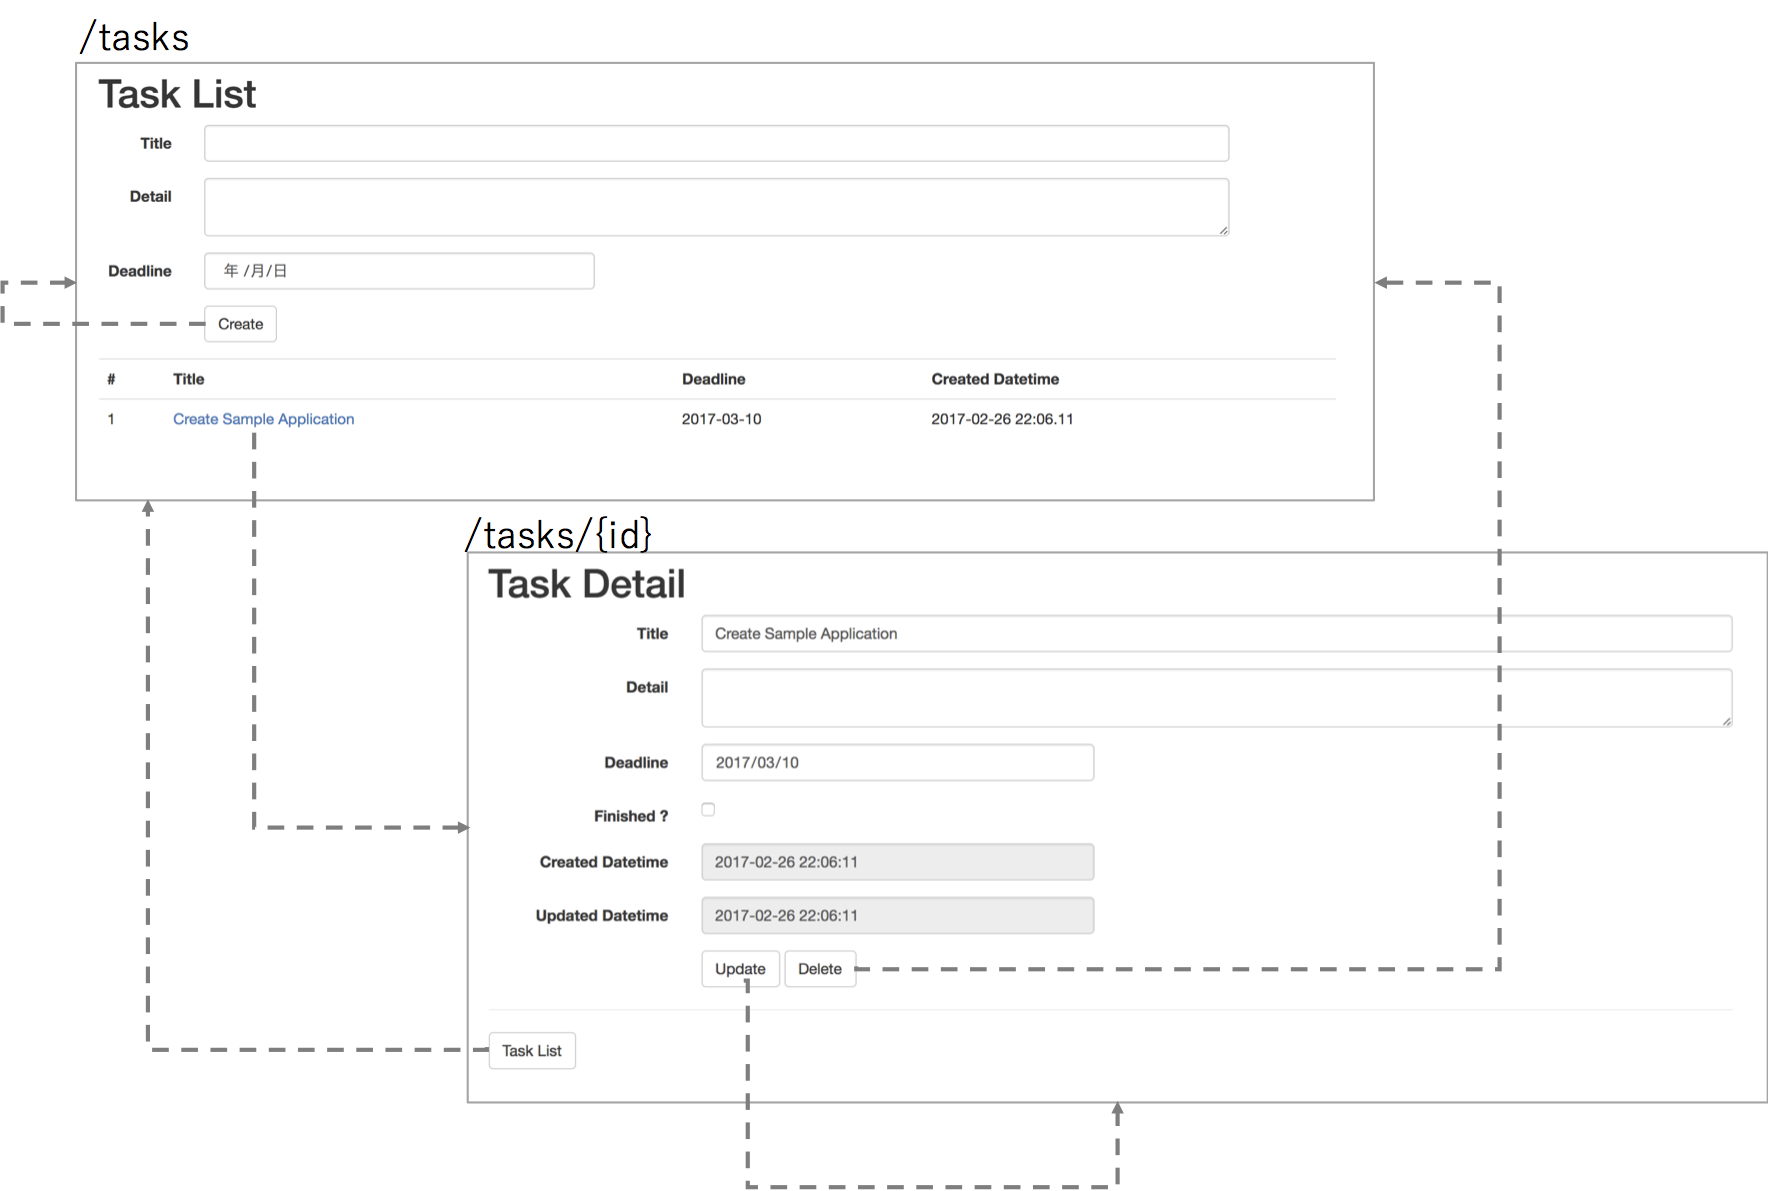
Client(Web UI)
Clientは、Service Providerから提供されているREST APIを使用して、リソースオーナのタスク情報を管理するためのWeb UI(タスク一覧画面とタスク詳細画面)を提供します。
| エンドポイント名 | エンドポイント概要 | アクセスを許可する条件 |
|---|---|---|
| GET /tasks | リソースサーバから取得したタスク情報のタスク一覧画面に表示する | 認証済みの利用者 |
| POST /tasks | リソースサーバにタスク情報を作成する | 認証済みの利用者 |
| GET /tasks/{id} | リソースサーバから取得したタスク情報をタスク詳細画面に表示する | 認証済みの利用者 |
| POST /tasks/{id}?update | リソースサーバで管理しているタスク情報を更新する | 認証済みの利用者 |
| POST /tasks/{id}?delete | リソースサーバで管理しているタスク情報を削除する | 認証済みの利用者 |
Note: タスク管理用UIの認証・認可
Client側で用意するタスク管理用の画面は、Client側のアプリケーションのユーザ認証を必要として、ユーザ認証にはSpring Securityが提供しているBasic認証を使用して行います。
画面イメージと画面遷移は以下の通りとする。
アプリケーションの構成
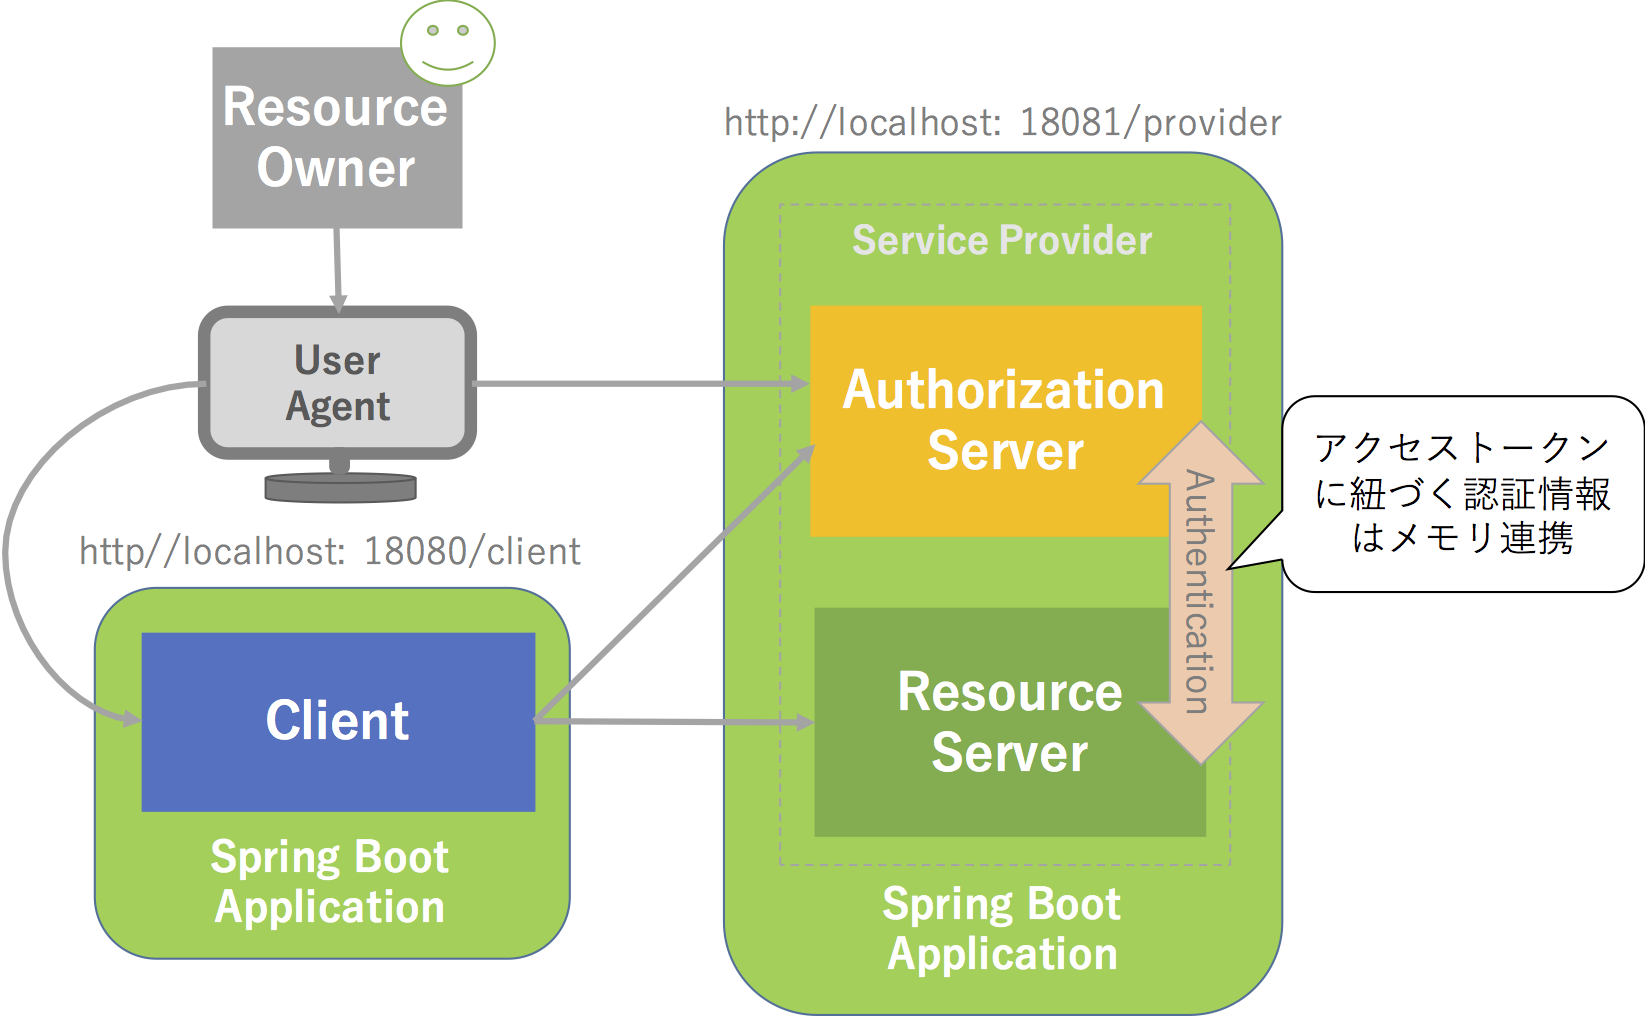
今回は、「クライアント」と「サービスプロバイダ(認可サーバ+リソースサーバ)」という2つのSpring Bootアプリケーションを作成して、認可コードグラントフローでAPIの認証・認可を行うアプリケーションを構築します。なお、認可サーバとリソースサーバ間でのアクセストークン及びアクセストークンに紐づく認証情報の連携は、Webアプリケーション上でのインメモリ連携とします。
Warning:
本エントリーで作るアプリケーションはHTTP通信を使用して動かしますが・・・OAuth 2.0のプロトコルフローでは、リソースオーナ及びClientの認証やアクセストークンを扱うエンドポイントはHTTPS通信を使用する必要があります。
Note:
認可サーバとリソースサーバは役割が違うため、以下のような感じで独立したWebアプリケーションとして作成するケースの方が多いと思いますが、今回はアプリケーション構成のシンプルさを優先し、認可サーバとリソースサーバはひとつのSpring Bootアプリケーションで実現することにしました。
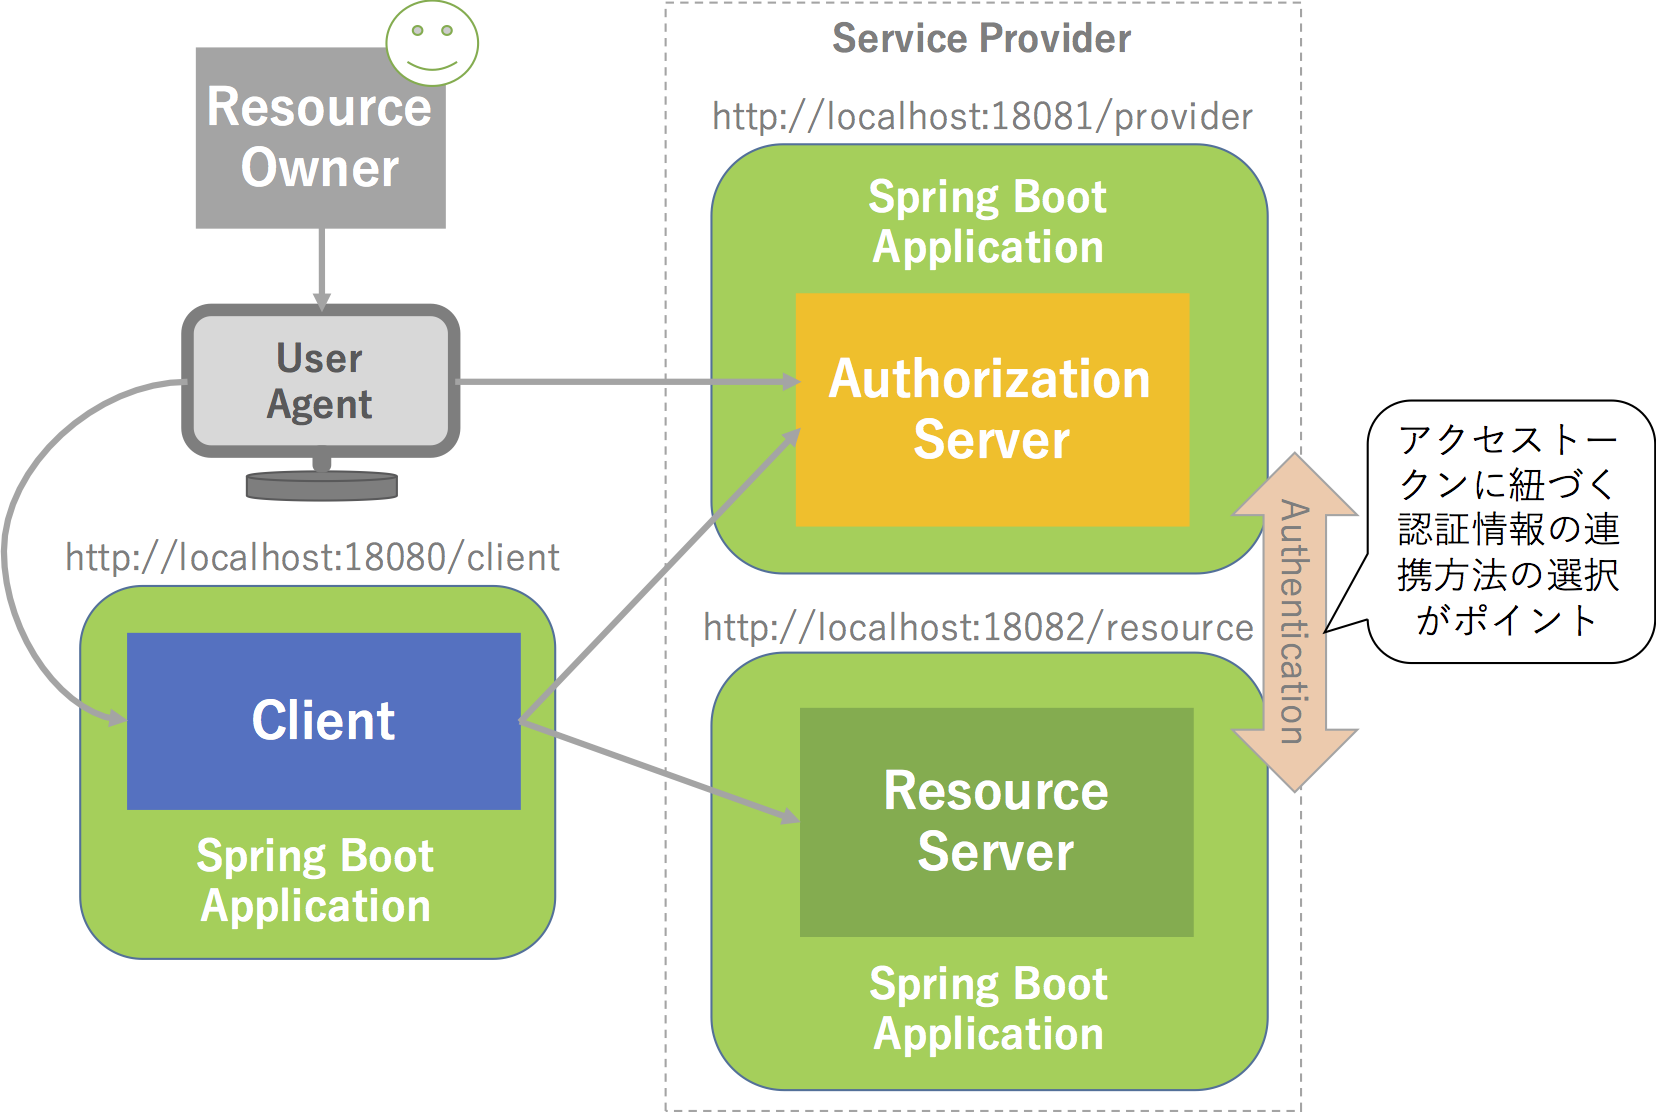
認可サーバとリソースサーバを別のWebアプリケーションとして作成する場合は、アクセストークン及びアクセストークンに紐づく認証情報をサーバ間で連携方法の選択がひとつのポインントになります。なお、認可サーバとリソースサーバをわけた際の実装方法などについては、次回以降で紹介する予定です。
動作検証済みバージョン
本エントリーで作成するアプリケーションは、以下のバージョンのライブラリを使用して検証しています。
- Spring Boot 1.5.1.RELEASE
- Spring Framework 4.3.6.RELEASE
- Spring Security 4.2.1.RELEASE
- Spring security OAuth 2.0.12.RELEASE
- Thymeleaf 2.1.5.RELEASE
- H2 Database 1.4.193
開発プロジェクトの作成
では、実際にアプリケーションを作って、認可コードグラントフローによるREST APIの認証・認可を体感してみましょう。
まず、Spring Bootアプリケーションの開発プロジェクト作成しましょう。ここではコマンドラインでプロジェクトを作成する例になっていますが、SPRING INITIALIZRのWeb UIやお使いのIDEの機能で生成しても(もちろん)OKです!!
今回は2つのアプリケーションを作るので、それらのアプリケーションを格納する親ディレクトリを作成します。
$ mkdir spring-security-oauth-demo
$ cd spring-security-oauth-demo
作成したディレクトリに移動した後に、Service ProviderとClient用のSpring Bootアプリケーションの開発プロジェクトを作成します。
Service Provider用の開発プロジェクト作成
$ curl -s https://start.spring.io/starter.tgz\
       -d name=service-provider\
       -d artifactId=service-provider\
       -d dependencies=web,jdbc,h2\
       -d baseDir=service-provider\
       | tar -xzvf -
Client用の開発プロジェクト作成
$ curl -s https://start.spring.io/starter.tgz\
       -d name=client\
       -d artifactId=client\
       -d dependencies=thymeleaf\
       -d baseDir=client\
       | tar -xzvf -
ビルド用のプロジェクト作成
Service ProviderまたはClientの開発プロジェクトからMavenラッパーなど必要なファイルをコピーします。
$ cp -r client/.mvn .mvn
$ cp client/mvnw* .
$ cp client/.gitignore .
$ cp client/pom.xml .
コピーしたpom.xmlをビルド用の設定に修正します。ここではservice-providerとclientをサブモジュールとして管理するように設定しています。こうすることで、service-providerとclientをまとめてMavenビルドすることができるようになります。
$ vi pom.xml
<?xml version="1.0" encoding="UTF-8"?>
<project xmlns="http://maven.apache.org/POM/4.0.0" xmlns:xsi="http://www.w3.org/2001/XMLSchema-instance"
        xsi:schemaLocation="http://maven.apache.org/POM/4.0.0 http://maven.apache.org/xsd/maven-4.0.0.xsd">
        <modelVersion>4.0.0</modelVersion>

        <groupId>com.example</groupId>
        <artifactId>spring-security-oauth-demo</artifactId>
        <version>0.0.1-SNAPSHOT</version>
        <packaging>pom</packaging>

        <name>spring-seucirty-oauth-demo</name>
        <description>Spring Security OAuth Demo project for Spring Boot</description>

        <modules>
                <module>service-provider</module>
                <module>client</module>
        </modules>

</project>
Service Providerに依存ライブラリを追加
Service Providerに、「Spring Security OAuth」「JacksonのJSR 310用拡張モジュール」「JTS Topology Suite」を追加します。(「JTS Topology Suite」は今回のエントリーに直接関係なのですが・・・H2 Databaseが使用していて実行時にエラーがでるので追加しています)
$ vi service-provider/pom.xml
<dependency>
	<groupId>org.springframework.security.oauth</groupId>
	<artifactId>spring-security-oauth2</artifactId>
</dependency>
<dependency>
	<groupId>com.fasterxml.jackson.datatype</groupId>
	<artifactId>jackson-datatype-jsr310</artifactId>
</dependency>
<dependency>
	<groupId>com.vividsolutions</groupId>
	<artifactId>jts</artifactId>
	<version>1.13</version>
	<scope>runtime</scope>
</dependency>
Clientに依存ライブラリを追加
Clientに、「Spring Security OAuth」「JacksonのJSR 310用拡張モジュール」「ThymeleafのJSR 310用拡張モジュール」「Webjars Locator」「WebJar for Bootstrap」を追加します。
$ vi client/pom.xml
<dependency>
	<groupId>org.springframework.security.oauth</groupId>
	<artifactId>spring-security-oauth2</artifactId>
</dependency>
<dependency>
	<groupId>com.fasterxml.jackson.datatype</groupId>
	<artifactId>jackson-datatype-jsr310</artifactId>
</dependency>
<dependency>
	<groupId>org.thymeleaf.extras</groupId>
	<artifactId>thymeleaf-extras-java8time</artifactId>
</dependency>
<dependency>
	<groupId>org.webjars</groupId>
	<artifactId>webjars-locator</artifactId>
</dependency>
<dependency>
	<groupId>org.webjars</groupId>
	<artifactId>bootstrap</artifactId>
	<version>3.3.7-1</version>
</dependency>
Note:
「Webjars Locator」と「WebJar for Bootstrap」については、「Spring MVC(+Spring Boot)上での静的リソースへのアクセスを理解する」の中の・・・
で簡単に説明しているので、興味のある方はご覧ください。
Mavneビルドの確認
ビルド用のpom.xmlが格納されているディレクトリでMavneビルド(Maven Package)を行い、pom.xmlの設定の妥当性を確認します。以下のようなログがでればMavneビルドは成功です。
$ ./mvnw package
...
[INFO] ------------------------------------------------------------------------
[INFO] Building spring-seucirty-oauth-demo 0.0.1-SNAPSHOT
[INFO] ------------------------------------------------------------------------
[INFO] ------------------------------------------------------------------------
[INFO] Reactor Summary:
[INFO]
[INFO] service-provider ................................... SUCCESS [  3.899 s]
[INFO] client ............................................. SUCCESS [  2.697 s]
[INFO] spring-seucirty-oauth-demo ......................... SUCCESS [  0.000 s]
[INFO] ------------------------------------------------------------------------
[INFO] BUILD SUCCESS
[INFO] ------------------------------------------------------------------------
[INFO] Total time: 7.088 s
[INFO] Finished at: 2017-02-25T09:05:35+09:00
[INFO] Final Memory: 29M/395M
[INFO] ------------------------------------------------------------------------
Service Providerの作成
まずは、Service Providerを作成します。
Service Providerのサーバ設定
冒頭のアプリケーション構成で紹介した通り、Service Providerのポートを18081に、コンテキストパスを/providerにします。また、REST APIで扱うタスク情報がアプリケーションの再起動時に消えないようにするために、H2のファイルベースのデータベースを使用するようにします。
server.port=18081
server.context-path=/provider
spring.datasource.url=jdbc:h2:~/.h2/service-provider
Note:
Service ProviderとClientを同一ホスト(localhostなど)で動かす場合、
context-path(デフォルトは/)が同じだとセッションIDを管理するCookieが競合してHTTPセッションを正しく扱えないことがあるため、ローカル環境で動かす場合はcontext-pathの設定も必要になります。
テーブルのセットアップ
タスク情報を保存するためのテーブルを作成します。
CREATE TABLE IF NOT EXISTS tasks (
  id IDENTITY PRIMARY KEY
  , username VARCHAR(255) NOT NULL
  , title TEXT NOT NULL
  , detail TEXT
  , deadline DATE
  , finished BOOLEAN NOT NULL DEFAULT FALSE
  , created_at DATETIME DEFAULT SYSTIMESTAMP
  , updated_at DATETIME DEFAULT SYSTIMESTAMP
  , version BIGINT DEFAULT 1
);

CREATE INDEX IF NOT EXISTS idx_tasks_username ON tasks(username);
ドメインオブジェクトの作成
REST APIで扱うタスク情報を保持するドメインオブジェクトを作成します。
package com.example;

import java.time.LocalDate;
import java.time.LocalDateTime;

public class Task {

	private long id;
	private String username;
	private String title;
	private String detail;
	private LocalDate deadline;
	private boolean finished;
	private LocalDateTime createdAt;
	private LocalDateTime updatedAt;
	private long version;

	// getter/setter

}
Repositoryの作成
タスク情報を保持するドメインオブジェクトのRepositoryクラスを作成します。本エントリーではJPAなどのO/R Mapperは使わずに、Spring Frameworkが提供するデータアクセス機能(JdbcOperations)を利用して実装します。(実際には・・・名前ベースのパラメータが扱えるNamedParameterJdbcOperationsを使います)
Note:
JdbcOperations及びNamedParameterJdbcOperationsのBeanは、Spring BootのAutoConfigureの仕組みでBean定義されるため、開発者が明示的にBean定義する必要はありません。
package com.example;

import java.util.List;

import org.springframework.jdbc.core.BeanPropertyRowMapper;
import org.springframework.jdbc.core.namedparam.BeanPropertySqlParameterSource;
import org.springframework.jdbc.core.namedparam.MapSqlParameterSource;
import org.springframework.jdbc.core.namedparam.NamedParameterJdbcOperations;
import org.springframework.jdbc.support.GeneratedKeyHolder;
import org.springframework.stereotype.Repository;
import org.springframework.transaction.annotation.Transactional;

@Transactional
@Repository
public class TaskRepository {
	private final NamedParameterJdbcOperations jdbcOperations;

	public TaskRepository(NamedParameterJdbcOperations jdbcOperations) {
		this.jdbcOperations = jdbcOperations;
	}

	public List<Task> findAll(String username) {
		return jdbcOperations.query(
				"SELECT id, username, title, detail, deadline, finished, created_at, updated_at, version FROM tasks WHERE username = :username ORDER BY deadline DESC, id DESC",
				new MapSqlParameterSource("username", username), new BeanPropertyRowMapper<>(Task.class));
	}

	public Task findOne(long id) {
		return jdbcOperations.queryForObject(
				"SELECT id, username, title, detail, deadline, finished, created_at, updated_at, version FROM tasks WHERE id = :id",
				new MapSqlParameterSource("id", id), new BeanPropertyRowMapper<>(Task.class));
	}

	public void save(Task task) {
		if (task.getId() == null) {
			GeneratedKeyHolder holder = new GeneratedKeyHolder();
			jdbcOperations.update(
					"INSERT INTO tasks (username, title, detail, deadline, finished) VALUES(:username, :title, :detail, :deadline, :finished)",
					new BeanPropertySqlParameterSource(task), holder);
			task.setId(holder.getKey().longValue());
		} else {
			jdbcOperations.update(
					"UPDATE tasks SET title = :title, detail = :detail, deadline = :deadline, finished = :finished, updated_at = SYSTIMESTAMP, version = version + 1 WHERE id = :id",
					new BeanPropertySqlParameterSource(task));
		}
	}

	public void remove(long id) {
		jdbcOperations.update("DELETE FROM tasks WHERE id = :id", new MapSqlParameterSource("id", id));
	}

}
RestController(REST API)の作成
タスク情報に対するCRUD操作(REST API)を提供するControllerクラスを作成します。JdbcTemplate使用時に対象データが見つからないとEmptyResultDataAccessExceptionが発生するため、REST API用のHandlerメソッドに加え、EmptyResultDataAccessExceptionをハンドリングして404 Not Foundを返却するための例外ハンドリングメソッドも実装します。
package com.example;

import static org.springframework.web.servlet.mvc.method.annotation.MvcUriComponentsBuilder.on;
import static org.springframework.web.servlet.mvc.method.annotation.MvcUriComponentsBuilder.relativeTo;

import java.net.URI;
import java.security.Principal;
import java.util.List;
import java.util.Optional;

import org.springframework.dao.EmptyResultDataAccessException;
import org.springframework.http.HttpStatus;
import org.springframework.http.ResponseEntity;
import org.springframework.web.bind.annotation.DeleteMapping;
import org.springframework.web.bind.annotation.ExceptionHandler;
import org.springframework.web.bind.annotation.GetMapping;
import org.springframework.web.bind.annotation.PathVariable;
import org.springframework.web.bind.annotation.PostMapping;
import org.springframework.web.bind.annotation.PutMapping;
import org.springframework.web.bind.annotation.RequestBody;
import org.springframework.web.bind.annotation.RequestMapping;
import org.springframework.web.bind.annotation.ResponseStatus;
import org.springframework.web.bind.annotation.RestController;
import org.springframework.web.util.UriComponentsBuilder;

@RequestMapping("/api/tasks")
@RestController
public class TaskRestController {

	private final TaskRepository repository;

	TaskRestController(TaskRepository repository) {
		this.repository = repository;
	}

	@GetMapping
	List<Task> getTasks(Principal principal) {
		return repository.findAll(extractUsername(principal));
	}

	@PostMapping
	ResponseEntity<Void> postTask(@RequestBody Task task, Principal principal, UriComponentsBuilder uriBuilder) {
		task.setUsername(extractUsername(principal));
		repository.save(task);
		URI createdTaskUri = relativeTo(uriBuilder).withMethodCall(on(TaskRestController.class).getTask(task.getId()))
				.build().encode().toUri();
		return ResponseEntity.created(createdTaskUri).build();
	}

	@GetMapping("{id}")
	Task getTask(@PathVariable long id) {
		return repository.findOne(id);
	}

	@PutMapping("{id}")
	@ResponseStatus(HttpStatus.NO_CONTENT)
	void putTask(@PathVariable long id, @RequestBody Task task) {
		task.setId(id);
		repository.save(task);
	}

	@DeleteMapping("{id}")
	@ResponseStatus(HttpStatus.NO_CONTENT)
	void deleteTask(@PathVariable long id) {
		repository.remove(id);
	}

	private String extractUsername(Principal principal) {
		return Optional.ofNullable(principal).map(Principal::getName).orElse("none");
	}

	@ExceptionHandler(EmptyResultDataAccessException.class)
	@ResponseStatus(HttpStatus.NOT_FOUND)
	void handleEmptyResultDataAccessException() {
		// NOP
	}

}
REST APIの動作確認
作成したREST APIが正しく動作するか確認してみます。
Service Providerの起動
Spring Bootが提供しているMaven Pluginを使用して、Spring Bootアプリケーションを起動します。
$ ./mvnw -pl service-provider spring-boot:run
「タスク情報の一覧取得API」の呼び出し
では・・無邪気に「タスク情報の一覧取得API」を呼び出してみましょう!!
$ $ curl -D - -s http://localhost:18081/provider/api/tasks
HTTP/1.1 401
X-Content-Type-Options: nosniff
X-XSS-Protection: 1; mode=block
Cache-Control: no-cache, no-store, max-age=0, must-revalidate
Pragma: no-cache
Expires: 0
X-Frame-Options: DENY
Strict-Transport-Security: max-age=31536000 ; includeSubDomains
WWW-Authenticate: Basic realm="Spring"
Content-Type: application/json;charset=UTF-8
Transfer-Encoding: chunked
Date: Sat, 25 Feb 2017 01:53:04 GMT

{"timestamp":1487987584305,"status":401,"error":"Unauthorized","message":"Full authentication is required to access this resource","path":"/provider/api/tasks"}
どうやらBasic認証が必要みたいですね。
これは、Spring BootのAutoConfigureがSpring Securityのクラスをみつけると・・・デフォルトで全てのリクエストパス(/**)にBasic認証を要求する仕組みになっているためです。
今はREST APIの動作確認がしたいので、いったんBasic認証を無効化してしまいましょう。Spring Bootが要求するBasic認証は、security.basic.enabled=falseという設定を追加することで無効化することができます。
security.basic.enabled=false
Warning:
REST APIの動作確認が終わったらBasic認証を有効化してください!!
Basic認証を無効化した後にREST APIにアクセスすると、空のタスク一覧が取得できるようになりました。
$ curl -D - -s http://localhost:18081/provider/api/tasks
HTTP/1.1 200
Content-Type: application/json;charset=UTF-8
Transfer-Encoding: chunked
Date: Sat, 25 Feb 2017 02:01:57 GMT

[]
「タスク情報の作成API」の呼び出し
起動直後でタスク情報が1件も登録されてないので、「タスク情報の作成API」を呼び出してタスク情報を作成してみましょう。
$ curl -D - -s http://localhost:18081/provider/api/tasks -H "Content-Type: application/json" -X POST -d '{"title":"Test Title","detail":"Test Detail","deadline":"2017-02-28"}'
HTTP/1.1 201
Location: http://localhost:18081/provider/api/tasks/1
Content-Length: 0
Date: Sat, 25 Feb 2017 02:17:37 GMT
タスク情報の作成に成功すると、Locationヘッダに作成したタスク情報にアクセスするためのURLが設定されます。
「タスク情報の取得API」の呼び出し
「タスク情報の取得API」を呼び出して(Locationヘッダに設定されているURLにアクセスして)、作成したタスク情報を取得してみましょう。
$ curl -D - -s http://localhost:18081/provider/api/tasks/1
HTTP/1.1 200
Content-Type: application/json;charset=UTF-8
Transfer-Encoding: chunked
Date: Sat, 25 Feb 2017 02:29:12 GMT

{"id":1,"username":"none","title":"Test Title","detail":"Test Detail","deadline":[2017,2,28],"finished":false,"createdAt":[2017,2,25,11,17,37,671000000],"updatedAt":[2017,2,25,11,17,37,671000000],"version":1}
なにやらタスク情報が取得できましたが・・・日付・日時のところのフォーマットがちょっと残念な感じなので、フォーマット済みの値が出力されるようにしてみましょう。フォーマット済みの日付・日時を出力したい場合は、spring.jackson.serialization.write-dates-as-timestamps=falseを設定してください。
spring.jackson.serialization.write-dates-as-timestamps=false
spring.jackson.serialization.write-dates-as-timestamps=falseを設定した後に再度アクセスすると、それっぽい形式にフォーマットされていることが確認できます。
$ curl -D - -s http://localhost:18081/provider/api/tasks/1
HTTP/1.1 200
Content-Type: application/json;charset=UTF-8
Transfer-Encoding: chunked
Date: Sat, 25 Feb 2017 02:31:13 GMT

{"id":1,"username":"none","title":"Test Title","detail":"Test Detail","deadline":"2017-02-28","finished":false,"createdAt":"2017-02-25T11:17:37.671","updatedAt":"2017-02-25T11:17:37.671","version":1}
「タスク情報の更新API」の呼び出し
せっかくなので・・・「タスク情報の更新API」を呼び出して、タスク情報を更新してみます。
$ curl -D - -s http://localhost:18081/provider/api/tasks/1 -H "Content-Type: application/json" -X PUT -d '{"title":"Test Title(Edit)","detail":"Test Detail(Edit)","deadline":"2017-03-31"}'
HTTP/1.1 204
Date: Sat, 25 Feb 2017 02:33:58 GMT
更新したタスク情報を取得すると、正しく更新できていることが確認できます。
$ curl -D - -s http://localhost:18081/provider/api/tasks/1
HTTP/1.1 200
Content-Type: application/json;charset=UTF-8
Transfer-Encoding: chunked
Date: Sat, 25 Feb 2017 02:34:21 GMT

{"id":1,"username":"none","title":"Test Title(Edit)","detail":"Test Detail(Edit)","deadline":"2017-03-31","finished":false,"createdAt":"2017-02-25T11:17:37.671","updatedAt":"2017-02-25T11:33:58.51","version":2}
「タスク情報の削除API」の呼び出し
最後の「タスク情報の削除API」を呼び出し、作成したタスク情報を削除してみます。
$ curl -D - -s http://localhost:18081/provider/api/tasks/1 -X DELETE
HTTP/1.1 204
Date: Sat, 25 Feb 2017 02:35:20 GMT
削除したタスク情報を取得しようとすると、対象データがないことを通知するクライアントエラー(404: Not Found)します。
$ curl -D - -s http://localhost:18081/provider/api/tasks/1
HTTP/1.1 404
Content-Length: 0
Date: Sat, 25 Feb 2017 02:35:37 GMT
認可サーバのセットアップ
コンフィギュレーションクラスに@EnableAuthorizationServerを付与して、OAuthの認証・認可に必要なBean定義を行い、認可サーバ上に「認可エンドポイント」と「トークンエンドポイント」を公開します。
package com.example;

import org.springframework.context.annotation.Configuration;
import org.springframework.security.oauth2.config.annotation.web.configuration.EnableAuthorizationServer;

@EnableAuthorizationServer
@Configuration
public class AuthorizationServerConfiguration {
}
また、Spring Bootのデフォルトだと以下の値が起動時にランダムに割り当てられるため、固定値を設定するようにします。
- デフォルトユーザ(
user)のパスワード - デフォルトクライアントのクライアントID
- デフォルトクライアントのシークレット
security.user.password=password
security.oauth2.client.client-id=client
security.oauth2.client.client-secret=secret
さらに、デフォルトクライアントが扱えるスコープとグラントタイプの指定も行いましょう。「passowrd:リソースオーナパスワードクレデンシャル」は本来であれば不要なのですが、CUI(cURLコマンド)を使用して認可サーバとリソースサーバの動作確認を行うために指定しておきます。
security.oauth2.client.scope=read,write
security.oauth2.client.authorized-grant-types=authorization_code,password
この状態でService Providerを起動すると以下のようなログが出力され、認可サーバにOAuth用のエンドポイントが公開されたことがわかります。
...
2017-02-25 13:41:48.269  INFO 75893 --- [           main] .s.o.p.e.FrameworkEndpointHandlerMapping : Mapped "{[/oauth/authorize]}" onto public org.springframework.web.servlet.ModelAndView org.springframework.security.oauth2.provider.endpoint.AuthorizationEndpoint.authorize(java.util.Map<java.lang.String, java.lang.Object>,java.util.Map<java.lang.String, java.lang.String>,org.springframework.web.bind.support.SessionStatus,java.security.Principal)
2017-02-25 13:41:48.270  INFO 75893 --- [           main] .s.o.p.e.FrameworkEndpointHandlerMapping : Mapped "{[/oauth/authorize],methods=[POST],params=[user_oauth_approval]}" onto public org.springframework.web.servlet.View org.springframework.security.oauth2.provider.endpoint.AuthorizationEndpoint.approveOrDeny(java.util.Map<java.lang.String, java.lang.String>,java.util.Map<java.lang.String, ?>,org.springframework.web.bind.support.SessionStatus,java.security.Principal)
2017-02-25 13:41:48.271  INFO 75893 --- [           main] .s.o.p.e.FrameworkEndpointHandlerMapping : Mapped "{[/oauth/token],methods=[GET]}" onto public org.springframework.http.ResponseEntity<org.springframework.security.oauth2.common.OAuth2AccessToken> org.springframework.security.oauth2.provider.endpoint.TokenEndpoint.getAccessToken(java.security.Principal,java.util.Map<java.lang.String, java.lang.String>) throws org.springframework.web.HttpRequestMethodNotSupportedException
2017-02-25 13:41:48.271  INFO 75893 --- [           main] .s.o.p.e.FrameworkEndpointHandlerMapping : Mapped "{[/oauth/token],methods=[POST]}" onto public org.springframework.http.ResponseEntity<org.springframework.security.oauth2.common.OAuth2AccessToken> org.springframework.security.oauth2.provider.endpoint.TokenEndpoint.postAccessToken(java.security.Principal,java.util.Map<java.lang.String, java.lang.String>) throws org.springframework.web.HttpRequestMethodNotSupportedException
2017-02-25 13:41:48.272  INFO 75893 --- [           main] .s.o.p.e.FrameworkEndpointHandlerMapping : Mapped "{[/oauth/check_token]}" onto public java.util.Map<java.lang.String, ?> org.springframework.security.oauth2.provider.endpoint.CheckTokenEndpoint.checkToken(java.lang.String)
2017-02-25 13:41:48.273  INFO 75893 --- [           main] .s.o.p.e.FrameworkEndpointHandlerMapping : Mapped "{[/oauth/confirm_access]}" onto public org.springframework.web.servlet.ModelAndView org.springframework.security.oauth2.provider.endpoint.WhitelabelApprovalEndpoint.getAccessConfirmation(java.util.Map<java.lang.String, java.lang.Object>,javax.servlet.http.HttpServletRequest) throws java.lang.Exception
2017-02-25 13:41:48.290  INFO 75893 --- [           main] .s.o.p.e.FrameworkEndpointHandlerMapping : Mapped "{[/oauth/error]}" onto public org.springframework.web.servlet.ModelAndView org.springframework.security.oauth2.provider.endpoint.WhitelabelErrorEndpoint.handleError(javax.servlet.http.HttpServletRequest)
...
リソースサーバのセットアップ
コンフィギュレーションクラスに@EnableAuthorizationServerを付与して、OAuthの認証・認可に必要なBean定義を行い、ResourceServerConfigurerAdapterのconfigure(HttpSecurity)をオーバーライドしてREST APIへの認可設定を行います。
package com.example;

import org.springframework.context.annotation.Configuration;
import org.springframework.http.HttpMethod;
import org.springframework.security.config.annotation.web.builders.HttpSecurity;
import org.springframework.security.config.http.SessionCreationPolicy;
import org.springframework.security.oauth2.config.annotation.web.configuration.EnableResourceServer;
import org.springframework.security.oauth2.config.annotation.web.configuration.ResourceServerConfigurerAdapter;

@EnableResourceServer
@Configuration
public class ResourceServerConfiguration extends ResourceServerConfigurerAdapter {
	@Override
	public void configure(HttpSecurity http) throws Exception {
		http.antMatcher("/api/**")
			.authorizeRequests()
			.antMatchers(HttpMethod.GET, "/**").access("#oauth2.hasScope('read')")
			.antMatchers(HttpMethod.POST, "/**").access("#oauth2.hasScope('write')")
			.antMatchers(HttpMethod.PUT, "/**").access("#oauth2.hasScope('write')")
			.antMatchers(HttpMethod.DELETE, "/**").access("#oauth2.hasScope('write')");
	}
}
上記設定を行うことで、/api配下へのリクエストに対してOAuthの認証・認可を適用することができます。
認可・リソースサーバの動作確認
認可サーバとリソースサーバのセットアップが終わったところで、リソースサーバにアクセスしてみましょう。
$ curl -D - -s http://localhost:18081/provider/api/tasks
HTTP/1.1 401
X-Content-Type-Options: nosniff
X-XSS-Protection: 1; mode=block
Cache-Control: no-cache, no-store, max-age=0, must-revalidate
Pragma: no-cache
Expires: 0
X-Frame-Options: DENY
Cache-Control: no-store
Pragma: no-cache
WWW-Authenticate: Bearer realm="oauth2-resource", error="unauthorized", error_description="Full authentication is required to access this resource"
Content-Type: application/json;charset=UTF-8
Transfer-Encoding: chunked
Date: Sat, 25 Feb 2017 09:39:55 GMT

{"error":"unauthorized","error_description":"Full authentication is required to access this resource"}
なにやらエラーになりました。エラー内容をみてみると・・・認証エラー(401 Unauthorized)となり、OAuthのBearerトークンによる認証が必要であることが通知されています。
アクセストークンの取得
本エントリーは「認可コードグラント」を使用してアクセストークンを取得してREST APIにアクセスする方法を説明するのが最終的な目的ですが、まずは・・・お手軽にアクセストークンを取得できる「リソースオーナーパスワードクレデンシャル」を使用してタスク情報にアクセスするためのアクセストークンを取得してみましょう。
$ curl -D - -s -u client:secret http://localhost:18081/provider/oauth/token -X POST -d grant_type=password -d username=user -d password=password
HTTP/1.1 200
X-Content-Type-Options: nosniff
X-XSS-Protection: 1; mode=block
Cache-Control: no-cache, no-store, max-age=0, must-revalidate
Pragma: no-cache
Expires: 0
X-Frame-Options: DENY
Content-Type: application/json;charset=UTF-8
Transfer-Encoding: chunked
Date: Sat, 25 Feb 2017 14:08:39 GMT

{"access_token":"d2fbded0-b8f6-4c2d-bee5-6dd3cafc0097","token_type":"bearer","expires_in":43138,"scope":"read write"}
リソースサーバへのアクセス
取得したアクセストークンを「Authorization」ヘッダに指定してリソースサーバへ再度アクセスしましょう。
$ curl -D - -s http://localhost:18081/provider/api/tasks -H "Authorization: Bearer d2fbded0-b8f6-4c2d-bee5-6dd3cafc0097"
HTTP/1.1 200
X-Content-Type-Options: nosniff
X-XSS-Protection: 1; mode=block
Cache-Control: no-cache, no-store, max-age=0, must-revalidate
Pragma: no-cache
Expires: 0
X-Frame-Options: DENY
Content-Type: application/json;charset=UTF-8
Transfer-Encoding: chunked
Date: Sat, 25 Feb 2017 14:11:17 GMT

[]
せっかくなので・・・新しいタスクを作成し、作成したタスク情報を取得してみましょう。
$ curl -D - -s http://localhost:18081/provider/api/tasks -H "Authorization: Bearer d2fbded0-b8f6-4c2d-bee5-6dd3cafc0097" -H "Content-Type: application/json" -X POST -d '{"title":"Test Title","detail":"Test Detail","deadline":"2017-02-28"}'
HTTP/1.1 201
X-Content-Type-Options: nosniff
X-XSS-Protection: 1; mode=block
Cache-Control: no-cache, no-store, max-age=0, must-revalidate
Pragma: no-cache
Expires: 0
X-Frame-Options: DENY
Location: http://localhost:18081/provider/api/tasks/6
Content-Length: 0
Date: Sat, 25 Feb 2017 15:24:40 GMT
$ curl -D - -s http://localhost:18081/provider/api/tasks/6 -H "Authorization: Bearer d2fbded0-b8f6-4c2d-bee5-6dd3cafc0097"
HTTP/1.1 200
X-Content-Type-Options: nosniff
X-XSS-Protection: 1; mode=block
Cache-Control: no-cache, no-store, max-age=0, must-revalidate
Pragma: no-cache
Expires: 0
X-Frame-Options: DENY
Content-Type: application/json;charset=UTF-8
Transfer-Encoding: chunked
Date: Sat, 25 Feb 2017 15:26:13 GMT

{"id":6,"username":"user","title":"Test Title","detail":"Test Detail","deadline":"2017-02-28","finished":false,"createdAt":"2017-02-26T00:24:40.843","updatedAt":"2017-02-26T00:24:40.843","version":1}
Client(Web UI)の作成
Service Provider(認可サーバとリソースサーバ)の作成が終わったので、リソースサーバで管理しているタスク情報を操作するためのWeb UIを作成します。
Clientのサーバ設定
冒頭のアプリケーション構成で紹介した通り、Cleintのポートを18080に、コンテキストパスを/clientにします。
server.port=18080
server.context-path=/client
今回のアプリケーションでは、Client側のユーザ認証はSpring BootがセットアップしてくれるBasic認証を使用します。デフォルトの動作だと起動毎にデフォルトユーザのパスワードがかわるので、パスワードを固定化しておきます。
security.user.password=password
Clientのセットアップ
コンフィギュレーションクラスに@EnableOAuth2Clientを付与して、アクセストークンを管理するコンポーネント(OAuth2ClientContext)やリソースオーナからの認可を取得するためにユーザエージェント(ブラウザ)を認可サーバへ誘導するためのコンポーネント(OAuth2ClientContextFilter)などをBean定義します。さらに、OAuth用に拡張されたRestTemplate(OAuth2RestTemplate)のBean定義を行います。OAuth2RestTemplateを使用すると、OAuth関連の処理(認可サーバからアクセストークンを取得する処理など)をアプリケーションが意識する必要がなくなり、OAuthによる認証・認可を行わない時と同じようにREST APIを呼び出すことができるようになります。
package com.example;

import org.springframework.context.annotation.Bean;
import org.springframework.context.annotation.Configuration;
import org.springframework.security.oauth2.client.OAuth2ClientContext;
import org.springframework.security.oauth2.client.OAuth2RestTemplate;
import org.springframework.security.oauth2.client.resource.OAuth2ProtectedResourceDetails;
import org.springframework.security.oauth2.config.annotation.web.configuration.EnableOAuth2Client;

@EnableOAuth2Client
@Configuration
public class ClientConfiguration {

	@Bean
	OAuth2RestTemplate oauth2RestTemplate(OAuth2ClientContext context, OAuth2ProtectedResourceDetails details) {
		return new OAuth2RestTemplate(details, context);
	}

}
加えて、OAuth関連(APIのURL、認可サーバのURL、クライアント情報)の設定を追加します。
# APIのURL
api.url=http://localhost:18081/provider/api

# 認可サーバのエンドポイントのURL
auth.url=http://localhost:18081/provider/oauth
security.oauth2.client.access-token-uri=${auth.url}/token
security.oauth2.client.user-authorization-uri=${auth.url}/authorize

# クライアント情報の設定
security.oauth2.client.client-id=client
security.oauth2.client.client-secret=secret
security.oauth2.client.scope=read,write
Note:
Spring BootのAutoConfigureのデフォルトでは、「認可コードグラントフロー」を使用してリソースサーバへアクセスするようにBean定義されます。
ドメインオブジェクトの作成
REST APIを介して操作するタスク情報を保持するドメインオブジェクトを作成します。(Service Providerを作成した時に作成したTaskクラスをClient側にコピーしてください)
package com.example;

import java.time.LocalDate;
import java.time.LocalDateTime;

public class Task {

	private long id;
	private String username;
	private String title;
	private String detail;
	private LocalDate deadline;
	private boolean finished;
	private LocalDateTime createdAt;
	private LocalDateTime updatedAt;
	private long version;

	// getter/setter

}
Repositoryの作成
タスク情報を保持するドメインオブジェクトのRepositoryクラスを作成します。
このクラスでは、Spring Security OAuthが提供しているRestOperationsインタフェースの実装クラス(OAuth2RestTemplate)のメソッドを使用して、リソースサーバ上で管理しているタスク情報にアクセスします。
package com.example;

import java.util.Arrays;
import java.util.List;

import org.springframework.beans.factory.annotation.Value;
import org.springframework.stereotype.Repository;
import org.springframework.web.client.RestOperations;

@Repository
public class TaskRepository {

	private final RestOperations restOperations;
	private final String resourcesUrl;
	private final String resourceUrlTemplate;

	TaskRepository(RestOperations restOperations,
			@Value("${api.url}/tasks") String resourcesUrl) {
		this.restOperations = restOperations;
		this.resourcesUrl = resourcesUrl;
		this.resourceUrlTemplate = resourcesUrl + "/{id}";
	}

	public List<Task> findAll() {
		return Arrays.asList(restOperations.getForObject(resourcesUrl, Task[].class));
	}

	public Task findOne(long id) {
		return restOperations.getForObject(resourceUrlTemplate, Task.class, id);
	}

	public void save(Task task) {
		if (task.getId() == null) {
			restOperations.postForLocation(resourcesUrl, task);
		} else {
			restOperations.put(resourceUrlTemplate, task, task.getId());
		}
	}

	public void remove(long id) {
		restOperations.delete(resourceUrlTemplate, id);
	}

}
Controllerの作成
タスク情報のCRUD操作を行うためのWeb UIを提供するControllerクラスを作成します。
package com.example;

import java.time.LocalDate;
import java.time.LocalDateTime;
import java.util.List;

import org.hibernate.validator.constraints.NotEmpty;
import org.springframework.beans.BeanUtils;
import org.springframework.format.annotation.DateTimeFormat;
import org.springframework.stereotype.Controller;
import org.springframework.ui.Model;
import org.springframework.validation.BindingResult;
import org.springframework.validation.annotation.Validated;
import org.springframework.web.bind.annotation.GetMapping;
import org.springframework.web.bind.annotation.ModelAttribute;
import org.springframework.web.bind.annotation.PathVariable;
import org.springframework.web.bind.annotation.PostMapping;
import org.springframework.web.bind.annotation.RequestMapping;
import org.springframework.web.servlet.mvc.support.RedirectAttributes;

@RequestMapping("/tasks")
@Controller
public class TaskController {

	private final TaskRepository repository;

	TaskController(TaskRepository repository) {
		this.repository = repository;
	}

	@ModelAttribute
	TaskForm setUpForm() {
		return new TaskForm();
	}

	@GetMapping
	String list(Model model) {
		List<Task> taskList = repository.findAll();
		model.addAttribute(taskList);
		return "task/list";
	}

	@PostMapping
	String create(@Validated TaskForm form, BindingResult bindingResult, Model model) {
		if (bindingResult.hasErrors()) {
			return list(model);
		}
		Task task = new Task();
		BeanUtils.copyProperties(form, task);
		repository.save(task);
		return "redirect:/tasks";
	}

	@GetMapping("{id}")
	String detail(@PathVariable long id, TaskForm form, Model model) {
		Task task = repository.findOne(id);
		BeanUtils.copyProperties(task, form);
		model.addAttribute(task);
		return "task/detail";
	}

	@PostMapping(path = "{id}", params = "update")
	String update(@PathVariable long id, @Validated TaskForm form, BindingResult bindingResult,
			Model model, RedirectAttributes redirectAttributes) {
		if (bindingResult.hasErrors()) {
			return "task/detail";
		}
		Task task = new Task();
		BeanUtils.copyProperties(form, task);
		repository.save(task);
		redirectAttributes.addAttribute("id", id);
		return "redirect:/tasks/{id}";
	}

	@PostMapping(path = "{id}", params = "delete")
	String delete(@PathVariable long id) {
		repository.remove(id);
		return "redirect:/tasks";
	}

	static class TaskForm {
		private static final String DATE_TIME_FORMAT = "uuuu-MM-dd HH:mm:ss";

		private Long id;
		@NotEmpty private String title;
		private String detail;
		@DateTimeFormat(iso = DateTimeFormat.ISO.DATE) private LocalDate deadline;
		private boolean finished;
		@DateTimeFormat(pattern = DATE_TIME_FORMAT) private LocalDateTime createdAt;
		@DateTimeFormat(pattern = DATE_TIME_FORMAT) private LocalDateTime updatedAt;
		private long version;

		public Long getId() {
			return id;
		}

		public void setId(Long id) {
			this.id = id;
		}

		public String getTitle() {
			return title;
		}

		public void setTitle(String title) {
			this.title = title;
		}

		public String getDetail() {
			return detail;
		}

		public void setDetail(String detail) {
			this.detail = detail;
		}

		public LocalDate getDeadline() {
			return deadline;
		}

		public void setDeadline(LocalDate deadline) {
			this.deadline = deadline;
		}

		public boolean isFinished() {
			return finished;
		}

		public void setFinished(boolean finished) {
			this.finished = finished;
		}

		public LocalDateTime getCreatedAt() {
			return createdAt;
		}

		public void setCreatedAt(LocalDateTime createdAt) {
			this.createdAt = createdAt;
		}

		public LocalDateTime getUpdatedAt() {
			return updatedAt;
		}

		public void setUpdatedAt(LocalDateTime updatedAt) {
			this.updatedAt = updatedAt;
		}

		public long getVersion() {
			return version;
		}

		public void setVersion(long version) {
			this.version = version;
		}
	}

}
Note:
登録日時(
createdAt)や更新日時(updatedAt)は入力項目ではないのでフォームの項目として保持すべきではありませんが、入力チェックエラーが出るたびにリソースサーバからタスク情報を取得するのも微妙なので、ちょっと乱暴ですが今回はフォームの項目に含めてしまいます。
タスク一覧画面の作成
リソースサーバから取得したタスク一覧を表示し、新しいタスク情報を作成するためのWeb UIを提供します。
<!DOCTYPE html>
<html xmlns="http://www.w3.org/1999/xhtml"
      xmlns:th="http://www.thymeleaf.org">
<head>
    <meta http-equiv="Content-Type" content="text/html; charset=UTF-8"/>
    <title>Task List</title>
    <link rel="stylesheet" href="https://maxcdn.bootstrapcdn.com/bootstrap/3.3.7/css/bootstrap.css" type="text/css"
          th:href="@{/webjars/bootstrap/css/bootstrap.css}"/>
    <style type="text/css">
        .strike {
            text-decoration: line-through;
        }
    </style>
</head>
<body>

<div class="container">

    <h1>Task List</h1>

    <div id="taskForm">
        <form action="list.html" method="post" class="form-horizontal"
              th:action="@{/tasks}" th:object="${taskForm}">
            <div class="form-group">
                <label for="title" class="col-sm-1 control-label">Title</label>
                <div class="col-sm-10">
                    <input type="text" class="form-control" id="title" th:field="*{title}"/>
                    <span class="text-error" th:errors="*{title}">error message</span>
                </div>
            </div>
            <div class="form-group">
                <label for="detail" class="col-sm-1 control-label">Detail</label>
                <div class="col-sm-10">
                    <textarea class="form-control" id="detail" th:field="*{detail}">
                    </textarea>
                    <span class="text-error" th:errors="*{detail}">error message</span>
                </div>
            </div>
            <div class="form-group">
                <label for="detail" class="col-sm-1 control-label">Deadline</label>
                <div class="col-sm-4">
                    <input type="date" class="form-control" id="detail" th:field="*{deadline}"/>
                    <span class="text-error" th:errors="*{deadline}">error message</span>
                </div>
            </div>
            <div class="form-group">
                <div class="col-sm-offset-1 col-sm-10">
                    <button type="submit" class="btn btn-default">Create</button>
                </div>
            </div>
        </form>
    </div>

    <table id="todoList" class="table table-hover" th:if="${not #lists.isEmpty(taskList)}">

        <tr>
            <th>#</th>
            <th>Title</th>
            <th>Deadline</th>
            <th>Created Datetime</th>
        </tr>

        <tr th:each="task : ${taskList}">
            <td th:text="${taskStat.count}">1</td>
            <td>
                <span th:class="${task.finished} ? 'strike'">
                    <a href="detail.html"
                       th:text="${task.title}" th:href="@{/tasks/{id}(id=${task.id})}">
                        Create Sample Application
                    </a>
                </span>
            </td>
            <td>
                <span th:text="${#temporals.format(task.deadline,'uuuu-MM-dd')}" th:if="${task.deadline != null}">2017-02-28</span>
            </td>
            <td>
                <span th:text="${#temporals.format(task.createdAt,'uuuu-MM-dd HH:mm.ss')}">2017-02-27 15:17:02</span>
            </td>
        </tr>

    </table>

</div>
</body>
</html>
タスク詳細画面の作成
リソースサーバから取得したタスク情報を表示し、更新及び削除するためのWeb UIを提供します。
<!DOCTYPE html>
<html xmlns="http://www.w3.org/1999/xhtml"
      xmlns:th="http://www.thymeleaf.org">
<head>
    <meta http-equiv="Content-Type" content="text/html; charset=UTF-8"/>
    <title>Task Detail</title>
    <link rel="stylesheet" href="https://maxcdn.bootstrapcdn.com/bootstrap/3.3.7/css/bootstrap.css" type="text/css"
          th:href="@{/webjars/bootstrap/css/bootstrap.css}"/>
</head>
<body>

<div class="container">

    <h1>Task Detail</h1>

    <div id="taskForm">
        <form action="detail.html" method="post" class="form-horizontal"
              th:action="@{/tasks/{id}(id=*{id})}" th:object="${taskForm}">
            <div class="form-group">
                <label for="title" class="col-sm-2 control-label">Title</label>
                <div class="col-sm-10">
                    <input class="form-control" id="title" value="Create Sample Application" th:field="*{title}"/>
                    <span class="text-error" th:errors="*{title}">error message</span>
                </div>
            </div>
            <div class="form-group">
                <label for="detail" class="col-sm-2 control-label">Detail</label>
                <div class="col-sm-10">
                    <textarea class="form-control" id="detail" th:field="*{detail}">
                    </textarea>
                    <span class="text-error" th:errors="*{detail}">error message</span>
                </div>
            </div>
            <div class="form-group">
                <label for="detail" class="col-sm-2 control-label">Deadline</label>
                <div class="col-sm-4">
                    <input type="date" class="form-control" id="detail" value="2017-03-10" th:field="*{deadline}"/>
                    <span class="text-error" th:errors="*{deadline}">error message</span>
                </div>
            </div>
            <div class="form-group">
                <label for="finished" class="col-sm-2 control-label">Finished ?</label>
                <div class="col-sm-2">
                    <input type="checkbox" id="finished" th:field="*{finished}"/>
                </div>
            </div>
            <div class="form-group">
                <label for="createdAt" class="col-sm-2 control-label">Created Datetime</label>
                <div class="col-sm-4">
                    <input id="createdAt" class="form-control" value="2017-02-28 15:00:01" th:field="*{createdAt}" readonly="readonly"/>
                </div>
            </div>
            <div class="form-group">
                <label for="updatedAt" class="col-sm-2 control-label">Updated Datetime</label>
                <div class="col-sm-4">
                    <input id="updatedAt" class="form-control" value="2017-02-28 15:00:01" th:field="*{updatedAt}" readonly="readonly"/>
                </div>
            </div>
            <div class="form-group">
                <div class="col-sm-offset-2 col-sm-10">
                    <input type="hidden" th:field="*{version}"/>
                    <button type="submit" class="btn btn-default" name="update">Update</button>
                    <button type="submit" class="btn btn-default" name="delete">Delete</button>
                </div>
            </div>
        </form>
    </div>

    <hr/>

    <a href="list.html" class="btn btn-default" th:href="@{/tasks}">Task List</a>

</div>
</body>
</html>
認可コードグラントフローを体感する
Service ProviderとClientのアプリケーションの作成が終わったので、実際にアプリケーションを使って認可コードグラントフローを体感してみましょう!!
アプリケーションの起動
まず、Service ProviderとClientのアプリケーションを起動します。
$ ./mvnw -pl service-provider spring-boot:run
...
2017-02-27 00:29:12.820  INFO 78931 --- [           main] o.s.j.e.a.AnnotationMBeanExporter        : Registering beans for JMX exposure on startup
2017-02-27 00:29:12.867  INFO 78931 --- [           main] s.b.c.e.t.TomcatEmbeddedServletContainer : Tomcat started on port(s): 18081 (http)
2017-02-27 00:29:12.872  INFO 78931 --- [           main] com.example.ServiceProviderApplication   : Started ServiceProviderApplication in 3.247 seconds (JVM running for 5.825)
$ ./mvnw -pl client spring-boot:run
...
2017-02-27 00:29:49.282  INFO 78940 --- [           main] o.s.j.e.a.AnnotationMBeanExporter        : Registering beans for JMX exposure on startup
2017-02-27 00:29:49.337  INFO 78940 --- [           main] s.b.c.e.t.TomcatEmbeddedServletContainer : Tomcat started on port(s): 18080 (http)
2017-02-27 00:29:49.344  INFO 78940 --- [           main] com.example.ClientApplication            : Started ClientApplication in 3.033 seconds (JVM running for 6.17)
タスク一覧画面の表示
ブラウザのアドレスバーに http://localhost:18080/client/tasks を入力して、タスク一覧画面を表示してみましょう。
初回アクセス時は、まずClient側のユーザ認証(Basic認証)が求められるので、ダイアログにユーザ名(user)とパスワード(password)を入力して「ログイン」ボタンを押下してください。

Client側のユーザ認証が成功すると、リソースオーナからの認可グラント(認可コード)を得るためにService Providerから提供されている認可エンドポイント(/oauth/authorize)にリダイレクトされます。初回アクセス時は、Service Provider側でのリソースオーナの認証(Basic認証)が求められるので、ダイアログにユーザ名(user)とパスワード(password)を入力して「ログイン」ボタンを押下してください。

Service Provider側のリソースオーナの認証が成功すると、Clientが要求したスコープに対してリソースオーナの認可を得るための画面(認可画面)が表示されるので、スコープ毎に許可・拒否を選択して「Authorize」ボタンを押下してください。(ここでは、全てのスコープを許可してください)

Note:
本エントリーでは、Spring Security OAuthが提供している認可画面を使用していますが、実際のアプリケーション開発ではカスタマイズするのが一般的だと思うので、次回以降でカスタマイズ方法を紹介したいと思います。
リソースオーナからの認可が終わると、タスク一覧画面が表示されます ![]()

タスクの登録
とはいえ・・・タスクが未登録のためちゃんとリソースサーバからタスク情報が取得できているのかわからない・・・ですね ![]()
なので・・・次にWeb UIを使ってタスクを登録してみましょう。タスク一覧画面内の入力フォームにタスク情報を入力して「Create」ボタンを押下してください。


タスク詳細画面の表示
タスク一覧にはタイトル、期限日、作成日時以外表示していないので、タスク詳細画面を表示してタスクの詳細情報を確認しましょう。タスク一覧のタイトルがリンクになっているので、表示したいタスクのタイトル(リンク)を押下してください。

タスクの更新・削除
タスクを更新または削除する場合は、タスク詳細画面の「Update」または「Delete」ボタンを押下してください。ここでは、期限日を「2017/03/15」に更新しています。(なお、削除は割愛します)


writeスコープ(一部のスコープ)を拒否してみる
アクセストークンと認可情報を破棄するために、Service Providerを再起動("Ctrl+C" + "./mvnw spring-boot:run")し、再度タスク一覧画面を表示します。すると・・・Service Providerの認可画面が表示されるので、writeスコープのアクセスを拒否します。

タスク一覧画面で新しいタスクを作成しようとすると・・・「Insufficient scope for this resource」というエラーメッセージが表示され、「タスク作成API」の呼び出しが拒否されました。

全スコープを拒否してみる
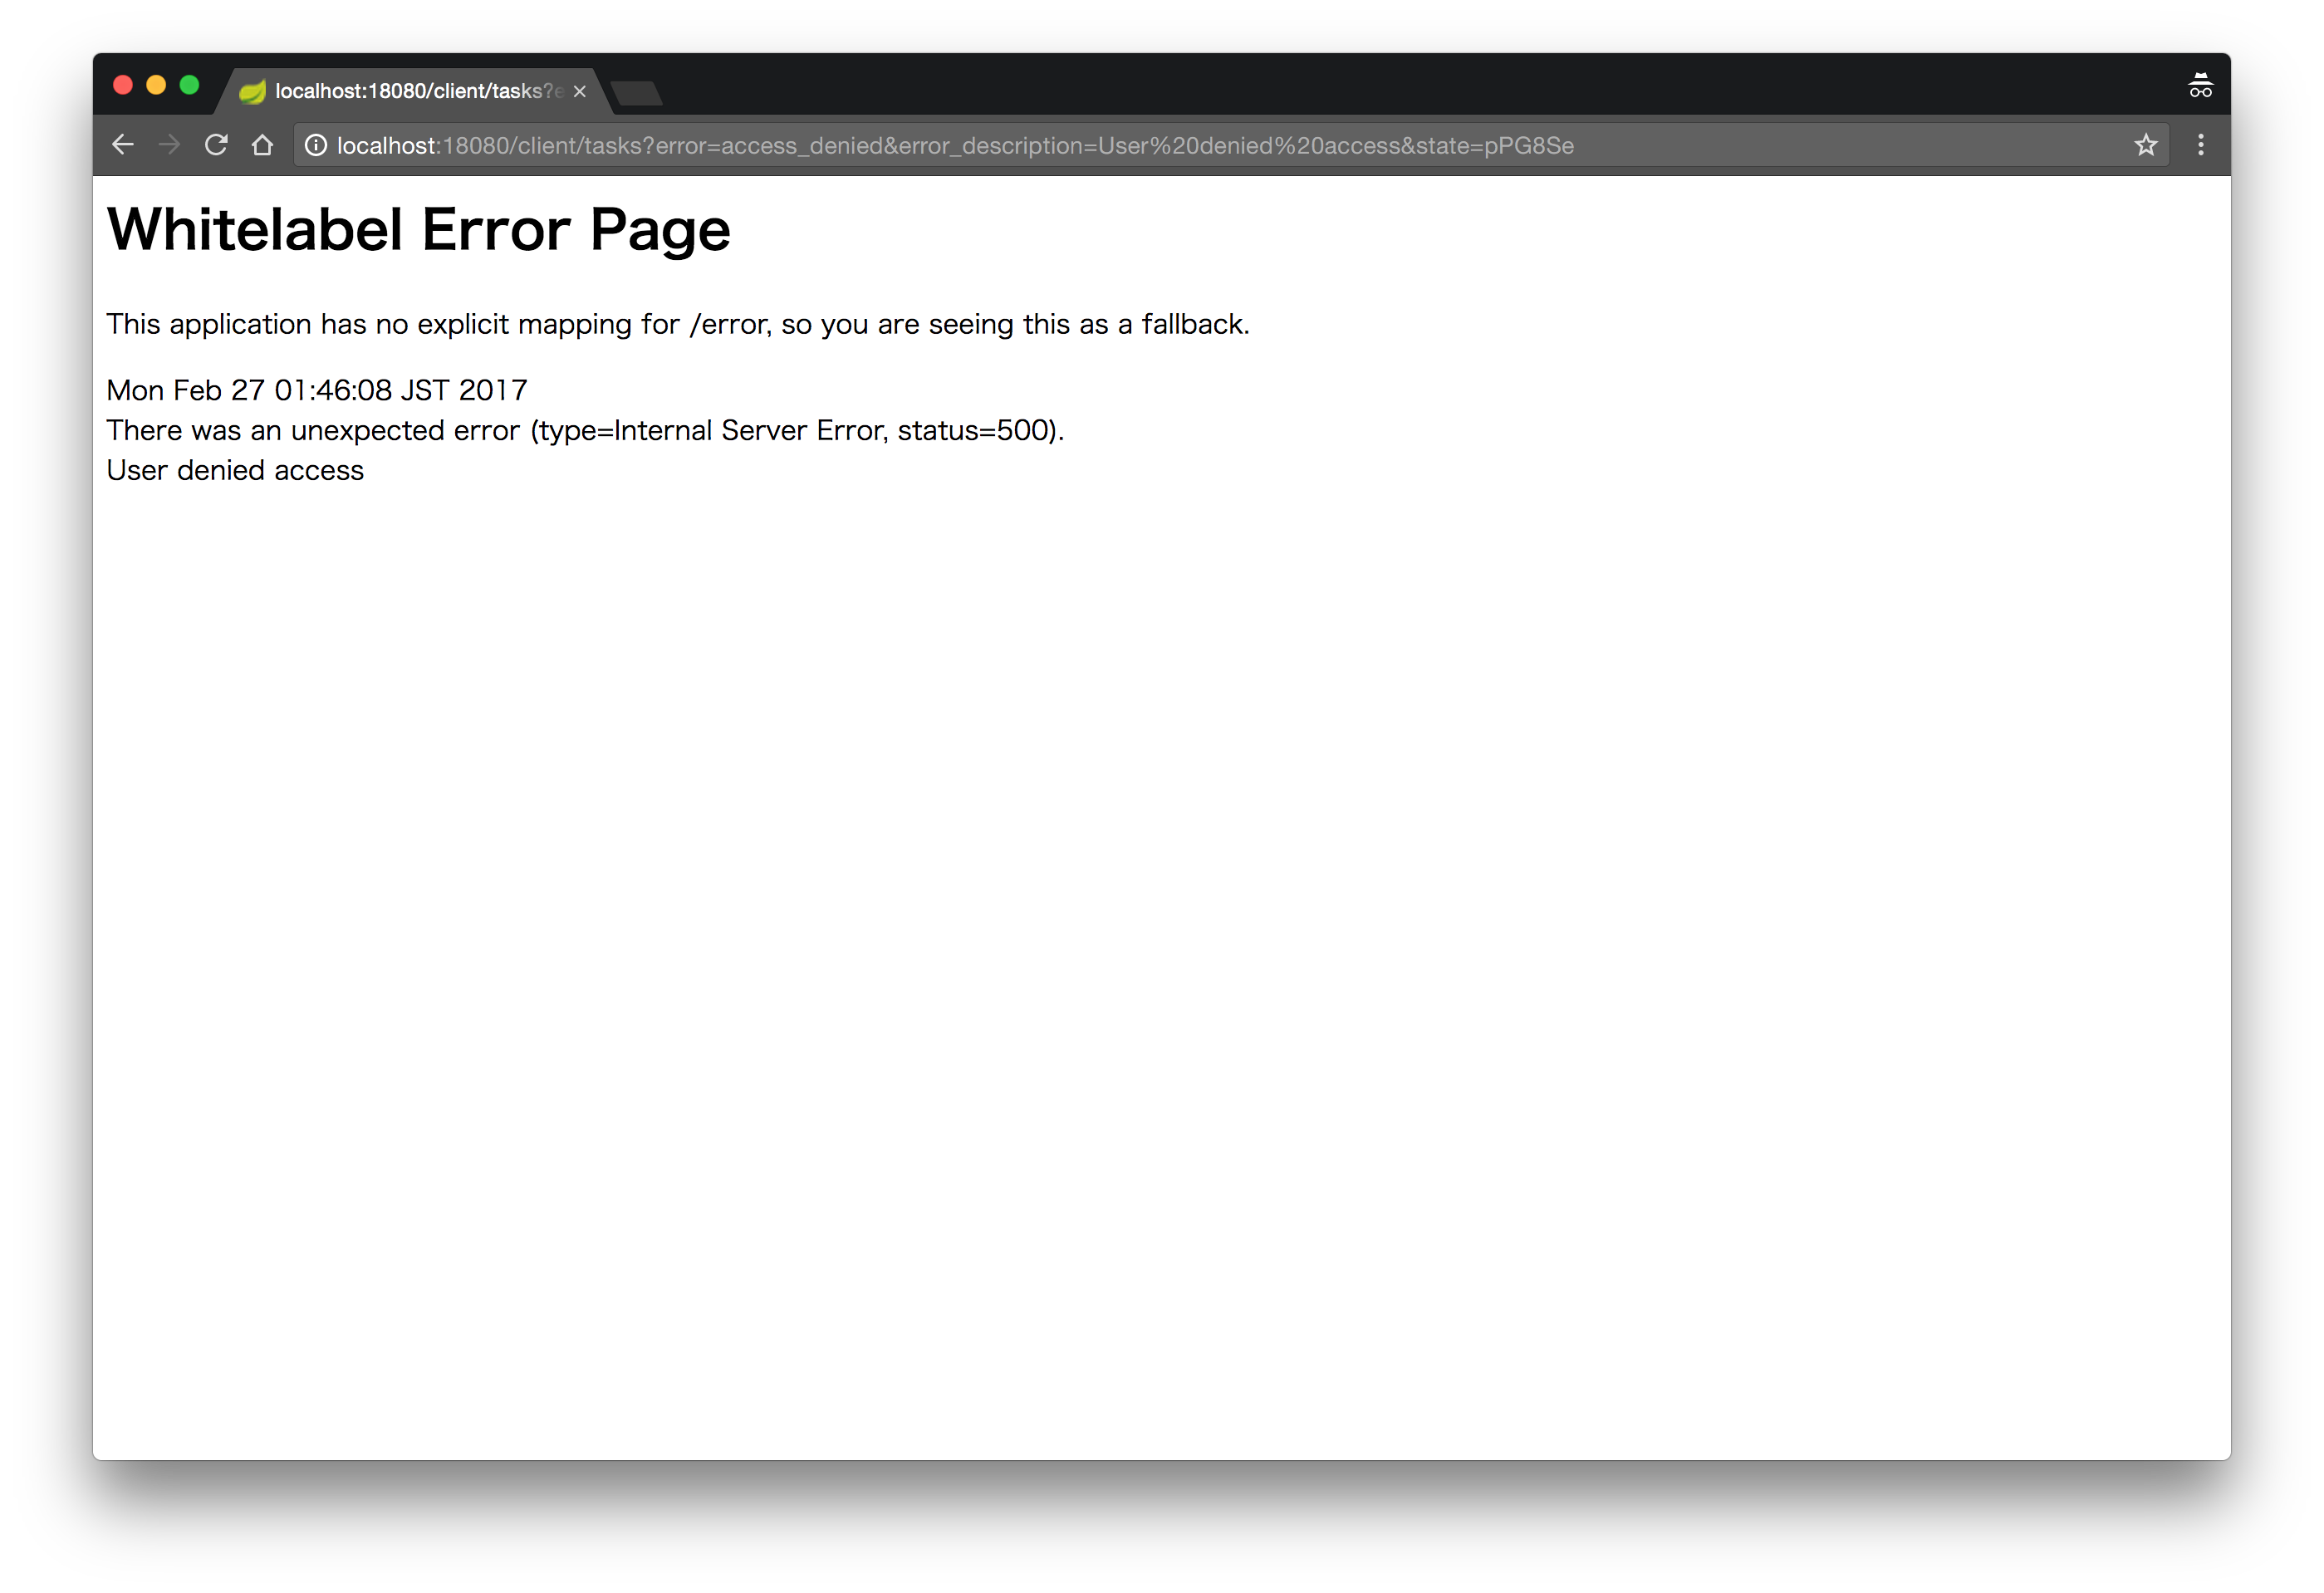
アクセストークンと認可情報を破棄するために、Service Providerを再起動("Ctrl+C" + "./mvnw spring-boot:run")し、再度タスク一覧画面を表示します。すると・・・Service Providerの認可画面が表示されるので、全スコープのアクセスを拒否します。すると・・・「認可コード」の代わりに、リソースオーナがアクセスを拒否したことを通知するパラメータを付与してClient側のページにリダイレクトします。
[超重要] REST APIのセキュリティ上の問題点をなくそう!!
実はここまでで作成してきたアプリケーション(REST API)にはセキュリティ上の重大な問題点が存在するのですが、何が問題なのかわかりますか? それは・・・なんと・・・他人のタスク情報を参照・更新できてしまうのです ![]()
![]()
![]()
この問題を解決する方法としては、以下の2つが考えられます。
- タスク情報にアクセスする際の条件(SQLの条件)にユーザ名を加える
- タスク情報の所有者と認証情報のユーザが一致するかチェックする
どちらの方法を採用するかは、セキュリティ要件次第でしょう。前者は存在しないタスクに対して操作した時と同じ振る舞い(404 Not Found)になるのに対して、後者はアクセス拒否(403 Forbidden)になるため、不正なアクセスがあったことを記録する必要がある場合は後者の方法をとる方がよいと思います。
SQLに条件にユーザ名加える
タスク情報にアクセスする際の条件(SQLの条件)にユーザ名を加える場合は、Repositoryのメソッドの引数にユーザ名を追加してSQLの条件にユーザ名を加えましょう。ここでは、更新と削除処理については、処理を行う前にfindOneメソッドを呼び出すこと自身のタスク情報に対する処理かチェックするようにしています。
@Transactional
@Repository
public class TaskRepository {
	// ...

	public Task findOne(long id, String username) {
		return jdbcOperations.queryForObject(
				"SELECT id, username, title, detail, deadline, finished, created_at, updated_at, version FROM tasks WHERE id = :id AND username = :username",
				new MapSqlParameterSource("id", id).addValue("username", username), new BeanPropertyRowMapper<>(Task.class)); // ★★★修正
	}

	public void save(Task task, String username) {
		if (task.getId() == null) {
			GeneratedKeyHolder holder = new GeneratedKeyHolder();
			jdbcOperations.update(
					"INSERT INTO tasks (username, title, detail, deadline, finished) VALUES(:username, :title, :detail, :deadline, :finished)",
					new BeanPropertySqlParameterSource(task), holder);
			task.setId(holder.getKey().longValue());
		} else {
			findOne(task.getId(), username); // ★★★追加
			jdbcOperations.update(
					"UPDATE tasks SET title = :title, detail = :detail, deadline = :deadline, finished = :finished, updated_at = SYSTIMESTAMP, version = version + 1 WHERE id = :id",
					new BeanPropertySqlParameterSource(task));
		}
	}

	public void remove(long id, String username) {
		findOne(id, username); // ★★★追加
		jdbcOperations.update("DELETE FROM tasks WHERE id = :id", new MapSqlParameterSource("id", id));
	}

}
Repositoryのメソッドの引数変更に伴い、Controllerクラスの修正も行います。
@RequestMapping("/api/tasks")
@RestController
public class TaskRestController {

	// ...

	@PostMapping
	ResponseEntity<Void> postTask(@RequestBody Task task, Principal principal, UriComponentsBuilder uriBuilder) {
		task.setUsername(extractUsername(principal));
		repository.save(task, task.getUsername()); // ★★★修正
		URI createdTaskUri = relativeTo(uriBuilder)
				.withMethodCall(on(TaskRestController.class).getTask(task.getId(), principal)).build().encode().toUri(); // ★★★修正
		return ResponseEntity.created(createdTaskUri).build();
	}

	@GetMapping("{id}")
	Task getTask(@PathVariable long id, Principal principal) {
		return repository.findOne(id, extractUsername(principal)); // ★★★修正
	}

	@PutMapping("{id}")
	@ResponseStatus(HttpStatus.NO_CONTENT)
	void putTask(@PathVariable long id, @RequestBody Task task, Principal principal) {
		task.setId(id);
		repository.save(task, extractUsername(principal)); // ★★★修正
	}

	@DeleteMapping("{id}")
	@ResponseStatus(HttpStatus.NO_CONTENT)
	void deleteTask(@PathVariable long id, Principal principal) {
		repository.remove(id, extractUsername(principal)); // ★★★修正
	}

	// ...

}
他人のタスク情報にアクセスすると、以下のようにリソースが存在しな時に発生するエラー(404 Not Found)になります。

所有者チェックを行う
タスク情報の所有者と認証情報のユーザが一致するかチェックする場合は、Spring Securityが提供しているメソッドセキュリティの仕組みを利用するのがてっとり早いでしょう。
まず、メソッドセキュリティの仕組みを有効化するために、コンフィギュレーションクラスに@EnableGlobalMethodSecurityを付与します。
@EnableGlobalMethodSecurity(prePostEnabled = true) // ★★★追加
@EnableResourceServer
@Configuration
public class ResourceServerConfiguration extends ResourceServerConfigurerAdapter {
	// ...
}
次に、タスク情報を取得するメソッドに対して、リソースオーナ以外アクセスできないように認可設定を行います。
@Transactional
@Repository
public class TaskRepository {
	// ...
	@PostAuthorize("returnObject.username == authentication.name") // ★★★追加
	public Task findOne(long id) {
		return jdbcOperations.queryForObject(
				"SELECT id, username, title, detail, deadline, finished, created_at, updated_at, version FROM tasks WHERE id = :id",
				new MapSqlParameterSource("id", id), new BeanPropertyRowMapper<>(Task.class));
	}
	// ...
}
最後に、更新または削除する際にもfindOneメソッドを呼び出すように修正します。
@RequestMapping("/api/tasks")
@RestController
public class TaskRestController {

	// ...

	@PutMapping("{id}")
	@ResponseStatus(HttpStatus.NO_CONTENT)
	void putTask(@PathVariable long id, @RequestBody Task task) {
		repository.findOne(id); // ★★★追加
		task.setId(id);
		repository.save(task);
	}

	@DeleteMapping("{id}")
	@ResponseStatus(HttpStatus.NO_CONTENT)
	void deleteTask(@PathVariable long id) {
		repository.findOne(id); // ★★★追加
		repository.remove(id);
	}

	// ...

}
他人のタスク情報にアクセスすると、以下のように認可エラー(403 Forbidden)になります。

アプリケーションの完成版
本エントリーで作成したアプリケーションの完成版は、以下のGitHubリポジトリで公開してあります。
まとめ
説明がちょっと長くなりましたが・・・認可コードグラントフローを使用してREST APIの認証・認可を行うアプリケーションを作ってみました。今回はあくまでSpring Security OAuth + Spring Bootで認可コードグラントフローを体感してもらう(触れてもらう)ことが目的だったので、Spring BootのAutoConfigureの仕組み(デフォルトの動作)を最大限に活用してアプリケーションを作るようにしました。
しかし・・・実際のアプリケーション開発では、ユーザ(リソースオーナ)やクライアントの情報はデータベースなどで管理するのが一般的ですし、アクセストークンや認可情報もアプリケーション内のメモリ上で管理するのではなくデータベースなどに永続化することが求められるケースの方が多いでしょう。さらに、Service Providerが扱うリソースも1種類ではなく複数になるケースやクライアントも複数のService Providerのリソースへアクセスするようなケースなども想定されるため、今回紹介した内容だけでは実運用に耐えられるアプリケーションを開発するのが難しいのも現実です。
なので・・・次回以降では、Spring Security OAuthのアーキテクチャを説明し、Spring Boot・Spring Security・Spring Security OAuthの拡張ポイントを使用したアプリケーションの開発方法を紹介していきたいと思っています。
では、また次回!!