この前、ベースがSwiftのプロジェクトにGoogle Analytics (以後、GAと書いたりします) を導入する機会があったのでメモ。
Google AnalyticsはSwiftサポートをまだしていないため、基本はObjective-CとSwiftのブリッジ作ってからObjective-Cと同じコードを書くだけです。
なので、これからGAをプロジェクトに導入したい人向けかと思われます。
今回作成したプロジェクト
※結論:このプロジェクトを見れば十分。
環境
- iOS8+
- Xcode version 6.1 (6A1052d)
- Swift version 1.1 (swift-600.0.54.13)
- CocoaPods 0.34.4
CocoaPods公式は0.35のrc版を配布していますが、今回使っていません。
実装
前提
- 既にプロジェクトが存在しているものに導入します。
- GAのTrackingIDも取得済みとします。
- GAのセットアップなどは公式のリファレンスを参考にしています。
1. Google Analytics のインストール
Google Analytics の iOS SDK 最新版は 3.10 なので、それを CocoaPods 経由でインストールします。
Podfile
source 'https://github.com/CocoaPods/Specs.git'
platform :ios, '8.0'
xcodeproj 'GoogleAnalytics-Sample'
pod 'GoogleAnalytics-iOS-SDK', '3.10'
もしくは、公式のダウンロードページから導入してください。
2. Google Analyticsのセットアップの前に
GAを使用するために、まずはSwiftで使えるようブリッジングします。
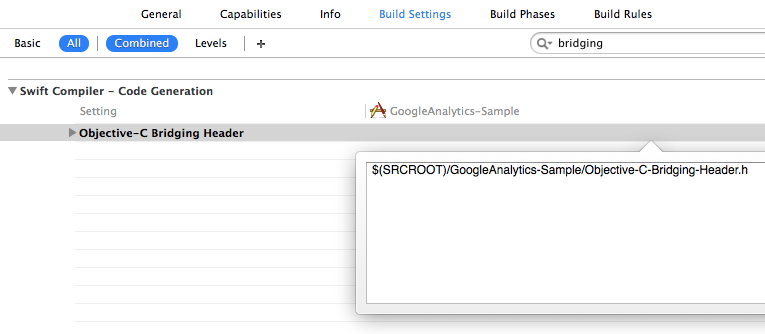
ブリッジングの導入
- ブリッジングのヘッダーファイルを作成する。(名前は何でも良い。今回は
Objective-C-Bridging-Header.hにしました) - プロジェクト(もしくはターゲット
)のBuild Settingsにて、「bridging」で検索する -
Objective-C Bridging Headerというのがあるので、そこの値に作成したヘッダーファイルのパスを入力する
参照:Swift and Objective-C in the Same Project
これでブリッジングを導入できました。
今回、GAをSwiftで使用するために下記のように書いています。
Objective-C-Bridging-Header.h
// Objective-C-Bridging-Header.h

#ifndef GoogleAnalytics_Sample_Objective_C_Bridging_Header
#define GoogleAnalytics_Sample_Objective_C_Bridging_Header

#import <GoogleAnalytics-iOS-SDK/GAI.h>
#import <GoogleAnalytics-iOS-SDK/GAIFields.h>
#import <GoogleAnalytics-iOS-SDK/GAILogger.h>
#import <GoogleAnalytics-iOS-SDK/GAIDictionaryBuilder.h>

#endif
※1 インクルードガードはお作法でいれてます。
※2 CocoaPodsでない場合は記載が変わります。
3. Google Analyticsのセットアップ
ブリッジングしているので、既にSwiftで使用できるようになっています。
AppDelegateにGAを初期化するコードを書きます。
今回はAppDelegateを使用していますが、普段はユーティリティーなクラスを作成しています。
AppDelegate.swift
import UIKit

@UIApplicationMain
class AppDelegate: UIResponder, UIApplicationDelegate {

    var window: UIWindow?

    var tracker: GAITracker?

    class func setupGoogleAnalytics() {
        GAI.sharedInstance().trackUncaughtExceptions = true;
        GAI.sharedInstance().dispatchInterval = 20
        GAI.sharedInstance().logger.logLevel = .Verbose
        if let appDelegate = UIApplication.sharedApplication().delegate as? AppDelegate {
            appDelegate.tracker = GAI.sharedInstance().trackerWithTrackingId("UA-XXXXXXXX-X")
        }
    }

    func application(application: UIApplication, didFinishLaunchingWithOptions launchOptions: [NSObject: AnyObject]?) -> Bool {
        AppDelegate.setupGoogleAnalytics()
        return true
    }

}
これでGAを使用する準備は整ったので、あとはスクリーントラッキングに必要なコードを埋め込むだけです。
4. スクリーントラッキングコード
今回、ベースクラスで使われる GAITrackedViewController は使用せず、自分でベースクラスを作成し、その中で GAIDictionaryBuilder を用いて送信する実装をします。
ベースクラスをBaseViewControllerという名前で作成し、下記のコードを仕込みます。
BaseViewController.swift
class ViewController: UIViewController {

    override func viewWillAppear(animated: Bool) {
        super.viewWillAppear(animated)
        if let appDelegate = UIApplication.sharedApplication().delegate as? AppDelegate {
            let screenName = reflect(self).summary
            let build = GAIDictionaryBuilder.createAppView().set(screenName, forKey: kGAIScreenName).build()
            appDelegate.tracker?.send(build)
        }
    }

}
このベースを継承させたViewControllerを作成していけば、そのControllerが表示されるときにトラッキングされるようになります。
TopViewController.swift
class TopViewController: BaseViewController {}
DetailViewController.swift
class DetailViewController: BaseViewController {}
実際に、GAに送られてくる値は下記のようになります。
おわりに
ブリッジングヘッダーの導入方法とGAのセットアップの簡単な説明でしたが、これからやろうかな、って思っていた人の助けになればと。
あと、GAのSwiftサポートはいつなんでしょうかね。(64bit対応も遅かったですし)
Advent Calendar 2014
今年ももう終わり。今年は4つ書きます!
- 本当はGolangも書きたかったけど、満員でした。
- SublimeTextは触った事が数分しかない。
- Vimは今回書きません。(Xcodeばっかりなので、、)

