これはReact Advent Calendar 2016の18日目の記事です。
やったこと
react-routerのチュートリアルではReactCSSTransitionGroupによるアニメーションの例しかないので、ReactTransitionGroupによるアニメーションの例を作ってみました。
ReactTransitionGroupにより、ページ遷移などの動作をフックに任意のコードを実行することができそうです。
Animation Add-Ons - React
react-router/examples/animations at master · ReactTraining/react-router
できたもの
naoishii/reactTransitionGroup-example

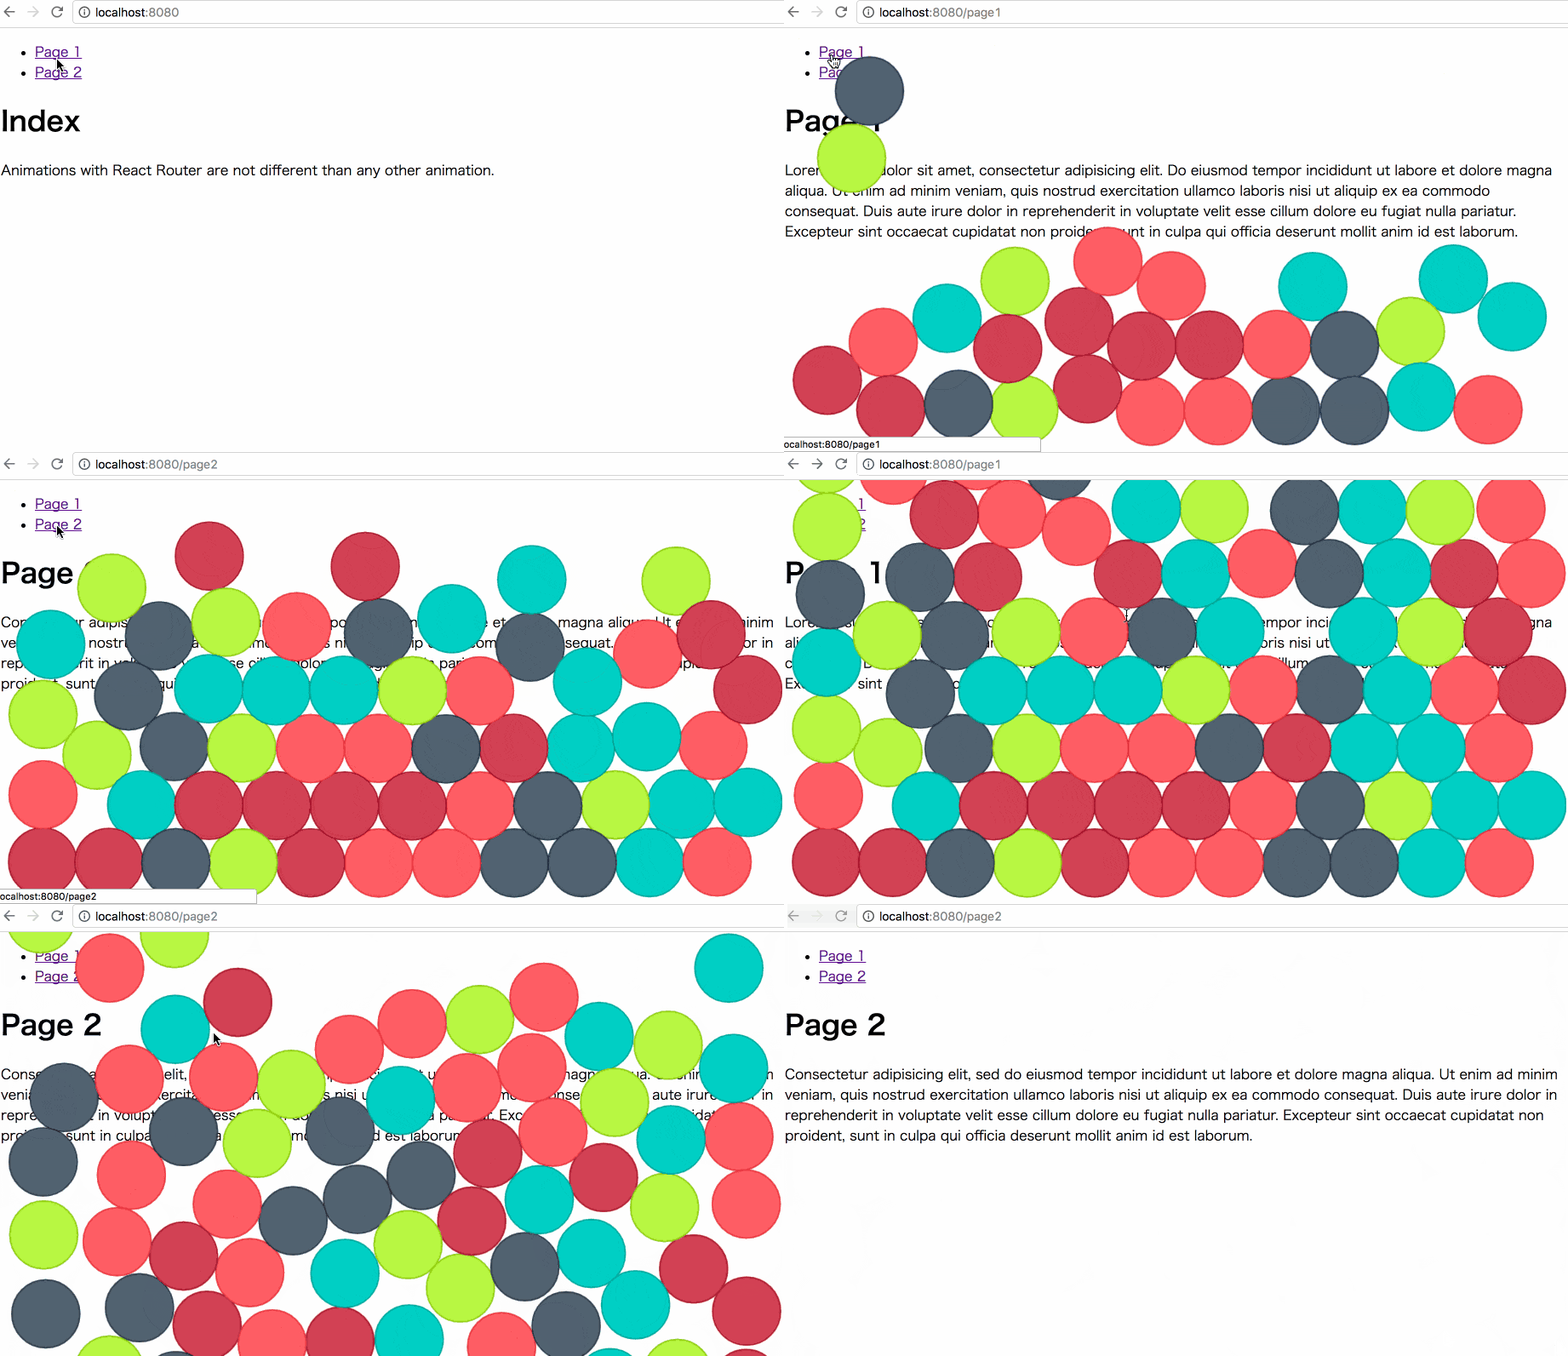
ページを遷移するたびに画面全体にボールが落ちてきて、一定数以上貯まると下に落ちていきます。
ボールの動きにはmatter.js を利用しています。
作り方と解説
リポジトリはこちら。
アニメーション以外の部分をreact-routerの公式チュートリアルからほとんどそのまま使っています。
ルーティングさせる
CSSのアニメーションでは以下のようになっている部分を
    <ReactCSSTransitionGroup
      component="div"
      transitionName="example"
      transitionEnterTimeout={500}
      transitionLeaveTimeout={500}
    >
      {React.cloneElement(children, {
        key: location.pathname
      })}
    </ReactCSSTransitionGroup>
このように書き換えます
    <ReactTransitionGroup>
      {React.cloneElement(children, {
        key: location.pathname,
      })}
    </ReactTransitionGroup>
さらに、アニメーションをつけたいコンポーネントをanimate()関数に渡し、返り値となるコンポーネントをRouteに渡します。
const AnimatedIndex = animate(Index);
const AnimatedPage1 = animate(Page1);
const AnimatedPage2 = animate(Page2);

reactDom.render((
  <Router history={browserHistory}>
    <Route path="/" component={App}>
      <IndexRoute component={AnimatedIndex} />
      <Route path="page1" component={AnimatedPage1} />
      <Route path="page2" component={AnimatedPage2} />
    </Route>
  </Router>
), document.querySelector('[data-react="app"]'));
ReactTransitionGroupの子コンポーネントは特別なライフサイクルフックを持つことができます。
アニメーションの制御はanimate()関数でもっているので、Index, Page1などはアニメーションと関係のない普通のコンポーネントです。
ライフサイクルメソッドをもたせる必要があるので、Stateless Functional Componentは使えないことに注意します。
アニメーションをコントロールする
animate()関数でコンポーネントにアニメーションをつけます。
animate()関数は既存のコンポーネントにアニメーション用のライフサイクルメソッドを与えて返す高階コンポーネントです。
import React from 'react';
import BallPool from './ballPool';

const body = document.querySelector('body');
const h = document.createElement('div');
h.id = 'hoge';
h.style.display = 'none';
h.style.position = 'fixed';
h.style.top = '0';
body.appendChild(h);

const ballPool = new BallPool(h);

export default function animate(Component) {
  return class Animated extends React.Component {
    componentWillAppear(done) {
      ballPool.initWorld();
      done();
    }

    componentWillEnter(done) {
      ballPool.update();
      h.style.display = 'block';
      setTimeout(done, 1000);
    }

    componentDidEnter() {
      h.style.display = 'none';
    }

    render() {
      return <Component {...this.props} />;
    }
  };
}
今回の例ではmatter.jsを使ったので、matter.jsがコントロールするHTML要素を作ったりmatter.jsによる処理をまとめたクラスを作ったりということをanimate.jsで行っています。
ボールを作るなどの処理はクラスにまとめて別ファイルに書き出しました。
componentWillAppear, componentWillAppear, componentDidEnterはReactTransitionGroupを親に持つことでフックできるライフサイクルメソッドです。
ここにライフサイクルに対応するメソッドを叩いたりオーバーレイで表示させる要素の表示/非表示のコントロールをしています。
アニメーションの処理
実際のアニメーションはBallPoolクラスに切り出してあります。
ここではreact-routerとは一切関係ない処理のみが書かれています。
- 見えない壁や床を作る処理
- ボールを作る処理
- 床を消す処理
- 不要になったオブジェクトを消す処理
など書きましたが、本題とあまり関係ないので特に解説はしないつもりです。
matter.jsを利用したのも以前別のことに使ったことがあったのと、簡単に見た目が派手なことができるから以上の理由はありません。
まとめ
- CSSアニメーション以上の複雑な処理をしたい場合はReactTransitionGroupを使う。
- ReactTransitionGroupにより得られるライフサイクルメソッドで処理をコントロールする。
- アニメーション用のライフサイクルメソッドを与える高階コンポーネントを作ると便利。
間違っているところ、わかりにくいところ、改善できるところなどありましたらコメントいただけると助かります。