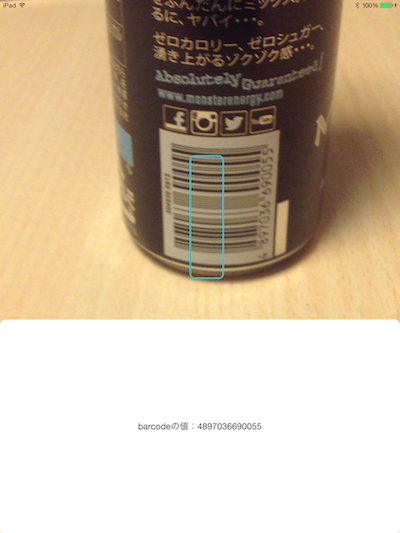
Titaniumで使えるiOSとAndroidのバーコードリーダモジュールにScanditがあります。
今回はScanditのAlloyライクな書き方と、スキャン画面にビューをオーバーレイして、バーコードを読み込んだ結果を同一の画面に表示する方法を書きます。
スキャンしながら、スキャン結果を表示できるので、場合によっては使い勝手の良いアプリを作れると思います。
準備
Scanditを使うには、公式ページで登録しApp Keyを取得する必要があります。
基本的な使い方は小松 一星さんが、15分で作るバーコードリーダーアプリに書いていますのでここでは割愛します。
Alloyな書き方
とりあえず、スキャナ部分のビューをviewsに書くコードは以下のようになります。
app/alloy.js
Alloy.Globals.scandit = require("com.mirasense.scanditsdk");
app/views/index.xml
<Alloy>
  <Window class="container">
    <View ns="Alloy.Globals.scandit" id="scannerView" />
  </Window>
</Alloy>
app/styles/index.tss
".container": {
  backgroundColor: "white",
  navBarHidden: true
}

"#scannerView": {
  width: "100%",
  height: "100%"
}
app/controllers/index.js
// モジュール読込
// iOS のときはステータスバーを非表示
if(Ti.Platform.osname == 'iphone' || Ti.Platform.osname == 'ipad'){
  Ti.UI.iPhone.statusBarHidden = true;
}

// 初期化
$.scannerView.init("あなたのScanditのApp Key", 0);
$.scannerView.showSearchBar(false);    // 上部に検索バーを表示しない
$.scannerView.showToolBar(true);       // scanditのツールバーを表示する

// 成功時のコールバック設定
$.scannerView.setSuccessCallback(function(e) {
  alert('barcode の値は ' + e.barcode + ' です');
});

$.index.addEventListener('open', function(e) {
  // 各種プラットフォームへの最適化
  if(Ti.Platform.osname == 'iphone' || Ti.Platform.osname == 'ipad'){
    $.scannerView.setOrientation(Ti.UI.orientation);
  }
  else {
    $.scannerView.setOrientation($.index.orientation);
  }

  $.scannerView.setSize(Ti.Platform.displayCaps.platformWidth, Ti.Platform.displayCaps.platformHeight);
  $.scannerView.startScanning();     //バーコードリーダ起動
});

$.index.open();
スキャン結果画面のオーバーレイ
次に、スキャン結果画面をスキャナの上にオーバーレイします。
app/views/index.xmlにスキャン結果画面を追加します。
app/views/index.xml
<Alloy>
  <Window class="container">
    <View ns="Alloy.Globals.scandit" id="scannerView" />
    <!--スキャン結果画面-->
    <View id="overlayView" >
      <Label id="barcodeLabel"/>
    </View>
    <!--/スキャン結果画面-->
  </Window>
</Alloy>
app/views/index.xmlにスキャン結果画面のプロパティを追加します。
app/styles/index.tss
".container": {
  backgroundColor: "white",
  navBarHidden: true
}

"#scannerView": {
  width: "100%",
  height: "100%"
}

/*スキャン結果画面*/
"#overlayView": {
    bottom:0,
    width:Ti.UI.FILL,
    height:"40%",
    borderRadius:10,
    backgroundColor: 'white'
}
controllers/index.jsでは、カメラ上のバーコードのスキャン位置をsetScanningHotSpotで中央から上のほうに設定します。
また、スキャンが成功した際にalertでバーコードの値を表示するのではなく、先ほどViewに追加したbarcodeLabelに表示するように修正します。
app/controllers/index.js
// モジュール読込
// iOS のときはステータスバーを非表示
if(Ti.Platform.osname == 'iphone' || Ti.Platform.osname == 'ipad'){
  Ti.UI.iPhone.statusBarHidden = true;
}

// 初期化
$.scannerView.init("あなたのScanditのApp Key", 0);
$.scannerView.showSearchBar(false);    // 上部に検索バーを表示しない
$.scannerView.showToolBar(true);       // scanditのツールバーを表示する

// 成功時のコールバック設定
$.scannerView.setSuccessCallback(function(e) {
  //barcodeLabelalert('barcode の値は ' + e.barcode + ' です');
  $.barcodeLabel.setText('barcodeの値:' + e.barcode);
});

$.scannerView.setScanningHotSpot(0.5, 0.25); //スキャン位置を上部に設定

$.index.addEventListener('open', function(e) {
  // 各種プラットフォームへの最適化
  if(Ti.Platform.osname == 'iphone' || Ti.Platform.osname == 'ipad'){
    $.scannerView.setOrientation(Ti.UI.orientation);
  }
  else {
    $.scannerView.setOrientation($.index.orientation);
  }

  $.scannerView.setSize(Ti.Platform.displayCaps.platformWidth, Ti.Platform.displayCaps.platformHeight);
  $.scannerView.startScanning();     //バーコードリーダ起動
});

$.index.open();
